![]() Solid French-Style Burner
Solid French-Style Burner
Countertop Electric Ranges
User Manual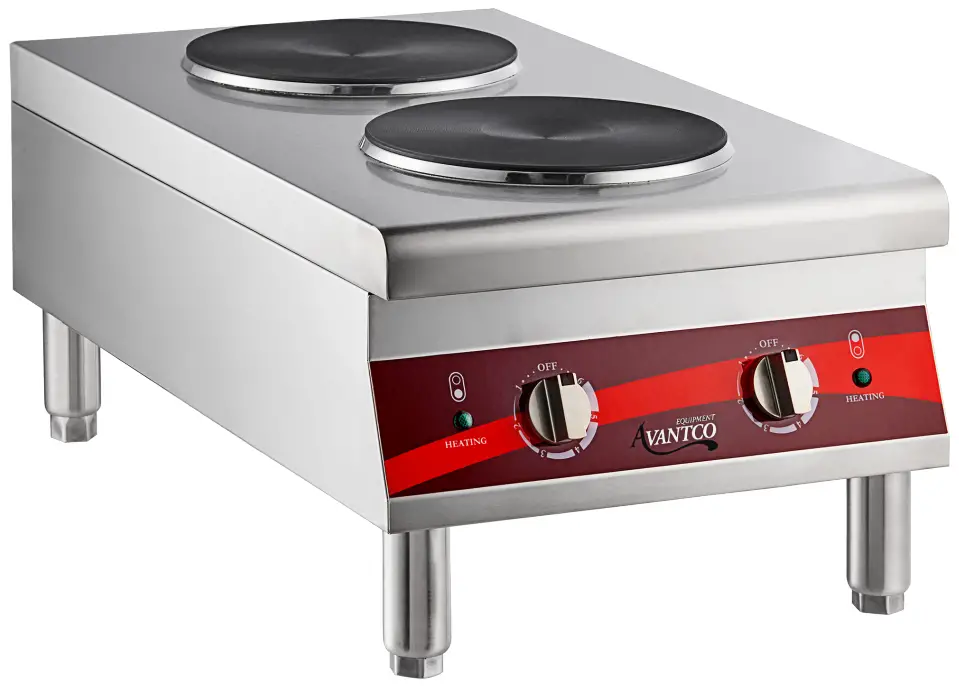 Models: 177CER200, 177CER400
05/2022![]()
Please read and keep these instructions. Indoor use only.
www.AvantcoEquipment.com
Important Safety Information
![]() WARNING!
WARNING!
When using electrical appliances, basic safety precautions should always be followed, including the following:
- Read all instructions carefully and completely.
- For commercial use only.
- Do not touch hot surfaces.
- Protect against electrical shock by keeping all cords, plugs, and other electrical components away from water or other liquids.
- Unplug this unit when not in use and before cleaning.
- Allow the unit to cool before putting on or taking off parts.
- Do not operate this or any appliance with a damaged electrical cord or plug.
- Do not operate this or any appliance after it has malfunctioned or been damaged in any way.
- Do not use outdoors.
- Disconnect the unit by turning the temperature control to “OFF”, then removing the electrical plug from the wall outlet.
- Do not use e appliance for any application other than intended use.
- Do not allow this oven to touch or be covered by flammable material, such as curtains, draperies, walls, etc., when in operation.
- Do not clean with metal scouring pads as pieces can break off and touch electrical components, heightening the risk of electrical shock
- This appliance is not intended for use by persons (including children) with reduced physical sensory or mental capabilities, or lack of experience and knowledge unless they have been given supervision or instruction concerning the use of the appliance by a person responsible for their safety.
- Place the unit on a flat surface that is well ventilated. The appliances must be supervised during the operation, DO NOT leave the appliance without powering off.
NOTE: SAVE THESE INSTRUCTIONS FOR FUTURE REFERENCE.
Specifications
| MODEL # | DESCRIPTION | OVERALL DIMENSIONS | VOLTAGE | WATTAGE PER BURNER | TOTAL WATTAGE | PLUG |
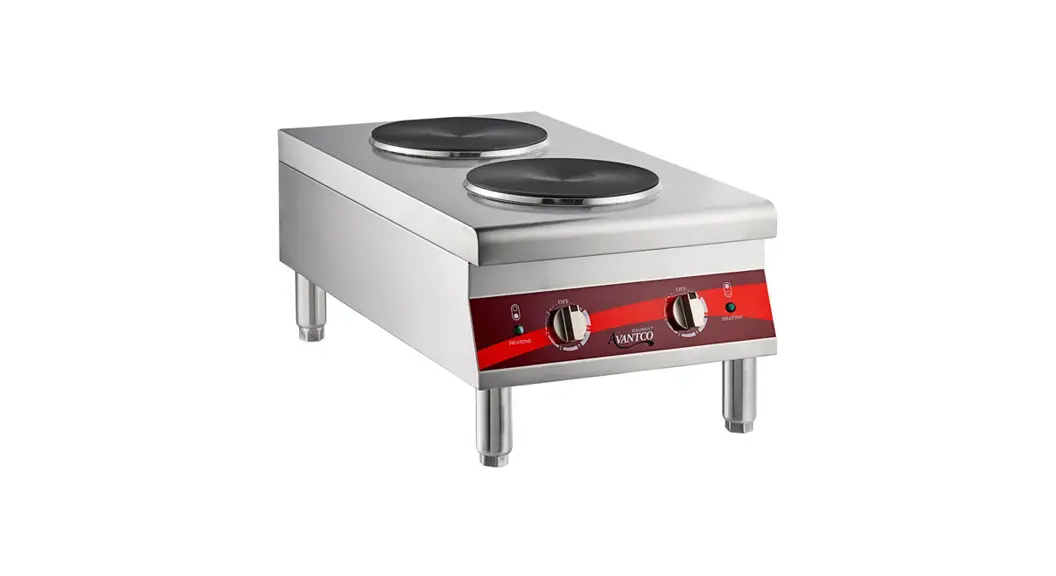
| 177CER200 | Dual Solid Burner Electric Range | 15″W x 25″D x 11.8″H | 208/240V | 2000W | 3000/4000W | NEMA 6-20P |
| 177CER400 | Four Solid Burner Electric Range | 24″W x 25″D x 11.8″H | 208/240V | (2) 2000W (2) 1500W | 5000/7000W | NEMA 6-30P |
| 177CER200 | 177CER400 |
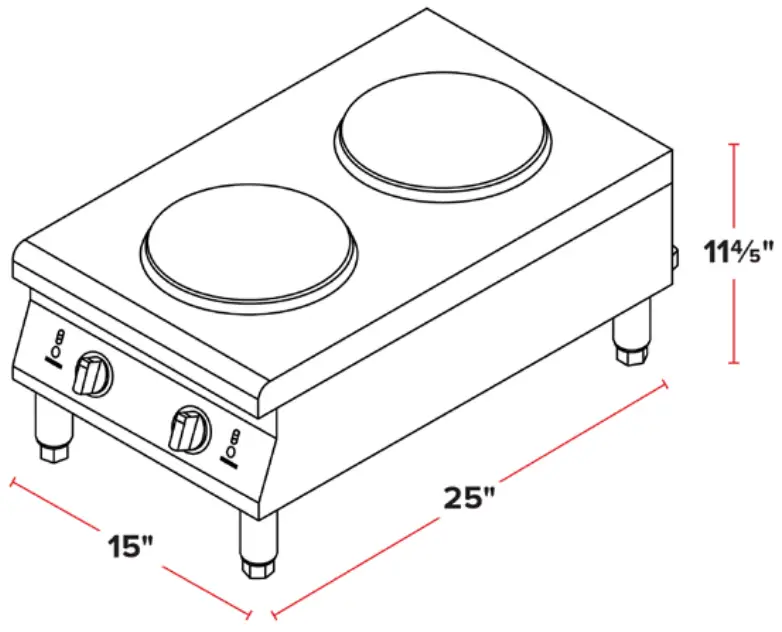 | 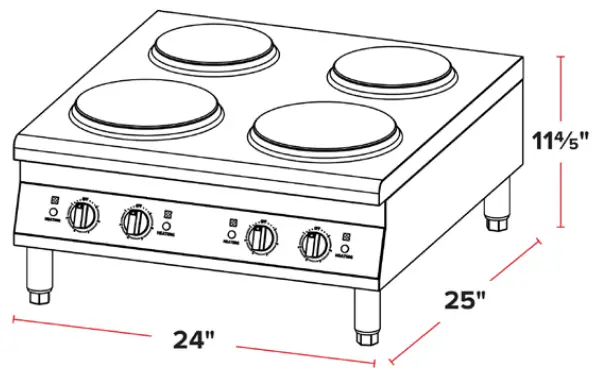 |
Installation
![]() CAUTION!
CAUTION!
This unit should be installed in a non-combustible location only.![]() CAUTION!
CAUTION!
The installation must be performed by qualified personnel or the warranty will be void.![]() WARNING!
WARNING!
Check the serial plate on this unit before installation. Only connect the unit to the voltage and frequency listed on the serial plate.
- Remove the electric range, parts, and other documentation from the box/carton and dispose of any non-essential packaging materials.
- Turn the unit upside down and install the 4 legs into the threaded inserts on the unit.
- Turn the unit right side up and place it in the intended operating location, adjusting the legs to ensure the unit is level and secure
- Remove any protective plastic sheeting from the range and wipe down all surfaces.
- Before initial use, plug the unit in and turn the temperature control to the maximum setting and allow the equipment to warm up for 10-15 minutes. You may notice smoke appearing due to the cooking surface and elements burning in. This is normal and after 10-15 minutes the equipment is ready to use.
- Continue to operate instructions.
Electrical Connections
Check the serial plate to determine what voltage this unit requires.![]() WARNING: IMPROPER GROUNDING COULD RESULT IN ELECTRICAL SHOCK.
WARNING: IMPROPER GROUNDING COULD RESULT IN ELECTRICAL SHOCK.
This unit is equipped with a three-prong (grounded) electrical plug for your protection against shock hazards. It should be plugged directly into a properly grounded three-prong receptacle.
DO NOT CUT OR REMOVE THE GROUNDING PRONG FROM THIS PLUG.
Operation
- Plug the unit in using the correct outlet and electrical connection
- Turn on the selector switch to the desired setting for each burner.
- Wait approximately 10-15 minutes for the unit to preheat to the desired temperature.
- Cook or warm food products in the desired manner.
- At the end of the operation, turn each selector switch to the off position and unplug. Allow the unit to cool down before performing any cleaning or other maintenance.
Cleaning
NOTE: DO NOT IMMERSE THE CORD, PLUG, OR EQUIPMENT IN WATER OR OTHER LIQUID
- Allow the equipment to cool completely before cleaning
- Unplug the equipment
NOTE: DO NOT CLEAN THE EQUIPMENT WITH HIGHLY ABRASIVE OBJECTS SUCH AS STEEL WOOL.
- Use a damp cloth or sponge dipped in soapy water to clean the equipment
- Dry thoroughly after cleaning
Troubleshooting
| PROBLEM | CAUSE | REMEDY |
| The indicator light does not come on when the the selector switch is in a position other than “OFF” or 0 | The equipment is not plugged in | Plug in the equipment |
| Indicator light malfunction | Replace pilot light | |
| Selector switch malfunction | Replace selector switch | |
| The indicator light does come on, but the equipment does not heat | Selector switch malfunction | Replace selector switch |
| Heating element malfunction | Replace heating element |
Parts Diagram
177CER200/177CER400

| # | DESCRIPTION | ITEM # | MODEL |
| 1 | Burner (2000W) | 177PCER2001 | 177CER200 / 177CER400 |
| 4 | Burner (1500W) | 177PCER4001 | 177CER400 |
| 8 | Power cord | 177PCER2006 | 177CER200 / 177 |
| 9 | Terminal | 177PCER2007 | 177CER200 / 177CER400 |
| 16 | Knob | 177PCER20013 | 177CER200 / 177CER400 |
| 17 | Adjustable feet | 177PCER20011 | 177CER200 / 177CER400 |
| 20 | Working indication light | 177PCER20015 | 177CER200 / 177CER400 |
| 22 | Switch | 177PCER20016 | 177CER200 / 177CER400 |


