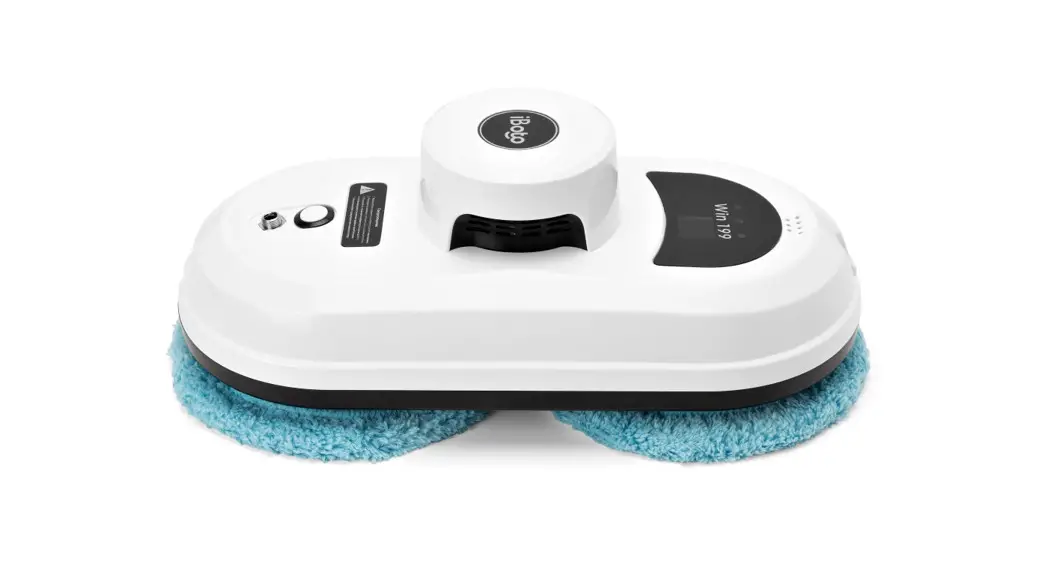
Win 199 Glass Bot
User Manual
Hi, I’m iBoto! Glad to be in your house!
Read the manual to get to know me better!
! Note
Read all documents before using them.
The appliance is not to be used by children. Persons with reduced physical, sensory or mental capabilities, or lack of experience and knowledge may only use this appliance if they are supervised or have been given instruction about how to use, it safely and understand what risks are involved. Children should be supervised to ensure they do not play with the robot.
!!! The appliance is for window cleaning with Frames. (Frameless glass/window cleaning is not applicable.) Users should judge and use is safety on proper operation sites, and be responsible for all possible consequences.
Safety information
Application of Power Adapter and Battery
- Use only the power adapter supplied with this device. Use of another type of power adapter will result in malfunction and/or danger.
- Please use the proper electric outlet and make sure no heavy objects are placed on the power adapter or power cord.
- Allow adequate ventilation around the adapter when using it to operate the device. Do not cover the power adapter with objects that will reduce cooling.
- Do not use the adapter in a high-moisture environment. Never handle the adapter with wet hands.
- Connect the adapter to a proper power source. The voltage requirements are found on the adapter.
- Do not use a broken adapter. power cord or plug.
- Do not attempt to service the adapter. There are no service parts inside. Replace the whole unit if it is damaged or exposed to high moisture. Consult your dealer for help and maintenance.
- The battery used in this device may present a risk of fire or chemical burn if mistreated. Do not disassemble, short contact, heat above 60’C ( 140 F). or incinerate.
- If you have to dispose of this old equipment, please take it to the local recycling center for recycling electrical and electronic parts.
- Retain the safety and operating instructions for future reference.
- Follow all operating and use instructions.
- Do not expose your device to rain or excess humidity, and keep it away from liquids (such as beverages, faucets, and so on).
- Avoid exposing your device to direct sunlight or intense light source, and keep it away from heat sources (such as radiators. space heaters. stoves, and so on).
- Do not place the device in the vicinity of strong magnetic fields.
- f-<keep the device and accessories away from children.
- Product operating temperature: 0°C -40°C (32°F -104°F).
Risk of electric shock!
- Always switch the device off before carrying out any cleaning or maintenance work.
- Never pull the power plug out of the socket by the power cord; instead, pull it out by the power plug itself.
- Never perform repairs on your device yourself. Repairs to electric devices may only be carried out by an authorized customer service center.
- Do not insert any pointed objects into the electric contacts.
- Do not change the contacts.
- Do not continue to operate the robot if the device itself or the power cord is damaged
- Contact your local customer service in the event of damage.
- Do not clean the robot, or the power cable in water, or other liquids.
- Do not use the robot on damp ground or in places in which it can get into contact with liquids or be immersed in water.
- Do not use the robot in hazardous areas such as open fireplaces, running showers, or swimming pools.
- Make sure that you do not damage, bend or twist the power cord. Do not place any heavy objects on top of the cord. This could damage the power cord and cause a fire or electrical shock.
- Drooping or bare cables, curtains, tablecloths, or cords in the working area of the robot are to be secured in order to avoid damage to it or cause an electrical shock.
! Warning
- Fasten the safety rope and tie it to the indoor fixture before operating the device.
- Check if the safety rope is broken or the knot is loose before operating the device.
- Set a danger-warning area downstairs for no-balcony windows and doors.
- The battery shall be full-charged (green lamp ON) before use.
- Do not use it on rainy or moist days.
- Turn the power on before putting the device onto the glass.
- Make sure the appliance can stick and stand on the glass surface while put onto the glass.
- Before turning the power off, please hold the device.
- Do not use it on frameless glass.
- Make sure to put the cleaning ring onto the cleaning wheel correctly for no leakage.
- Do not spray or pour water onto the appliance.
- Prohibit children from using this device.
- Remove anything on the glass. Do not use it on cracked glass. Reflective or coating glass might be slightly scratched due to dirt on the glass while operating.
- f-<eep hair, loose clothing, fingers, and all parts of body away from the openings and moving parts.
- Do not use in areas with existing flammable or combustible liquids, or gas.
About Win199 Robot Window Cleaner
Win 199 1<; a cleaning robot that works on multiple surfaces of glosses. tries. smooth walls and tables It works with a bu. lt-tn vacuum motor that helps rt suck air and stand on the glass surface An embedded UPS (Uninterrupted Power Svstcrn) prevents the robot from tolling from the window even when no electrical power
With two wheels that freely traverse on the window surface or on the wall surface, Win 199 clecms gloss surface cfnctcntlv by the rntclhqcnt Al-technology path column As well, it can be manually operated to clean under different modes from the remote control
Features
- APP Control through IOS/Andro1d system
- For glosses thicker than 6mm
- Al Technology
- Cleaning speed 2 5mrnutes/meter’ 2
- 4 kinds of outdoor-onc operation modes to clcomnq the entire window
- Auto-flush
- Embedded UPS (Uninterrupted Power System)
- Ann-cn oppmq control olqontbrn
- Auto-detect edges of the window
- Mier o-fiber cloth
- High-strength safety rope ( 150Kgf)
- Remote control
- Tobie cleaning mode
Specifications
Input Voltage AC110-240V
Dimension: 29* 14* 11 5cm
Net Weight: O 95KG
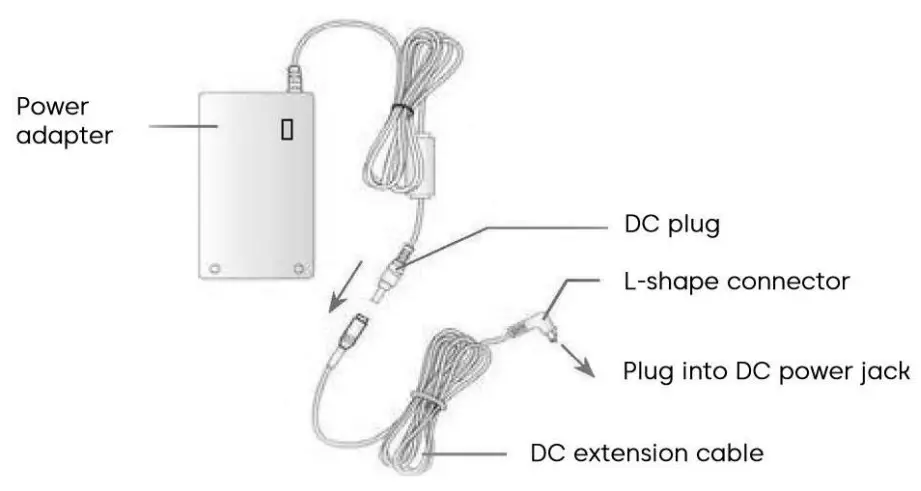
Input Voltage
ACl 00-240V. S0/60Hz
Adaptor, 24V, 90W. 5 Sm
Coble
Safe Standby Power:
Bu.lt-m L1-1on battery. 600mAh 14. 8V
Cbor qrnq Tirne 1 hour
Packing
Gift box dimension 30*23*14.5 cm
G.W 1.4 kG NW O 95 kG
What’s in the package?
Cleaner x 1 pcs
Cleaning cloth x 12 pcs
Remote controller x 1 pcs
Adapter, (100-240VAC. S0-60Hz)
x 1 AC power cord x 1 pcs
DC power extension cable (4 meters)
x 1 User Manual x 1
Cteomnq ring x 4 Safety rope x 1
Know Your Win199
Top view
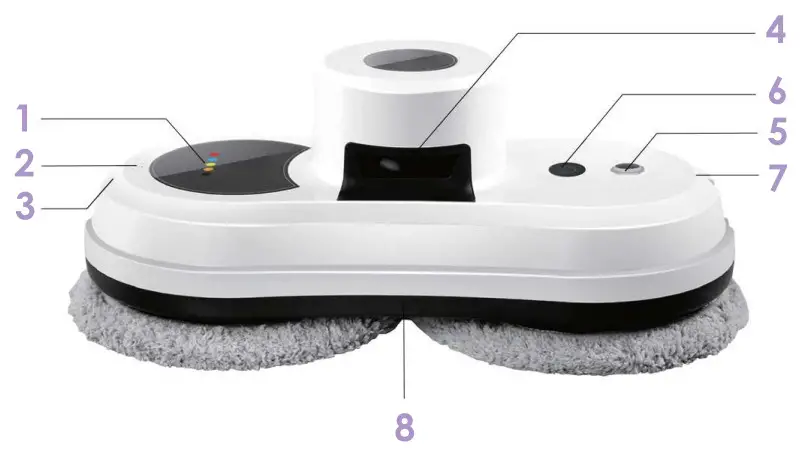
| 1 | Red Flashing Abnormal blue on Normal Green On Full- charged Rose Red on. Charging White on Electnferous tncncotton | 5 | Power Jack |
| 2 | Buzzer | 6 | Power Switch |
| 3 | Hooking Hole | 7 | Hooking Hole |
| 4 | Air Vent | 8 | Bottom Red right Flash Abnormal The bottom Blue light on: the Normal |
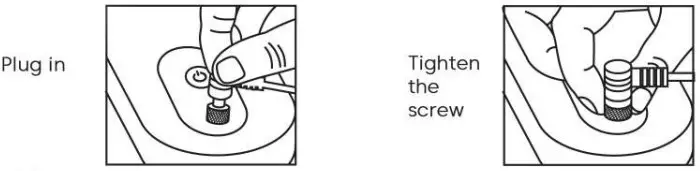
Power connection
Switch On/Off Button
long press 2s to turn on/off
When it’s on. Press to start/pause

For safety, you must fix your Win199 to the indoor fixture before use
LED Indications Situation LED indications 1. Battery Charging 1. Orange-LED Is on 2. Battery fully charged 2. Green-LED is on 3.No Electrical Power 3. Red-Led Flashing, Beep Sound Repeats 4. Hardware error 4. Both Red-LED and Blue-LED flashing. 5. Friction Factor Check Error at Start-up Red-LED one-time Beep 6. Vacuum Pressure too Low Red-LED one-time Beep 7. Air Leakage while Working Red-LED one-time Beep
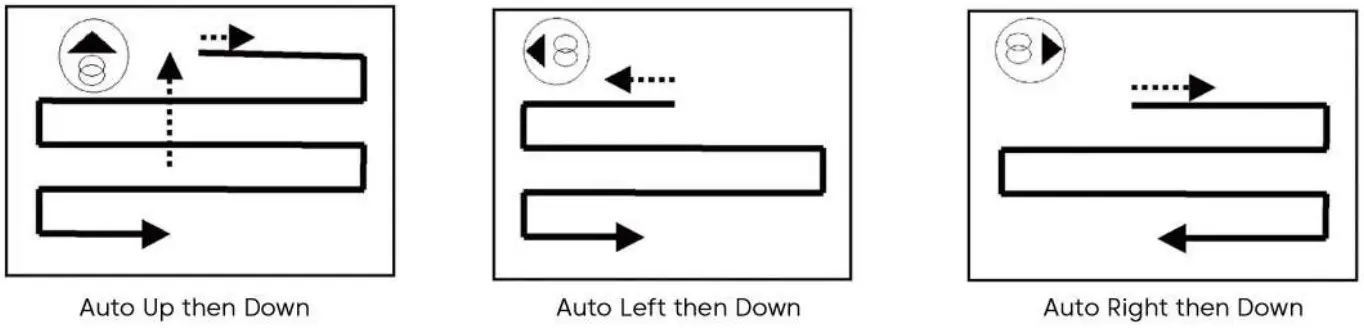
Know Your Win199 Remote control
The device can be remote controlled from the front and backside.
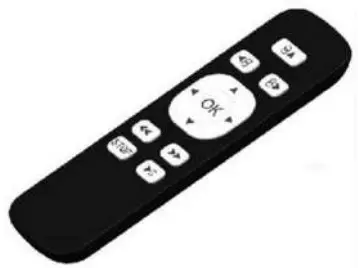
| Automatically move up and then down | |
| Automatically move left then down | |
| Automatically move right then down | |
| Stop cleaning | |
| Stop Cleaning | |
| Manually move up | |
| Manually move down | |
| Manually move right | |
| Manually move left | |
| Start cleaning |
Please remove the msulonon spacer 1n the bottom of the back of the remote controller before using it If you have to replace the battery. Just pull down the battery cover.
Before Using
The robot shall always connect the power cable for normal use.
How to put the robot onto the glass to start using?
- Turn on the power switch, and then make sure the fan is running.
- Put the device onto the glass and keep 10cm away from the window frame.
- Check if the device can stick to the glass before releasing it.
How to take the device down from the glass?
- While the device is running, please hold the safety rope with one hand and take the device down from the glass with the other hand.
- Turn off the power switch in a safe area.
Safety rope and buckle
- Before using, check if the safety rope is broken or the knot is loose.
- Fasten the safety rope and tie it to the indoor fixture before operating.
UPS (Uninterrupted Power System) function
- The UPS function will be enabled automatically when no electric power is supplied. The backup time of this UPS is 30 minutes.
- If no electric power is supplied, the device will stop automatically, alert, and flash red User shall take the device down from the glass as soon as possible.
- Users can pull the device back by pulling the safety rope. Slightly pull the safety rope at an angle close to the glass to prevent dropping.
Please make sure the battery was full-charged (green lamp ON) before using
- First, turn off the power switch on the device. Plug in the power. Orange lamp ON means
- Green lamp ON means the battery was full-charged.
Table cleaning mode
Put the device on the table and select auto-cleaning mode, the device will run in table-cleaning mode.
Notice
- Do not use it on frameless glass.
- Make sure to put the cleaning ring onto the cleaning wheel correctly for no leakage.
- Do not use it on rainy or moist days.
- Set a danger-warning area downstairs for no-balcony windows and doors.
How to Clean the Glass
Step I: Use ONLY a clean-and-dry cleaning cloth to clean dust and sand on the glass.
Step II: Change again the cleaning cloth. Keep the upper wheel’s cleaning cloth as clean-and-dry. Spray a little detergent (1-2 sprays) on the lower wheel’s cleaning cloth, but do not make the cloth wet (if too wet, the machine can’t move well). Then clean the glass again.
How to Start:
- Press on “Power Switch”
 for three seconds to start;
 - Press the “Start button”
 to start cleaning, or press the keys on the remote control to start. Start
DC Power Adapter / Extension Cable
Using/Changing the Cleaning Cloth
- Put a clean-and-dry cleaning cloth onto the cleaning ring.
- Put the cleaning ring onto the clean wheel and ensure the 6 slots on the ring are well fixed with the cleaner wheel to avoid air leakage.

Frequently Asked Questions (FAQ)
– Ans: It means that the friction factor is not properly used. Please check:
( 1) Whether the cleaning cloth is too dirty.
(2) Glass stickers. window film on the glass will also affect the friction factor.
(3) If the clean window many times, the glass surface will become very slippery.
(4) The glass surface will become slippery if cleaned several times in low-humidity environments such as in air-conditioned rooms.
– Ans: Press![]() the STOP key and switch to
the STOP key and switch to ![]() or
or![]() mode to continue cleaning.
mode to continue cleaning.
Ans: Press ![]() or
or![]() mode to continue cleaning.
mode to continue cleaning.
– Ans:
1. The friction factor is too low which might be caused by glass stickers, and window film on the glass.
2. The cleaning cloth might be too wet.
3. If the clean window many times, the glass surface will become very slippery.
4. The glass surface will become slippery if cleaned several times in low-humidity environments such as in an air-conditioned room.
5. When startup (press, ![]() or
or ![]() or
or![]() , keep 10 cm away from the window
, keep 10 cm away from the window
– Ans:
1. The cleaning cloth is too dirty. Please change the cleaning cloth.
2. The glass surface has different friction factor areas due to stickers, window film, and so on. Please use it in a single area.
3. The screw of the cleaning wheel might be loose, please tighten it.
– Ans: The cleaning cloth is too dirty. Please change the cleaning cloth and clean it for the second time.
– Ans:
1. Users can pull the robot back with a safety rope. Slightly pull the safety rope at an angle close to the glass to prevent dropping.
2. Switch the power switch to “off” status.
3. Check whether the electricity is in poor contact or the cable is broken.
– Ans:
1. Slightly pull the safety rope at an angle close to the glass to prevent dropping.
2. Check if any obstacle on the Glass and move the obstacle.
3. Check whether there is air leakage caused by gaps or uneven window frames.
| Situation | LED signal | Explanations |
| Blue: Flash Red: On No alarm | It means the battery voltage is too low, wait till the battery full-charged. If the machine still can’t be used after four hours of charge, the battery shall be changed. | |
| Blue: Flash Red: Flash No alarm | Machine hardware failure. Please contact the local retailer or local authorized dealer far repair. |
– Ans: Press the Stop key to stop it, and take it off carefully from the glass.
Disclaimer
The manufacturer makes no representations or warranties, either expressed or implied, with respect to the contents hereof and specifically disclaims any warranties, merchantability, or fitness for any particular purpose.
Further, the manufacturer reserves the right to revise this publication and ta make changes from time ta time in the contents hereof without obligation of this company to notify and person of such revision or changes.
The place and safety of this glass cleaning tool usage must be judged and responsible by the user. But also need to follow the instructions in this user manual.
Product Warranty
If there are defects in your glass-cleaning robot due to faulty materials, workmanship, or function within the warranty period from the date of purchase or delivery, please contact your local retailers or local authorized dealers for repair or replacement.
Exclusions
This warranty will automatically become null and void and shall not be applicable to any purchased products if:
Normal wear and tear (e.g. cleaning cloth, safety rope, etc).
Reduction in battery discharge time due to battery age or use.
Damage caused by assembling or installing that is not in accordance with the instructions manufacturer.
Damage is caused by using the glass-cleaning robot for any other purposes than normal domestic household.
Damage caused by using parts and accessories with are not specified by the manufacturer.
Damage caused by accident, abuse, or misuse.
The environment
![]() The symbol on this appliance indicates that this appliance may not be treated as household waste. Instead, it must be handed over to the applicable collection point for the recycling of electrical and electronic equipment. Disposal must be carried out in accordance with local environmental regulations for waste disposal. For more detailed information about the treatment, recovery, and recycling of this appliance, please contact your local city office, your household, and waste disposal service, or the shop where you purchased the appliance.
The symbol on this appliance indicates that this appliance may not be treated as household waste. Instead, it must be handed over to the applicable collection point for the recycling of electrical and electronic equipment. Disposal must be carried out in accordance with local environmental regulations for waste disposal. For more detailed information about the treatment, recovery, and recycling of this appliance, please contact your local city office, your household, and waste disposal service, or the shop where you purchased the appliance.
![]()
This appliance complies with the European Directives 2014/30/EU, 2014/35/EU, and 2014/53/EU.
Subject to change without notice.
Download App and control it with your smartphone
Users can control the cleaner through Bluetooth matching to their smartphone, which is simple and convenient.
IOS System:
Requires iOS 7.0 or later. Compatible with iPhone. iPad. and, Pod touch.
Android System:
Requires Android 4 3 or later. Bluetooth 4.0 or later
The app can be downloaded from AppStore (ios system) or google play (Android system) by searching “Glassbot”.
Also, it can be obtained if you scan below QR Codes

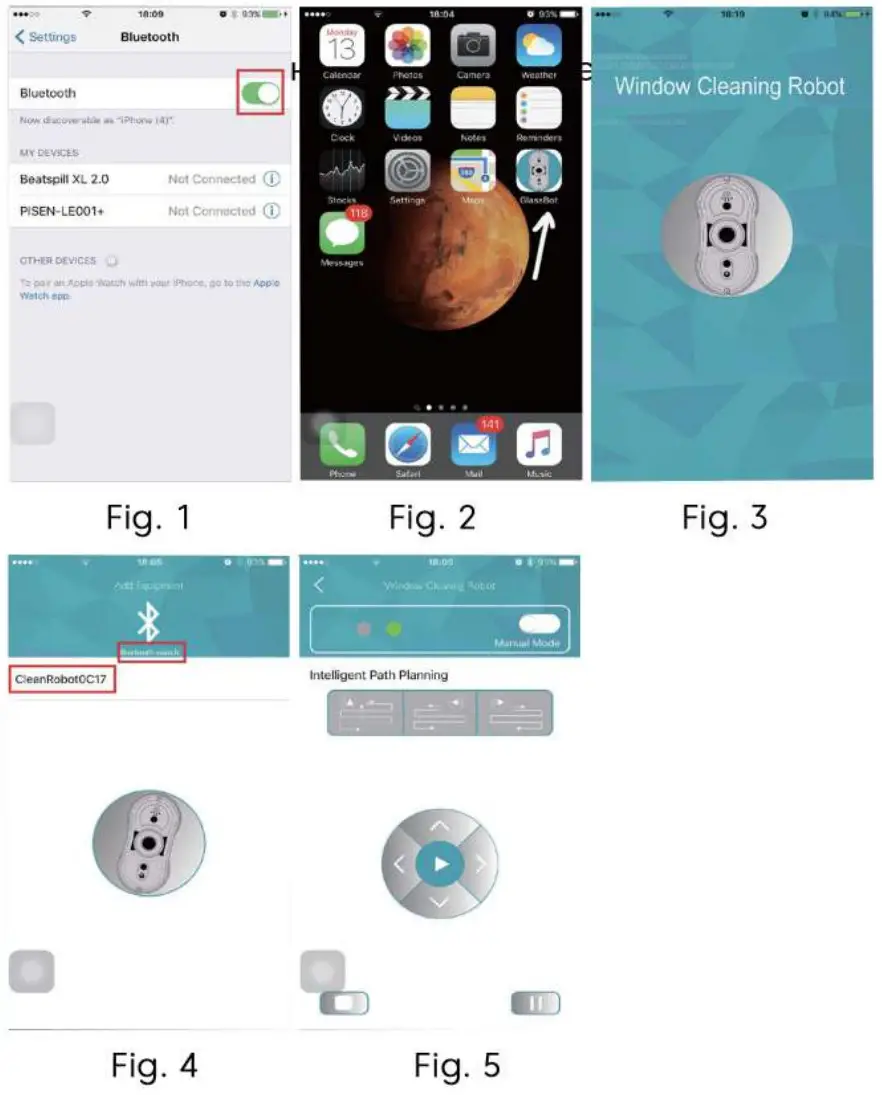
How to control it through APP?
- Connect the robot to the power supply and press “Start” to turn it on
The robot has to be turned on so the program can be found and matched to your smartphone. - Turn on your phone’s “Bluetooth” (Fig 1)
- Find the Glossbot App and open it on your phone (Fig 2)
- App is available (Fig 3)
- Click “Bluetooth search” on your phone, and match it to your phone (Fig 4)
- Connection successful, you can control it through your phone now (Fig 5)
Warranty card No.
This guarantee is valid if the seller fills in all the fields in the table and has the buyer’s signature
| Model No: | Purchase date |
| Serial number: | Last name First name and signature of the buyer: I have read the warranty terms and conditions: —– |
| Name, phone number, and legal address of the selling organization: | Seller’s signature: |
Warranty Conditions
This warranty is issued by the manufacturer in addition to and in no way restricts constitutional and other consumer rights.
The warranty is valid if the product is found to be defective or assembled under the following conditions:
- The guarantee covers products intended for use in Europe. The product must be used in strict compliance with the instructions for use. technical standards and/or safety
requirements. The list of models intended for users is published on the website www.1boto.eu. - This warranty does not cover damage caused by fire, lightning, or other natural phenomena; mechanical damage; or misuse. including connection to power sources not specified m the instructions for use; voltage fluctuations, excessive or incorrect use of power supply or input voltage, depreciation; negligence. including the entry of foreign bodies and insects into the product; repair or adaptation to a person not certified to provide such services, as well as installation. adaptation. modification or operation m Vernon of the technical conditions and
I or safety requirements specified in the product. - If during the warranty period, a part or parts of the product are replaced by a part or parts not supplied or authorized by the manufacturer which is of unsatisfactory quality and unsuitable, the consumer loses all warranty rights, including the right to return the product.
- This warranty does not cover software, trim, body parts, lamps, batteries, and connecting cables. screens used batteries. screens, filters. brushes. cartridges, and other
limited parts.
| Warranty repair number | Date of receipt of the device for repair | Dote Issue of the device | Repair Description | List of replaced ports | Name and seal of the service center | Full name of the master who performed the repair |
This table is filled in by a representative of the Service Center that performs warranty repairs of the product. After the warranty repair, this ticket must be returned to the Owner.
Warranty period
IBoto Technology Inc. provides a manufacturer’s warranty for the entire range of goods supplied to Europe for 2 (two) years from the date of purchase.
Window Cleaner Robot iBoto Win 199 Service life of 5 years Made in China Manufactured by: Mamibot Manufacturing (Shanghai) Co., Ltd. 21st FL, No 1st, LN1040 Caoyang Rd, Shanghai, China. 04/2021 Importer: ELKO Grupa, Toma iela 4, LV-1003, Riga, Latvija Representative Office in Netherlands: iBoto Global BV, Keizersgracht 241,1016EA Amsterdam, www.iboto.eu

While iBoto is working


