PayRange 01778 BluKey Select
Introduction
The turnkey PayRange payment system includes a BluKey hardware device for the machine along with a mobile app and transaction processing service for the consumer. Consumers maintain a prepaid balance on their smartphones and use it to make payments at a variety of machines that can include vending, amusement, parking, transit ticketing, and laundry equipment.
BluKey Select (BKSelect) device provides mobile payment functionality for vending machines with MDB and works with virtually any vending machine and other kinds of machines that accept payments from MDB payment devices. Additionally, BKSelect connects to vending machine keypads to provide customers touchless selection of product on their phone.
BKSelect supports installation into older machines that do not have MDB CPD2 but have an installed card reader.
RTC (real-time clock) support timekeeping in case of power outage.
DEX connector can support remote DEX/UCX functionality.
Installing BluKey Select takes just 2-3 minutes and requires only plugging in an appropriate cable harness into the machine.
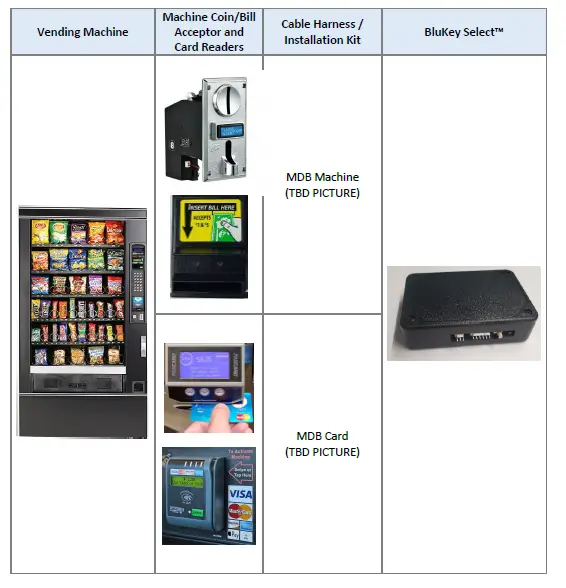
PayRange BluKey Select™ Mobile Payment System consists of:
- BluKey Select™ (accepts payments from PayRange mobile app)
- MDB Cable Harness (usually part of the machine)
- Keypad Cable Harness (connects BluKey Select to Machine Keypad), includes Config plug
- Optional Card Harness (connects BluKey Select to Card reader installed in the Machine)
- Optional DEX Cable Harness
Before Installation
- Create your PayRange Operator Account
a. Go to http://manage.payrange.com.
b. Sign up for a customer account. If you already have a customer account, Sign in.
c. Once logged in, click Create an Operator Account (may need to click Account first).
d. Select Operator Sign up (at the bottom of the page), follow prompts to create your account.
e. Setup ACH for payment with your bank routing and account number.
Note: Though it is possible to skip banking information, Weekly payments will commence only after banking is setup, and there are mobile sales.
f. Issue free vend code for installation tests.
See video: https://www.youtube.com/watch?v=Xxbb3XjKKx0
OFFERS > Create Offer >
- Offer Type: Free Vend
- Description: Technician free vend offer
- Max Vend Amount: <enter amount to cover wash/dry cycle>
- Enter any other necessary information
- Click “Create Offer” button
- Copy offer codes and send them to installation technician(s) (via email or text)
Setup for Your Machine Installers
Prepare Installers:
- a. Download and install the PayRange app.
- b. Load funds to the app with a credit/debit card, or issue free vend code.
- c. Prepare additional point of sale material such as table tents, location flyers, and location posters. These can be downloaded free at https://www.payrange.com/resources.
Note: Because the PayRange device is inside the machine, the users won’t know it is there unless you tell them. The more you do to promote PayRange, the quicker they will become loyal users of your machines. - d. Provide necessary tools and supplies
i. BluKey Select device
ii. Keypad Harness for the machine
See document “Touchless Keypad Harness Summary” to choose appropriate harness.
iii. Harness for card reader (if machines are equipped with card readers)
iv. Room key and necessary building access cards
v. Operator (Installer / Service) key for the machine
vi. Smartphone, tablet or connected laptop with PayRange app
vii. Installer login & password into Operator Account
Installation Steps
These are generic installation instructions. Each individual machine and harness may have additional steps or details relevant to installation.
- Disconnect power from the machine
Important! Avoid electric shock and damage to the machine and BluKey Select. Always disconnect power from the machine BEFORE opening the machine cabinet. - Open machine cabinet
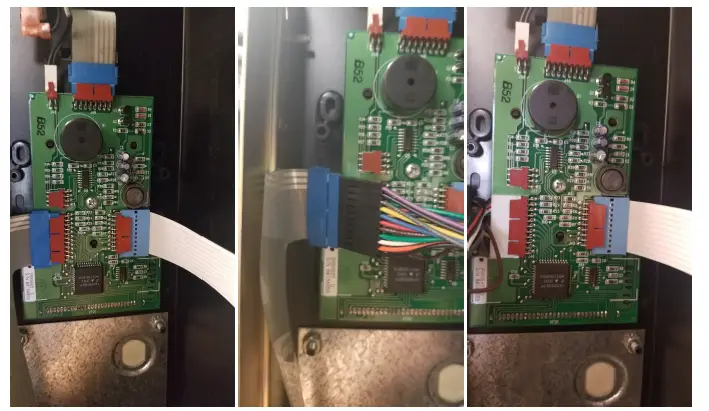
Unlock door/panel with operator/service key if needed, open the machine door/panel and position as necessary for service. - Connect Keypad Harness to Machine Keypad and Machine Control
See Installation Manual for the Keypad
Harness. Below is a representative example.
- Connect configuration plug to CONF connector
See Installation Manual for the Keypad Harness. - Plug Keypad Harness into BluKey Select KEYPAD connector
- Plug MDB Machine harness into BluKey Select MACHINE connector
- Is Card Reader Present?
No – Skip to step # 11 - Does machine support CPD2?
Yes – Skip to step # 10
No – Continue to step # 9 - Machine with no CPD2 support: Connect Card Reader to BluKey Select CARD connector
a. Disconnect card reader cable from machine MDB connector
If card reader is connected to power separately, keep that connection.
b. Plug MDB Card harness into BluKey Select CARD connector
c. Plug in card reader cable into MDB Card harness
Continue to step # 11 - Machine with CPD1/CPD2 support: Connect Card Reader to BluKey Select MDB harness
a. Disconnect card reader cable from machine MDB connector
If card reader is connected to power separately, keep that connection.
b. Plug in card reader cable into card connector on MDB harness - Connect BluKey Select to Machine
MDB connector - Power up the machine (leave the machine door/panel open)
- BluKey Select should power up and turn on solid blue LED
Note: Some machines disable payment when service panel is open – BluKey Select will be blinking red LED. Manually pressing on service panel switch should let BluKey Select turn on solid blue LED.
See section “Troubleshooting / Light Codes” on page 18 if BluKey Select does not power up or does not turn on solid blue LED. - Configure BluKey Select
See section “BluKey Select Device Configuration” on page 9. - Power off the machine
- Place wires and BluKey Select inside the machine
Position BluKey Select near the control panel.
Tie loose cables with zip-ties. - Close machine door/panel
- Power up the machine
- Verify machine operation
Check mobile payment, coin payment, keypad vend and touchless vend and verify that PayRange app shows “Machine in Use” when vending is in progress - Place PayRange stickers on the machine
Place “Pay with PayRange” sticker on the machine front.
Place “PayRange overview” sticker in the room.
BluKey Select Device Configuration
Register BluKey Select device (using website)
Note: This can be prepared off-site, before installation.
- Login with your operator account to the Manage website at https://manage.payrange.com
- Click DEVICES > Register in the left panel
- Enter device Serial number and Pin (from BluKey Select back label)
- Enter Display name (it will be shown in the app to customers)
- Enter other relevant information (laundry/machine type, location name, address, etc.)
- Optionally: upload picture of the machine number sticker to the “Picture” field (if picture is not uploaded, a standard machine number picture will be shown in the app)
- If there is a PayRange decal for the machine, attach the decal to the machine. If there is a scan to pay QR code, enter Scan to Pay number from the decal
Complete device registration: - Click the Register button to complete device registration
Register BluKey Select device (using mobile app)
Note: When done filling information on the screen, click Next button to advance. Use Back button if need to return and correct any information.
- Open PayRange app, Sign In with your operator account (if not logged in)
- Click on the hamburger menu (top left), select Operator Mode > Register Device
- Enter device Serial number and Pin (from BluKey Select back label), or click camera icon and scan the barcode
- Enter Display name (usually it is a number from machine sticker for customer)
- Enter other relevant information (machine type, location name, address, etc.)
- Note: Picture of the machine will be automatically generated.
- If there is a PayRange decal for the machine, attach the decal to the machine. If there is a scan to pay QR code, enter Scan to Pay number from the decal
- Click the Register button to complete device registration
- Proceed to section “Configure BluKey Select device for payment (using website)” below
Configure BluKey Select device for payment (using website)
Note: This can be prepared off-site, before installation.
- Login with your operator account to the Manage website at https://manage.payrange.com
- Enter device Serial number (from BluKey Select back label) into search box at the top, click Search > Search Device
- Click on the Device ID in search results to open Device view
- Click Edit Device
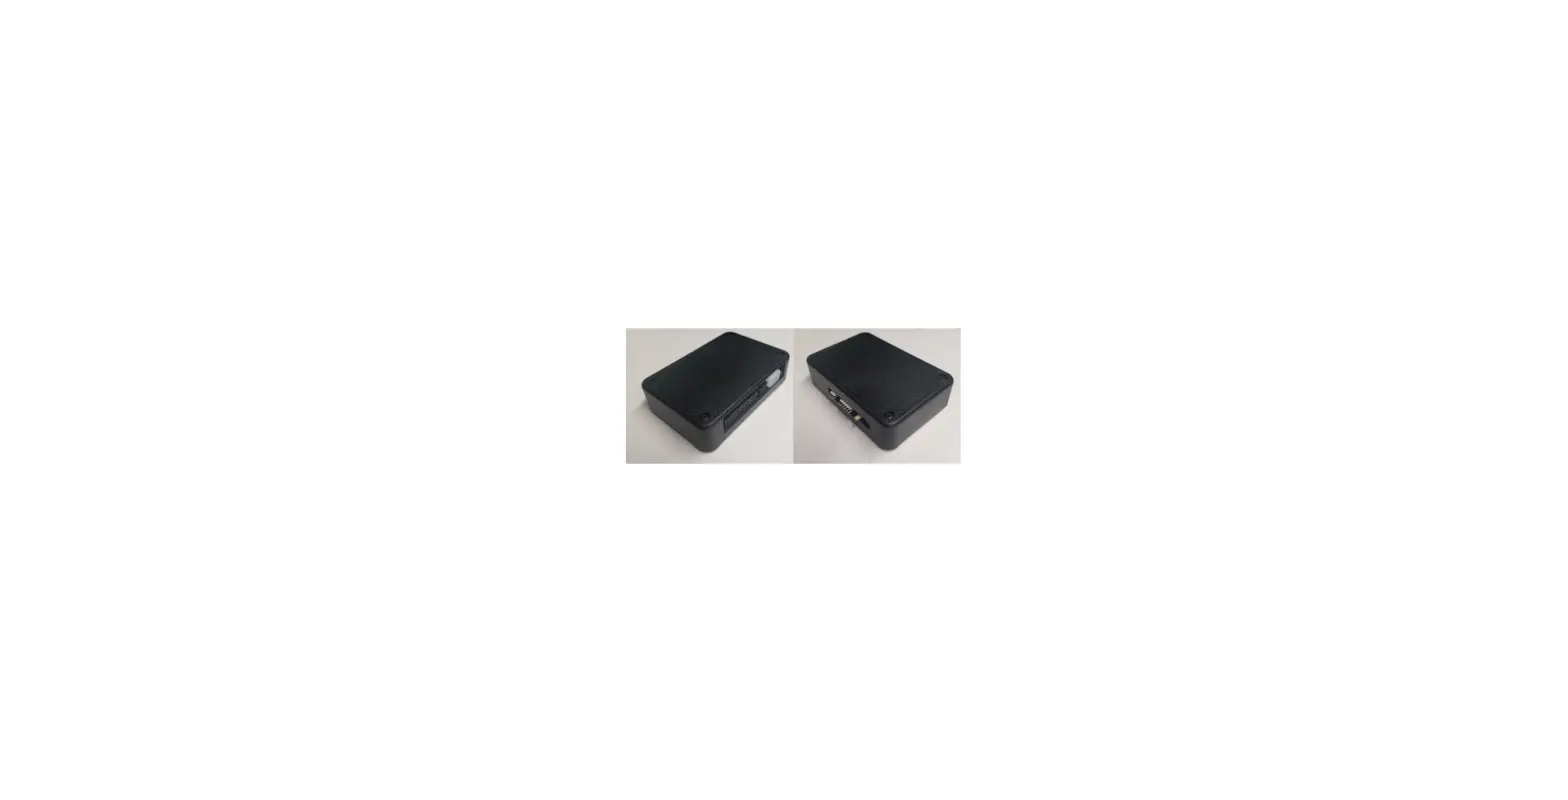
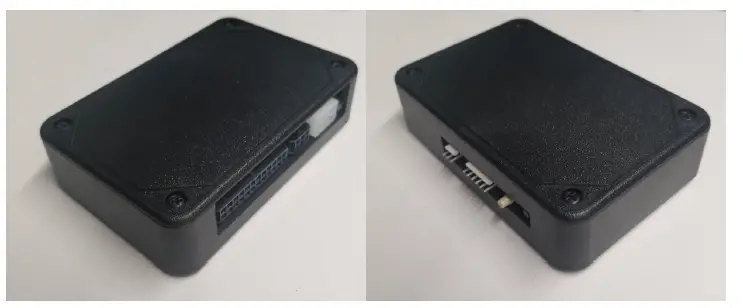
BluKey Select Reference
Interfaces
- DEX Connector
- MACHINE (MDB in) Connector
- Button
- Power/Status LED
- CARD LED
- CARD (MDB out) connector
- CONF connector
- KEYPAD connector
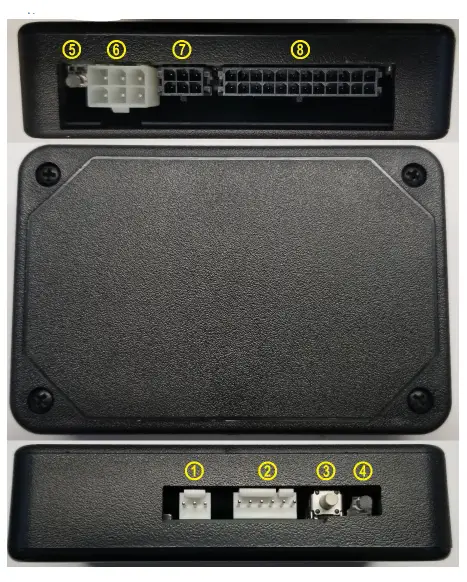 Connectors
The “MACHINE” connector for connecting to MDB machine with MDB Cable Harness, KEYPAD connector for Keypad Cable Harness and CONF connector for configuration plug.
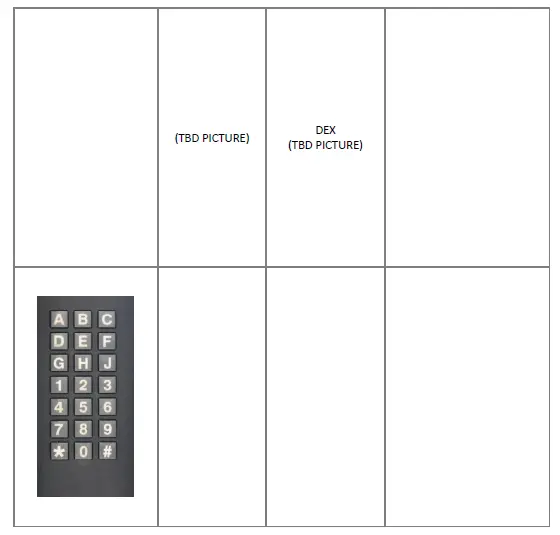
With an appropriate keypad harness and configuration plug BKSelect can be connected to keypad on any MDB machine type to provide touchless product selection.
The “CARD” MDB connector that can be used for installation into machines that only support CPD1 but already have a card reader.
Absolute Maximum Ratings
| Symbol | Description | Min | Max | Unit | Notes |
| TSTG | Storage temperature | -40 | 85 | °C | 1 |
| VCCDCF_MAX | MDB/GND Power supply, DC (filtered) | -0.3 | 50 | VDC | peak |
| VCCDCU_MAX | MDB/GND Power supply, DC (unfiltered) | -0.3 | 50 | VDC | peak |
| ICARDDC_OUT_PK | MDB_OUT/GND output current | 2000 | mA | peak |
| IDD3O_MAX | CONF 3.3V power supply output, DC | – | 300 | mA | |
| VDI | Digital input voltage | -0.3 | VDD + 0.3 | V | 2 |
| IDO | Digital output current | ±50 | mA | ||
| VKEY_MAX | KEYPAD connector operating voltage | 60 | VDC | ||
| IKEY_MAX | KEYPAD connector operating current | 100 | mA |
- Determined according to JEDEC Standard JESD22-A103, High Temperature Storage Life.
- VDD is 3.3V internal reference on CONF connector.
Operating Conditions
| Symbol | Description | Min | Typ | Max | Unit | |
| TO | Operating temperature range | -30 | – | 70 | °C | |
| VCCDC | MDB/GND Power supply, DC | 9 | 34 | 41 | VDC | |
| ICC34 | Power supply current, max (@ 34VDC) | – | – | 90 | mA | |
| UCC | Power consumption | – | – | 3.03 | W (1) | |
| ICARDDC_OUT | MDB_OUT/GND output current | – | – | 1000 | mA | |
| VDD3O | CONF 3.3V power supply output, DC | +3.13 | – | +3.47 | V | |
| IDD3O | CONF 3.3V power supply output, DC | – | – | 100 | mA | |
| IMDBIL | MACHINE connector input current low | – | – | 100 | µA | |
| IMDBIH | MACHINE connector input current high @4V | – | – | 15 | mA | |
| IMDBOL | MACHINE connector output current low | – | – | 30 | µA | |
| IMDBOH | MACHINE connector output current high @1V | – | – | 15 | mA | |
| IMDBOSNIFF | MACHINE connector output sniff current | – | – | 0.45 | mA | |
| IVMCIL | CARD connector input current low | – | – | 1 | mA | |
| IVMCIH | CARD connector input current high @1V | 15 | – | – | mA | |
| IVMCOL | CARD connector output current low | – | – | 100 | µA | |
| IVMCOH | CARD connector output current high @4V | 100 | – | – | mA | |
| VCONFIL | CONF Input logic level low | VDD*0.4 | V (2) | |||
| VCONFIH | CONF Input logic level high | VDD*0.6+0.4 | – | – | V (2) | |
| VCONFOH | Output high voltage (IO = -32mA) | VDD-0.7 | – | – | V (2) | |
| VCONFOL | Output low voltage (IO = +32mA) | – | – | 0.55 | V | |
| RKEY | KEYPAD connector closed contacts resistance | – | – | 50 | Ohm | |
- Power consumption excludes load on CARD connector by external card reader.
- VDD is 3.3V internal reference on CONF connector.
ESD handling ratings
| Symbol | Description | Min. | Max. | Unit | Notes |
| VHBM | Electrostatic discharge voltage, human body model | -2000 | +2000 | V | 1 |
| VCDM | Electrostatic discharge voltage, charged-device model | -500 | +500 | V | 2 |
| ILAT | Latch-up current at ambient temperature of 105°C | -100 | +100 | mA | 3 |
- Determined according to JEDEC Standard JESD22-A114, Electrostatic Discharge (ESD) Sensitivity Testing Human Body Model (HBM
- Determined according to JEDEC Standard JESD22-C101, Field-Induced Charged-Device Model Test Method for Electrostatic-Discharge-Withstand Thresholds of Microelectronic Components.
- Determined according to JEDEC Standard JESD78, IC Latch-Up Test.
RF Specifications
| Symbol | Description | Min. | Max. | Unit | Notes |
| FRF | RF Frequency range (Bluetooth 4.1) | 2402 | 2483.5 | MHz | |
| PRFO | RF Output power | 4.91 | dBm | ||
| SRFI | RF Sensitivity (at 0.1% BER) | TBD | dBm |
Connector Pinouts
“MACHINE” (MDB in) Connector (6-pin)
“MACHINE” connector is suitable for powering BluKey Select from 24V AC, 12VDC and other low-voltage power supplies and has inputs for low-voltage signals.
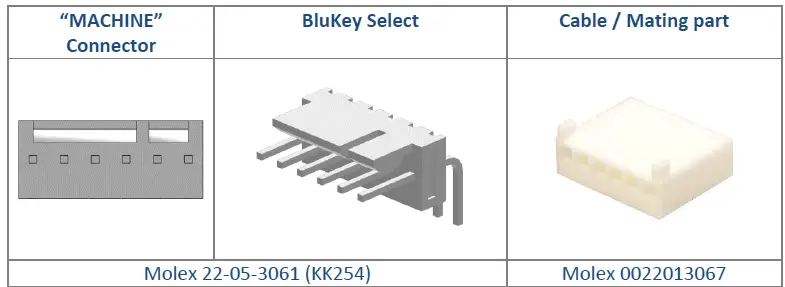
| “MACHINE” Connector | BluKey Select | Cable / Mating part | |
| Molex 22-05-3061 (KK254) | Molex 0022013067 | ||
| Pin | Name | Notes | |
| 1 | MDB_COM | MDB data common | |
| 2 | MDB_TXD | MDB transmit data (BKSelect input) | |
| 3 | MDB_RXD | MDB receive data (BKSelect output, Sniff input) | |
| 4 | (NC) | ||
| 5 | MDB_GND | MDB power supply common | |
| 6 | MDB_V | MDB power supply | |
“CARD” (MDB out) Connector (6-pin)
“CARD” connector is to support additional card reader.
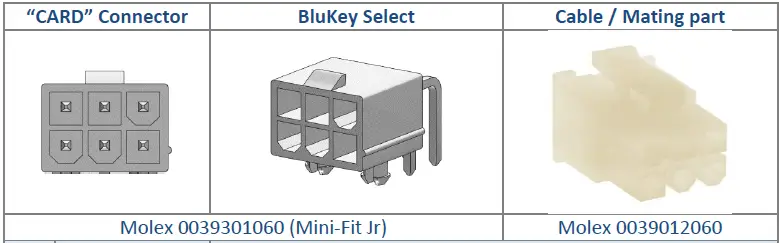
| “CARD” Connector | BluKey Select | Cable / Mating part | |
| Molex 0039301060 (Mini-Fit Jr) | Molex 0039012060 | ||
| Pin | Name | Notes | |
| 1 | MDB_OUT | MDB power supply (pass through from MACHINE) | |
| 2 | MDB_GND | MDB power supply common | |
| 3 | (NC) | ||
| 4 | VMC_RXD | MDB VMC receive data (BKSelect input) | |
| 5 | VMC_TXD | MDB VMC transmit data (BKSelect output) | |
| 6 | VMC_GND | MDB data common | |
“CONF” Connector (6-pin)
“CONF” connector is provided to select Keypad harness configuration.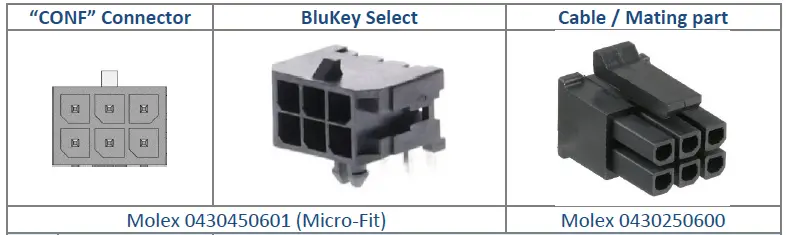
| “CONF” Connector | BluKey Select | Cable / Mating part | |
| Molex 0430450601 (Micro-Fit) | Molex 0430250600 | ||
| Pin | Name | Notes | |
| 1 | CONF0 | Config input | |
| 2 | CONF1 | Config input | |
| 3 | CONF2 | Config input | |
| 4 | CONF3 | Config input | |
| 5 | 3V3_OUT | 3.3V output | |
| 6 | GND | Ground | |
“KEYPAD” Connector (24-pin)
“KEYPAD” connector is provided for Keypad harness.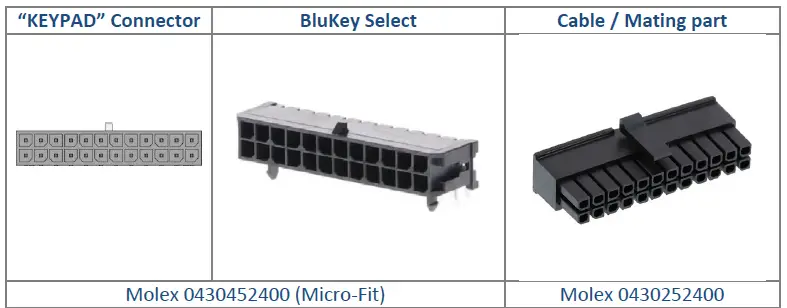
| “KEYPAD” Connector | BluKey Select | Cable / Mating part | |
| Molex 0430452400 (Micro-Fit) | Molex 0430252400 | ||
| Pin | Name | Notes | |
| 1 | KEY_COM | Common for all KEYn | |
| 2 | KEY1 | ||
| 3 | KEY2 | ||
| 4 | KEY3 | ||
| 5 | KEY4 | ||
| 6 | KEY5 | ||
| 7 | KEY6 | ||
| 8 | KEY7 | ||
| 9 | KEY8 | ||
| 10 | KEY9 | ||
| 11 | KEY10 | ||
| 12 | KEY11 | ||
| 13 | KEY_COM | Common for all KEYn | |
| 14 | KEY1 | ||
| 15 | KEY2 | ||
| 16 | KEY3 | ||
| 17 | KEY4 | ||
| 18 | KEY5 | ||
| 19 | KEY6 | ||
| 20 | KEY7 | ||
| 21 | KEY8 | ||
| 22 | KEY9 | ||
| 23 | KEY10 | ||
| 24 | KEY11 | ||
“DEX” (UCX) Connector (3-pin)
“DEX” connector is for permanent connection to vending machine DEX port.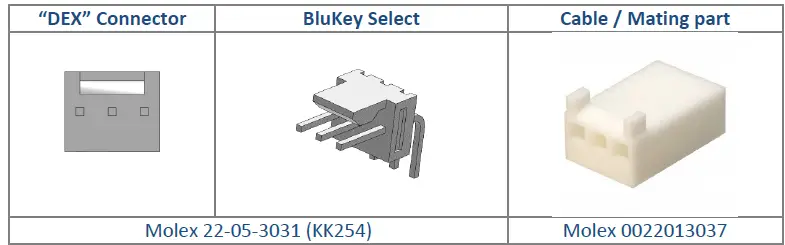
| “DEX” Connector | BluKey Select | Cable / Mating part | |
| Molex 22-05-3031 (KK254) | Molex 0022013037 | ||
| Pin | Name | Notes | |
| 1 | GND | DEX data common | |
| 2 | DEX_TIP_RXD | DEX receive data (BKSelect input) | |
| 3 | DEX_RING_TXD | DEX transmit data (BKSelect output) | |
“Battery Connector Pinout
BKSelect battery connector is JST SM02B-SURS-TF (2-pin) to connect backup battery for the internal real-time-clock.
| Pin | Name | Notes |
| 1 | 3V_IN | (+) 3V from battery |
| 2 | GND | (-) Common |
Recommended CR1632. Only lithium-based 3V watch coin cell batteries are supported (e.g. CR2016, CR2032).
Recommended Mating Parts
- MACHINE Connector: Molex 0022013067 (KK254)
- CARD Connector: Molex 0039012060 (Mini-Fit Jr.)
- Battery Connector: JST 02SUR-32S
- DEX Connector: Molex 0022013037 (KK254)
- CONF Connector: Molex 0430250600 (Micro-Fit)
- KEYPAD Connector: Molex 0430252400 (Micro-Fit
Mechanical
BluKey Select dimensions (inches) are given in the following figure.

Regulatory Approval
Modification statement
PayRange has not approved any changes or modifications to this device by the user. Any changes or modifications could void the user’s authority to operate the equipment.
United States
This device complies with Part 15 of the FCC Rules. Operation is subject to the following two conditions:
- This device may not cause harmful interference; and
- This device must accept any interference received, including interference that may cause undesired operation
To satisfy RF exposure requirements, this device and its antenna must operate with a separation distance of at least 20 cm from all persons.
Canada
This device complies with Industry Canada license-exempt RSS standard(s). Operation is subject to the following two conditions:
- This device may not cause harmful interference; and
- This device must accept any interference received, including interference that may cause undesired operation
To satisfy RF exposure requirements, this device and its antenna must operate with a separation distance of at least 20 cm from all persons.
Device Labelling
- FCC ID:
2AF78-01778 - IC:
21341-01778
Troubleshooting / Light Codes

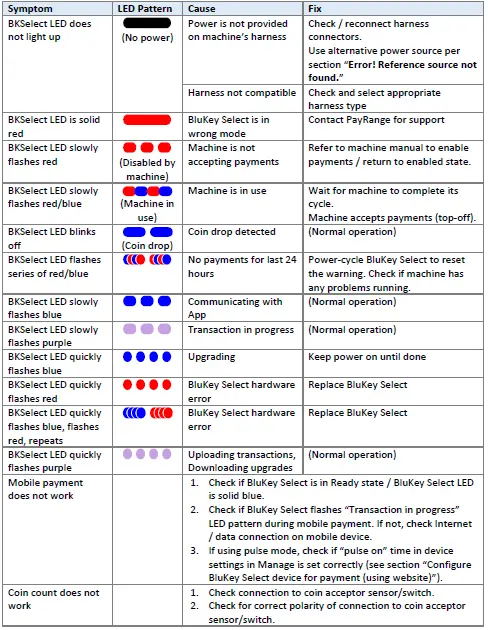
| Symptom | LED Pattern | Cause | Fix |
| 3. Check if coin count input is configured properly for the harness in Manage (see section “Error! Reference source not found.”). | |||
| App does not show “Machine in Use” during cycle | 1. Check harness connection to BKSelect and to machine 2. Check if Inhibit/Available signals are configured properly for the harness in Manage (see section “Error! Reference source not found.”). | ||
| Machine does not accept coins | 1. Check if machine accepts coins if BluKey Select harness is disconnected from the machine’s coin harness (can disconnect harness from BluKey Select). If not, replace coin acceptor and its harness. 2. Check machine’s wiring (a loose wire in connector pin could be causing coin sensor/switch disconnects). 3. For optical coin sensors: Clean coin sensor optics or replace coin sensor or coin acceptor assembly. | ||
Appendix B: BluKey Select Firmware Upgrade
PayRange may release firmware updates with new functionality and improvements.
BKSelect firmware is upgraded automatically, in the background.
Contact PayRange support for additional information on firmware upgrades.
Contacting PayRange Support
For assistance with installing and operating your BluKey Select devices, please contact our support group:
For Technical Support:
Phone: +1 (855) 856-6398 (menu option 1)
Email: [email protected]
For Sales and Marketing Support:
Phone: +1 (855) 856-6398 (menu option 2)
Email: [email protected]
Document History
Part Number 23.00xxx-xx
| Issue | Date | Reason |
| 0.1 | 25 May 2021 | Initial Release – DRAFT 1 |


