
SERV IT 423SWT18 High Wattage Strip Warmer User Manual
Introduction
- Please read instructions before using this appliance. This appliance is for commercial use only.
- When using electrical appliances, basic precautions should always be followed to reduce the risk of fire, electric shock and injury.
- Clean machine thoroughly before and after each use following the cleaning instructions provided below.
Safety Instructions
WARNING!
All power must be disconnected at power source before any service procedure is performed.
- This appliance is hot when in use. To avoid burns, do not let bare skin touch hot surfaces. Keepcombustible materials, such as drapes and other furnishings, away from appliance.
- Extreme caution is necessary when any appliance is used by or near children and whenever the appliance is left unattended.
- Always unplug appliance when not in use and before cleaning, adjusting or maintaining this machine. To disconnect appliance, turn switch off and remove plug from power source.
- Do not operate any appliance with a damaged cord or plug, after the appliance malfunctions, has been dropped or damaged. Return appliance to an authorized service facility for examination, electrical or mechanical adjustment or repair.
- Do not use outdoors. This appliance is not intended for wet or moist locations. Never locate appliance where it may fall into water.
- Connect to properly grounded outlets only. Avoid the use of extension cords. Do not run cord under carpeting, runners or the like. Arrange cord away from traffic area and where it will not create a tripping hazard.
- This appliance is equipped with a power cord with a three blade plug. Plug ONLY into a matching three blade outlet. DO NOT cut or break off the third blade or attempt to use with a two blade extension cord.
- To prevent a possible fire, it is recommended that the unit is placed on a non-combustible surface.
- This appliance has electrical parts. Do not use it in areas where gasoline, paint, or flammable liquids are used or stored.
Overview
| MODEL # | OVERALL DIMENSIONS | POWER SUPPLY | TYPE |
| 423SWT18 | 18″L x 6.1″W x 2.6″H | 120V, 350W | Single |
| 423SWT24 | 24″L x 6.1″W x 2.6″H | 120V, 500W | Single |
| 423SWT30 | 30″L x 6.1″W x 2.6″H | 120V, 650W | Single |
| 423SWT36 | 36″L x 6.1″W x 2.6″H | 120V, 850W | Single |
| 423SWT42 | 42″L x 6.1″W x 2.6″H | 120V, 1050W | Single |
| 423SWT48 | 48″L x 6.1″W x 2.6″H | 120V, 1200W | Single |
| 423SWT54 | 54″L x 6.1″W x 2.6″H | 120V, 1425W | Single |
| 423SWT60 | 60″L x 6.1″W x 2.6″H | 120V, 1550W | Single |
| 423SWT72 | 72″L x 6.1″W x 2.6″H | 120V, 1750W | Single |
| 423SWTD24 | 24″L x 15.2″W x 2.6″H | 120V, 1000W | Double |
| 423SWTD36 | 36″L x 15.2″W x 2.6″H | 120V, 1700W | Double |
| 423SWTD48 | 48″L x 15.2″W x 2.6″H | 120V, 1900W | Double |
| 423SWTD60 | 60″L x 15.2″W x 2.6″H | 120V, 2200W | Double |
Infinite Hardwired
| MODEL # | OVERALL DIMENSIONS | POWER SUPPLY | TYPE |
| 423SWI18 | 18″L x 6.1″W x 2.6″H | 120V, 350W | Single |
| 423SWI24 | 24″L x 6.1″W x 2.6″H | 120V, 500W | Single |
| 423SWI30 | 30″L x 6.1″W x 2.6″H | 120V, 650W | Single |
| 423SWI36 | 36″L x 6.1″W x 2.6″H | 120V, 850W | Single |
| 423SWI42 | 42″L x 6.1″W x 2.6″H | 120V, 1050W | Single |
| 423SWI48 | 48″L x 6.1″W x 2.6″H | 120V, 1200W | Single |
| 423SWI54 | 54″L x 6.1″W x 2.6″H | 120V, 1425W | Single |
| 423SWI60 | 60″L x 6.1″W x 2.6″H | 120V, 1550W | Single |
| 423SWI72 | 72″L x 6.1″W x 2.6″H | 120V, 1750W | Single |
| 423SWID24 | 24″L x 15.2″W x 2.6″H | 120V, 1000W | Double |
| 423SWID36 | 36″L x 15.2″W x 2.6″H | 120V, 1700W | Double |
| 423SWID48 | 48″L x 15.2″W x 2.6″H | 120V, 1900W | Double |
| 423SWID60 | 60″L x 15.2″W x 2.6″H | 120V, 2200W | Double |
Toggle Cord & Plug
| MODEL # | OVERALL DIMENSIONS | POWER SUPPLY | TYPE |
| 423SWT18CP | 18″L x 6.1″W x 2.6″H | 120V, 350W | Single |
| 423SWT24CP | 24″L x 6.1″W x 2.6″H | 120V, 500W | Single |
| 423SWT30CP | 30″L x 6.1″W x 2.6″H | 120V, 650W | Single |
| 423SWT36CP | 36″L x 6.1″W x 2.6″H | 120V, 850W | Single |
| 423SWT42CP | 42″L x 6.1″W x 2.6″H | 120V, 1050W | Single |
| 423SWT48CP | 48″L x 6.1″W x 2.6″H | 120V, 1200W | Single |
| 423SWT54CP | 54″L x 6.1″W x 2.6″H | 120V, 1425W | Single |
| 423SWT60CP | 60″L x 6.1″W x 2.6″H | 120V, 1550W | Single |
| 423SWT72CP | 72″L x 6.1″W x 2.6″H | 120V, 1750W | Single |
Infinite Cord & Plug
| MODEL # | OVERALL DIMENSIONS | POWER SUPPLY | TYPE |
| 423SWI18CP | 18″L x 6.1″W x 2.6″H | 120V, 350W | Single |
| 423SWI24CP | 24″L x 6.1″W x 2.6″H | 120V, 500W | Single |
| 423SWI30CP | 30″L x 6.1″W x 2.6″H | 120V, 650W | Single |
| 423SWI36CP | 36″L x 6.1″W x 2.6″H | 120V, 850W | Single |
| 423SWI42CP | 42″L x 6.1″W x 2.6″H | 120V, 1050W | Single |
| 423SWI48CP | 48″L x 6.1″W x 2.6″H | 120V, 1200W | Single |
| 423SWI54CP | 54″L x 6.1″W x 2.6″H | 120V, 1425W | Single |
| 423SWI60CP | 60″L x 6.1″W x 2.6″H | 120V, 1550W | Single |
| 423SWI72CP | 72″L x 6.1″W x 2.6″H | 120V, 1750W | Single |
Operation
- Plug cord into grounded electrical outlet of the correct voltage. Electrical shock can occur if appliance is not grounded.
- Flip the switch to the ‘On’ position.
- Place food products directly under the elements for best results.
- Turn unit off when not in use.
- To disconnect appliance, turn switches off and remove plug from power source
Installation
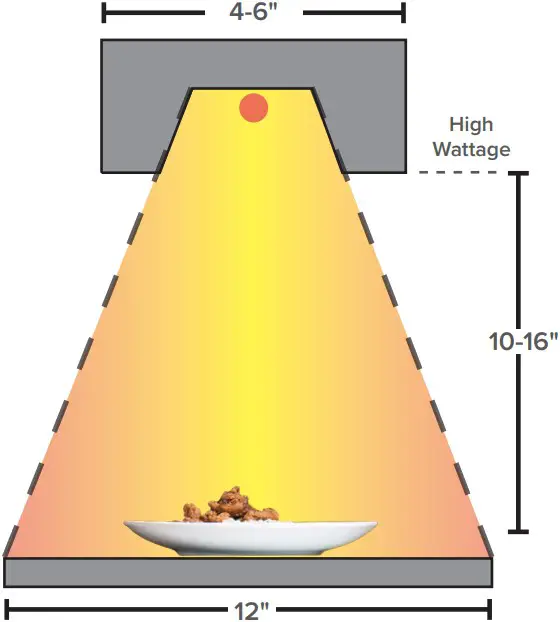
- For strip warmers of high wattage (18-25 watts per inch). 10-16” is the recommended mounting height
- Do not install strip warmers above or around combustible surfaces.
- Strip warmers can be mounted to the underside of a shelf with a minimum gap of 1” to protect electrical system.
- Remove the two center screws from end plates. Align the holes on the bracket with the mounting holes on the end plate. Use the screw to secure the bracket.
- Drill 4 holes on the underside of a shelf, use fasteners to install the brackets to the underside of the shelf.
- A qualified electrician must install hardwired models or warranty will be void.

Cleaning
- Unplug the cord and let warmer cool before cleaning or moving.
- This unit can be cleaned with a damp sponge and mild soap. Rinse with clean water and wipe dry.
- Do not immerse in water or other liquid.
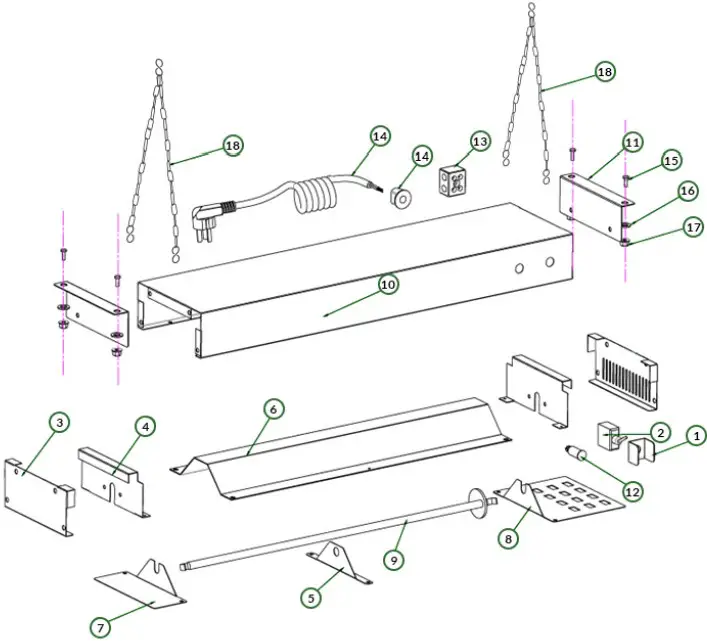
Parts Diagram – Toggle Control
| NO. | Description | Replacement Part# | Pcs. |
| 1 | Switch Guard | 423PSW01 (423SWT18/24/30/36/42/48/54/60/72, 423SWT18/24/30/36/42/48/54/60/72CP,423TD24/36/48/60) | 1 |
| 2 | Toggle Switch | 423PSWSWITCH (423SWT18/24/30/36/42/48/54/60/72, 423SWT18/24/30/36/42/48/54/60/72 CP, 423TD24/36/48/60) | 1 |
| 3 | End Plates | 2 | |
| 4 | Element Guard | 423PSWGUARD (423SWI18/24/30/36/42/48/54/60/72, 423SWT18/24/30/36/42/48/54/60/72,423SWT18/24/30/36/42/48/54/60/72CP, 423TD24/36/48/60) | 1 |
| 5 | Element Support (Mid) | 423PSWELEM1 (423SWT18/24/30/36/42/48/54/60/72, 423SWT18/24/30/36/42/48/54/60/72 CP, 423TD24/36/48/60) | 1 |
| 6 | Reflector | 1 | |
| 7 | Element Support (Left) | 423PSWELEM2 (423SWT18/24/30/36/42/48/54/60/72, 423SWT18/24/30/36/42/48/54/60/72 CP, 423TD24/36/48/60) | 1 |
| 8 | Cover Plate | 1 | |
| 9 | Element | 423PSWELEM24 (423SWT24/T24CP/I24/I24CP/TD24), 423PSWELEM36 (423SWT36/ T36CP/TD36), 423PSWELEM48 (423SWT48/T48CPTD48), 423PSWELEM60 (423SWT60/ T60CPTD60), 423PSWELEM72 (423SWT72/T72CP/I72), 423PSWELEM18 (423SWT18/ T18CP), 423PSWELEM30 (423SWT30/T30CP), 423PSWELEM42 (423SWT42/T42CP/I42), 423PSWELEM54 (423SWT54/T54CP) | 1 |
| 10 | Housing | 1 | |
| 11 | Mounting Brackets | 423PBRACKET (423SWT18/24/30/36/42/48/54/60/72, 423SWT18/24/30/36/42/48/54/60/72 CP, 423TD24/36/48/60) | 2 |
Toggle Control, cont.
| NO. | Description | Replacement Part# | Pcs. |
| 12 | Indicator Light | 1 | |
| 13 | Terminal Block | 423PSWTB (423SWT18/24/30/36/42/48/54/60/72, 423SWT18/24/30/36/42/48/54/60/72CP,423TD24/36/48/60) | 1 |
| 14 | Cord and Plug Set | 423PSWCORD15 (423SWT18/24/30/36/42/48/54/60/72, 423SWT18/24/30/36/42/48/54/60/72 CP, 423TD24/36/48/60) | 1 |
| 15 | Screw | 1 | |
| 16 | Washer | 1 | |
| 17 | Nut | 1 | |
| 18 | Support Chains | 423PSWCHAIN (423SWT18/24/30/36/42/48/54/60/72, 423SWT18/24/30/36/42/48/54/60/72 CP, 423TD24/36/48/60) | 2 |
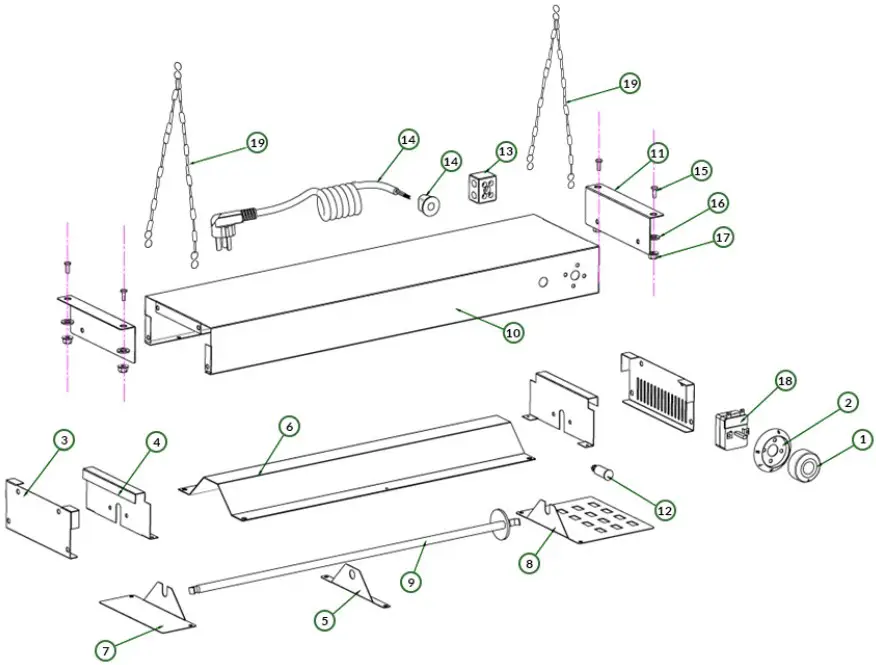
Parts Diagram – Infinite Control
| NO. | Description | Replacement Part# | Pcs. |
| 1 | Knob | 423PSWKNOB (423SWI18/24/30/36/42/48/54/60/72, 423SWI18/24/30/36/42/48/54/60/72CP,423ID24/36/48/60) | 1 |
| 2 | Knob Base | 1 | |
| 3 | End Plates | 2 | |
| 4 | Element Guard | 423PSWGUARD (423SWI18/24/30/36/42/48/54/60/72, 423SWI18/24/30/36/42/48/54/60/72 CP, 423ID24/36/48/60) | 1 |
| 5 | Element Support (Mid) | 423PSWELEM1 (423SWI18/24/30/36/42/48/54/60/72, 423SWI18/24/30/36/42/48/54/60/72 CP, 423ID24/36/48/60) | 1 |
| 6 | Reflector | 1 |
| NO. | Description | Replacement Part# | Pcs. |
| 7 | Element Support (Left) | 423PSWELEM2 (423SWI18/24/30/36/42/48/54/60/72, 423SWI18/24/30/36/42/48/54/60/72 CP, 423ID24/36/48/60) | 1 |
| 8 | Cover Plate | 1 | |
| 9 | Element | 423PSWELEM24 (I24/I24CP/ID24), 423PSWELEM36 (I36/I36CP/ID36), 423PSWELEM48 (I48/ I48CP/ID48), 423PSWELEM60 (I60/I60CP/ID60), 423PSWELEM72 (I72/I72CP) | 1 |
| 10 | Housing | 1 | |
| 11 | Mounting Brackets | 423PBRACKET (423SWI18/24/30/36/42/48/54/60/72, 423SWI18/24/30/36/42/48/54/60/72CP,423ID24/36/48/60) | 2 |
| 12 | Indicator Light | 1 | |
| 13 | Terminal Block | 423PSWTB (423SWI18/24/30/36/42/48/54/60/72, 423SWI18/24/30/36/42/48/54/60/72CP,423ID24/36/48/60) | 1 |
| 14 | Cord and Plug Set | 423PSWCORD15 (423SWI18/24/30/36/42/48/54/60/72, 423SWI18/24/30/36/42/48/54/60/72 CP, 423ID24/36/48/60) | 1 |
| 15 | Screw | 1 | |
| 16 | Washer | 1 | |
| 17 | Nut | 1 | |
| 18 | Infinite Heat Control | 423PSWTHERM (423SWI18/24/30/36/42/48/54/60/72, 423SWI18/24/30/36/42/48/54/60/72 CP, 423ID24/36/48/60) | 1 |
| 19 | Support Chains | 423PSWCHAIN (423SWI18/24/30/36/42/48/54/60/72, 423SWI18/24/30/36/42/48/54/60/72 CP, 423ID24/36/48/60) | 2 |
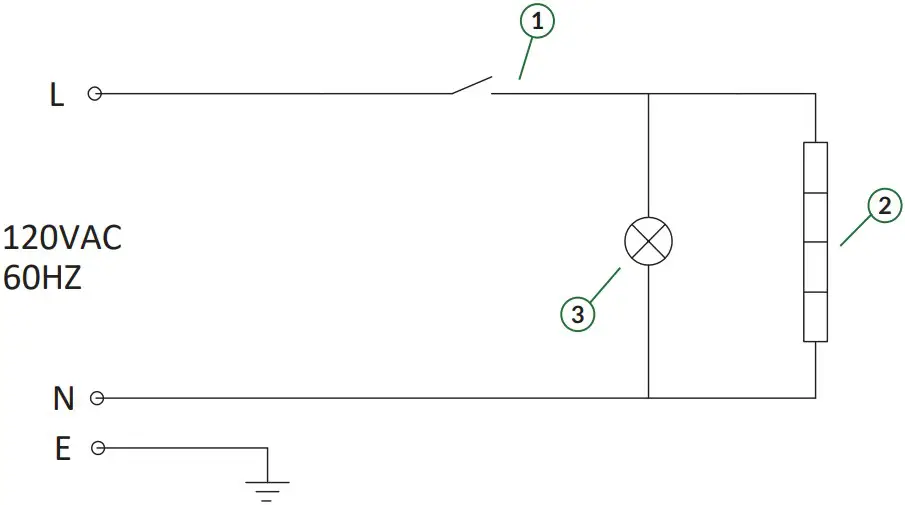
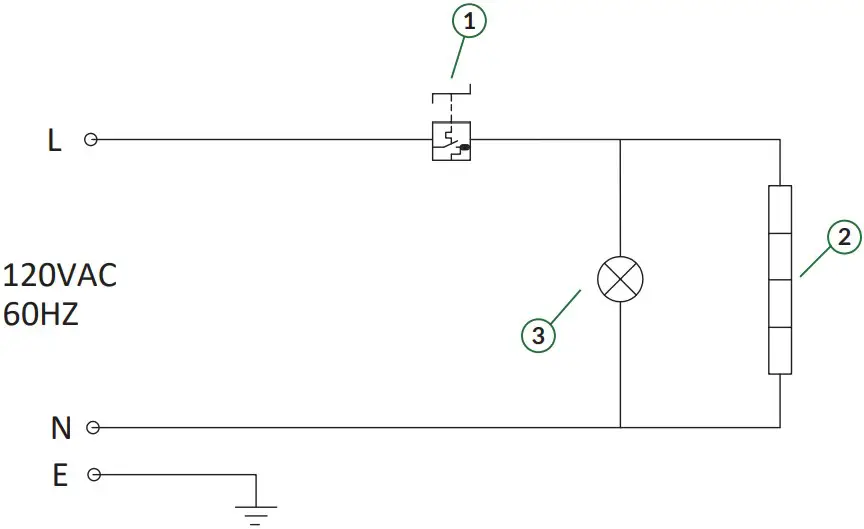
Wiring Diagram – Toggle Control
| NO. | Description |
| 1 | Switch |
| 2 | Heater |
| 3 | Indicator |
Wiring Diagram – Infinite Control
| NO. | Description |
| 1 | Energy Regulator |
| 2 | Heater |
| 3 | Indicator |


