![]()
Assembly Instruction for use with FAMISKY Desktops 48″ and larger
For Assembly assistance, email [email protected]
Caution
![]() Keep children and pets away from the electrically height-adjustable desk during the operation. Unplug the power cord during a thunderstorm or if you do not intend to use the desk for a long time.
Keep children and pets away from the electrically height-adjustable desk during the operation. Unplug the power cord during a thunderstorm or if you do not intend to use the desk for a long time.
![]() Make sure the desktop not touching the wall.
Make sure the desktop not touching the wall.
![]() Ensure no obstacles in the desk’s path and no object above and 20” under the desk.
Ensure no obstacles in the desk’s path and no object above and 20” under the desk.
![]() Working environment temperature 0-40, keep products away from corrosive gas, liquid, and dusty objects.
Working environment temperature 0-40, keep products away from corrosive gas, liquid, and dusty objects.
![]() It is strictly forbidden to disassemble the products privately to avoid that the failure of the products or the damage to the human body caused by electronic products, etc.
It is strictly forbidden to disassemble the products privately to avoid that the failure of the products or the damage to the human body caused by electronic products, etc.
![]() Although the product with anti-collision function, in order to avoid any pinching, please ensures that hands or other parts of your body are in a safe position during the operation. Anti-collision is not enabled during all resets.
Although the product with anti-collision function, in order to avoid any pinching, please ensures that hands or other parts of your body are in a safe position during the operation. Anti-collision is not enabled during all resets.
![]() Please read the following instructions carefully before start using the high adjustable desk. The company does not bear any warranty or liability for damage and human injury caused by any abnormal operation.
Please read the following instructions carefully before start using the high adjustable desk. The company does not bear any warranty or liability for damage and human injury caused by any abnormal operation.
![]() It is necessary to reset manually after the initial installation or power off.
It is necessary to reset manually after the initial installation or power off.
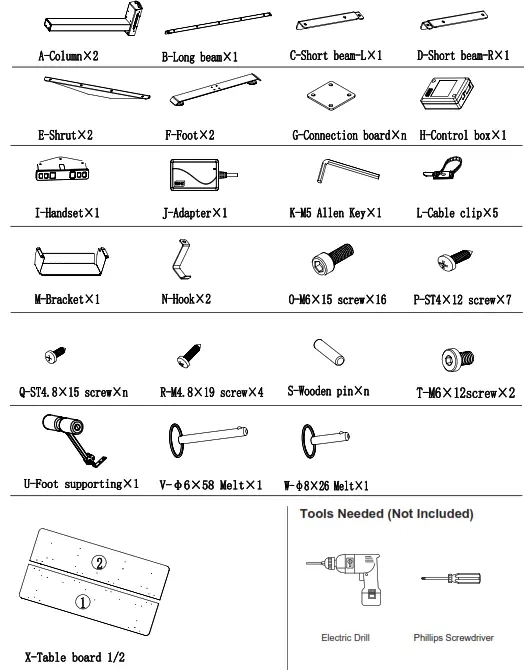
Parts List
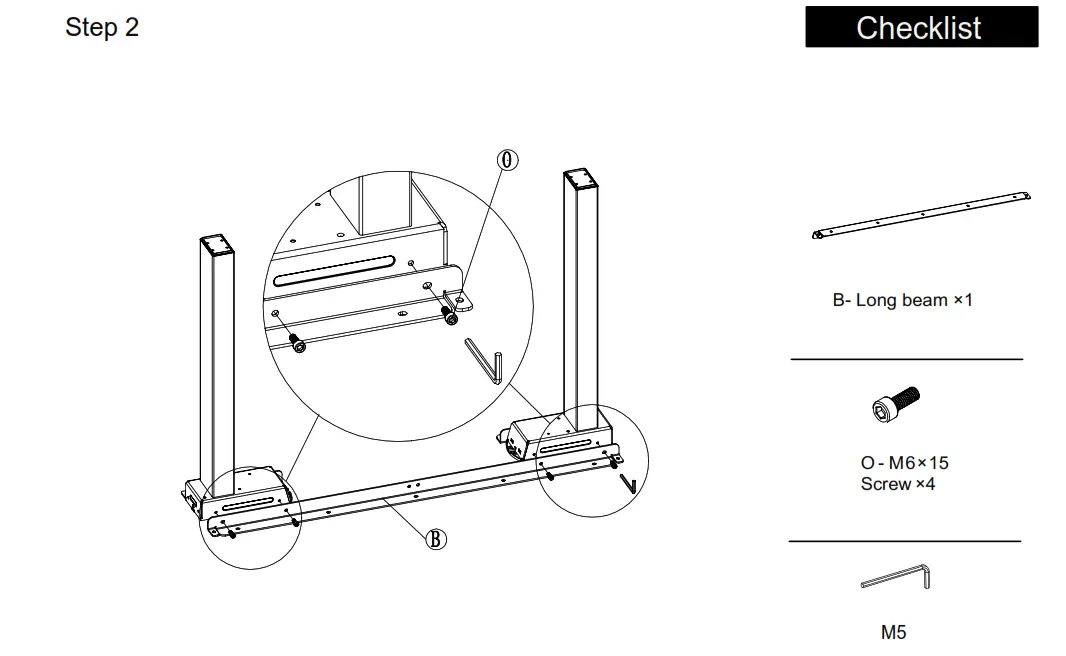
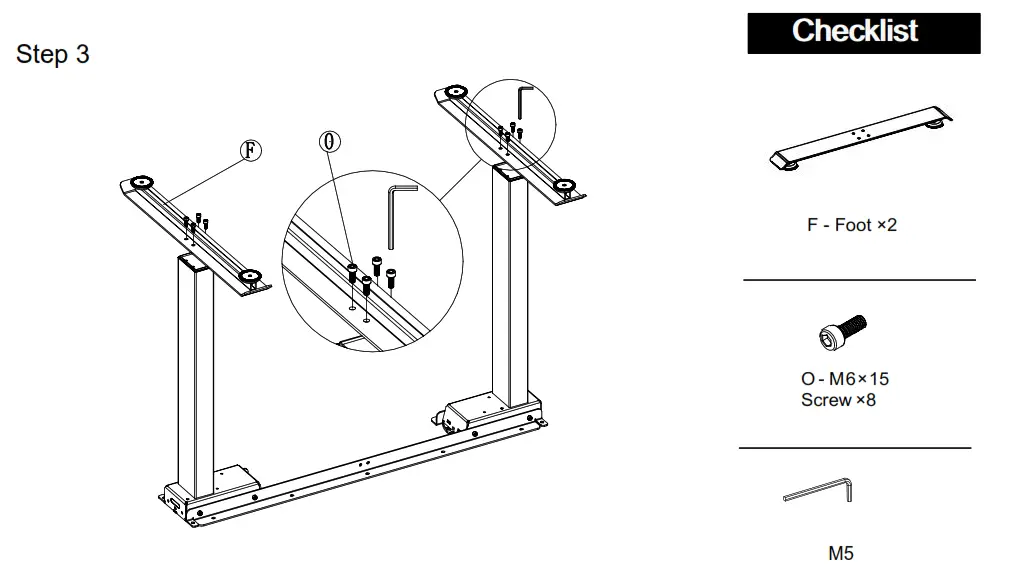
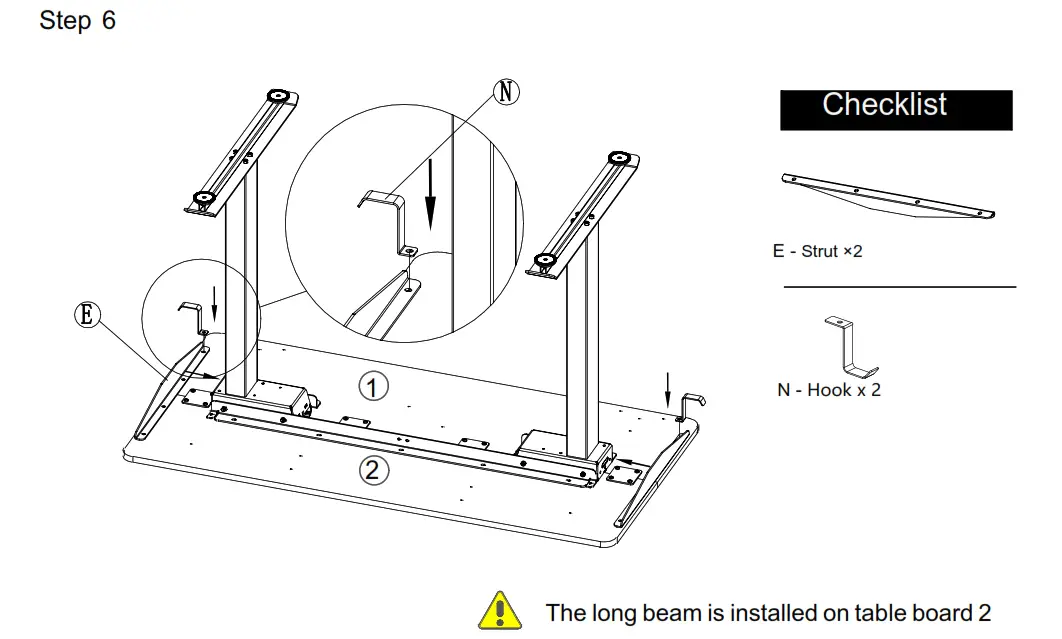
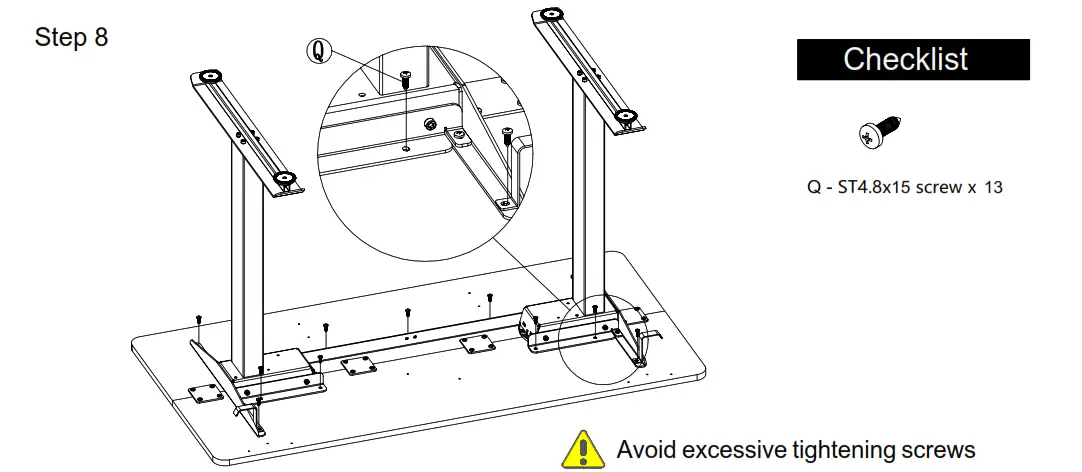
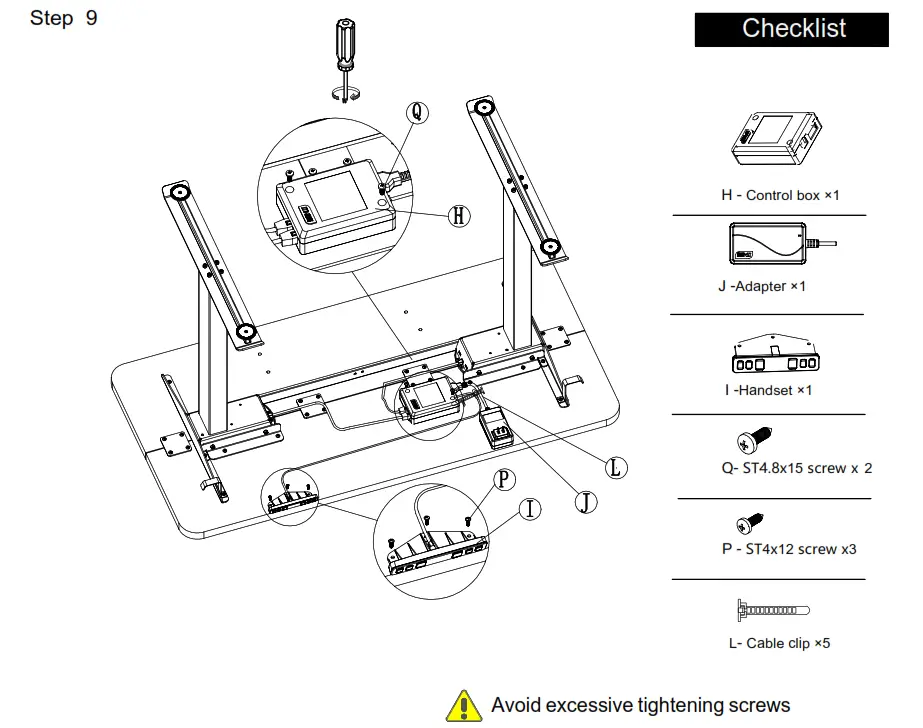
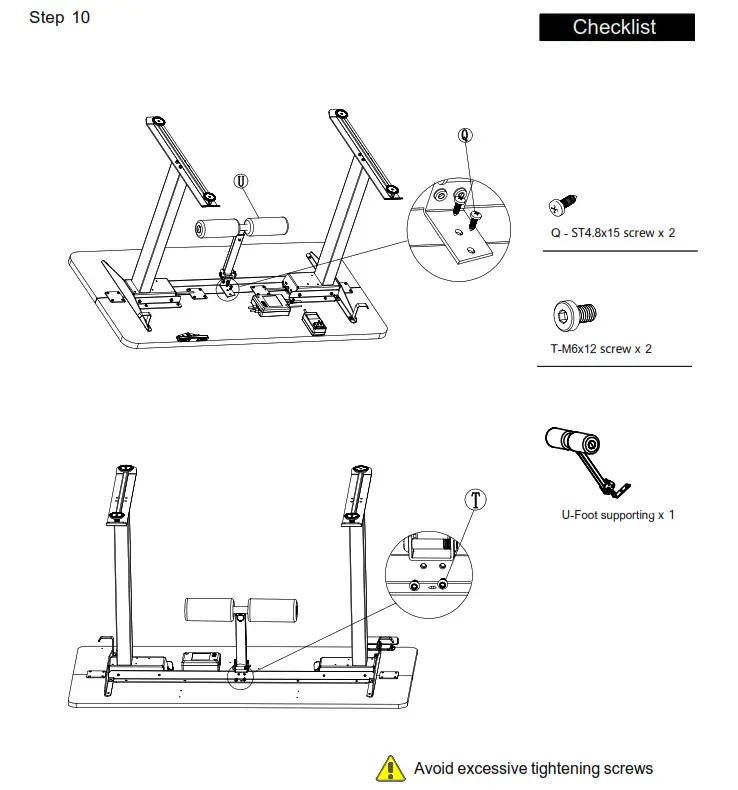
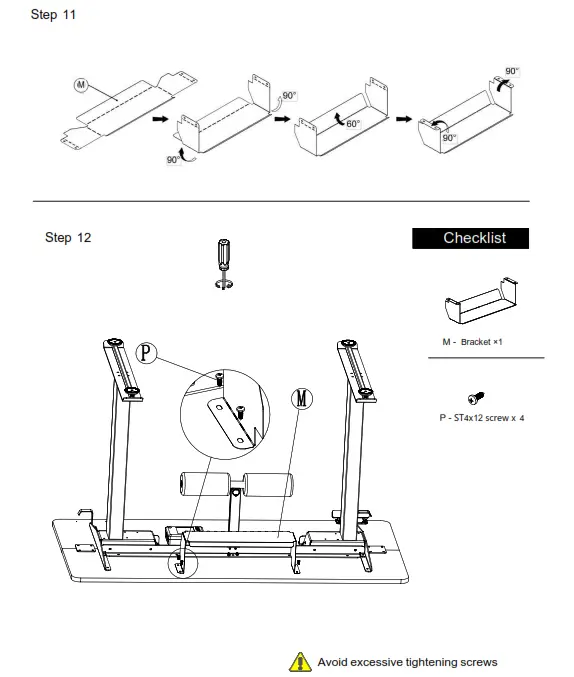
Assembly
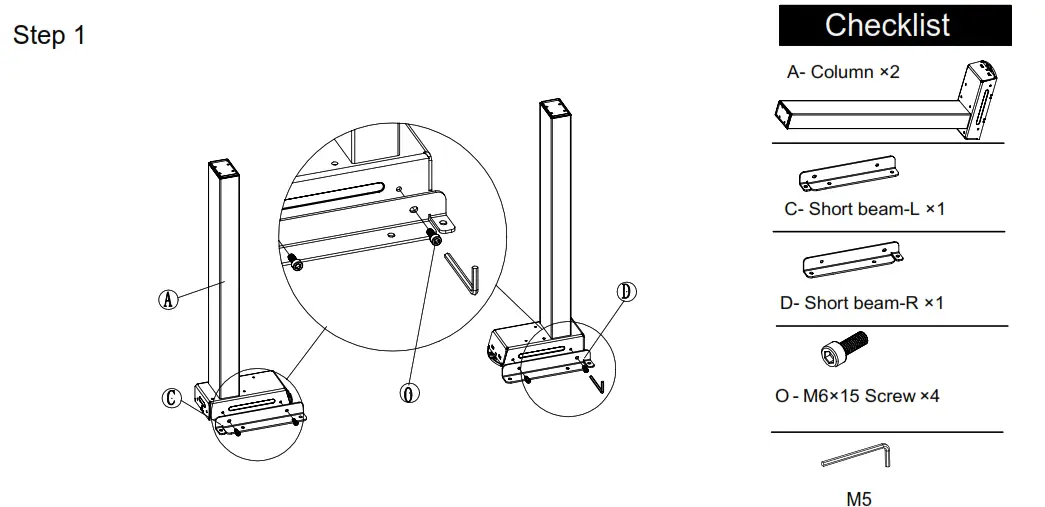
![]() Please pay attention to distinguish between c-short beam- L and D-short bean-R
Please pay attention to distinguish between c-short beam- L and D-short bean-R
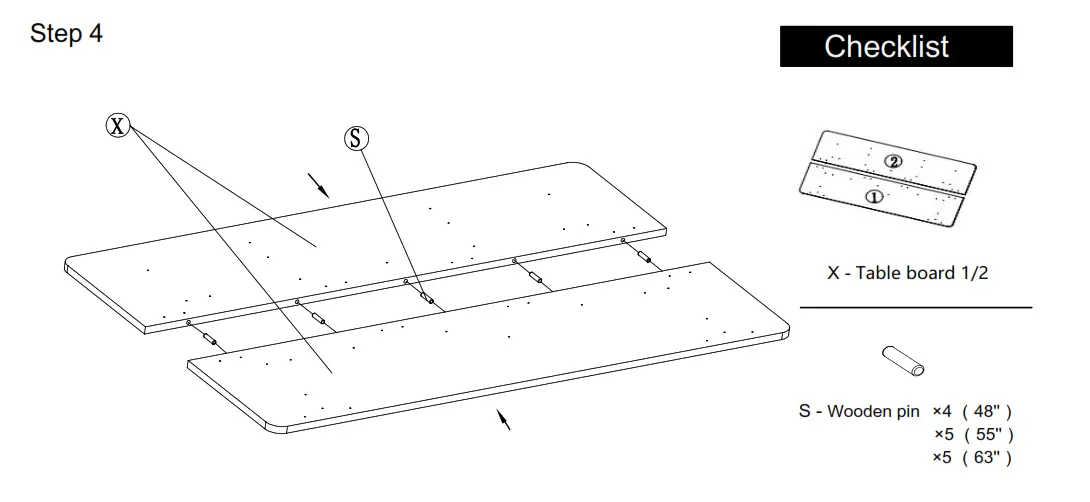
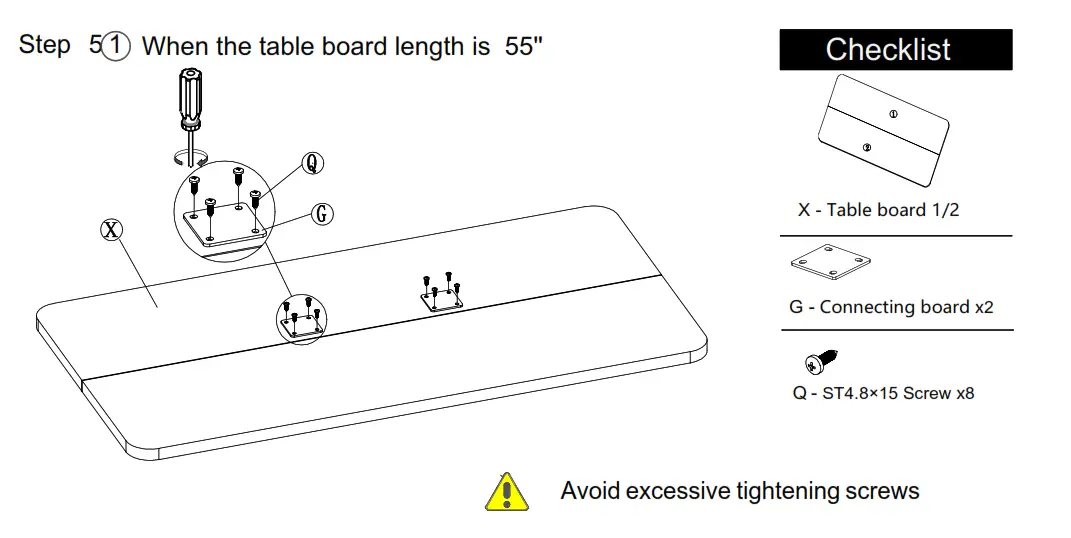
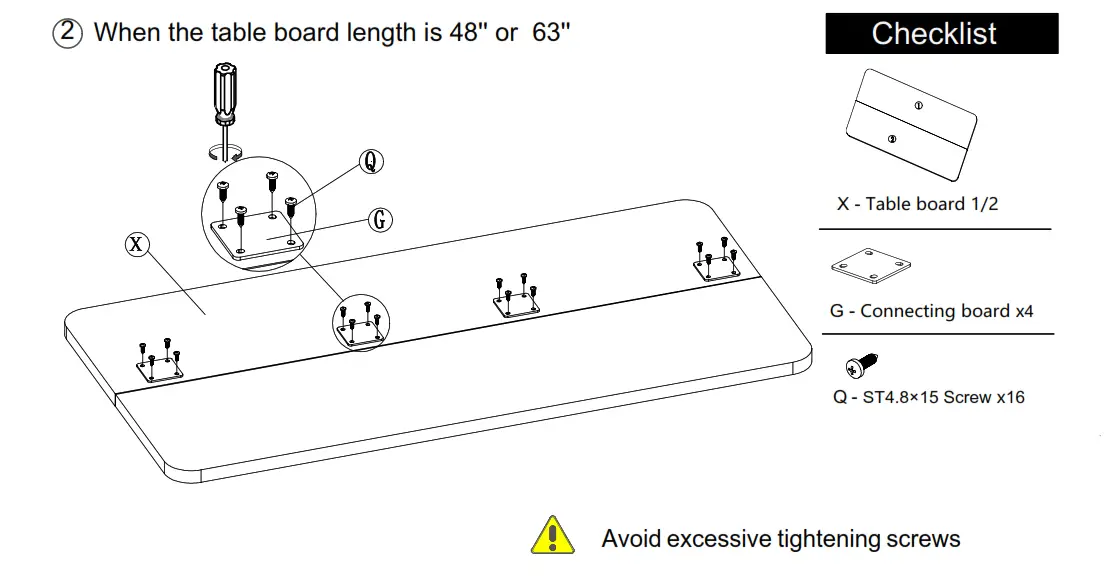
![]() Please make sure the size of the tabletop matches the number of wooden pins
Please make sure the size of the tabletop matches the number of wooden pins

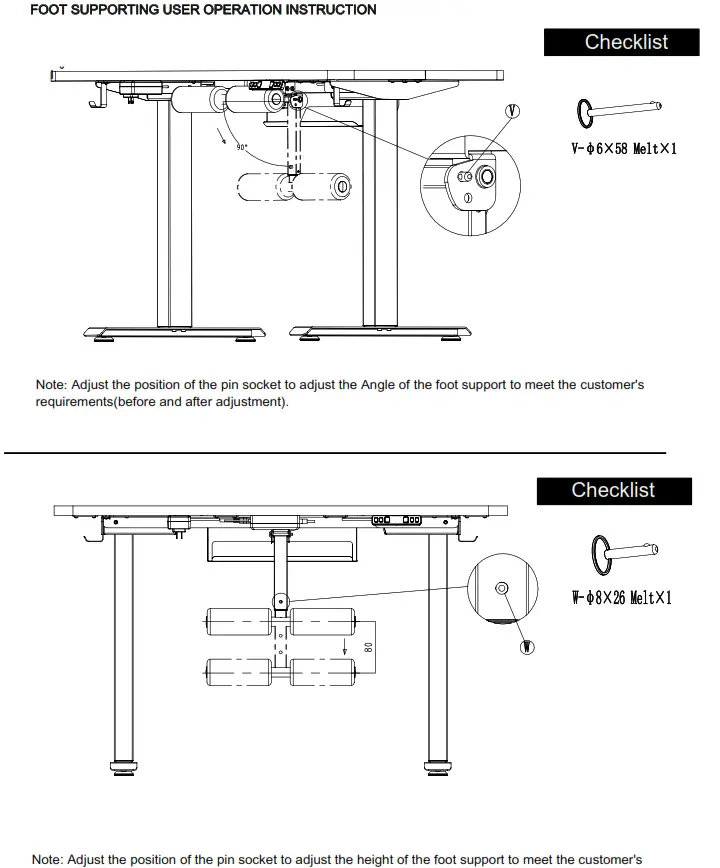
USER OPERATION INSTRUCTION
![]() Read this instruction before the operation
Read this instruction before the operation
Digital Handset Operation
1. Picture

2. Initialization procedure
Step | Operation | Motion |
| 1 | Press and hold | Legs begin to move down at a half speed of normal operation |
| 2 | Keep pressing | Legs move down to the lowest position and rebound 2-5 mm, then stop |
| 3 | Release | Initialization is completed |
The initialization procedure must be completed before the first running after table is installed or parts replaced
3. Move up and down
| Step | Operation | Motion |
| 1 | Press and hold | Legs move up |
| 2 | Release | Legs stop |
| 3 | Press and hold | Legs move down |
| 4 | Release | Legs stop |
4.Set memory positions
Step | Operation | Motion |
| 1 | Press and hold | Run the legs to the position you want the table surface to be |
| 2 | Click button S, then click button 1 or 2 or 3 within next 6 seconds | Position 1 or 2 or 3 is saved |
5. Move to the memorized positions
Step | Operation | Motion |
| 1 | Press and hold the button 1 or 2 or 3 | Legs return to the corresponding position saved |
6. Toggle the display unit format
Step | Operation | Motion |
| 1 | Press and hold button S, then press and hold | The height information will be changed between centimeters and inches |
| 2 | Release the buttons | completed |
![]() In inch format, the minimum height variation as the legs move up or down is 0.5 inches, while in centimeter format is 1 centimeter
In inch format, the minimum height variation as the legs move up or down is 0.5 inches, while in centimeter format is 1 centimeter
7. Verify the display switch data to table height
| Step | Operation | Motion |
| 1 | Set the table at any height, recommended at the bottom position | Measure the table actual height and write down the number in inches or in centimeters |
| 2 | Press and hold button S, then press and hold | The first number is flashing on the screen |
| 3 | Release the buttons, then click change the first number | The first number is being increased or decreased to the first number you measured |
| 4 | Click button S | The second number is flashing on the screen |
| 5 | Click | The second number is being increased or decreased to the second number you measured |
| 6 | Click button S | The third number is flashing on the screen |
| 7 | Click | The third number is being increased or decreased to the third number you measured |
| 8 | Click button S | Completed |
![]() Check the switch display format in inches or in centimeters and toggle to the unit you like and match to the actual measurement. In inch format, the minimum adjustable height is 0.5 inches, while in centimeter format is 1 centimeter.
Check the switch display format in inches or in centimeters and toggle to the unit you like and match to the actual measurement. In inch format, the minimum adjustable height is 0.5 inches, while in centimeter format is 1 centimeter.
8. Lock the bottom stroke limit
Step | Operation | Motion |
| 1 | Press and hold | Run the legs to the position you want the table surface to be |
| 2 | Press and hold button S, then press and hold 1, keep about 6 seconds | Letter “L” is indicated on the screen. That means the position is locked at the lowest position that the table can be moved to |
| 3 | Release the buttons | Completed |
![]() 1.Legs aren’t able to run below the locked position
1.Legs aren’t able to run below the locked position
2.Memory position(s) are/is below the locked position will lost even after the table is unlocked, you need to follow SET MEMORY POSITIONS again to reset these memory positions
3.Initialize switch will not unlock the top limit.
9.Lock the top stroke limit
| Step | Operation | Motion |
| 1 | Press and hold | Run the legs to the position you want the table surface to be |
| 2 | Press and hold button S, then press and hold 3, keep about 6 seconds | Letter “L” is indicated on the screen. That means the position is locked at the highest position that the table can be moved to |
| 3 | Release the buttons | Completed |
![]() 1.Legs aren’t able to run below the locked position
1.Legs aren’t able to run below the locked position
2.Memory position(s) are/is below the locked position will lost even after the table is unlocked, you need to follow SET MEMORY POSITIONS again to reset these memory positions
3.Initialize switch will not unlock the top limit.
10. Unlock the stroke
| Step | Operation | Motion |
| 1 | Press and hold button S, then press and hold 2, keep about 6 seconds | Letter “C” is indicated on the screen. That means the table’s unlocked and can be moved in full range |
| 2 | Release the buttons | Completed |
11.Exception code
Exception Code | Abnormal reason | Decision criteria | Troubleshooting and solution |
| E01 | The Column of Failure | Disconnect barrier between column and control box | 1. Loosen the connection between the column and the control box. Check the connection line to ensure reliable connection 2. The column internal components are damaged, and the column needs to be replaced 3. Try to run the column, and if E01 disappears, troubleshoot |
| E02 | A work schedule function that triggers mandatory rest | It ran continuously for more than 2 minutes | After 18 minutes, try to run the table push and the fault code disappears |
| E04 | Initialization Anomaly | 1. Initialize interrupt 2. Tilt the table | After the initialization process is interrupted, it needs to be reinitialized. When initialization is complete, the fault code disappears |
| E05 | The key card to Death | The hand button is held by the card for 30 seconds | 1. The key of the handset is stuck. Check whether the key state is normal 2. Change the handset |
| E06 | Communication Interruption | The communication data of the control box cannot be received by the handset for 5 seconds | 1. The connection between the handset and the control box is broken. Check whether the connection between the handset and the control box is reliable 2. Check whether the control box is normal |
Why choose FAMISKY?
Many ergonomic office solutions come at a high cost. Our mission is to use innovation, creativity, and efficiency to produce a more affordable solution that doesn’t sacrifice quality and is easily accessible to the millions of home and office workers globally.
WARRANTY SERVICE
To provide the best service to you, don’t forget to register your FAMISKY product to confirm your warranty.
It only takes a few simple steps and then you can access a wide range of services such as technical support, new product alert, promotions, and warranty service from FAMISKY.![]() Send your name and order ID to [email protected]
Send your name and order ID to [email protected]
For more FAMISKY products, check out our website at: www.famisky-us.com


