
![]() Flush Mount Ceiling Light
Flush Mount Ceiling Light
SKU: 944727, 944728, 944729
Instruction Manual
BEFORE YOU BEGIN
We recommend consulting a professional if you are unfamiliar with installing electric fixtures. Signature Hardware accepts no liability for any damage to the property, the product or for personal injury during installation. Observe all local electrical building codes. Unpack and inspect the product for shipping damage. If any damage is found, contact our Customer Relations team via live chat at www.signaturehardware.com or by emailing [email protected].
GETTING STARTED
Ensure that you have gathered all the required materials that are needed for the installation.
ADDITIONAL QUESTIONS?
Still need help? Check out our Help Center at www.signaturehardware.com for product and warranty information, or contact us through live chat or by emailing [email protected].
FOR YOUR SAFETY
WARNING: Be sure the electricity to the wires you are working on is shut off, either the fuse is removed or the circuit breaker is shut off. You don’t need special tools to install this fixture. Be sure to follow the steps in the order given. Under no circumstances should a fixture be hung on house electrical wires, nor should a swag type fixture be installed on a ceiling which contains a radiant type heating system. Read instructions carefully, if you are unclear as to how to proceed, consult a qualified electircian.
TOOLS AND MATERIALS:
 | Light Bulb (A19 100 watt maximum) |
 | Safety Glasses |
 | Wire Stripper |
 | Step Ladder |
 | Phillips Screwdriver |
 | Flathead Screwdriver |
 | Wire Cutters |
 | Electrical Tape |
CARE INSTRUCTIONS
To clean, wipe fixture with a soft cloth. Clean glass with a mild soap. Do not use abrasive materials such as scouring pads or powders, steel wool or abrasive paper.
| Connect Black or Red Supply Wire (Lead Wire) to: | Connect White Supply Wire (Neutral Wire) to: |
| Black wire | White wire |
| *Parallel wire (round or smooth) | *Parallel wire (square or ridged) |
| Clear, brown, gold or black wire without tracer | Clear, brown, gold or black wire with tracer |
| Insulated wire (other than green) with copper conductor | Insulated wire (other than green) with silver conductor |
* When parallel wires are used, the neutral wire is ridged down its length and the other wire is round and smooth (see illus.).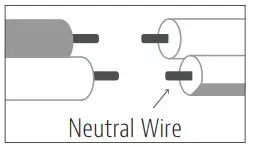 INSTALLATION (FIG. 1)
- Thread the mounting screws (C) into the matching holes in the mounting bar (B).

- Secure mounting bar (B) to the outlet box with outlet box screws (A).
- Connect the white wire from the fixture to the white wire from the outlet box and the black wire from the fixture to the black wire from the outlet box. Cover the two wire connections using the two provided wire connectors. Wrap the two wire connections with electrical tape for a more secure connection. Attach the grounding wire connections with electrical tape for a more secure connection. Connect he copper ground wires from the fixture and from the outlet box to the ground screw on the mounting bar.
Note: If you have electrical questions, consult your local electrical code for approved grounding methods. - After wires are connected, tuck them carefully inside outlet box. Raise the canopy (D) allowing for the mounting screws (C) to protrude through the key slots. Rotate the canopy (A) clockwise until the mounting screws (C) are in the narrow part of the key slots, and tighten with a screwdriver.

INSTALLATION (FIG. 2)
- Place the glass (H) on the bottom of the metal ring (E) then using the sheet metals (G) to compact the glass (H).
- Install light bulbs (Not provided). Please do not exceed the maximum wattage capacity recommended on the socket. We recommend the use of a clear light bulb.
- Raise the metal ring (E) to the canopy (D) and secure with the screws (F).
![]() 1.855.715.1800
1.855.715.1800
signaturehardware.com


