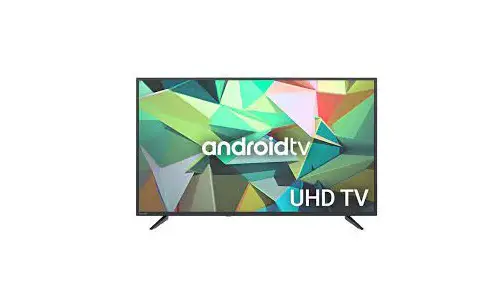
KALED43RT9220SVA 43-Inch 4K UHD HDR LED Smart TV
 43” 4K UHD HDR LED SMART TV
SERIES 9 RT9220 (KALED43RT9220SVA)
THIS USER GUIDE COVERS THE FOLLOWING MODELS
Kogan 43” Smart HDR 4K UHD LED TV (Series 9 RT9220)
SAFETY INFORMATION
The exclamation point within an equilateral
triangle is intended to alert the user to the
presence of important operating in the literature
accompanying the appliance.
The lightning flash with arrowhead symbol within
an equilateral triangle,is in tended to alert the
user to the presence of uninsulated dangerous
voltage within the products enclosure that may
be of sufficient magnitude to constitute a risk of
electric shock to persons.
CAUTION RISK OF ELECTRIC SHOCK
DO NOT OPEN
High, voltage are used in the operation of this product to
reduce the risk of elect shock,do not remove cover of the
cabinet, refer servicing to qualified service personal.
If the TV any changes or coarse adjustment, electric shocks
to be hurt, do not attempt to open a machine-maintenance,
customer contact centres needed overhaul.
IMPORTANT SAFETY PRECAUTIONS
1) Read these instructions.
2) Keep these instructions.
3) Heed all warnings.
4) Follow all instructions.
5) Do not use his apparatus near water.
6) Clean only with dry doth.
7) Do not block any ventilation openings. Install in accordance with the manufacturer’s instructions. 8) Do not install near any heat sources such as radiators, heat registers, stoves, or other apparatus (including amplifiers) that produce heat.
9) Do not defeat the safety purpose of the polarized or grounding-type plug. A polarized plug has two blades with one wider than the other. A grounding type plug has two blades and a third grounding prong. The wide blade or the third prong are provided for your safety, If the provided plug does not fit into your outlet, consult an electrician for replacement 5 TV Source setting of the obsolete outlet.
10) Protect the power cord from being walked on or pinched particularly at Plugs, convenience receptacles, and the point
How to turn off auto sleep function where they exit from the apparatus.
11) Only use attachments /accessories specified by the manufacturer.
12) Use only with the cart, stand,tripod, bracket or table specified by the manufacturer, or sold with the apparatus. When a cart is used caution when moving the cart/apparatus combination to avoid injury tip-over. 13) Unplug this apparatus during lightning storms or when unused for long periods of time. Caution: 14) To reduce the risk of fire or electric shock, do not expose this apparatus to rain or moisture. 15) The mains plug is used as disconnect device,the disconnect devices hall remain readily operable. 16) The socket-out shall be installed near the equipment and shall be easily accessible. ![]()
17) This product should never be placed in a built-in installation such as a bookcase or rack unless proper ventilation is provided or the manufacture’s instructions have been adhered to.
18) The apparatus shall not be exposed to dripping or splashing and that no objects filed with liquid, such as vases, shall be placed on the apparatus.
19) Do not place any sources of danger on the apparatus(e.g.liquid filled objects,lighted candles).
20) Wall or Ceiling Mounting-The appliance should be mounted to a wall or ceiling only as recommended by the manufacturer.
21) Never place the TV,remote control or batteries near naked flames or other heat sources, ![]() including direct sunlight.To prevent the spread of fire,keep candles or other flames away from the TV, remote control and batteries at all times.
including direct sunlight.To prevent the spread of fire,keep candles or other flames away from the TV, remote control and batteries at all times.
22) PThe USB terminal should be loaded with 0.5A under normal operation. These servicing instructions are for use by qualified service personnel only.To reduce the risk of electric shock do not perform any servicing other than that contained in the operating instructions. unless you are qualified to do so.
23) The battery shall not be exposed to excessive heat such as sunshine,fire or the like.
24) This equipment is a Class Il or double insulated electrical appliance.It has been designed in such a way that it does not require a safety connection to electrical earth
25) The maximum using environment temperature is 45 degrees. The Maximum using altitude is 2000 meters 2
COMPONENTS
![]()
![]()
![]()
![]()
![]()
A (KALE D75RT92 20SVA)
75″ SMART HDR 4K UHD LED TV
SERIES 9 RT9220
A Kogan 43” Smart HDR 4K UHD LED TV
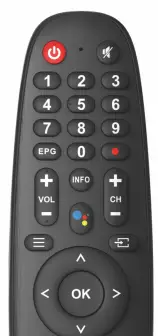
B Remote control
C Stand (x2)
D BA4 x 18mm screw (x4) E AAA battery (x2)
F Quick-start guide
G Warranty card
NOT INCLUDED Phillips head screwdriver, antenna cable, broadband internet connection.
Note: The following is only functional schematic, And the actual position and arrangement of different models may be different.
One key: Seven keys:
EXTERNAL DEVICE CONNECTION DIAGRAM
Press this button in standby mode to turn on/off the TV.
Terminal Interface
SOURCE/ MENU/ OK CH + / –
VOL + / –
Turn ON/OF Power.
External Signal Input Selection
Display Main MENU And Confirm MENU Item Selection. Selecting Channel.
Adjusting Volume.
DVD Set-top boxes
HDMI input connection
USB connection
AV input connection
Note: The following is a general guide to inputs and ports, your TV may not feature all of the below.
AV input
External Av Signal Input.
HDMI input
Digital signal input from HDMI
video connector.
ANT 75
Connect the antennal/cadle tv
input (75/VHF/UHF).
EARPHONE output
When earphones are plugged in, speakers are disabled.
USB input
Connect a USB device here to play its media files or to record programs via the PVR function.
OPTICAL output
Connect the SPDIF receiver.
LAN
LAN Connect the Internet.
AV input connection
TV connection
LAN
AV output connection LAN connection 4
TV INSTALL AND CONNECT
10cm
10cm 10cm
Set your TV
To put your TV on a firm place which can bear the weight of the TV.
To avoid danger, please don’t positions the TV near water or heating place (such as light, candle, heating machine),do not block the ventilation at the back of TV.
TV STAND INSTALLATION INSTRUCTIONS
1. Open the carton and remove the TV and scattered accessories and base (some models without base).
2. In order to avoid damaging the TV,please cover it with soft mattress, put it on the table,
FM ANT TV ANT
TV signal output Connect antenna and power
1.Connect the antenna cable to the antenna socket on the back of the TV.
2.To plug the power cord of TV (AC 100-240V~ 50/60Hz).
3.Connect the power supply, enter the standby mode (red light), press the power button of the TVor the power button on the remote control to turn on the TV
Note: Turn on TV face down on the soft material and screw the neck of the base to the TV.
3. screw the base and connected to the TV.
4. the installation is complete.
Note: Picture for reference purposes only. Please prevail in kind Picture for reference purposes only.
REMOTE CONTROL OVERVIEW
![]()
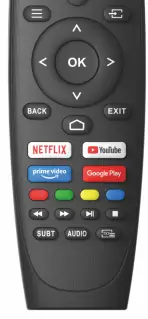
Switches the TV between on and standby mode
Microphone hole
Mute or restore TV sound
VOL + VOL
CH +
Increase the volume
Decrease the volume
Increase the program
BACK
Press these buttons to select items Press these buttons to select and adjust items
Go back to the previous step
Press these buttons according to different prompts
Press to fast reverse in USB mode Press to fast forward in USB mode
Figures 0-9 are used to directly input
CH
Decrease the program
Press to exit the OSD menuPress to play the video and press again to EXIT
EPG INFO
channel number
Press to display Electronic Program Guide and select the favorite channel
Press to start recording the program Press to info the source and channel’s info
Displays the OSD(On Screen Display) menu
Display/Select signal source options
To confirm the choice with program the highlighted
Displays the home screen
Connects to NETFLIX for viewing online TVshows and films(internet connection required).
Connects to YouTube (internet connection required).
pause the video
Hold on or off for current page display SUBT SUBT
Press to enter Teletext when play the program
Google Assistant
menu item
Accesso diretto a Amazon Prime Video
To open app homepage
AUDIO
Press to change the language when playing the stream which contains multi-language
INITIAL INSTALLATION
1. Initial Installation
1.3 Configure the network
The first time you switch the TV on, the initial step screen appears which guides you through the initial process. Please according to the Text Tips to finish initial installtion.
->Select wired or wireless to connect to internet.
->If you select skip, it could be performed in homepage or settings menu.
1.4 Google Account Sign in
1. 1 Language select
->Press /
remote control to select the language option,then click【OK】to confirm.
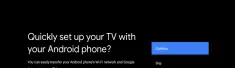
1.2 Quickly set up your TV with your Android phone? (Continue/skip) Steps:
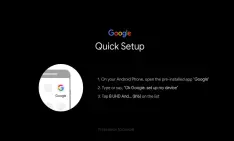
Sign in to get new apps,recommendations,movies,the Assistant,and more from Google.Two ways to login Google account:

1. On your Android Phone, open the Pre-installed app “Google”.
2. Type or say, “Ok Google, set up my device”.
3. Tap the model name on the list.
->Use your phone or computer:
1. Visit androidtv.com/setup on your phone or computer, Make sure your other
device is on the same Wi-Fi network as your Android TV ™
INITIAL INSTALLATION
2. Enter the display code on your phone or computer
![]()
![]()
![]() 1.7 Pairing Bluetooth Remote
1.7 Pairing Bluetooth Remote
-> Press’BACK ‘and ‘ VOL-
‘ simultaneously on remote control to enter the
->Use your remote:
Use the remote to enter your Google account and password to sign in to Google account.
1.5 Google setting
In these steps you will setup the Terms of Service, Location, Help improve Android, Google Assistant and additional Google functions.
1.6 Play Auto Installs
Select install or un-install he recommended apps and Google apps by using this process.
->Press “Continue” to the next setting page.
Bluetooth pairing mode. The Indicator light on remote control will flash when enter the pairing mode.
-> Press【OK】to begin pairing.
-> Press on remote control to skip the pairing mode.
INITIAL INSTALLATION
1.8 Country select
->Press /
on remote control to select the country option, then click【OK】to confirm.
Setup completed and Disclaimer Terms
1.9 1.10 Set the TV password for Parental Controls, “0000” is invalid. Select TV mode(Home/Retail)
Home mode is optimized for efficient energy usage for home use. Retail mode is optimized to store demo with fixed settings.
1.11 Chromecast built-in™
Select On/Off to make Chromecast built-in available.
1.12 TV Channel Setting
->Select Antenna/Cable/Satellite to scan TV channel. ->If you select skip, the channel scan could be performed in menu.
HOME
2. HOME
When initial setup is complete, the TV will enter the homepage by default, or press on remote control to display the homepage.
->Press / / / on remote control to switch between Google Assistant, Apps, Play Next, Netflix, YouTube, and more on the Homepage.
-> Press【OK】to enter.
Google Assistant
Use your voice to jump to shows,control devices,and more—with Google Assistant
Apps
List of downloaded and pre-loaded apps on your device
Play Next
Based on your watch history and includes next episode in a series or unfinished movies
Settings
Manage apps and TV controls, changepreferences, sounds,and account
Favorite apps
Quick access to frequently used apps
Channels
For easy content discovery
SETTINGS
3.Settings
Allows to set various performance of your TV.
-> Press / on remote control to select “Settings”which is in the upper right corner of the screen.
-> Press / on remote control to select the option which you want to adjust in the Settings menu.
-> Press【OK】to enter.
3.1 Network&internet
Adjust all network setting and check connection if you have connection problems. -> Press /
remote control to select “Network&internet” in the settings menu.
-> Press /
remote control to select:Wi–Fi/Add new network/Scanning always available/Proxy settings/IP settings.
3.2 Channel
-> Press / on remote control to select “Channel” menu.
->Press【OK】to enter”Parental Controls”, then click / or use the number buttons on remote control to enter your PIN(Password for Parental Controls).
3.3 Device Preferences
-> Press /
on remote control to select “Device Preferences”.
-> Press / on remote control to select the options of About, Date & time, Timer, Language, Inputs, Picture, Sound, Google Assistant, Reset,etc.
SETTINGS
->Press【OK】to jump to the corresponding sub-option.
3.3.1 About
-> Press /
on remote control to select “About”.
-> Press /
on remote control to check additional information such as System update, Device name, Restart, Status, and more.
-> Press on remote control to return to the previous menu. Press on remote control to exit the menu.
3.3.2 Reset
If select reset, it will erase all data from your device’s internal storage, including: your Google account, System and app data and settings, and downloaded apps. -> Press / on remote control to select “Reset”.
-> Press /
on remote control to select “Cancel” or “Erase everything”. 12
APP INSTALL/MOVE/UNINSTALL 4 App Install/Move/Uninstall
–>Press /
on remote control to select”Apps”on Homepage, then click 【OK】to enter.
-> Select “Get more apps” and input app name.
-> Select “search” which is in the upper right corner of the page.
Example for “Facebook”
4.1 Install
->Input “Facebook”, find “Facebook”App will show in the list, then click【OK】 to select it.
->Select “Install”,when completed select to open or Uninstall.
4.2 Move
->Select” Facebook”, press and hold【OK】on remote control, then click / remote control to select”Move”
-> Press / / / on remote control to move, then click【OK】to confirm.
4.3 Uninstall
->Select “Facebook”, press and hold【OK】on remote control, then click / on remote control to select”Uninstall”.
-> press【OK】to uninstall.
![]() TV SOURCE SETTING
TV SOURCE SETTING
5 TV source setting
The way to enter TV source in Homepage:
->Press on remote control or Select”Live TV”on Homepage.
->Press on remote control.
->Press on remote control to select”Channels”and select”New Channels Available”to enter.
13 HOW TO TURN OFFAUTO SLEEP FUNCTION Menu – > Settings – > Device Preferences -> Power – > Off
SPECIFICATIONS
Audio
Speakers
Connectivity
Ethernet (RJ45)
HDMI
HDMI-ARC
HDMI-CEC
USB
Wi-Fi
Dimensions
Distance Between Legs
Without Stand
With Stand
VESA Wall Mount Pattern Weight
Display
Colours
2 x 10W
Yes
2.0
Yes | HDMI 1
Yes | HDMI 1, HDMI 2, HDMI 3 2 x USB 2.0
IEEE 802.11a/b/g/n/ac
863.9mm
970.1 x 563.9 x 81.7 mm 970.1 x 611.2 x 208.1 mm 200 x 200
8.5kg
1.07G
USB Media Playback
USB Media Playback Formats
Inputs
Composite (AV)
HDMI
Outputs
Optical Audio Out
Performance
CPU
GPU
OS
RAM
Storage Capacity
Power
Average Consumption Energy Consumption Energy
Yes
JPG, JPEG, PNG, BMP, MP3, DD, DD+, AAC, MPG, MPEG4, H.265, VP9 (4K@60P)
1
3
1
ARM CA55 Quad Core with TEE1.2GHz Mali-470 MP3
Android 9.0
1.5GB
8GB
90W
194kWh per year
Computer Supported Resolutions 640×360, 853×480, 1024×576, 1280×720, 1366×768, 1920×1080, 3840×2160 (@60Hz)
Rating
Tuning And Signal
5.5 Star
Contrast Ratio Native Aspect Ratio Refresh Rate
Resolution
Response Time Size
Viewing Angle
Features
EPG
HDCP
TV Resolution
5000:1
16:9
60Hz
3840 x 2160 8.5ms
43”
178°/178°
Yes
Yes | 2.0
4K UHD
Tuner Type Notes:
DVB-T/T2/C
Browser
• Design and specifications are subject to change without notice.
No
• Weight and dimension shown are approximate.
15
TROUBLESHOOTING
Common fixes
Many minor issues can be resolved by hard resetting, or power cycling the unit or upgrading the firmware.
To perform a hard reset, or power cycle, please use the following steps. • Unplug it from the main power socket and leave it for 10-15 minutes.
• Press and hold the power button on the TV for 5 seconds.
• Connect the TV back to the power and turn it on.
Poor picture and sound quality
• Try a different channel
• Adjust the antenna
• Check all connections
No picture or sound in TV status
• Try another channel
• Press the TV/AV button
• Make sure TV is plugged in
No colour, wrong colour or tints
• Make sure the program itself is broad cast in colour
• Select the picture menu, then adjust the colour and tint submenus
Blurred or snowy picture, distorted sound
• Check direction, location and connections to your antenna
• Issues may be caused by the use of an indoor antenna (poor signal)
Remote control malfunctions
• Replace remote control batteries
• Check battery terminals
• Remote is out of range, move closer to TV
• Remove any obstructions between remote and IR sensor of TV
• Make sure the power cord to your TV is
Care & maintenance
Unplug the television from the power supply before cleaning. Do not use any liquid cleaners or harsh chemicals. Always use a soft, damp cloth.
Cleaning the screen
Wet a soft cloth in a mixture of lukewarm water and a little fabric softener or dish washing detergent. Wring the cloth until it’s almost dry, and then use it to wipe the screen.
Make sure the excess water is off the screen, and then let it air-dry before you turn on your TV.
Cleaning the casing
To remove dirt or dust, wipe the TV casing with a soft, dry, lint-free cloth. Please be sure not to use a wet cloth.
• Check the antenna connection plugged in and turned on
For our full TV troubleshooting guide,
No sound or sound is too low at maximum volume
• Check the volume settings on any external speakers connected to your television
• Adjust the TV volume accordingly
• Check another channel or input
• Check that MUTE hasn’t been turned on
Picture rolls vertically
Image is not centred on the screen
• Adjust the horizontal and vertical position “No Signal” on HDMI source
• Test the device with a different HDMI cable
• Plug the device into another HDMI port
• Try a different device connected to the same cable and port head online to help.kogan.com
• Check all connections
Perform a factory reset on your TV
© Copyright 0221, Kogan.com – KALED43RT9220SVA
16


