
 DS18 Hydro Full Range Digital Marine Monoblock AMP
 INTRODUCTION
The DS18 NXL marine amplifiers offer high quality audio reproduction for the audiophile and the everyday listener a like. All models feature fully variable crossovers with 12dB per octave slopes, allowing you the ability to tailor the sound to best fit the speakers and your listening preferences. Fully Variable Crossovers: Fully variable crossovers promote installation ease and save the cost of outboard crossovers. Additionally, they may be used in conjunction with outboard passive or active crossovers, depending on the complexity required by the system. The 12 dB per octave slope offers steep roll-off above or below the selected frequency.
Protection Circuitry: Against Overload, Short Circuit, Thermal, and Reverse Polarity. These Protection features are designed to protect the amplifier from misuse, as well as from common causes of amplifier failure.
INSTALLATION
Professional installation by an authorized DS18 NXL marine amps dealer is highly recommended! Otherwise, the performance of your new gear may not be satisfactory. In the event that you decide to do your own installation, please read and follow this manual very carefully. Failure to do so may compromise the integrity of this product, your automobile, and possibly void the product warranty. Select a location that will provide adequate ventila-tion for the amplifier. Avoid mounting the amplifier with the fins facing down. The fins should be facing up, either vertically or horizontally. Secure the amplifier with the screws provided.
WARRANTY!
Before securing the amplifier, inspect the mounting location carefully to ensure that you do not drill into or damage any electrical, hydraulic, fluid, or fuel lines.
Input Section (Waterproof RCAs Harness)
Because of the wide range of head unit output configurations all DS18 NXL marine amps have an adjustable input sensitivity of “Gain”. The gain is not a volume or a power limiting control like a throttle. It makes the amp more sensitive to input from the stereo. With the gain up the amp will reach full output at a lower volume setting on the deck. At higher gain settings the amp also becomes more sensitive to noise from the car’s electrical system. Try to run the gain at the lowest setting possible for your system.
There is no correct gain setting Because speakers require different power demands to reach the same output the gains most often need to be used to compensate for these differences. If you tried to set all the gains at half way you would probably find the system didn’t sound very good. Using good judgment and listening carefully to each speaker is still the best way to tune a system.
Input Section (Waterproof RCAs Harness)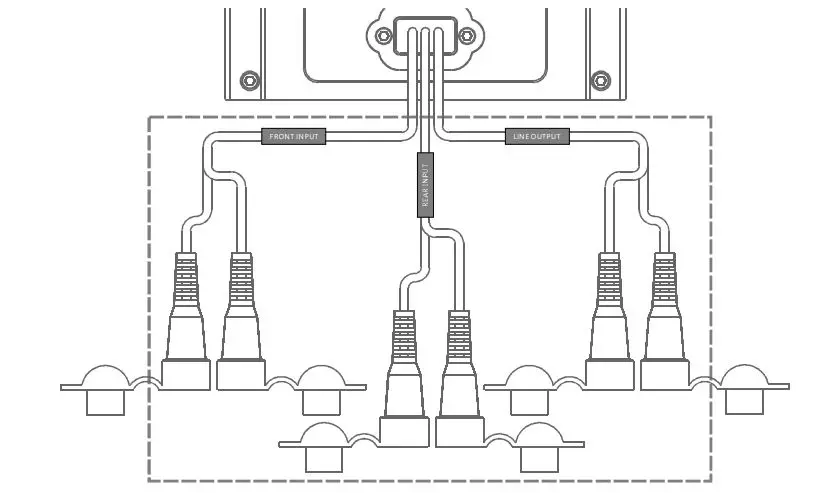
Top Crossover controls
A crossover is a device that removes unwanted frequencies from a speaker or amplifier.A tweeter can easily be destroyed by bass notes if they are not filtered out.Likewise, a subwoofer will not sound natural if it is playing midrange notes.A crossover removes these sounds from the speaker.As you might guess,careful adjustment in need to ensure that all the speakers are playing the right sounds and that you are left with no “holes” or low spots in the frequency response.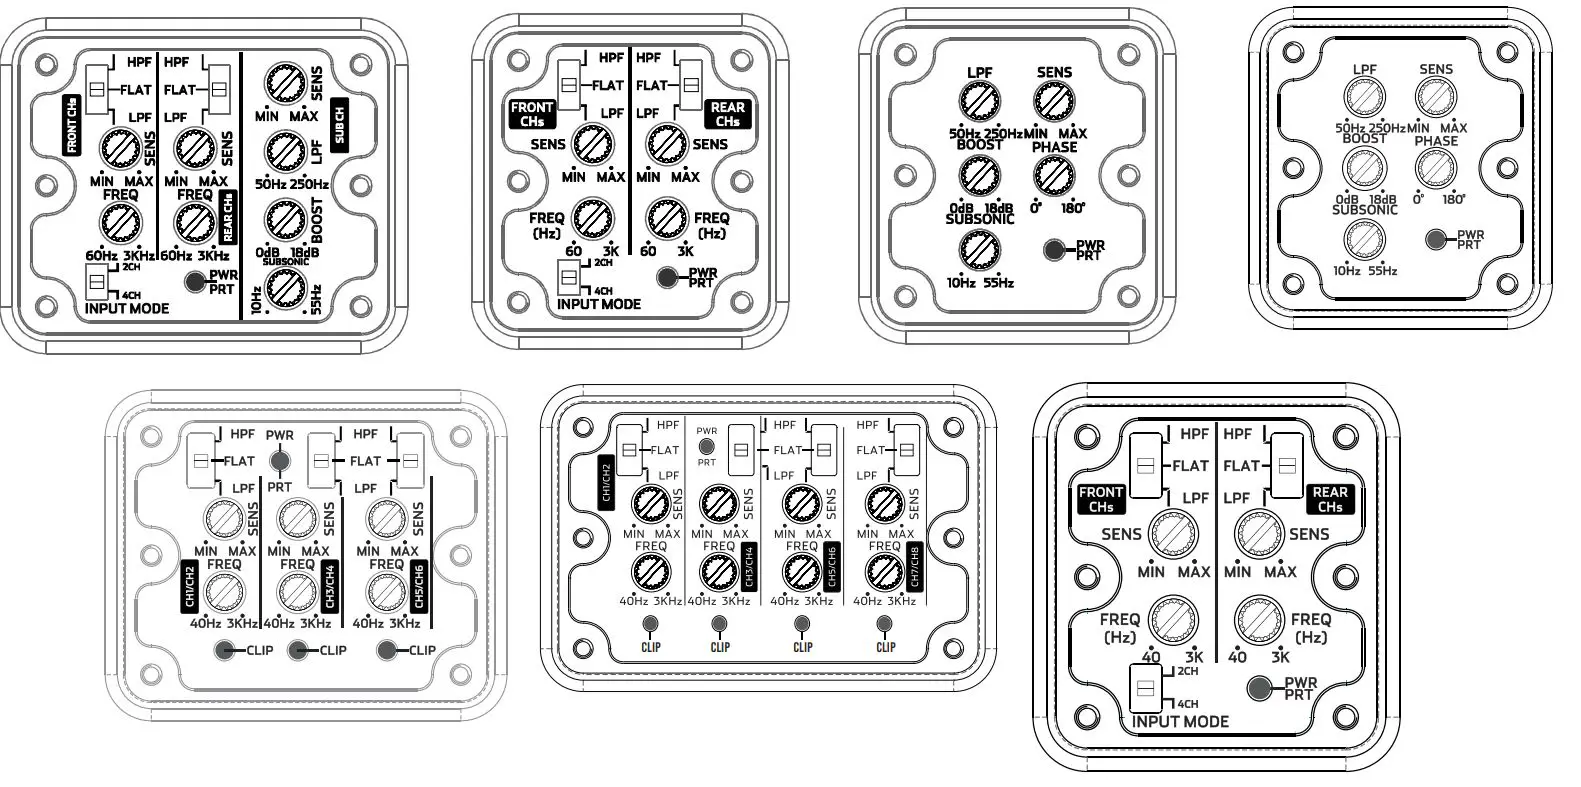 BASS BOOST
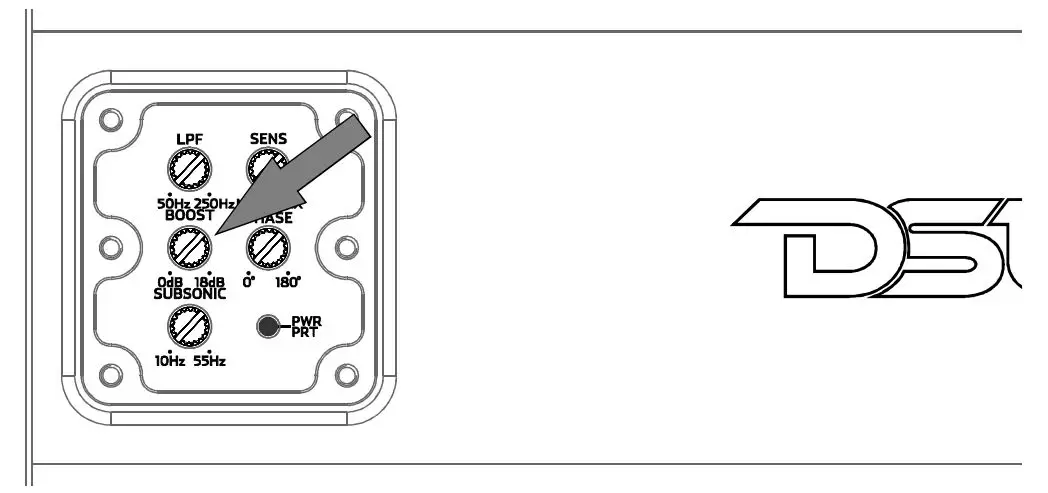
DS18 NXL600.1D, NXL800.5D & NXL1100.1D marine amps have an adjustable bass boost.Begin your adjustments at low volume.If you do not hear any improvement then woofer does not need any BASS BOOST. The Low Pass Filter(LPF) must be switched on for the bass boost to activate. Use Bass Boost carefully.The demands on power output are tremendous.Try to minimize the use by changing the woofer`s position or the enclosure size.
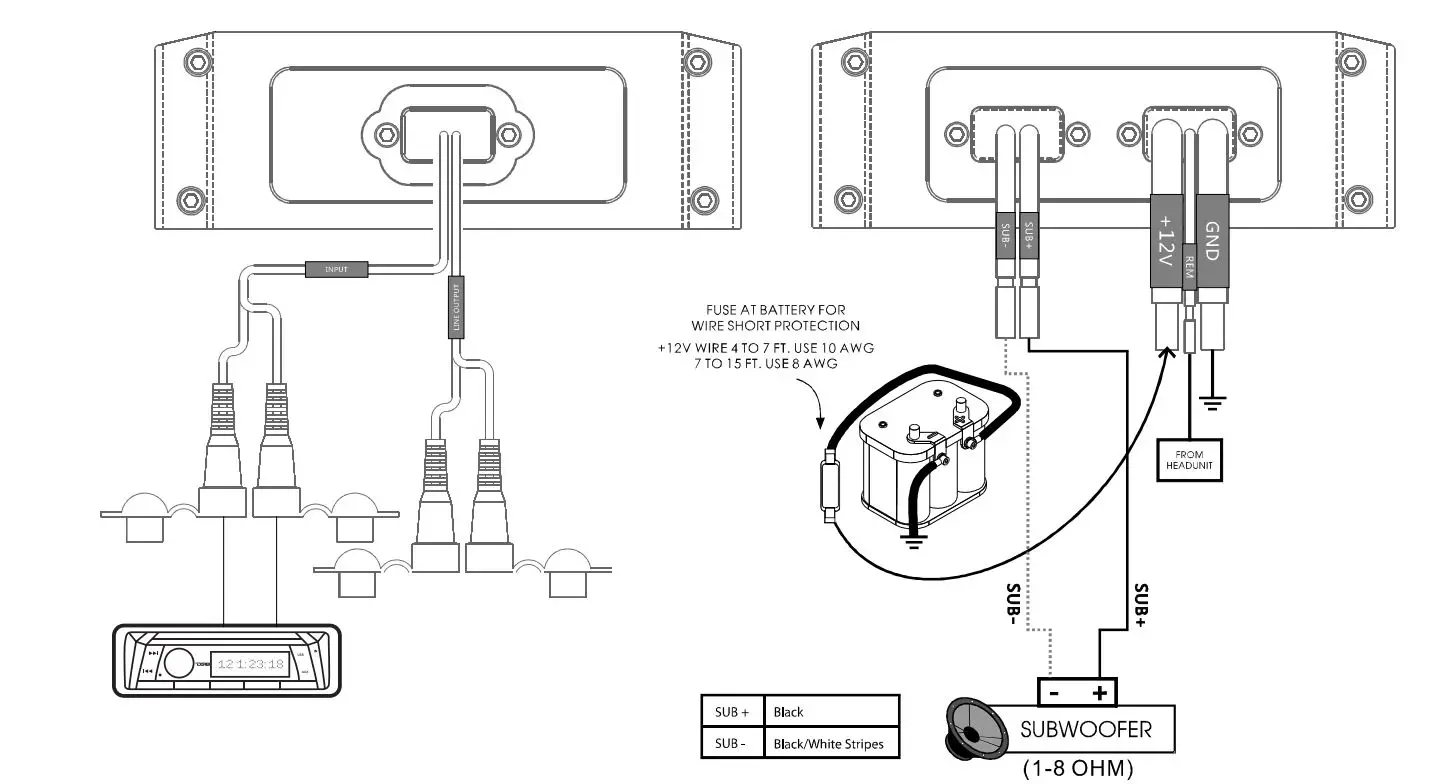
SPEAKER OUTPUTS
This amplifier is a multi channel amplifier design; meaning it has more than one channel of speaker outputs. It is equipped with an over-mold harness. Connect this carefully and neatly; strip your wire back and twist the exposed leads and use an insu-lated waterproof marine connector. If the wires ever come in contact with each other the amplifier will go into protection mode. Know your total ohm load before you make any connections.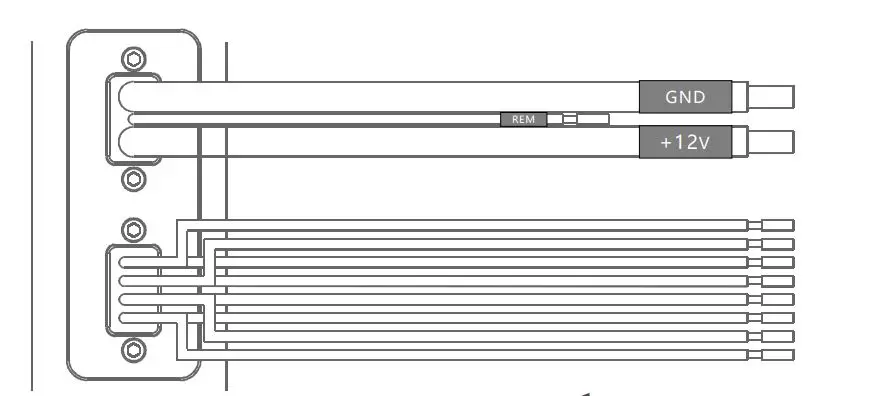
INSTALLATION INSTRUCTIONS
- Before you start, disconnect the negative cable from the car battery Tape up the end so it is iso-lated from the battery.
- Run an appropriate gauge wire from the battery to the amplifier. Plan this part of the installation carefully. This cable will carry very high current. If it should short to the body and it is not properly fused it could catch fire.
- Connect the power wire to the battery using a fuse capable of the total current load of all amplifi-ers connected Don’ t install the fuse yet. Wait until the end. Locate the fuse as close as possible to the battery If the fuse is further than 18 inches (wire length) from the battery you should reevaluate the wire and fuse placement.
- Find the closest clear metal area to the amp for a ground. Sand, grind or scrape all paint and under-coating from the body and screw the ground securely in place.
It is advisable to test the ground with an ohmme-ter between the ground cable and the negative battery cable to ensure a good low resistance connection. Some alloys used in modern cars do not offer the best ground. If you believe this is the case- first consult with the vehicle manufacturer.
- Run the speaker wire to the speakers. It is advised that you leave some extra wire at this point. You can fix it later.
- If you haven’t done so already, mount the amp now.
- Connect the power and ground to the amplifier. Only after this step – you should install the fuse at the battery.
- Connect the remote wire from the head unit to the amplifier. Now is a good time to turn on the amp for the first time. Make sure it turns on prop-erly and does not go into protection mode.
- Connect the speaker wires to the amp and speakers (make sure the amp is off first). Make sure the polarity(+add-)is correct.
- Connect the RCA S to the amp.
- Double-check the amplifier controls at this time. Make sure everything is set correctly for your system.
- Now you`re ready to play it for the first time. It is best to leave the gain all the way down at first. Start with the head unit volume low and work your way up.
- Now you can tune the amp. Take your time and make only one adjustment at a time. It may take some time to get the system fully adjusted. During this time the amp is drawing current from the bat-tery. You should check the battery voltage from time to time and re-charge it if it gets low. That’s it. You’re done. Now have fun!
SPECIFICATIONS
| MODEL NO. | NXL200.2D | NXL400.4D | NXL600.1D | NXL800.5D |
| POWER OUTPUT AT 4 OHM | 100Wx 2 | 100Wx 4 | 250W | 80Wx4+200W |
| POWER OUTPUT AT 2 OHM | 150Wx 2 | 150Wx 4 | 400W | 125W x 4+300W |
| POWER OUTPUT AT 1 OHM | – | – | 600W | NOT RECOMMENDED |
| POWER OUTPUT AT 4 OHM BRIDGED | 300Wx 1 | 300Wx 2 | – | 250Wx 2 (Front/Rear) |
| Waterproof Level | IPX65 | IPX65 | IPX65 | IPX65 |
| TOTAL HARMONIC DISTORTION | 0.07% | 0.07% | 0.07% | 0.07% |
| S/N RATIO REF 1W AT 4OHM | >90dB | >90dB | >90dB | >90dB |
| GAIN RANGE | 0.2V-5.0V | 0.2V-5.0V | 0.2V-5.0V | 0.2V-5.0V |
| CROSSOVER RANGE | 40Hz-3KHz | 40Hz-3KHz | 50Hz-250Hz (LPF only) | 40Hz-3KHz(Front/Rear) 50Hz-250Hz(Sub) |
| FREQUENCY RANGE | 20Hz-20KHz | 20Hz-20KHz | 40Hz-500Hz | 20Hz-20KHz |
| BASS BOOST | N/A | N/A | 0dB-18dB | 0dB-18dB |
| INPUT/OUTPUT/POWER | HARNESS OVERMOLD | HARNESS OVERMOLD | HARNESS OVERMOLD | HARNESS OVERMOLD |
| DIMENSIONS(Lx125x42MM) | 192MM 7.56” | 245MM 9.65” | 215MM 8.46” | 295MM 16.1” |
| MODEL NO. | NXL850.4D | NXL900.6D | NXL1000.8D | NXL1100.1D |
| POWER OUTPUT AT 4 OHM | 200W | 160W | 130W | 1100W |
| POWER OUTPUT AT 2 OHM | 300 W | 240W | 200W | 900W |
| POWER OUTPUT AT 1 OHM | – | – | – | – |
| POWER OUTPUT AT 4 OHM BRIDGED | 500W | 400W | 360W | 600W |
| Waterproof Level | IPX65 | IPX65 | IPX65 | IPX65 |
| TOTAL HARMONIC DISTORTION | 0.07% | 0.07% | 0.07% | 0.07% |
| S/N RATIO REF 1W AT 4OHM | >95dB | >95dB | >95dB | >95dB |
| GAIN RANGE | 0.2V-5.0V | 0.2V-5.0V | 0.2V-5.0V | 0.2V-5.0V |
| CROSSOVER RANGE | 40Hz-3KHz | 40Hz-3KHz | 40Hz-3KHz | 40Hz-3KHz |
| FREQUENCY RANGE | 20Hz-20KHz | 20Hz-20KHz | 20Hz-20KHz | 20Hz-20KHz |
| BASS BOOST | N/A | N/A | N/A | 0dB-18dB |
| INPUT/OUTPUT/POWER | HARNESS OVERMOLD | HARNESS OVERMOLD | HARNESS OVERMOLD | HARNESS OVERMOLD |
| DIMENSIONS(Lx125x42MM) | 295MM 16 .1” | 295MM 16 .1” | 320MM 12.59” | 265MM 10.43” |
NXL200.2D
2CH/200W RMS Full Range Digital Marine Amplifier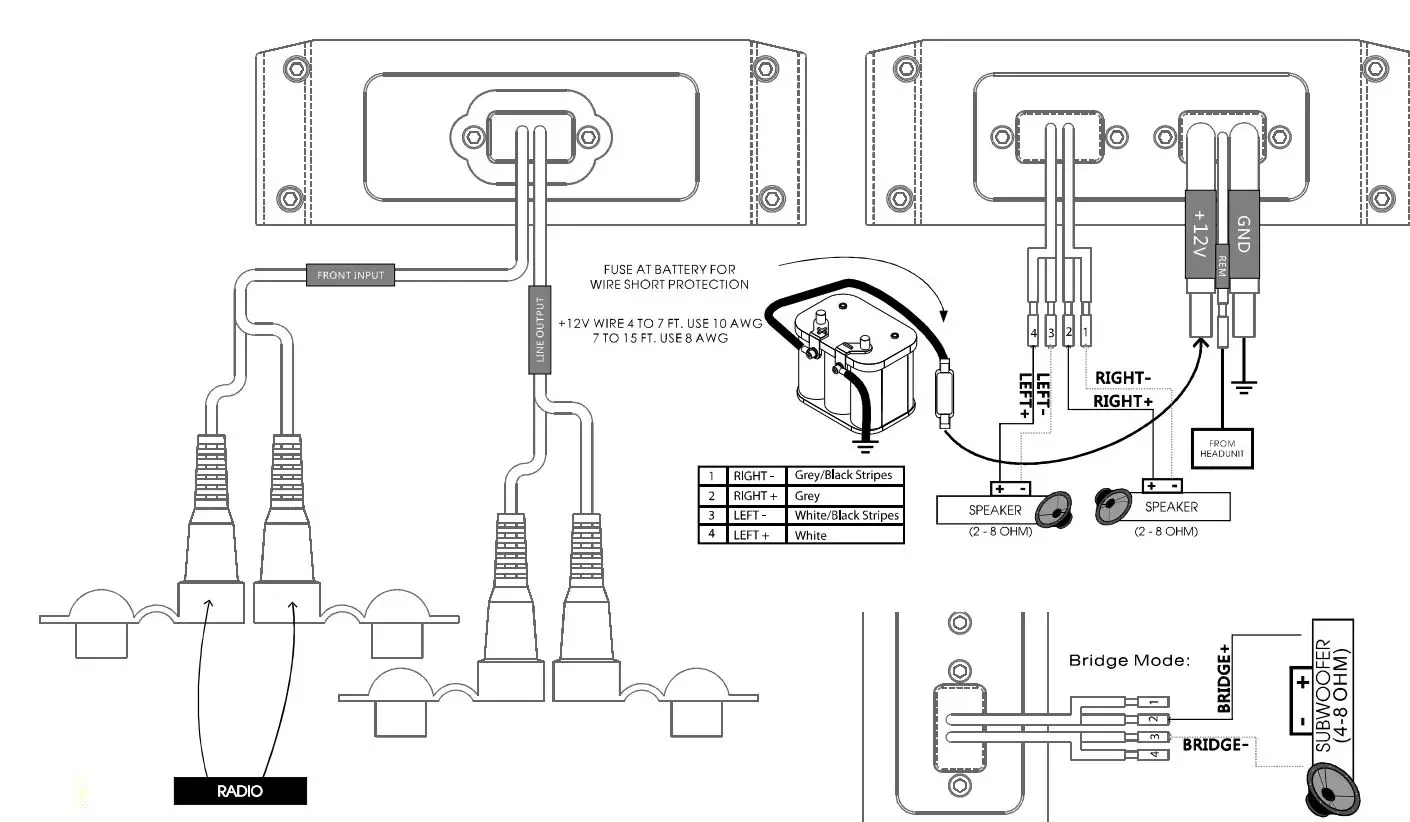
NXL600.1D
1CH/600W RMS Class-D MonoBlock Marine Amplifier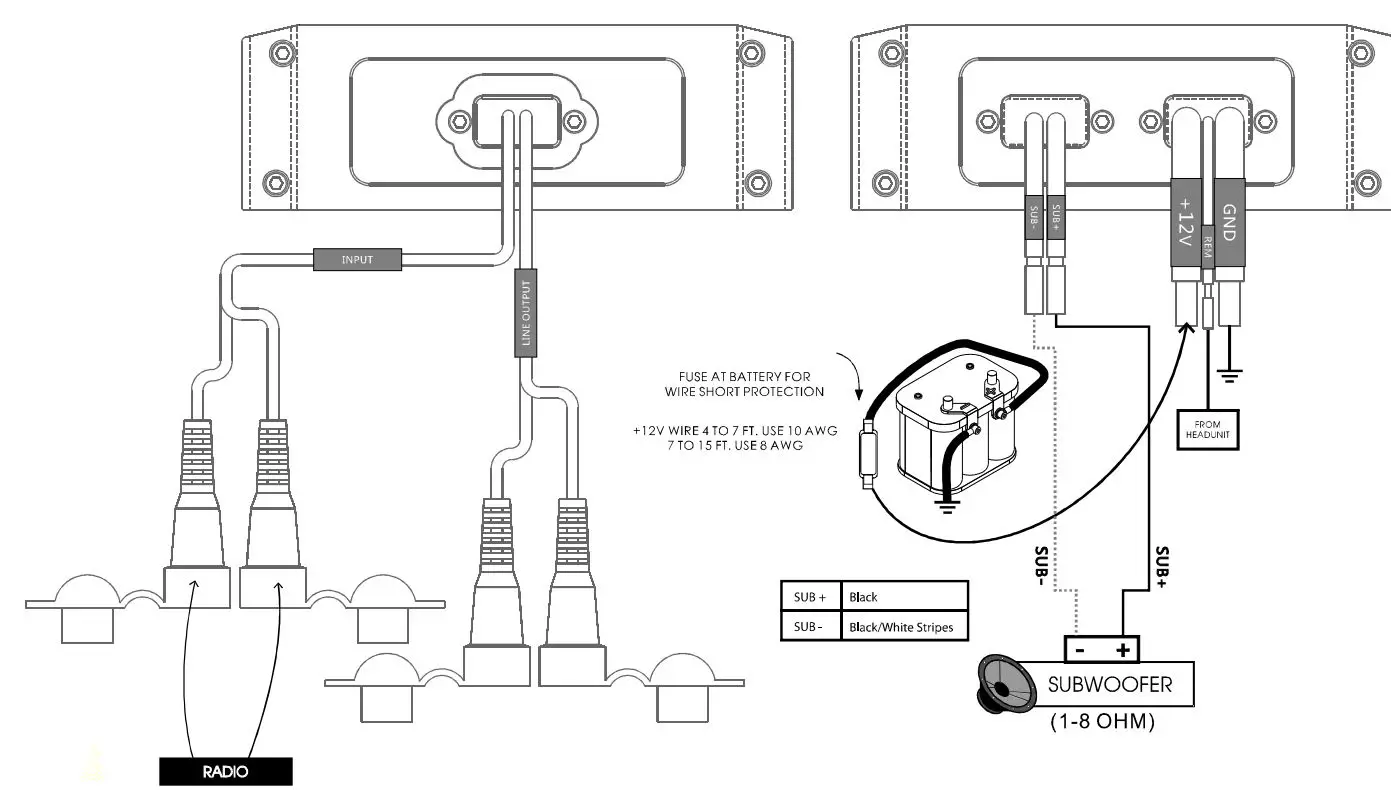 OXLHOD4D
4CH/40OW RMS Full Range Digital Marine Amplifier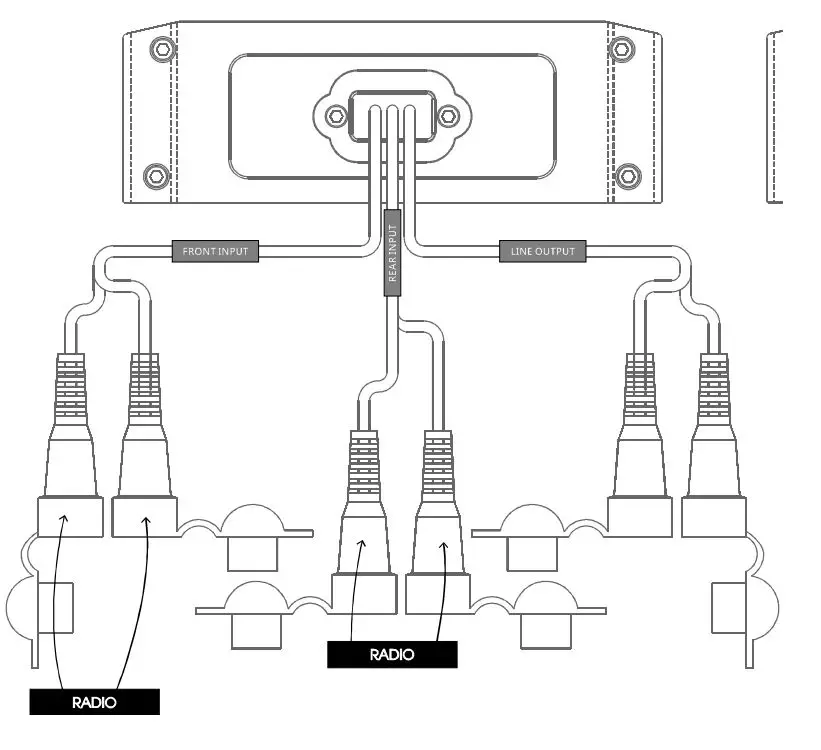
| 1 | FR+ | Grey | 5 | RR+ | Purple |
| 2 | FR- | Grey/Black Stripe | 6 | RR- | Purple/Black Stripe |
| 3 | FL- | White/Black Stripe | 7 | RL – | Green/Black Stripe |
| 4 | FL+ | White | 8 | RL+ | Green |
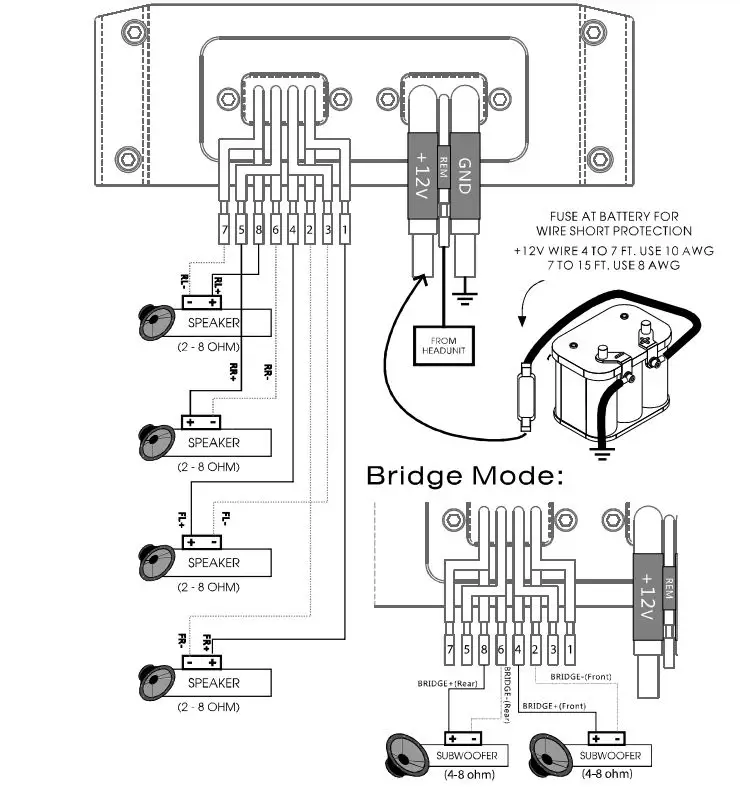
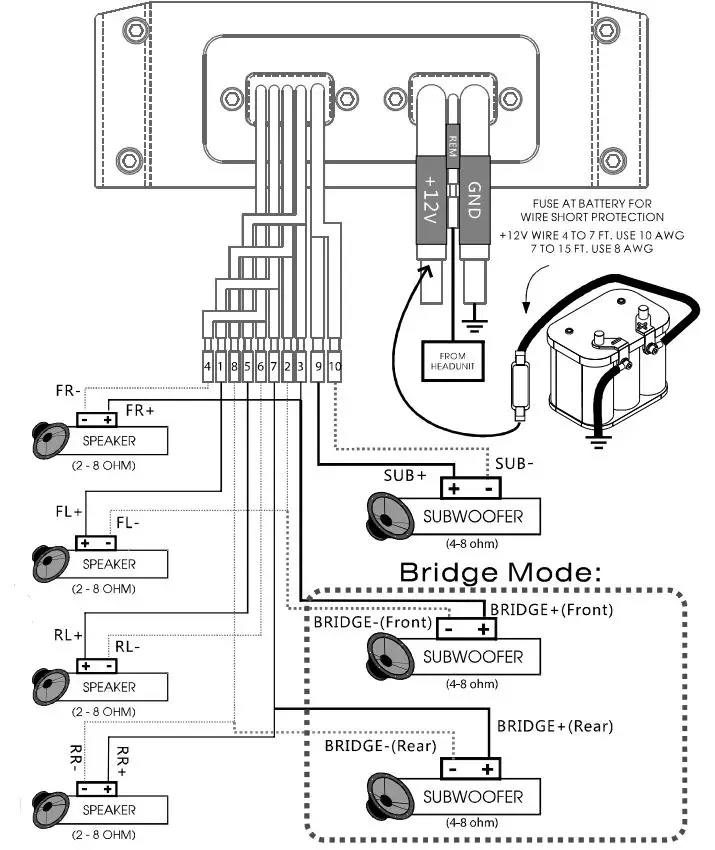
OXLBO05D
5CH/800W RMS Full Range Digital Marine Amplifier
| 1 | FL+ | White | 6 | RL- | Green/Black Stripe |
| 2 | FL – | White/Black Stripe | 7 | RR+ | Purple Stripe |
| 3 | FR+ | Grey | 8 | RR- | Purple/Black Stripe |
| 4 | FR- | Grey/Black Stripe | 9 | SUB+ | Black |
| 5 | RL+ | Green | 10 | SUB- | Black/White Stripe |
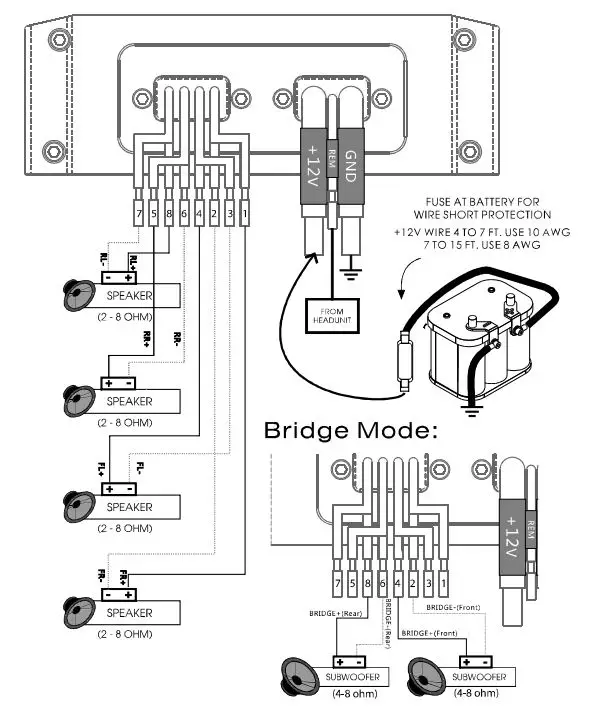
XLESO4D
4CH/850W RMS Full Range Digital Marine Amplifier
| 1 | FR+ | Grey | 5 | RR+ | Purple |
| 2 | FR- | Grey/ Black Stripe | 6 | RR- | Purple/Black Stripe |
| 3 | FL- | White/Black Stripe | 7 | RL- | Green/Black Stripe |
| 4 | FL+ | White | 8 | RL+ | Green |
nXLOO6D
6CH/ 900W RMS Full Range Digital Marine Amplifier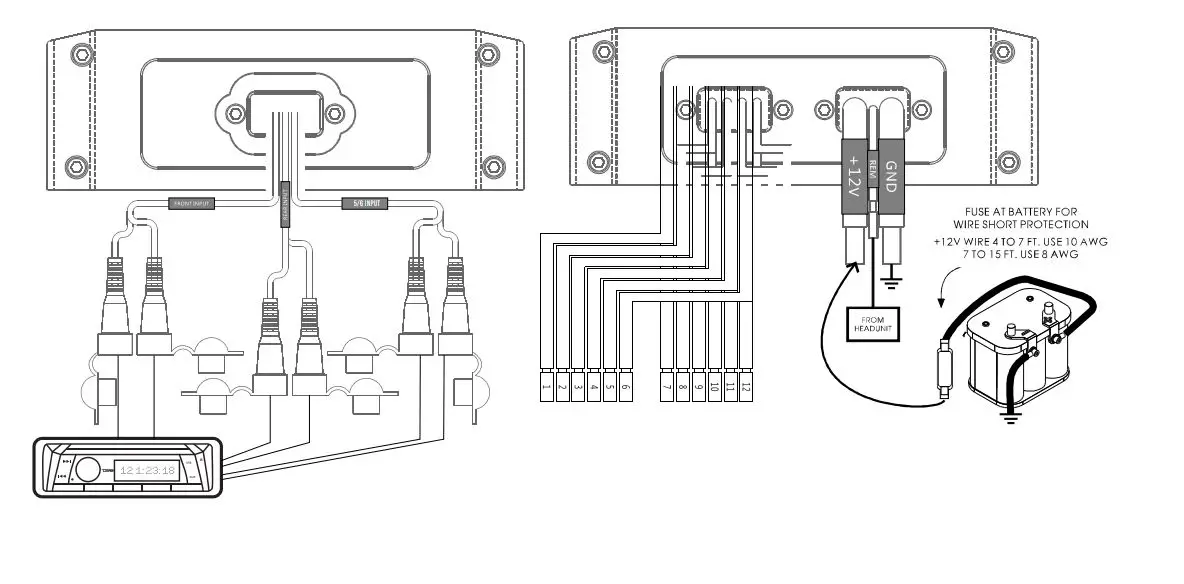
XLIOOD
1CH/110oW RMS Class-D MonoBlock Marine Amplifier
OXLIOO08D
8CH/ 1000W RMS Full Range Digital Marine Amplifier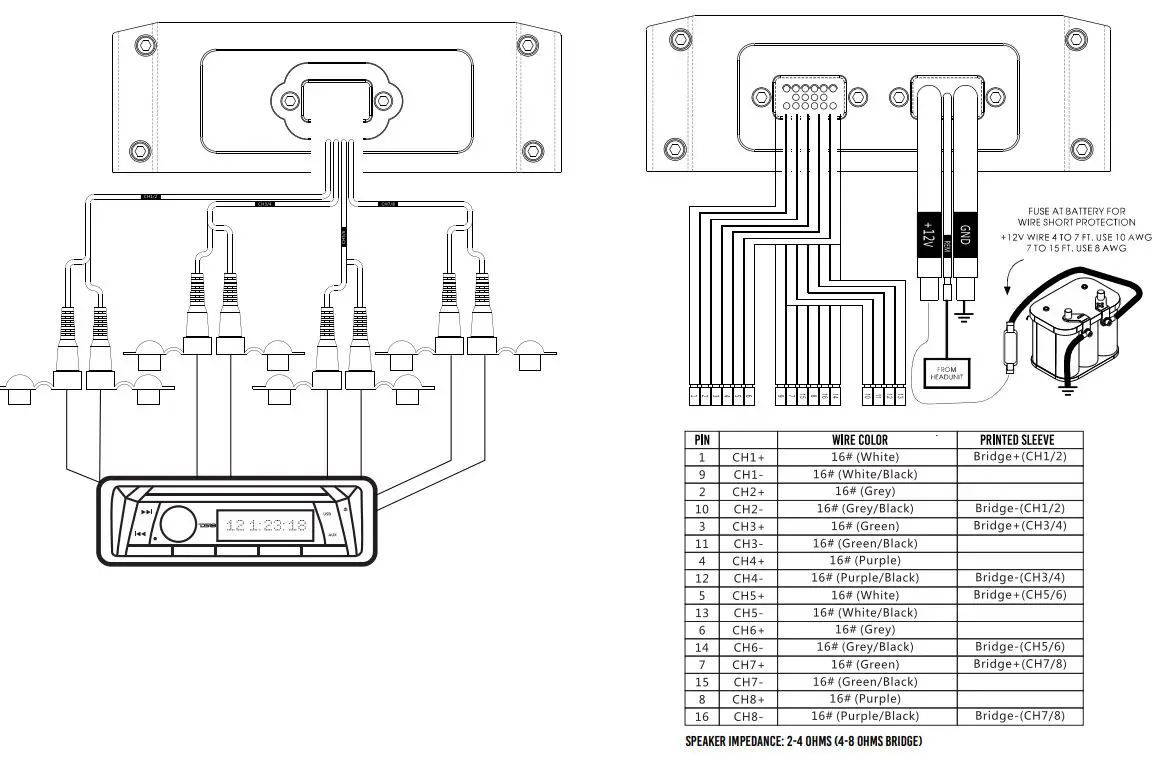
WARRANTY
Should your amplifier require service
Please consult with the dealer from which it was purchased,or contact DS18 Local Dealer.
Do not attempt to return your amplifier directly to us without first calling for a Return Authorization Number. Units received without an accompanying Return Authorization Number will be processed more slowly. Additionally, you must include a copy of your purchase receipt from an authorized dealer for consideration of in-warranty service; otherwise repair charges will apply.Units received without a receipt will be held for 30 days, allowing us time to contact you and obtain a copy of the receipt. After 30 days,all units will be returned without repair.


