AIE CDUSB-DELUXE USB Integrated Kit Universal Connection Guaranteed
INTRODUCTION
THIS SECTION WILL COVER THE PROPER MOUNTING ORIENTATION/POSITION AND ANGLE OF YOUR NEW CD PLAYER. THE UNIT MUST BE AFFIXED TO A SOLID SURFACE VIA THE PROVIDED ADHESIVE PAD. PLEASE FOLLOW THESE PRECISELY TO ENSURE PROPER FUNCTIONALITY AND FITMENT.
**FAILURE TO COMPLY VOID WARRANTY, CAUSE DAMAGE TO THE UNIT AND CREATE IMPROPER PERFORMANCE AND SOUNDS**
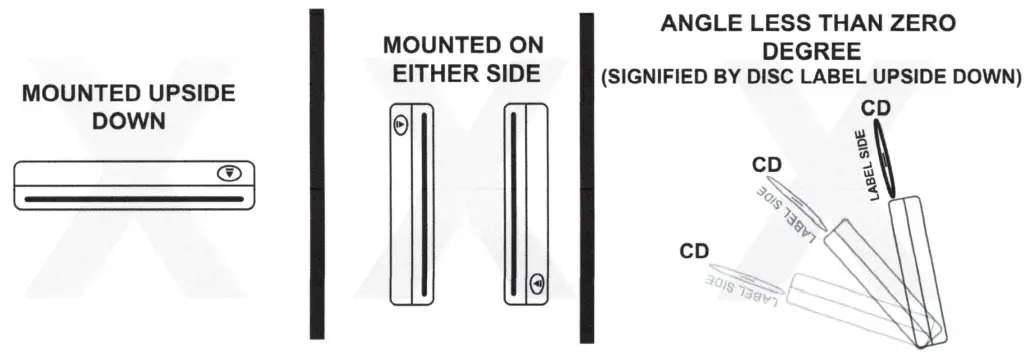
INSTALL POSITIONING ***CORRECT***
STEP 1 WHEN CHOOSING A PROPER LOCATION FOR YOUR CD PLAYER, YOU MUST ENSURE THAT THE UNIT WILL BE FREE FROM DUST, EXCESSIVE VIBRATIONS OR ERRATIC ENVIRONMENTS SUCH AS EXTREME HEAT FROM IN-VEHICLE COMPONENTS (HEATER VENTS ETC.)
STEP 2 ONCE CHOSEN, MAKE SURE THE MOUNTING POSITION IS WITHIN COMPLIANCE AS REQUIRED BY THE MANUFACTURER. THIS IS AS FOLLOWS:
HORIZONTAL POSITION IS DEFINED AS CD SLOT BEING ON THE TOP SIDE OF THE UNIT WITH THE ARROW PORTION OF THE EJECT BUTTON POINTING UP
VERTICAL POSITION IS DEFINED AS CD SLOT FACING UP. UNIT ANGLED NO GREATER THAN ZERO DEGREES (PERFECTLY STRAIGHT & UPRIGHT) THE MOUNTED ANGLE MUST **NOT** EXCEED PAST ZERO DEGREES TO AVOID DAMAGE/ABUSE TO THE UNIT AND CAUSE UNIT TO POSSIBLY MAKE IMPROPER FUNCTIONING SOUNDS.
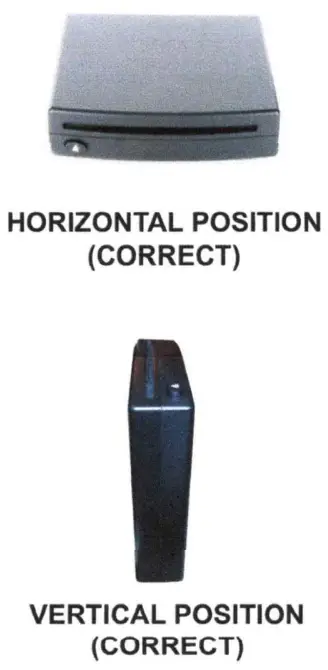

ANY ANGLE ZERO TO 90 DEGREES (CORRECT)
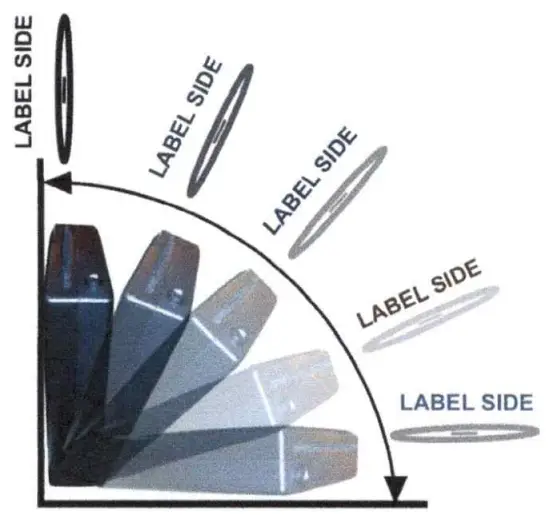
INSTALL POSITIONING ***NOT CORRECT***
INSTALLATION
Thank you for your purchase of the USB CD player kit. This unit has 3 methods of installation and is based on the configuration of your vehicle. Please reference each of the 3 installation techniques to find the proper one that suites your vehicle. Please ensure that you are only utilizing the parts intended for your vehicle configuration to ensure proper functionality.
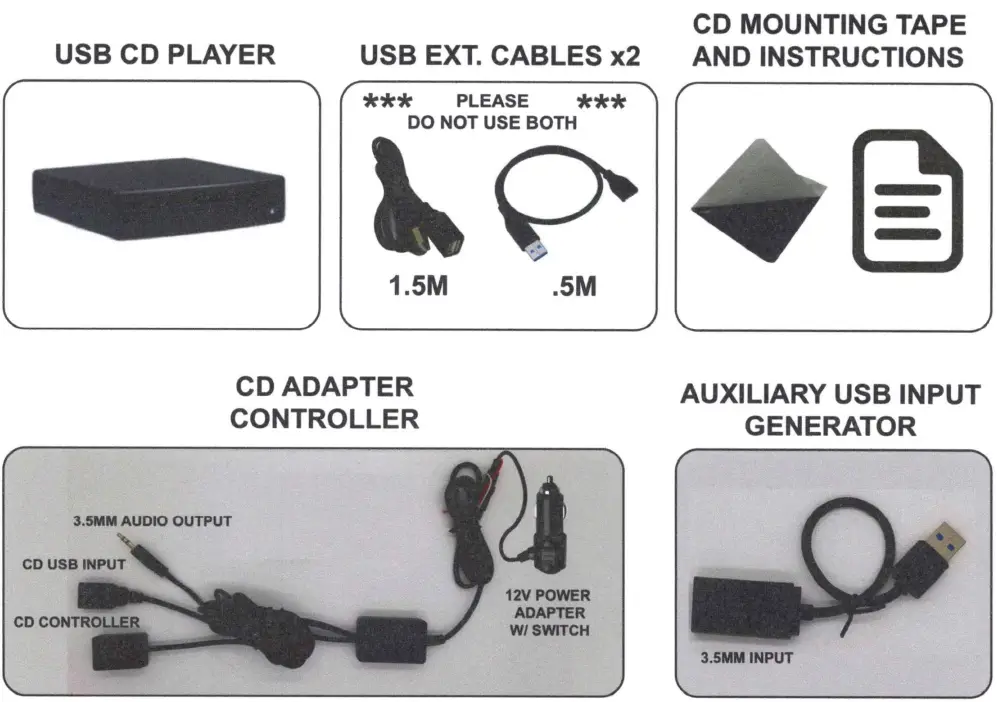
KIT CONTENTS
INSTALL ATION ADVISORY
PLEASE DO NOT ATTEMPT INSTALL ATION WITHOUT READING THES INSTRUCTIONS FIRST. FOR QUESTIONS REGARDING THIS INSTALLATION OR YOUR CONFIGURATION, PLEASE CONTACT YOUR AUTHORIZED DE ALER FOR FURTHER DETAILS AND PRODUCT SUPPORT.
PLEASE READ EACH OF THE 3 INSTALLATION CONFIGURATIONS CAREFULLY TO IDENTIFY WHICH IS BEST SUITABLE FOR YOUR VEHICLE. THIS SECTION WILL COVER INSTALL OPTION 1 OF 3 WHICH IS A DIRECT USS CONNECTION. PLEASE REFER TO THE ENCLOSED FIT CHART TO SEE IF YOUR VEHICLE IS APPLICABLE. IF YOU DO NOT FIND YOUR VEHICLE, PLEASE PROCEED TO INSTALL OPTION 2 OF 3 OR 3 OF 3.
INSTALL OPTION 1 (REFER TO FIT CHART)
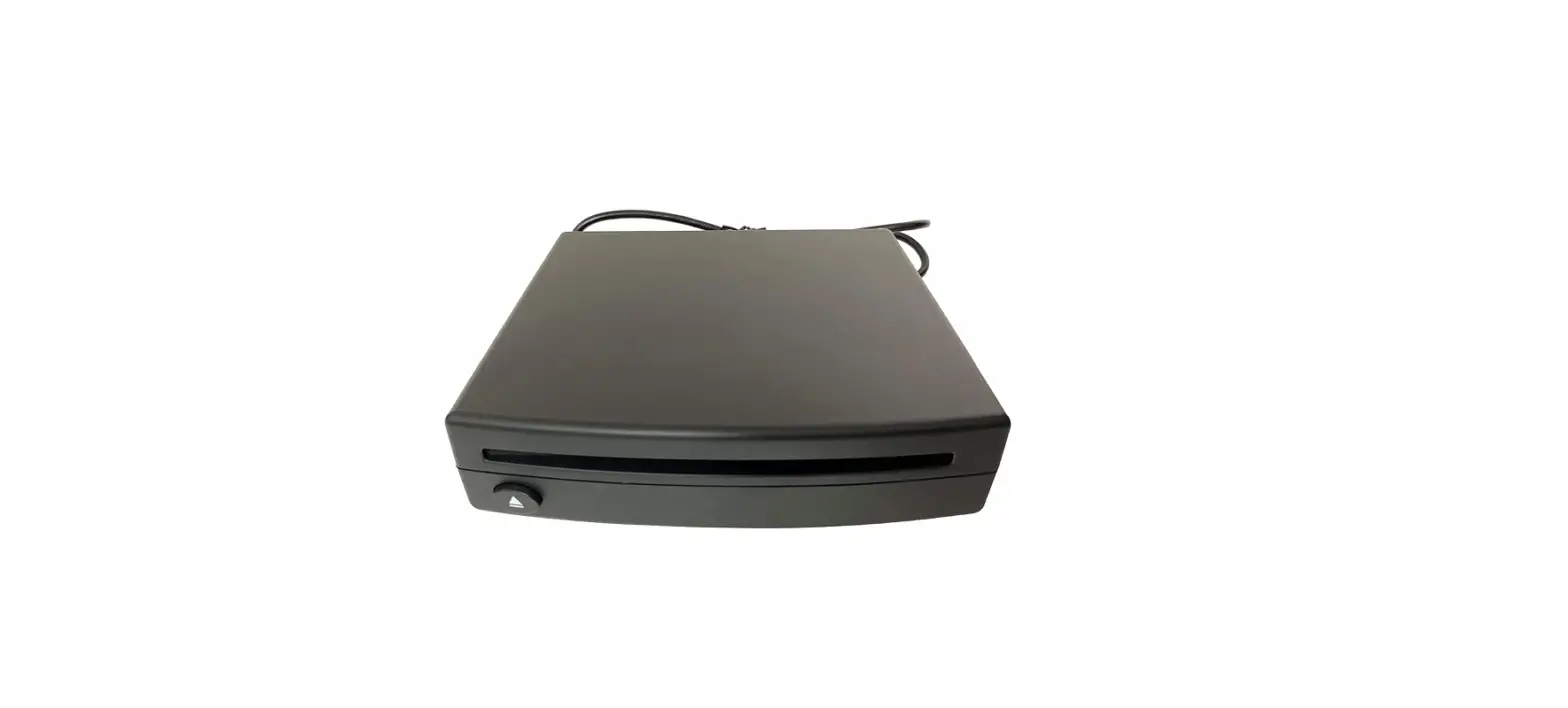
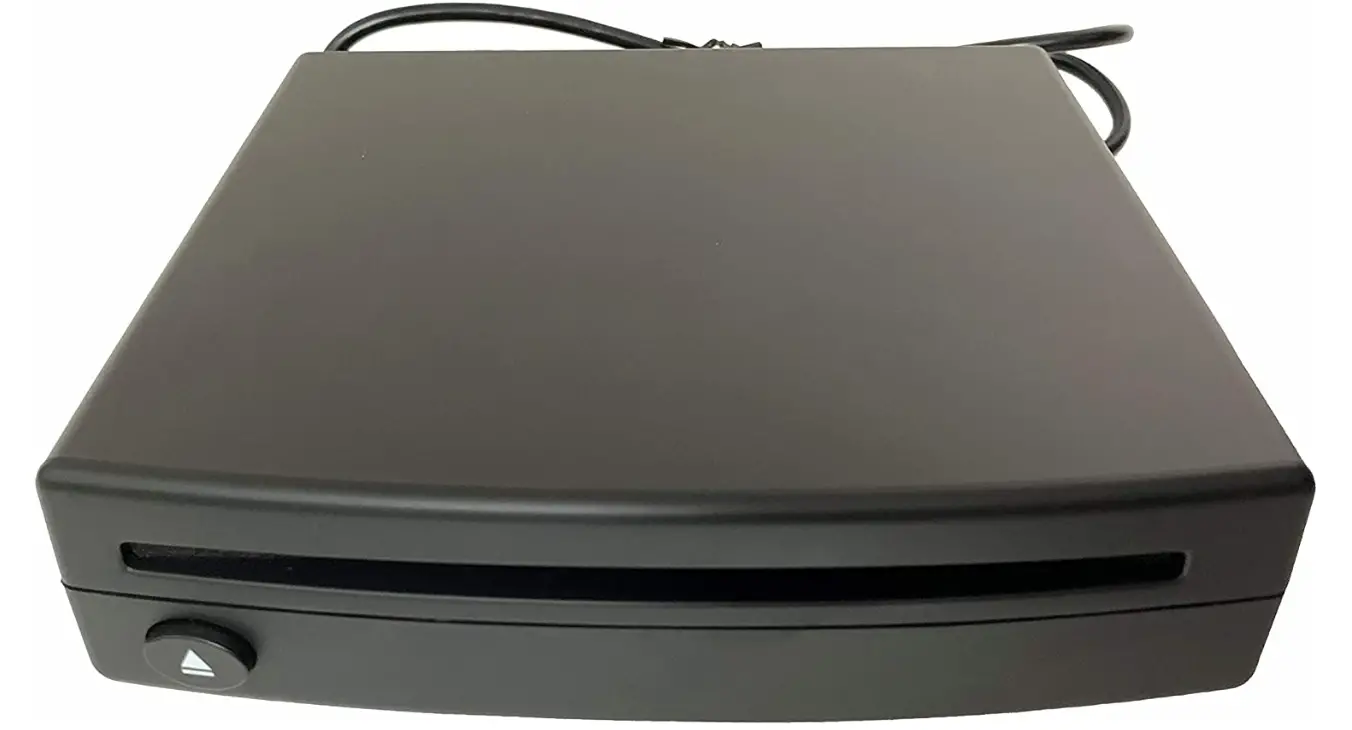
STEP 1 TAKE USB CD PLAYER AND FIND SUITABLE LOCATION. TRY TO FIND A LOCATION THAT DOES NOT REQUIRE ANY USB EXTENSION CABLE IF POSSIBLE.
STEP 2 THE CD PLAYER CAN MOUNT VERTICALLY OR HORIZONTALLY. PLEASE MAKE SURE IF MOUNTINGVERTICALLY THAT THE UNIT IS A COMPLETE 90 DEGREES. ONCE A LOCATION IS CHOSEN, TAKE THE PROVIDED MOUNTING TAPE AND PROCEED TO PEEL AND STICK IT TO THE CD PLAYER IN A DISCREET BUT STABLE FLAT SURFACE ON THE TOP OR BOTTOM OF THE UNIT. THEN PEEL THE OPPOSITE SIDE AND PROCEED TO STICK IT TO THE CHOSEN SURFACE MAKING SURE ENOUGH SURFACE CONTACT IS MADE TO STABILIZE THE UNIT AND KEEP IT FROM MOVING ONCE SECURED.
STEP 3 CONNECT THE CD PLAYER USB PLUG COMING OUT OF THE REAR OF THE CD PLAYER UNIT AND CONNECT IT TO YOUR VEHICLES DATA BASED USB CONNECTION INPUT. PLEASE MAKE SURE YOU ARE CONNECTING TO YOUR DATA PLUG AND NOT A USB POWER ONLY PLUG. THIS WILL BE THE SAME CONNECTION(S) THAT YOUR SMART DEVICE OR USB MEDIA MUSIC STICK WOULD CONNECT TO FOR RADIO PLAYBACK AND CONTROL.
STEP 4 ONCE CONNECTED, YOU MAY INSERT A DISC INTO THE USS CD SLOT. IF PROPERLY CONNECTED, THE UNIT WILL ACCEPT THE CD AND BEGIN THE LOADING PROCESS.
STEP 5 ONCE THE CD IS IDENTIFIED AND IS A PROPERLY FORMATTED CD, THE UNIT MAY BEGIN TO AUTO PLAY. THIS PROCESS WILL BE PART OF THE INDEX PROCESS AND CANNOT BE INTERRUPTED FOR AT LEAST 15 SECONDS. THE INDEXING PROCESS IS CREATING A TABLE OF CONTENTS FOR YOUR RADIO TO IDENTIFY AND IF THIS IS INTERRUPTED IN ANY WAY BY JUMPING TO A SONG OR PAUSING THE AUTO PLAYBACK, YOU WILL CORRUPT THE CDS PLAYBACK CAPABILIT Y AND YOU MUST START OVER. PLEASE REFER TO THE TROUBLESHOOTING SECTION OF THIS GUIDE FOR HOW TO CORRECT THE INDEXING CORRUPTION PROCESS.
STEP 6 ONCE INDEXING IS COMPLETE, YOU MAY PROCEED TO CHOOSE THE SONG OF YOUR CHOICE AND YOU WILL HAVE FULL CONTROL OF IT WITH FF, REW, PLAY/PAUSE
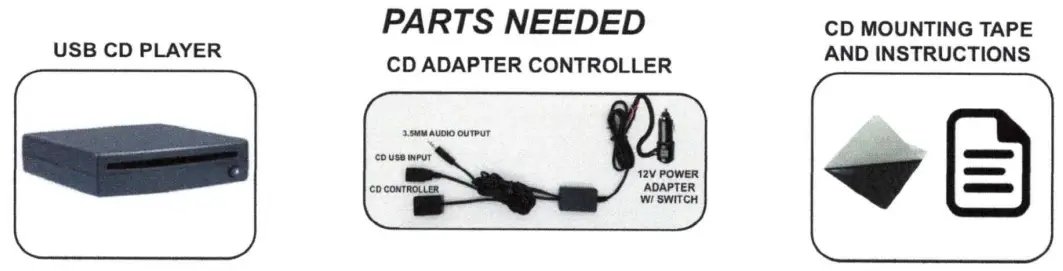
PARTS NEEDED

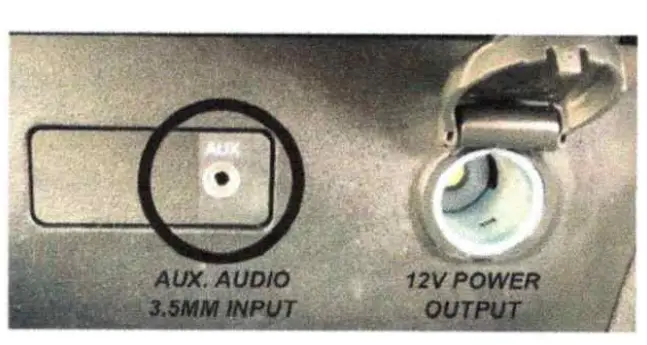
THIS SECTION WILL COVER INSTALL OPTION 2 OF 3. YOUR VEHICLE MUST BE EQUIPPED WITH A 3.5MM MIN/JACK AUDIO CONNECTION AND A 12 VOLT POWER PORT SHOWN HERE. IF EQUIPPED, PLEASE PROCEED WITH INSTALLATION INSTRUCTIONS BELOW.
INSTALL OPTION 2
STEP 1 TAKE USB CD PLAYER AND FIND SUITABLE LOCATION. TRY TO FIND A LOCATION THAT DOES NOT REQUIRE ANY USB EXTENSION CABLE IF POSSIBLE.
STEP 2 THE CD PLAYER CAN MOUNT VERTICALLY OR HORIZONTALLY. PLEASE MAKE SURE IF MOUNTING VERTICALLY THAT THE UNIT IS A COMPLETE 90 DEGREES. ONCE A LOCATION IS CHOSEN, TAKE THE PROVIDED MOUNTING TAPE AND PROCEED TO PEEL AND STICK IT TO THE CD PLAYER IN A DISCREET BUT STABLE FLAT SURFACE ON THE TOP OR BOTTOM OF THE UNIT. THEN PEEL THE OPPOSITE SIDE AND PROCEED TO STICK IT TO THE CHOSEN SURFACE MAKING SURE ENOUGH SURFACE CONTACT IS MADE TO STABILIZE THE UNIT AND KEEP IT FROM MOVING ONCE SECURED.
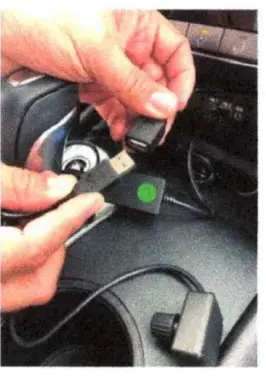
STEP 3 LOCATE THE CD ADAPTER CONTROLLER. REMOVE IT FROM ITS BAG AND UNRAVEL THE CABLING. NOTE THAT YOU MAY HAVE EXCESS CABLING THAT MAY CHOOSE TO EITHER BUNDLE TOGETHER OR TUCK AWAY IN A DISCREET, LESS VISIBLE LOCATION BUT KEEPING ENOUGH SLACK ACCESSIBLE TO LOCATE EACH COMPONENT ACCORDINGLY
WIRING PROCEDURE
- CONNECT CD PLAYER USB TO USB INPUT CONNECTION ON CD ADAPTER.

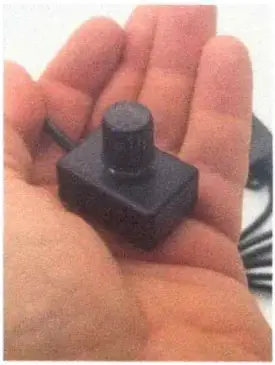
- LOCATE CD CONTROL AND FIND EASILY REACHABLE LOCATION. PEEL DOUBLE STICK TAPE PROTECTOR FROM BOTTOM AND STICK TO FLAT, CLEAN SURFACE

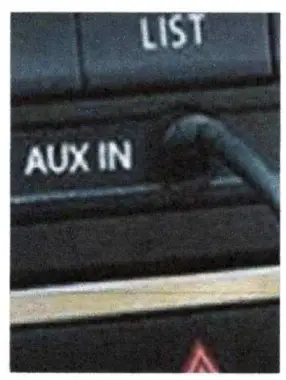
- LOCATE AUX IN AUDIO CONNECTION ON RADIO FACEOR INSIDE CENTER CONSOLEOR BELOW RADIO. CONNECT3.5MM AUX AUDIO OUTPUT FROM CD ADAPTER CONTROL

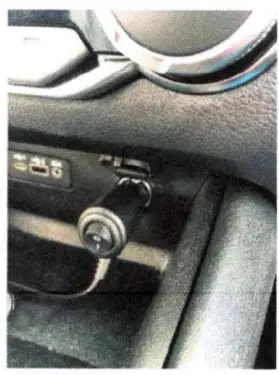
- LOCATE 12V POWER ADAPTER AND PROCEED TO INSERT PROVIDED POWER ADAPTER INTO 12V CAR POWER RECEPTACLE. MAKE SURE POWER IS ON AND ON/OFF SWITCH IS IN THE ON POSITION AND TEST CD PLAYER.

THIS SECTION WILL COVER INSTALL OPTION 3 OF 3. YOUR VEHICLE MUST BE EQUIPPED WITH A USB DATA INPUT CONNECTION AND A 12 VOLT POWER PORT SHOWN HERE. IF EQUIPPED, PLEASE PROCEED WITH INSTALLATION INSTRUCTIONS BELOW.
INSTALL OPTION 3

STEP 1 TAKE USB CD PLAYER AND FIND SUITABLE LOCATION. TRY TO FIND A LOCATION THAT DOES NOT REQUIRE ANY USB EXTENSION CABLE IF POSSIBLE.
STEP 2 THE CD PLAYER CAN MOUNT VERTICALLY OR HORIZONTALLY. PLEASE MAKE SURE IF MOUNTING VERTICALLY THAT THE UNIT IS A COMPLETE 90 DEGREES. ONCE A LOCATION IS CHOSEN, TAKE THE PROVIDED MOUNTING TAPE AND PROCEED TO PEEL AND STICK IT TO THE CD PLAYER IN A DISCREET BUT STABLE FLAT SURFACE ON THE TOP OR BOTTOM OF THE UNIT. THEN PEEL THE OPPOSITE SIDE AND PROCEED TO STICK IT TO THE CHOSEN SURFACE MAKING SURE ENOUGH SURFACE CONTACT IS MADE TO STABILIZE THE UNIT AND KEEP IT FROM MOVING ONCE SECURED.
STEP 3 LOCATE THE CD ADAPTER CONTROLLER AND AUX USB AUDIO CABLE. REMOVE IT FROM ITS BAG AND UNRAVEL THE CABLING. NOTE THAT YOU MAY HAVE EXCESS CABLING THAT MAY CHOOSE TO EITHER BUNDLE TOGETHER OR TUCK AWAY IN A DISCREET, LESS VISIBLE LOCATION BUT KEEPING ENOUGH SLACK ACCESSIBLE TO LOCATE EACH COMPONENT ACCORDINGLY
WIRING PROCEDURE
- CONNECT CD PLAYER USB TO USB INPUT CONNECTION ON CD ADAPTER.
- LOCATE CD CONTROL AND FIND EASILY REACHABLE LOCATION. PEEL DOUBLE STICK TAPE PROTECTOR FROM BOTTOM AND STICK TO FLAT, CLEAN SURFACE
- LOCATE USB AUX AUDIO CABLE PROVIDED CONNECT TO AN OPEN DATA USB RADIO INPUT AND LOCATE 3.5MM AUDIO OUTPUT FROM CD CONTROLLER. CONNECT TOGETHER. YOU MAY NEED TO PERFORM AUDIO CALIBRATION. PLEASE SEE CALIBRATE SECTION
- LOCATE 12V POWER ADAPTER AND PROCEED TO INSERT PROVIDED POWER ADAPTER INTO 12V CAR POWER RECEPTACLE. MAKE SURE POWER IS ON AND ON/OFF SWITCH IS IN THE ON POSITION AND TEST CD PLAYER.
NOTE: IF YOU DO NOT HAVE AUDIO PROCEED TO THE AUDIO CALIBRATION SECTION OF INSTRUCTIONS
There are 3 Types of installation for the CDUSB-DELUXE
- Using the single USB cable and assuming you have confirmed the vehicle you are attempting installation on is covered by the fit chart .JPG, simply connect the USB cable, mount the unit and you are done.
- If the vehicle is not on the fit chart .JPG, proceed to using the CD player adapter. Plug the USB cable from the USB CD player into the provided input on the adapter, connect ACC power and ground to the adapter power and ground leads, take the provided 3.5mm mini jack audio output and plug it into the vehicles provided 3.5mm audio input and then mount the provided dial controller somewhere convenient and accessible and you are complete.
- If the vehicle is not on the fit chart .JPG and does not have a 3.5mm mini jack audio input, take the USB AUX cable that is provided in the box and proceed to connect that to an open USB data input port of your vehicle. Please make sure the USB port you choose is for data and not just for charging only. This adapter is designed to an emulator which will adapt and convert the USB port to a 3.5mm mini jack input. This will allow the 3.5mm mini jack audio output connector from the CDP-1 to connect to and provide audio to your factory radio system.
Install Summary Instructions for adapter:
- Connect 3.5mm audio plug to car audio input
- Connect USB to CD player USB
- Put control knob in easy access location
- Connect red wire to ACC 12V
- Connect white wire to chassis ground
Functions for controller knob:
- Knob quick left – previous song Knob quick right – next song
- Knob push – play/pause
- Knob hold left – volume down
- Knob hold right – volume up
If the vehicle has an in-dash screen and the USB CD Player does not appear as an audio source:
Check to make sure the CD Player is plugged into the USB port for data and not the USB port for charging. The charging port is usually marked with a lighting symbol, but it could be faint and hard to see. The charging port will not work to connect the CD Player to the car.
Also, make sure to disconnect any USB extensions and plug in the CD Player directly. Some vehicles have sensitivity to USB cable lengths. USB signal is based on a specified length to allow for proper functionality and transmission. As an extension cable is provided, we cannot control the pre-existing factory length. Combining both the provided USB extension cable and the factory length may result in an improperly functioning or nonfunctioning unit. It is best to attempt installation based on using the built in USB cord first.
*If the CD will not play or skips:
Step 1. Insert CD
Step 2. WAIT. If the unit begins to auto play, still WAIT. The indexing process is being performed whereby the USB hub in your vehicle is building a table of contents to follow. This can take up to 15 seconds. If at any time this indexing process is interrupted by skipping to a song or pausing or unplugging or changing the source, it will interrupt the table of contents and it will skip songs, miss songs, play 10 sec then stop or just not work at all.
Ford and GM display on the screen that the unit is indexing and to “please wait”. It will even tell you when the indexing is complete, but make sure to still give it 15 seconds even if it only took 3 seconds. Other vehicles may not display anything on the screen. However, you must still wait for at least 15 seconds for the CD to index before pushing any buttons or trying to fast forward, skip, play, etc.
If the indexing process gets interrupted, you must eject the disc. Then insert a different disc to purge the vehicle USB hub. Let it index for that CD, then eject and reinsert the original CD. Let the original CD index again. Once finished indexing, it will be ready to listen to.
*CD Controller Re-sync:
Your CD Controller is fitted with a buffer re-sync procedure. In the event you leave your vehicle with a disc in the player, when you come back and decide to change the CD, the buffer will need re-syncing. Simply, push the dial in and hold it for 3 seconds. The buffer built-in will reset and you can then begin to play your CD’s.
- These CD Players work with ANY vehicle using the included CD Player Adapter and have an extremely low defect rate if properly installed. Please make sure you let every CD index for 15 seconds before trying to fast forward, skip, play, etc.
- Make sure you have read the Installation Instructions included with the CD Player and also located on the site page in the User Guide PDF, as well as this online Troubleshooting Guide located in the images. Please also view the helpful installation videos on the site page.
Video
FAQs
The answer is yes, as it is a universal programme whose goal is to provide you with a successful CD player installation outcome regardless of the automotive design.
I have no idea why yours stops functioning. Mine keeps on playing between pit stops.
The most recent model of your car probably has a USB port. A USB adaptor for a CD player should be purchased and connected. You ought to consider a power source. Choose a battery-operated player or look for a plug-in wire that your automobile will accept.
Put your favourite CD in the CD player after it has started. Two ends of aux cables are attached to your car’s aux port and your portable CD player, respectively. The “AUX” setting on your car’s sound system should be used. Turn the volume up and choose “PLAY” on your CD player.
According to Autoweek, the demise of the CD player began about ten years ago. Since then, a number of automakers have kept CD players in their vehicles, along with the nostalgic memory of motorists putting those little, metallic discs into their dashboards.
If your stereo has a “force eject” feature, use it to remove the CD. If this doesn’t work, attempt once more after starting the car. When the engine is off, some car CD players have been known to break down. For these players, try hitting the power and eject buttons while the engine is running.
To get rid of all the loose dirt and dust, use a soft-bristled brush. To get rid of microscopic particles, use a compressed air can or an electric fan. Wipe the surface of the CD player panel with an interior cleaner.
As you turn your ignition to the accessory power position, press and hold the EJECT button. To get both discs to come out of the machine at once, try gently inserting a blank disc about an inch into the player and repeatedly pushing the EJECT button.
Check the description to determine whether the item will fit in your car. I followed the directions exactly, which is why it was successful.
The CD’s damaged or scratched tracks are typically to fault. Check a couple more recently released CDs to see whether the skipping behaviour continues before assuming the player is at fault. If not, you may want to think about fixing or cleaning the disc so that it may start playing regularly again.
This is a sign that the eye that scans the data lines on the disc is having a problem. It requires professional cleaning and calibration before it can resume functioning.
Make sure the disc’s playback side is face down when placing it in the disc tray. The player might not be able to read the disc if it has damage, such as scratches, fractures, or is unclean with smudges or fingerprints. Wipe the disc with a delicate, dry cloth to resolve the problem.
Hi-fi systems, or at least the speakers, turntable, and amplifier components of those systems, should last much longer, roughly 10 to 20 years. While only having a lifespan of five to ten years, CD players are less durable.


