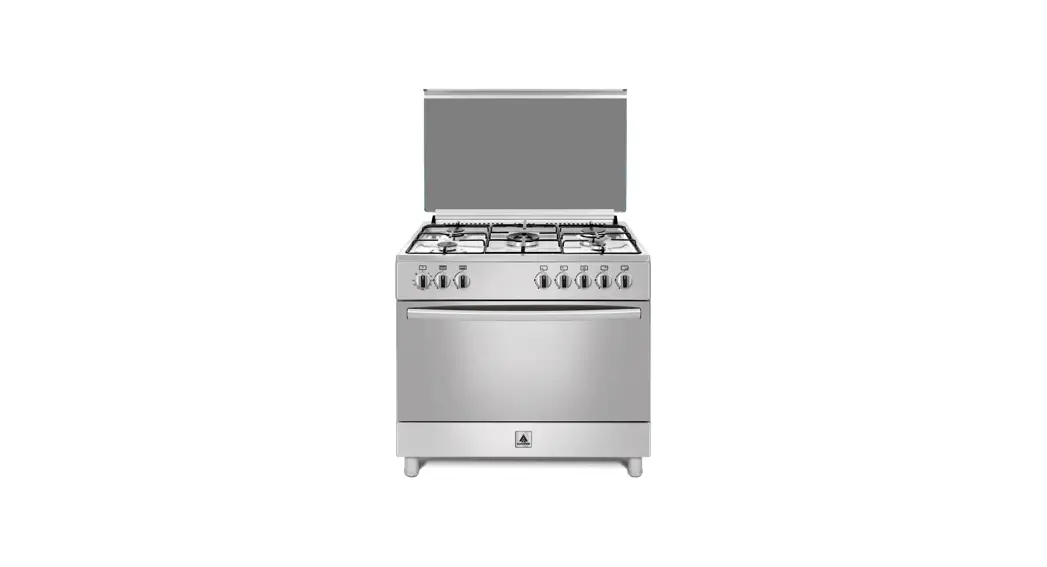
![]() GCHA-90SSM5 Gas Cooker
GCHA-90SSM5 Gas Cooker
User Manual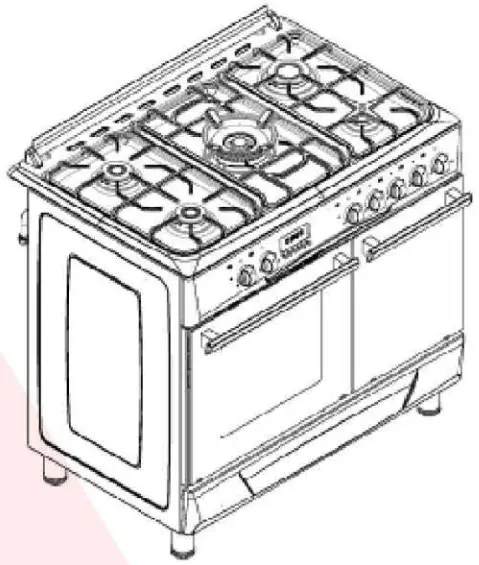
Your product
GENERAL VIEW
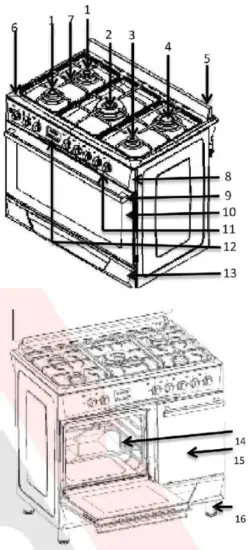
| 1- Average burner 2- Wok burner 3- Small burner 4- Big / mini wok burner 5- Splashback / Glass cover 6- Cooking Hob 7- Pan Supports 8- Front panel | 9- Door handle 10- Front glass 11- Button 12- Timer 13- Bottom Drawer 14- Cylinder holder 15- Gas cylinder compartment 16- Legs |
Technical Features
| Voltage/Frequency | 220-240 V 50-60 Hz |
| Total power consumption | Min. 0,006 kw/h — Max. 5,6 kw/h |
| Fuse to be used | Min. 16 A — Max. 25 A |
| Cable type/section | 3 X0,75 PVC— 3 X 1 PVC — 3 X 1,5 PVC — 3 X 2,5 PVC H05 |
| Cable length | Max. 1,5 mt |
| Outer sizes (height/width/depth) | 890 x 985 x 680 |
| Oven | Optional |
| Internal lighting | 25 W |
| Grill power consumption | 2000 W |
| Usable volume of the oven | 90X60 = 108 I 90X60 With Fan Ng 981 Cylinder compart. = 661 Cylinder comoartmentwIth fan r 59 I |
Basis: For the domestic electric ovens, the power label info is given as per the standard EN 50304. The values are determined according to the standard load and functions of the lower-upper heater or fan-supported heating (if any).![]() Technical specifications may be modified to improve the product quality without any prior advice
Technical specifications may be modified to improve the product quality without any prior advice![]() The figures in this manual are schematic and they may not be strictly the same as your product.
The figures in this manual are schematic and they may not be strictly the same as your product.![]() The values given in the marks on the product or other printed documents provided together with the product are values obtained in the laboratory according to the respective standards. These values may vary depending on the use and environmental conditions of the product.
The values given in the marks on the product or other printed documents provided together with the product are values obtained in the laboratory according to the respective standards. These values may vary depending on the use and environmental conditions of the product.
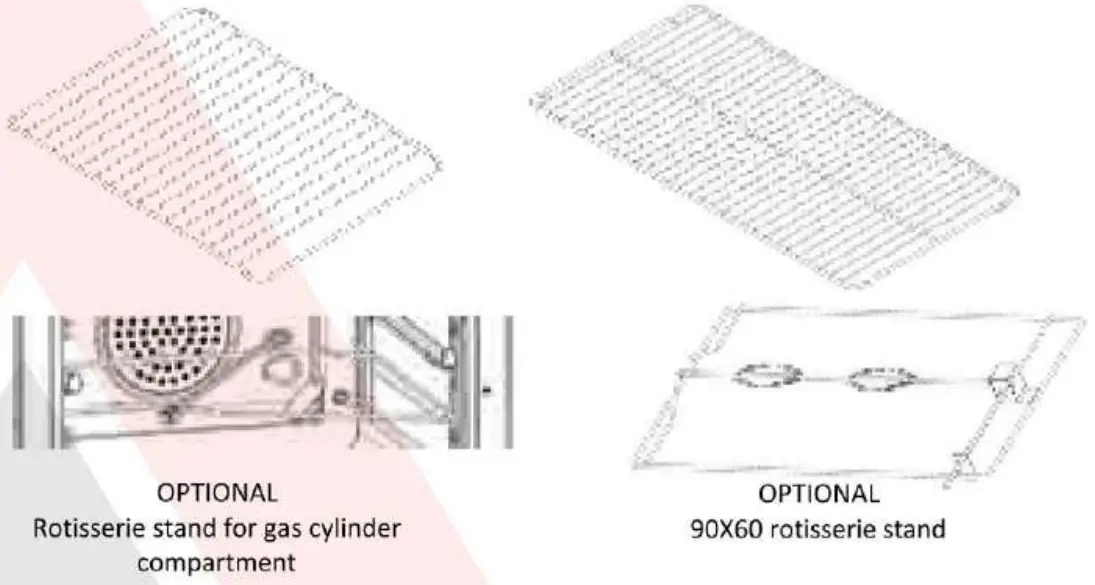
ACCESSORIES![]() Accessories provided may vary depending on the version of the product. All accessories described in the operating manual may not be available in your product.
Accessories provided may vary depending on the version of the product. All accessories described in the operating manual may not be available in your product.
Oven Tray: It may be used for pastry, frozen food, and large frying
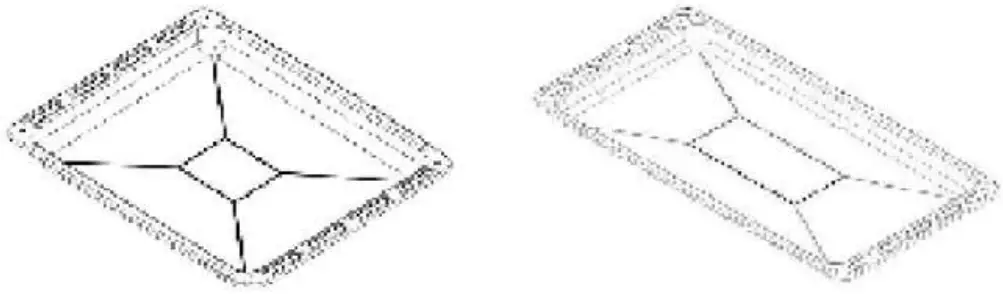 | |
| Tray for gas cylinder compartment | 90 X60 oven tray |
Wire rack: Used for grilling or adjusting the position of grilled meals to the desired level.
| Wire shelf for gas cylinder compartment | 90 X60 Oven wire shelf |
 | |
Important safety instructions
This section concerns safety instructions to help prevent risks of personal injury or property damage. Violation of these instructions will make any warranty invalid.
General Safety
- This product is not designed for use by any persons (including children) incompetent in physical, sensual, or mental capability or lack of information or experience unless they are attended by a person, who will be responsible for their safety and give necessary instructions on the use of the product. Children should always be attended to and not allowed to play with the product.
- Connect the product to an earthed socket/mains protected by a fuse in compliance with the values given in the “Technical specifications” In case of use with or without a transformer, remember to commission a qualified electrician for the earthing installation. In case the product is used before earthing is made according to the local regulations, our firm will not be responsible for any possible loss.
- If the power cable/plug is damaged, do not operate the product. Call the authorized Service Center.
- If the product is defective and has visual damage, do not operate the product.
- Do not make any repair or modification to the product. However, you may remove some failures; see solution proposals for problems, PP 35.
- Never wash the product by spraying or pouring water on it! Risk of electric shock!
- Do not use the product when your mind is adversely affected due to the use of drugs and/or alcoholic drinks.
- The power of the product should be disconnected during installation, maintenance, cleaning, and repair operations.
- Always have the installation and repair operations done by an authorized Service Center. The manufacturing firm may not be held responsible and the warranty of the product becomes invalid in case of any loss that may arise from operations performed by any unauthorized persons.
- Be careful when you use alcohol in your food. Alcohol evaporates at high temperatures and may cause fire by bursting into flame when in contact with hot surfaces.
- Do not heat the closed tin cans and glass jars. Pressure to generate inside will cause the jar to burst.
- As the sides of the product will get hot when operating, do not place inflammable substances nearby.
- Do not put the baking trays, plates, or aluminum folio directly on the base of the oven. The accumulated temperature may give damage the base of the oven.
- All around the ventilation channels should be kept unobstructed.
- The product may be hot during use. Do not touch the hot parts, inside of the oven and heating components, etc.
- When placing food inside and taking it out of the hot oven, always use heat-resistant oven gloves.
- Do not use the product when the front glass door is removed or broken.
- When the oven operates, its rear surface may also get hot. Power connections should not come into contact with the rear surface; otherwise, connections may be damaged.
- Do not compress the connection cables to the door of the oven and do not pass them over hot services. Melting of the cable may cause a short circuit and this causes fire.
- Make sure the product is switched-off after each use.
- The product and accessible parts of the product are hot when operating.
- Do not touch the product while operating.
- Do not use sharp and piercing materials to clean the inside and glass of the product; such materials may give damage your product.
- As hot oil may cause fire, always be careful and attend to the product when it operates.
- Do not attempt to extinguish the fire by use of water; immediately disconnect the power of the product and close the burning part with help of a wet blanket.
- Do not keep any flammable or combustible substance in the product.
- Do not use a steam cleaner.
- Do not use aggressive cleaning materials or sharp metal scrapers to clean the oven door (door) that may destroy the surface and cause a break of the glass.
- CAUTION: Prior to the replacement of the oven lamp, disconnect the power and allow it to cool down to eliminate the risk of electric shock.
- 1St shelf of the oven is the lowest shelf.
- Do not use the product or nylon, flammable and heat-sensitive materials.
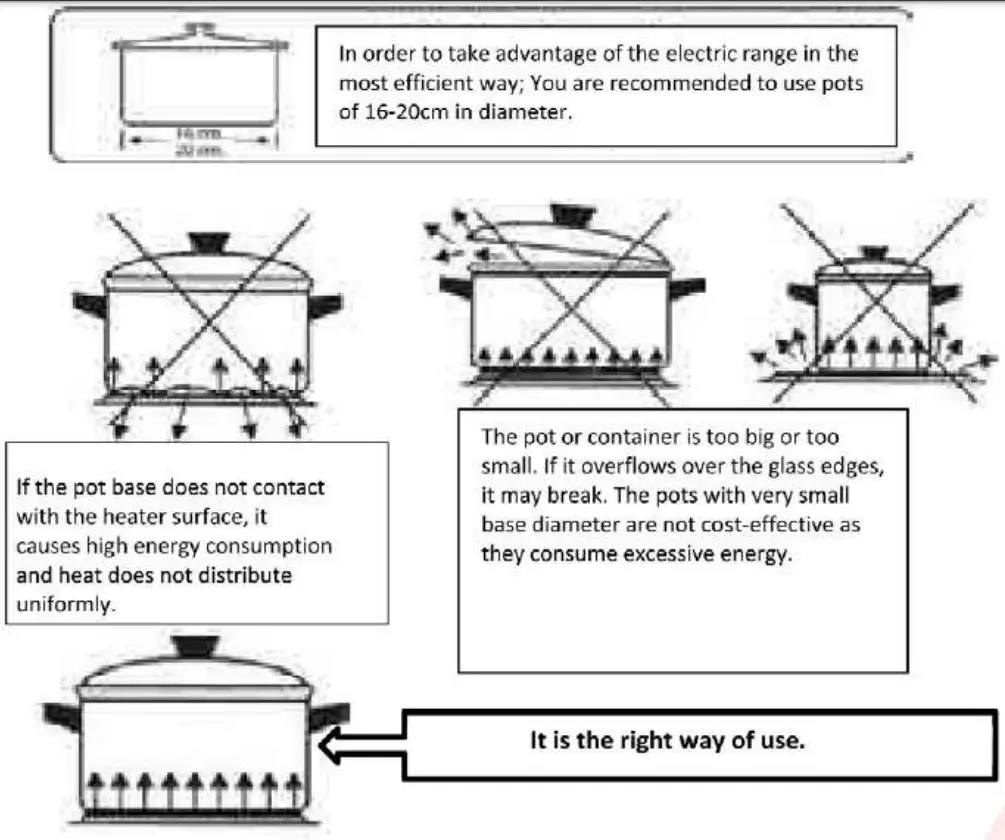
- The cooking pots to be placed on the heaters should be of the proper size.

Safety for children
During and after the use of the product, the exposed parts of the product will be hot before they cool down; keep the children away.
- CAUTION: The accessible parts may be hot during the use of the grill. Little children should be kept away from the product.
- Children under 8 years are forbidden to touch the product unless they are attended by an adult person.
- This product may be used by children above 8 years old and/or physically, sensually, or mentally impaired people provided they are informed about the risks of the product and safe use of it is shown to them.
- Children should not play with the product. Cleaning and maintenance of the equipment should not be performed by the children unattended.
- Packaging materials may be dangerous for children. Keep the packaging materials in a place not accessible by the children or sort them out and dispose of them in accordance with the instructions on waste.
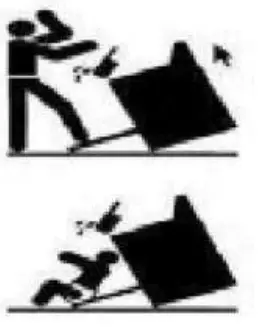
- When the door is open, do not put any heavy objects on it or do not allow the children to sit on the door. It may cause overturn of the oven or give damage the door hinges.

Safety for power-related operations
- All operations to be performed on the electric equipment and systems should be performed by competent and authorized persons.
- This product is not suitable for use by remote control.
- In case of any damage, switch off the product and disconnect the power. For this purpose, switch off the main switch of your home.
- Make sure the fuse current complies with the product’s current
Intended use
This product is designed for domestic use. You should not allow commercial use of it. “CAUTION: This product should be used for cooking purposes only. It should not be used for any other purpose such as heating the room.”
This product should not be used for the heating plates under the grill or hanging towels or clothing for drying or heating purpose.
The manufacturer does not assume any responsibility for any loss that may arise due to improper use or transportation of the product. The oven section may be used for defrosting, baking, frying, and grilling the food.
The service life of the product you purchase is 10 years. This is the period during which the manufacturer should make available the required replacement parts for the operation of the product as specified.
Installation
Prior to use of the product![]() Make sure the power and/or gas installation is proper. If not, call a competent electrician and installer to make the required arrangements.
Make sure the power and/or gas installation is proper. If not, call a competent electrician and installer to make the required arrangements.![]() Preparation of the installation place of the product and electric and/or gas installation is performed by the customer.
Preparation of the installation place of the product and electric and/or gas installation is performed by the customer.![]() Requirements specified in the related local standards with respect to power and/or gas should be observed for the set-up of the product.
Requirements specified in the related local standards with respect to power and/or gas should be observed for the set-up of the product.![]() Control the product before installation for any damage. If the product is damaged, do not have it set up. Any damaged products would create a risk to your safety.
Control the product before installation for any damage. If the product is damaged, do not have it set up. Any damaged products would create a risk to your safety.![]() Any work on the gas equipment and systems should be performed by authorized and competent persons.
Any work on the gas equipment and systems should be performed by authorized and competent persons.![]() The products have no system for discharge of the gases released as a result of combustion. The product should be installed and connected according to the applicable installation regulations. Especially take care of requirements for ventilation.
The products have no system for discharge of the gases released as a result of combustion. The product should be installed and connected according to the applicable installation regulations. Especially take care of requirements for ventilation.![]() The air required for combustion is taken from the room air and the released gases are directly given into the room.
The air required for combustion is taken from the room air and the released gases are directly given into the room.![]() A well-ventilated room is essential for the safe operation of your product. If there is no door or door for ventilation of the room, additional ventilation should be installed.
A well-ventilated room is essential for the safe operation of your product. If there is no door or door for ventilation of the room, additional ventilation should be installed.![]() The kitchen footprint should be more than 3m2. The kitchen volume should be greater than 20m3.
The kitchen footprint should be more than 3m2. The kitchen volume should be greater than 20m3.![]() The chimney outlet should be at a height of 1.80 meters from the floor and open to the atmosphere with a diameter of 150mm.
The chimney outlet should be at a height of 1.80 meters from the floor and open to the atmosphere with a diameter of 150mm.![]() The air vent should be a minimum of 75cm2 near the kitchen floor for opening, to the outer atmosphere.
The air vent should be a minimum of 75cm2 near the kitchen floor for opening, to the outer atmosphere. 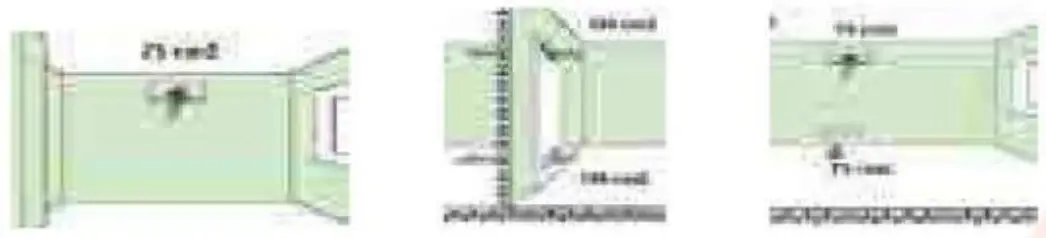
Installation and connections![]() Property damage!
Property damage!
Do not use the door and/or handle to move or handle the.
Mounting of the legs![]() The legs of the product are not assembled during the installation of the product. The legs of the products are packed in the bag located inside the oven.
The legs of the product are not assembled during the installation of the product. The legs of the products are packed in the bag located inside the oven.
Mount the legs of your product and adjust it to the kitchen counter. For the gas-fired ovens, if the legs are not mounted, the oven may not be supplied sufficiently during use of the oven and may impair burning.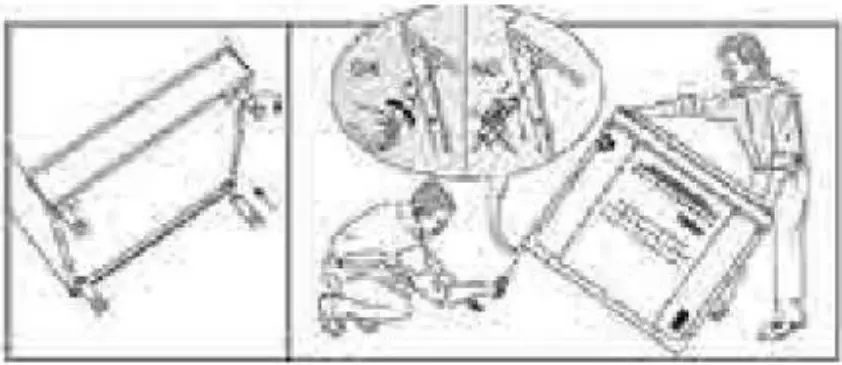
Power connection![]() The product should be definitely used with an earthed line! The manufacturer will not be responsible for any damages that may occur if it is used without an earthed line
The product should be definitely used with an earthed line! The manufacturer will not be responsible for any damages that may occur if it is used without an earthed line![]() Any risk of electric shock, short circuit, or fire due to installation made by unprofessional persons! Connection of the product to the mains may be performed only by an authorized and competent person and the warranty of the product starts only upon correct installation.
Any risk of electric shock, short circuit, or fire due to installation made by unprofessional persons! Connection of the product to the mains may be performed only by an authorized and competent person and the warranty of the product starts only upon correct installation.![]() Risk of electric shock, short circuit, or fire caused by use of damaged power cable! The power cable should not be crushed. twisted or compressed or should not contact hot parts of the product. If the power cable is damaged, it should be replaced by a competent electrician.
Risk of electric shock, short circuit, or fire caused by use of damaged power cable! The power cable should not be crushed. twisted or compressed or should not contact hot parts of the product. If the power cable is damaged, it should be replaced by a competent electrician.
- Mains supply data should be the same as the data given on the nameplate of the unit. The nameplate of the product is on the rear.
- The connection cable of the product should comply with the technical specifications and power consumption.
![]() Risk of electric shock! Prior to starting any work on the power installation, please disconnect the product electrically.
Risk of electric shock! Prior to starting any work on the power installation, please disconnect the product electrically.![]() For power, supply disconnection must be incorporated into the fixed wiring in accordance with the wiring rules.
For power, supply disconnection must be incorporated into the fixed wiring in accordance with the wiring rules.![]() The fixed wiring must be protected.
The fixed wiring must be protected.
Gas connection![]() Any work on the gas equipment and systems should be performed by the authorized and competent persons
Any work on the gas equipment and systems should be performed by the authorized and competent persons
Prior to installation, check that the local supply conditions (gas type and gas pressure) are compliant with the product settings
LPG connection
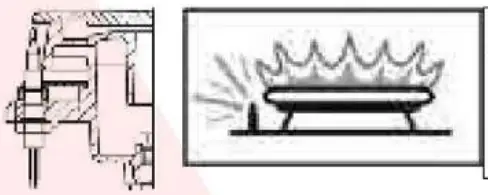
Be careful that the gas hose and gas valve you use for your oven should be safe. Attach the gas supply hose at the hose end being the oven and tighten it by means of clips and screws (Figure 6). Make sure it is tightened. The gas hose of the oven should be longer than 1500mm. The pressure of the valve to be used for LPG should be 30 mbar- 300mmSS and certificated.
Do not use an adjustable pressure-reducing valve.![]() The gas supply hose should not pass through the hot section behind the oven. The temperature of the gas hose should not exceed 90°C
The gas supply hose should not pass through the hot section behind the oven. The temperature of the gas hose should not exceed 90°C
Prior to use, make sure the system is gastight.
Figure 6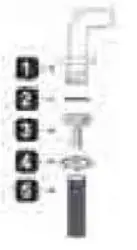 1- G1/2 Nipple (union)
2- Silicone gasket
3- 61/2 Hose inlet (gas inlet)
4- Metal clamp
5- Gas hose (inner diameter 8mm )
NG (natural gas) connection 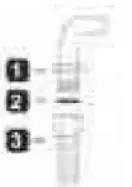 1- 61/2 Nipple (union)
2- Silicone gasket
3- G1/2 NG hose ( natural gas hose as per EN 14800)
If your equipment is set for natural gas, you should have it connected by an installer registered with the natural gas distribution company. The natural gas connection of your equipment is 1/2″.
If you desire to convert your equipment from LPG to natural gas or from natural gas to LPG, please call the nearest service center for gas conversion settings
Placement of cylinder wire and gas cylinder in case of product equipped with cylinder compartment. 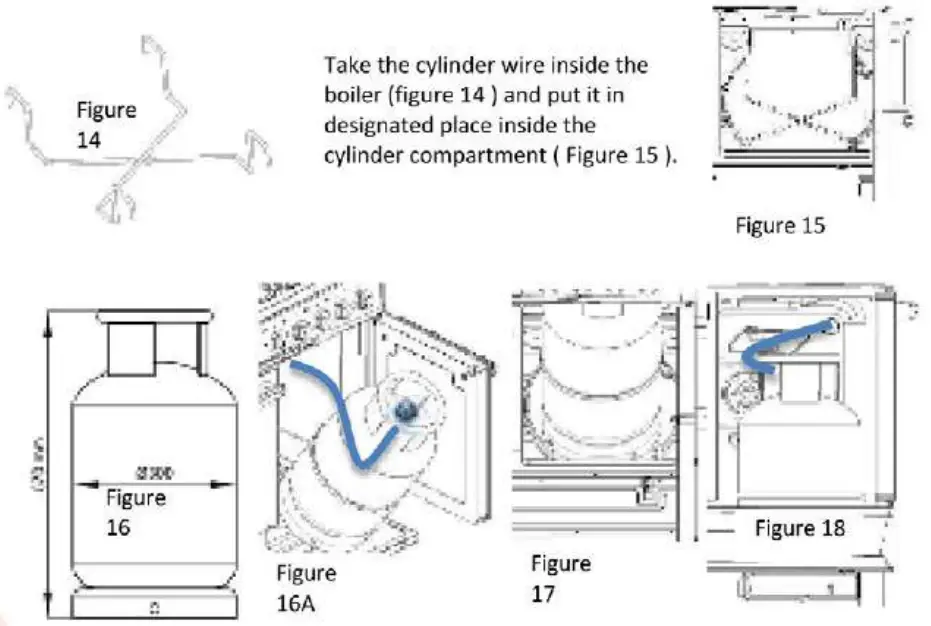
- Open the door of the lower cabinet and mount the regulator to the cylinder.
- It should be in such dimensions as those dimensions shown in Figure 16.
- As shown in Figurel6A, first place the lower part of the cylinder and then place the top part of the cylinder (figure 17).
- As shown in Figure 18, the gas hose should be mounted without keeping it long. Make sure the gas hose Is not damaged when the cylinder Is placed and removed.
Assembly of Splashback (Optional)  For some versions, we use “Splash Back” instead of the top glass cover; and the said Panel is located in the Lower Drawer as packed; how to mount this Panel is described below step by step:
 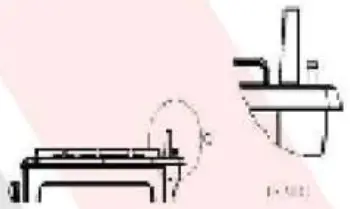 Untighten the screws (10) at the right and left sides on the rear of the tray by the help of spanner and ensure the skirt sheet into the channel in the lower part and tighten the screws again.
Regulator 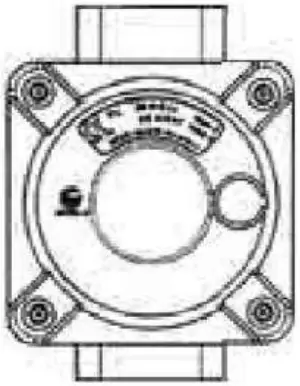 This part Is used In some countries or regions.
If the regulator Is mounted on the product, do not remove it and do not play with its adjustment.
This device is fixed to prevent any failures arising from high gas pressure.
In case of conversion from LPG to NG, you are not required to remove the part.
LPG – NG, NG — LPG conversions; 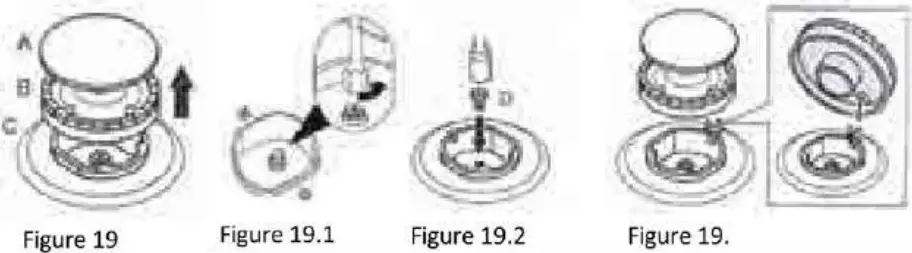
 Remove the burner cover and burner as shown in figure 19.
Remove the injector with the help of 7’s socket screwdriver as shown in Figure 19.1.
Fix the injector (0) you want to convert as shown in Figure 19.2 (see Table).
Put the burner In place again as shown in Figure 19.3.
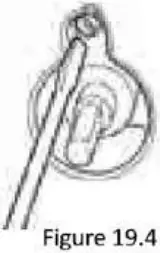
Upon completion of the conversion, then burn the burners in order and remove the switch on the control panel and adjust the low flame length by tightening or untightening the screw on the gas valve (19.4 cock) or inside the valve shaft.
- Then you desire to convert the oven burner, you should first remove the oven cover by referring to the removal of the cover page.
- Remove the screws at the market points (Figure 20).

- Lift up the burner housing sheet first in direction of the arrow and then upward towards the inside of the boiler and pull towards you to take the sheet out of its place (figure 21)
- Remove the mounting screws of the burner and pull the burner by 15mm to release the burner (figure 22).

- If there is lighter and thermoelement on the burner, remove the fixing rings and take the parts away from the burner.
- After the burner is released, the injector is removed with help of 7’s socket spanner and the desired injector is mounted. See page 22 for the injector table.
- Untighten the screw of the air adjusting screw on the burner and bring the corresponding letter of the desired gas type you want to adjust to the same axis of the screw and tighten the screw.
- You should bring it to GPL as indicated on the air adjusting sheet for LPG. For NG, you should bring it to ‘N’ on the air adjusting sheet.


Leakage control;
Open the valve or natural gas valve and apply soap water with ample foam to the connection point to control for gastight.
Never control by flame.
Final control
- Plug the power cable into the socket and activate the fuse of the equipment.
- Control the functions.
Placement
Place your product after you control the required power and gas connection.
When placing, make sure that the gas hose and power cable are not near the hot surface of the product.
When placing, make sure that the gas hose and power cable have not been damaged.
Set your product to the kitchen counter as a minimum according to the dimensions shown in Figure 8. 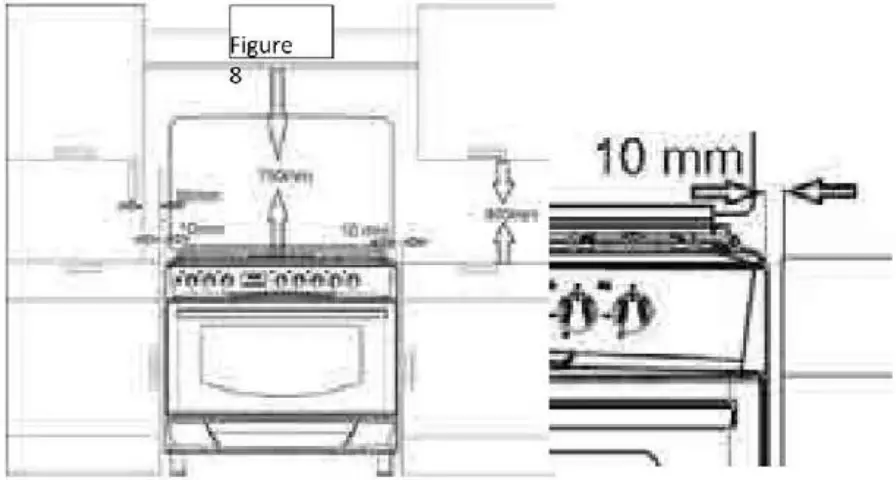 Disposal of the product
Destruction of the product
Packaging materials are dangerous for children. Keep the packaging materials in such a place that cannot be reached by the children.
The package of the product is made of recyclable materials. Sort it out according to the instructions on waste and dispose of it. Do not throw it together with normal domestic waste.
Transportation operations in future
- Keep the original package of the product and move the product in this original packaging. Observe the instructions on the box. If the original box is not available, then wrap it with blister packaging material or thick paperboard and tape it firmly.
- In order to prevent the wire grill and tray in the oven do not give any damage to the inner side of the oven’s door, place a cartoon strip on the inner side of the oven’s door so that it is in alignment with these trays. Tape the oven’s door to the side walls.
- Tape the caps and tray support firmly in place.
- Do not use the door or handle to move or transport the product.
![]() Do not put any object on the product. The product should be moved upright.
Do not put any object on the product. The product should be moved upright.![]() Control the general view of the product for any damage that may occur during transportation.
Control the general view of the product for any damage that may occur during transportation.
Disposal of the old product![]() Dispose of the old product so that it does not give any damage to the environment. This product has a symbol (WEEE) on this product, indicating that the electric and electronic equipment waste should be collected separately. In other words, it means that in order to recycle or disassemble this equipment to minimize any effect of it on the environment, the EU Directive 2002/96/EC should be observed. For further information, contact the concerned local and regional authorities.
Dispose of the old product so that it does not give any damage to the environment. This product has a symbol (WEEE) on this product, indicating that the electric and electronic equipment waste should be collected separately. In other words, it means that in order to recycle or disassemble this equipment to minimize any effect of it on the environment, the EU Directive 2002/96/EC should be observed. For further information, contact the concerned local and regional authorities.
Electronic products not subject to any controlled waste collection process constitute potential risk both for the environment and human health as they contain harmful substances.
You may refer to your authorized dealer or waste collection center of your municipality for due disposal of the product.
Always cut the power plug and break the door lock, if any, so that the children may not be exposed to any danger.
Initial Preparation
Things required to be done for energy saving
The following information would help you use the product ecologically and for energy saving:
- Use containers, dark in color or enamel coated for better heat transmission in the oven.
- When cooking the food, preheat the oven if it is required to be done as per the recipe or the table given in the operating manual.
- Do not open the oven door frequently when cooking.
- Try to cook more than one food in the oven simultaneously. You may do that by putting two cooking pots on the wire shelf.
- Cook more than one meal consecutively. So the oven will not lose its heat.
- Switch the oven off several minutes before the expiration of the cooking time. In such a case, do not open the oven door.
- Defrost the frozen food before cooking.
First use
First cleaning![]() Some detergents or cleaning agents may give damage the surface.
Some detergents or cleaning agents may give damage the surface.
- Take off all packaging materials.
- Wipe the surface of the product with a damp cloth or sponge and wipe it dry with a cloth.
First Heating
Heat the product for about 30 minutes and then switch it off. Thus any waste and layers possibly left in the oven during production are cleaned by elimination through incineration.![]() Hot surfaces may cause to burns I Do not touch hot surfaces of the unit. Keep the children away from the product and use oven gloves!
Hot surfaces may cause to burns I Do not touch hot surfaces of the unit. Keep the children away from the product and use oven gloves!
Electric oven
- Take out all oven trays and wire shelves from the oven.
- Close the oven door.
- Select the static position.
- Select the highest temperature; see Use of the electric oven.
- Operate for about 30 minutes.
- Switch off the oven; see Use of the electric oven.
![]() Smell and smoke occur during the first heating. Ensure well-ventilation.
Smell and smoke occur during the first heating. Ensure well-ventilation.
Use of the oven
General information about cooking, frying, and grilling in the oven![]() Risk of burn caused by hot steam. Be careful when opening the oven door as you may be subject to hot steam
Risk of burn caused by hot steam. Be careful when opening the oven door as you may be subject to hot steam
Hints on cooking in the oven
- Use appropriate metal plates with a non-sticking coating or aluminum containers or heat-resistant silicone molds.
- Use the space on the shelf in an optimum way.
- Place the cooking mold at the center of the shelf.
- Select the correct shelf position prior to operating the oven or grill. Do not change the shelf position when the oven is hot.
- old the oven door firmly.
Hints on roasting
- when cooking whole chicken turkey and a large part of meat the cooking performance will be improved if you marinate them by use of lemon juice and black pepper.
- Cooking of the bone-in-meats would last 15-30 minutes more than those without bones.
- Calculate the cooking time as about 4-5 minutes per centimeter of the meat thickness.
- after the expiration of the cooking time keep the meat in the furnace for 10 minutes. eat juice is better distributed on the fried meat and when the meat is cut it does not come out.
- The dish should be put on the medium or lower shelf on a flame-resistant plate
Hints on the grill
when you grill red meat fish and fowl they turn to brown quickly forming a nice peel and do not get dry. noisette shish meat and sausage bologna and juicy vegetables e.g. tomato-onion are especially suitable for grill.
- Distribute the parts to be grilled on the wire grill or on the tray with the wire grill in such a way that they do not go beyond the sies of the heater.
- Slide the grill wire or oven tray into the oven at the level you desire.
- If you put some water in the oven tray, then you may clean it more easily.
![]() Fire risk arising from the food not suitable for grill
Fire risk arising from the food not suitable for grill
Only grill the food suitable for Intensive grill flame.
Do not position the food much to the rear of the grill. Here is the hottest space and the oily food may burst into flame.
Use of electric oven
Selection of temperature and operation mode
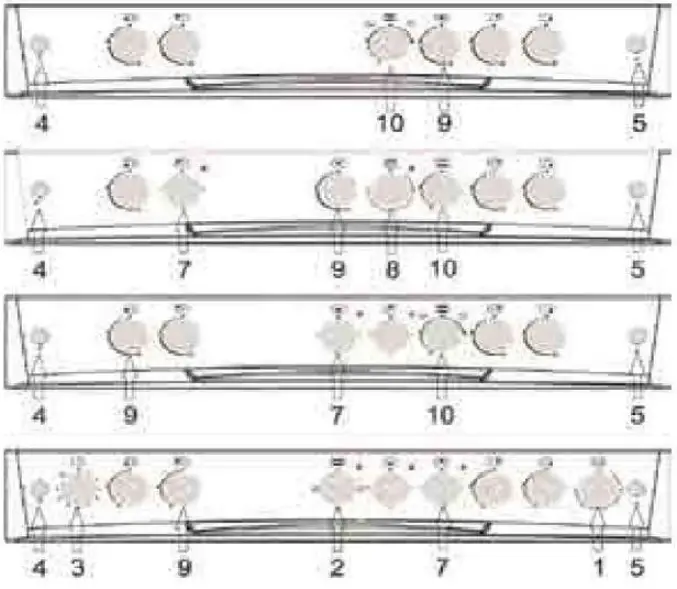
Models with sealed burners: 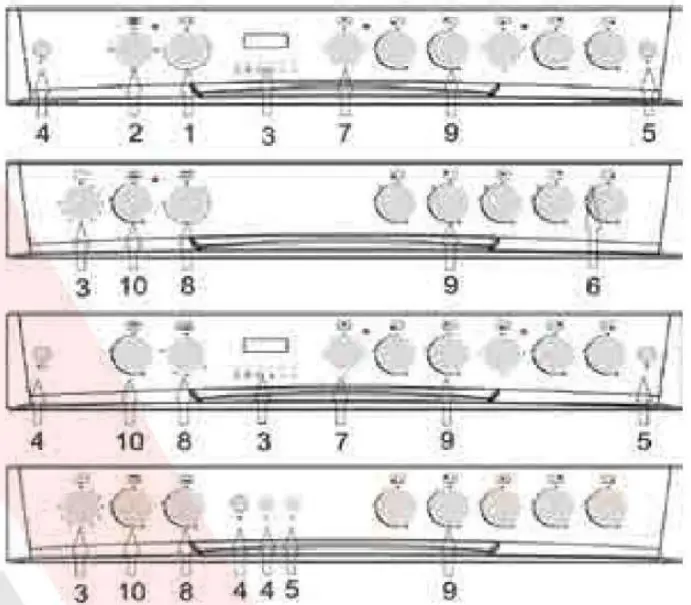
| 1. Electric temperature switch 2. Electric function switch 3. Timer switch 4. Lamp and chicken roasting 5. Lighter button | 6. Switch lighter symbol 7. Electric heater switch 8. Gas thermostat oven switch 9. Gas oven switch 10. Gas oven switch |
Models with open burners
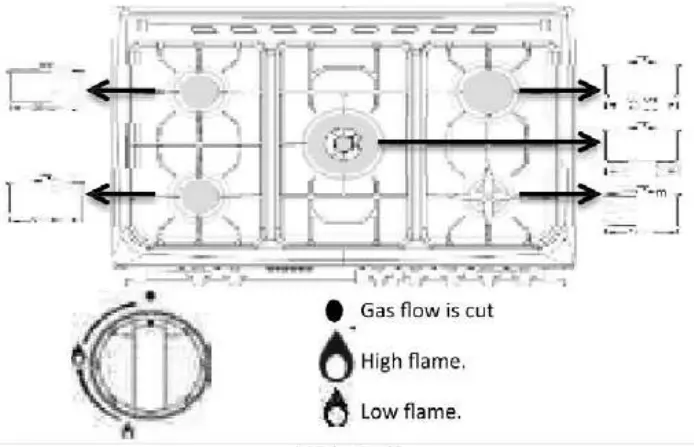
Use of gas burners: 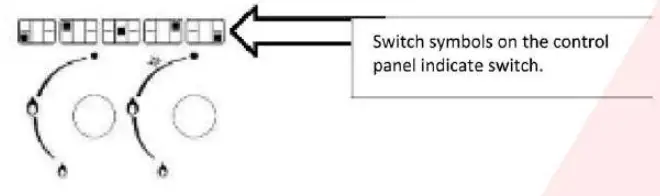
- Push the Gas burner switch and turn anticlockwise to high flame and-or temperature position on the panel.
- Ignite the lighter according to the version of your oven
- Set to the desired flame position. switch
- When the cooking completes, bring the oven switch clockwise to the upper point to switch off the oven heater.
Tablet. 1
| Injector ana power table | ||||
| Sumner | LPG Injector | NG Injector | I-Ictal version Power | NG version Power |
| Small tanner | Ø 0.50 | Ø 0.70 | 0.90 KW | 0.90 KW |
| IVIecllurn | Ø 0.65 | Ø 0.92 | 1.65 KW | 1.55 KW |
| Big Burner | Ø 0.80 | Ø 1.20 | 2.5 KW | 2.60 KW |
| Wok Burner | Ø 0.98 | Ø 1.45 | 3.8 KW | 3.70 KW |
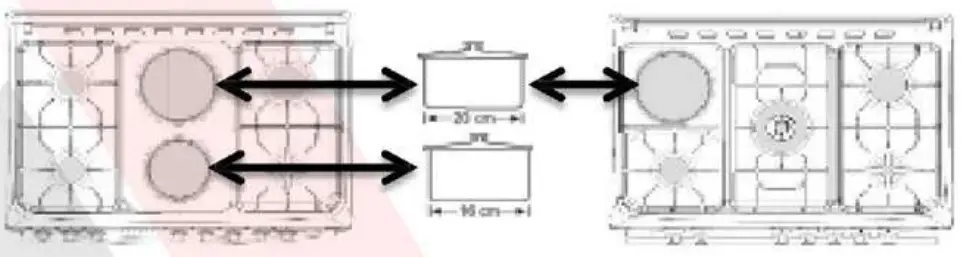
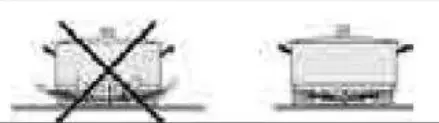 The size of the container and the dimension of the gas flame should comply with each other. Adjust the gas flame in such a way that it will not protrude from the container base. Put the container on the pot carrier by centering.
Gas cut-off safety assembly (for versions with thermal element)
 Push the Gas Range switch and turn anticlockwise to the high flame postilion.
- Ignite the lighter according to the version of your range.
- After ignition, push and hold the switch for 3.5 seconds for activation of the safety mechanism.
- If no ignition occurs after pushing and releasing the switch, repeat the same action by pushing and holding the switch for 15 seconds.
- Set to the desired flame position.
- When the cooking completes, bring the oven switch clockwise to the upper point to switch off the oven heater.
 Push the Gas Range switch and turn anticlockwise to the high flame postilion.
Use of the gas oven
Switch symbols on the control panel indicate switch position. 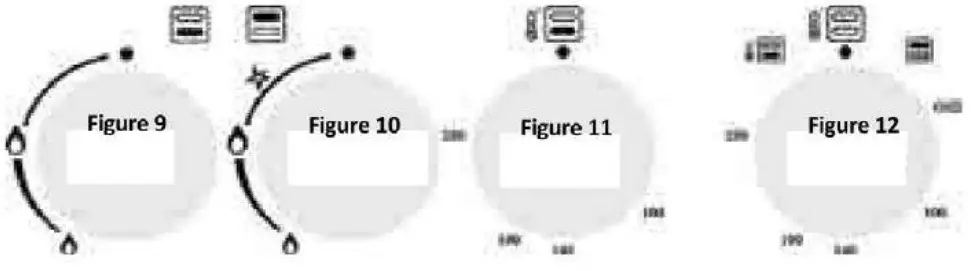
- Push the Gas Oven switch and turn 1-turn anticlockwise to high flame and-or temperature position on the panel.
- If, as shown in Figure 12, the oven button controls the burner of the upper heater, push the switch and turn clockwise to the grill Inscription or flame sign.
- Ignite the lighter according to the version of your oven.

- In the case of versions with thermal elements, after ignition, push and hold the switch for 3-5 seconds for activation of the safety mechanism.
- If no ignition occurs after pushing and releasing the switch, repeat the same action by pushing and holding the switch for 15 seconds.
- Set to the desired flame position.
- When the cooking completes, bring the oven switch clockwise to the upper point to switch off the oven heater.
| Oven injector and power table | ||||
| burner | LPG Injector | NG Injector | LPG version Power | NG version Power |
| 90×60 Upper burner | Ø 0,85 | Ø 1,70 | 3,25KW | 3,25 KW |
| 90×60 Lower burner | Ø 0,92 | Ø 1,30 | 3,60 KW | 3,40 KW |
| Upper burner with cylinder compartment | Ø 0,70 | Ø 0,92 | 1,70 KW | 1,65 KW |
| Lower burner with cylinder compartment | Ø 0,75 | Ø 1,10 | 2,40 KW | 2,40 KW |
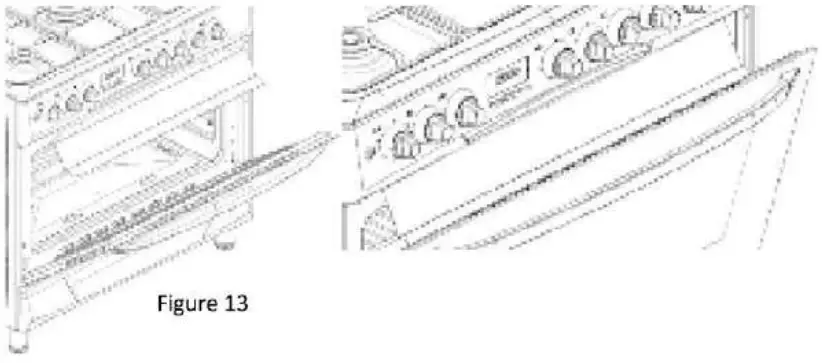
Use of grill sheet (if grill sheet is available for your product)
- When using the upper burner in the case of the gas ovens, the oven door opens as shown in figure 13.
- The grill sheet is mounted on the rollers located under the control panel; the cover is pushed forward to contact with the grill sheet.

Use of the chicken roasting (optional)
- If your product has chicken roasting accessories, take the shish among the accessories and loosen the screw of the V-sheet (dovetail) on the shish. And insert the shish into the chicken and then replace V-sheet firmly and tighten the screw.
- The bakelite part behind the shish will help you carry the product easily. During the cooking process, this part should be removed.
- Attach one chicken to a maximum weight of 8 kg on the shish


Use of the electric oven
The operation of the electronic oven is selected by use of the function switch. Temperature is set by the temperature switch. All oven functions are switched off by bringing the respective switch to the off (upper) position.
- Set the oven timer to the cooking time; see Use of the oven timer.
- Bring the temperature switch to the desired operating mode.
- Bring the function switch to the desired operating mode.
« The oven heats up to the set temperature and maintains it. The temperature light is on during the heating process>>
Switching the electric oven off
Turn the oven timer to the ‘off’ position.
In case the timer is set to a certain time, the timer will stop automatically; see Use of the oven timer.
Turn the function switch and temperature switch to the off (upper) position.
Operation modes
The order of the operating modes shown here may vary depending on the arrangement with your product.
Upper and Lower Heating![]() Upper and lower heating is on. The food is heated from below and above at the same time. For example, it is suitable for cakes, pies, or cakes in the cooking molds and casseroles. Do the cooking with a single tray.
Upper and lower heating is on. The food is heated from below and above at the same time. For example, it is suitable for cakes, pies, or cakes in the cooking molds and casseroles. Do the cooking with a single tray.
Upper Heating![]() Only the upper heating is on. For example, it is suitable for cakes with bright surfaces and food you desire to be brown on the surface.
Only the upper heating is on. For example, it is suitable for cakes with bright surfaces and food you desire to be brown on the surface.
Lower Heating![]() Only the lower heating is on. For example, it is proper for pizza and the food you desire to be the brown underside.
Only the lower heating is on. For example, it is proper for pizza and the food you desire to be the brown underside.
Lower + upper + turbo fan (optional)![]() Upper + lower and turbo motor heating is on. The food ensures more homogenous heating thanks to the turbo motor. It is, for example, suitable for cakes, pies or cakes in the cooking molds and casseroles. Do the cooking with single trays.
Upper + lower and turbo motor heating is on. The food ensures more homogenous heating thanks to the turbo motor. It is, for example, suitable for cakes, pies or cakes in the cooking molds and casseroles. Do the cooking with single trays.
Grill (optional)![]() The grill (under the oven ceiling) operates. It is suitable for grilling meat.
The grill (under the oven ceiling) operates. It is suitable for grilling meat.
- For grilling, place the food portions on the shelf position under the grill heater.
- Bring the temperature to the maximum setting.
- Turn the food over at about half of the grill time.
Heavy Grill (optional)![]() Grill operates (under the oven ceiling). It is suitable to grill meat.
Grill operates (under the oven ceiling). It is suitable to grill meat.
- For grilling, put the food portions on the correct shelf position under the grill heater.
- Bring the temperature to the maximum value.
- Turn over the food at half of the grilling time.
Turbo motor (optional)![]() It is used for defrosting thanks to Its turbo motor.
It is used for defrosting thanks to Its turbo motor.
Turbo resistor + turbofan (optional)![]() Turbo resistor and turbo motor heating are on. The foot is heated more homogenously thanks to the turbo motor. For example, it is suitable for cakes, yogurt, pies, or cakes in the cooking molds and casseroles. Do the cooking by using a single tray.
Turbo resistor and turbo motor heating are on. The foot is heated more homogenously thanks to the turbo motor. For example, it is suitable for cakes, yogurt, pies, or cakes in the cooking molds and casseroles. Do the cooking by using a single tray.
Grill + chicken roasting (optional)![]() It is suitable for cooking by use of a grill and chicken roasting motor.
It is suitable for cooking by use of a grill and chicken roasting motor.
- Ensure that the food is arranged on the shish in form of a grill such as meat, chicken, etc. for an even grill.
- Bring the temperature to the maximum value
Heavy grill + turbofan (optional)![]() Heavy grill (upper and grill resistor) turbo motor heating is on. Turbo motor guarantees more homogenous heating for the food. For example, it is suitable for casseroles. Do the cooking with a single tray
Heavy grill (upper and grill resistor) turbo motor heating is on. Turbo motor guarantees more homogenous heating for the food. For example, it is suitable for casseroles. Do the cooking with a single tray
Use of the oven timer
MECHANICAL TIMER (version 2) If the timer is as shown in Version 2:
Turn the timer switch clockwise for cooking. Set the duration
ANALOG TIMER (version 4) 
- SETTING TIMER
Press the button to set the time and hold it and turn anticlockwise - SETTING THE COOKING DURATION
- It is possible to set the cooking time by the analog timer up to 180 minutes. The alarm ring will automatically start after the completion of the set time. To silence the ringing alarm, turn the button anticlockwise without pressing it and continue till it reaches the manual symbol ”
 “ a appears on the display. The alarm will be off at this position.
DIGITAL TIMER (version 3) 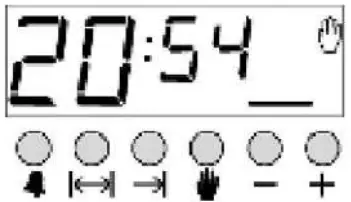 OT-3000-VFD-OD is an electronic timing module for making the food in the oven ready for service when you desire. To this end, simply set the time for cooking the food and the time you desire it to be ready for service.
Furthermore, it may also be used as an alarm timer independently of the oven, programmable by the minute.
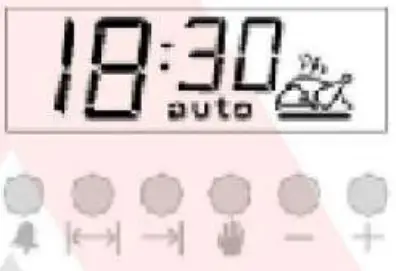
SETTING TIME
The setting timer may only be made when there is no current cooking program (the display shows
the clock and hand icon). Press the button ![]() , and the colon between the hour and minute starts to flash; you may set the time forward by + and backward by, —. When you press these keys, Ion, the time will advance in a fast way.
, and the colon between the hour and minute starts to flash; you may set the time forward by + and backward by, —. When you press these keys, Ion, the time will advance in a fast way. 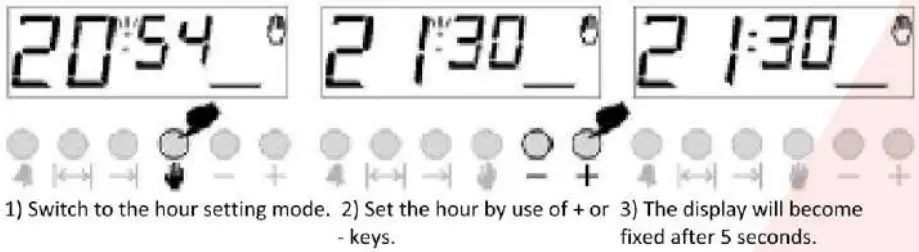 SETTING ALARM
By this function, you may make the alarm ring at the end of the time you have set. 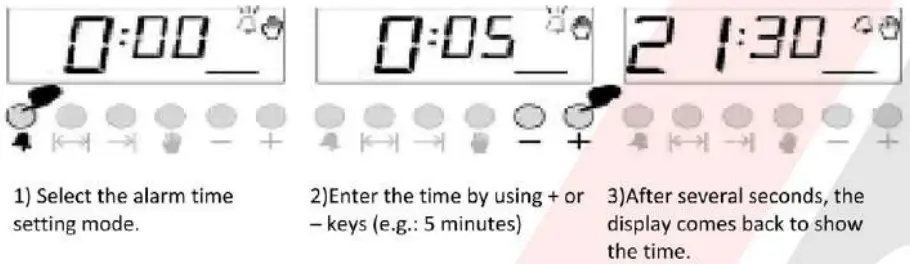 Note. How long remained to ring the alarm can be viewed on the display by pressing the key
 ![]() .
.
TO SILENCE THE RINGING ALARM
 | |
| 1)When the alarm time is set, the alarm starts to ring. | 2) You may silence the alarm by pressing the key |
AUTOMATIC COOKING PROGRAM
If you will start to immediately cook the food you put into the oven, you simply enter the cooking time.
Example: We put the food we desire to cook in the oven and want it to cook it for 2 hours and 15 minutes. 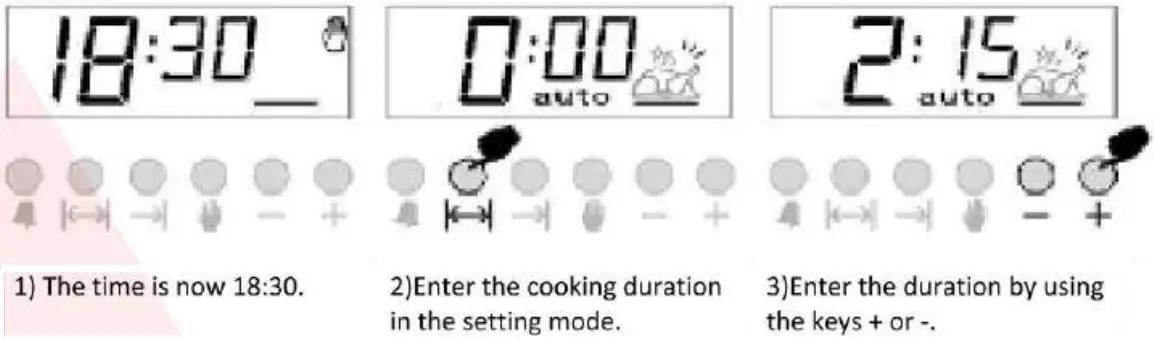
 The oven timer is set to cook the food for 2 hours and 15 minutes starting from this moment. Please remember to bring other control switches on the oven to the proper positions according to tot the cooking function and temperature you desire.
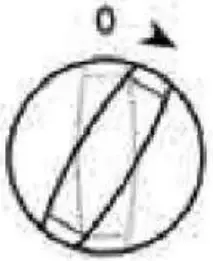 4). After several seconds, the display will start to show the current time, indicating that the food is cooked.
Note: When making the cooking program or when the program is running, you may cancel the program by pressing the key ![]() .
.
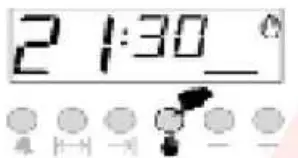
In the example given above, we saw that you may start the cooking process immediately by entering the cooking time. And you may also view and if required, set the time when the food will be ready (cooking completion time) by pressing the key ![]() . In the following example, the setting is made in such a way that the food will be ready at 21:30.
. In the following example, the setting is made in such a way that the food will be ready at 21:30.
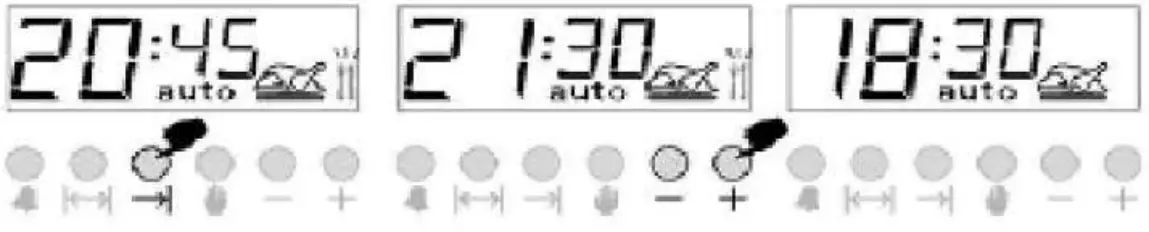 | ||
1)The display shows the time when the food will be ready, i.e. 18:30+2:15= 20:45. | 2) You may set the cooking completion time by help of the keys + or – | 3) After several seconds, the display will start to show the time. |
In this case, we have programmed the oven to be ready at 21:30. We had previously set the cooking time of the food as 2 hours and 15 minutes. And in this case, the oven will start the cooking process at 191.5, cook the food for 2 hours and 15 minutes and the cooking program will complete at 21:30.
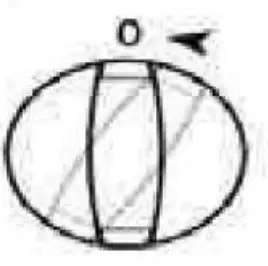
 | |
| The display to appear when the cooking process starts: | The display appears when the cooking process completes. |
When the cooking program completes, the audio warning is enabled and if it is not silenced it will operate for 7 minutes.
 |  |
| 1). Switch the oven off. | 2). Reset the oven timer. |
Note: The oven will remain disabled until you reset the oven timer.
In the example given above, the cooking time was entered and the cooking completion time calculated automatically was changed by us in the second phase. If desired, it is also possible to enter the cooking completion time; in such a case, the cooking time will be calculated automatically and, if required, it will be changed in the second phase.
IN CASE OF POWER FAILURE
In case the mains power is off, your oven will remain disabled for safety. This situation is shown by the hand icon flashing on the display. In this position, even if there Is currently a cooking program, it will be deleted. The time shown on the display is also not correct and is required to be adjusted. First press the key ![]() to enabling the oven and then you may set the time later (see time setting).
to enabling the oven and then you may set the time later (see time setting).
Note: If you do not intend to operate the oven, remember to bring the switch on the oven to the ‘off position.
THE FLASHING ‘HAND ICON INDICATES THAT THE OVEN IS DISABLED AND YOU SHOULD PRESS THE KEY ![]() TO SWITCH TO THE NORMAL POSITION.
TO SWITCH TO THE NORMAL POSITION.
SETTING ALARM VOLUME
- Reset the oven timer by pressing the key
 .
. - You may hear the set volume by keeping the (-) key pressed. Release the key (-) and press it to hold it again to listen to and select the volume. (3 levels)
- Now the alarm will ring at the volume you listened to last.
Note: The default alarm volume is at the highest level. When the mains power is off, if the alarm volume was changed, it will come back to the default setting.
SCREEN BRIGHTNESS SETTING
- Reset the oven tinier by pressing the key .
- Press the key (+). Pressing and releasing the key (+) will enable you to view the screen brightness level (3 levels)
- Now the screen will be at the brightness level you left last.
Note: The default screen brightness is at the brightest level When the mains power is off, if the screen brightness level was changed, it will come back to the default setting.
Cooking duration table 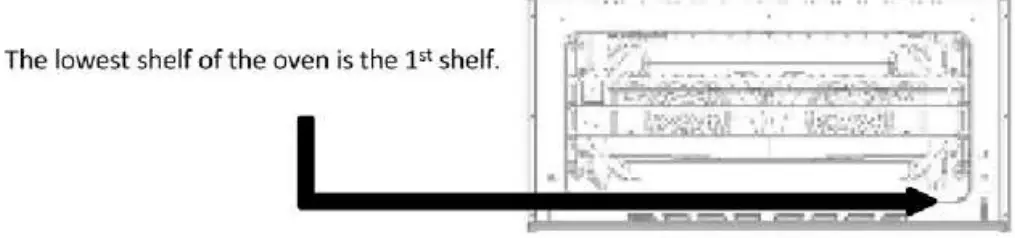
- The indicated values are determined at the laboratory. The values may vary according to your taste.
- Switch off the function switch and oven by use of the temperature switch.
Food Cooidrigcontainer Shelf position Temperature (•C) Cooling duration (m) (approx) Cake in tray Oven tray 3 170…180 25…35 Cake in mold Cake mold 18…22 cm 1…2 170…180 30..40 Cookie Oven tray 3 170…190 25…35 Crisp Millefeuille Oven tray 3 180…190 25…35 Do Not Oven tray 3 170…180 25…35 Pie Oven tray 3 200 40…50 Phyllo dough Roasting tray 5 200 35…45 Pastry Oven tray 3 180…190 40…45 Dough pastry Oven tray 3 180…190 40…50 Pizza Oven tray 1…2 200…220 15..20 Steak Oven tray 1…2 IS min.Max.» 100…110 Lamb’s leg Oven tray 1…2 90…100 Roasted chicken Oven tray 4 60…70 Turkey part Oven tray 1 25 dk.220 » 180…240 Fish Oven tray 1…2 200 15…25 Adjust the temperature to 150°C after “minutes maximum”*.
Operation of the grill![]() Hot surfaces may cause burns. Close the oven door at the time of grilling.
Hot surfaces may cause burns. Close the oven door at the time of grilling.
When grilling, turn the timer setting switch, if any, to the hand symbol.
Opening the grill
- Bring the function switch onto the grill symbol you will select.
- Then set it to the desired grill temperature.
- If required, do preheat for about 5 minutes.
» Temperature light turns on.
Switching Off the Grill
- Bring the function switch to the off (upper) position.
Grilling by the electric grill
| Food | Shelf position | Grill time |
| Fish | 4 | 30…40 DK.* |
| Chicken in part | 4 | 40…50 DK.* |
| Lamb chops | 4 | 40…50 DK.* |
| Steak | 4 | 40…50 DK.* |
| Veal chops | 4 | 40…50 DK.* |
| *depends on thickness. | ||
Use of the electric burners (hotplates)
If your product is equipped with an electric burner, the switching system to be used will be optional as follows:
| Position Of Switch | Ø 145 1000W | Ø 145 RAPID 1500W | Ø 180 1500W | Ø 180 RAPID 2000W |
| 1 | 100 W | 156 W | 155 W | 200 W |
| 2 | 165 W | 210 W | 185 W | 250 W |
| 3 | 255 W | 285 W | 330 W | 330 W |
| 4 | 510 W | 820 W | 390 W | 930 W |
| 5 | 750 W | 1070 W | 731 W | 1250 W |
| 6 | 1000 W | 1500 W | 1500 W | 2000 W |

| Position Of Switch | Ø 145 1000W | Ø 145 RAPID | Ø 180 1500W | Ø 180 RAPID |
| 1500W | 2000W | |||
| 1 | 250 W | 400 W | 400 W | 750 W |
| 2 | 750 W | 1100 W | 1100 W | 1250 W |
| 3 | 1000 W | 1500 W | 1500 W | 2000 W |
 |  |  |
Use dry-based pots on the range. Do not put the pot lid, particularly the wet ones, on the range. | After use of the range, allaw It to cool down and wipe with a damp cloth. If it’s got dirty excessively, then clean it thoroughly with water. | After cleaning the range, heat for several minutes to dry the top of the range. If you will not use it for an extended time, lubricate the top part to ensure a thin oil film on it. |
| Stainless metal sheets around the electric ranges may change color by heat. It does not cause any problem for use. | ||
Maintenance and cleaning
General information![]() If the product is cleaned regularly, the service life of the product extends and the frequently encountered problems reduce the Risk of electric shock! The power connection of the product should be switched off prior to the cleaning to avoid any risk of electric shock
If the product is cleaned regularly, the service life of the product extends and the frequently encountered problems reduce the Risk of electric shock! The power connection of the product should be switched off prior to the cleaning to avoid any risk of electric shock![]() “Caution: Glass Ild may crack when heated.
“Caution: Glass Ild may crack when heated.
Switch off all burners before the glass cover Is closed.” Hot surfaces may cause burns!
![]() Allow the product to cool down prior to cleaning it.
Allow the product to cool down prior to cleaning it.
- The product should be cleaned well after each use. Thus the food remnants are easily cleaned off and when the product is used subsequently, incineration of such waste is prevented.
- It is not required to use any special cleaning agent to clean the product. Clean the product by use of washing liquid, lukewarm water, and a soft cloth or sponge and dry by using a dry cloth.
- Make sure that any liquid left after the cleaning operation is completely wiped off and any food splash around during the cooking process is immediately cleaned.
- For cleaning stainless or inox surfaces and handle, do not use acid- or chlorine-containing cleaning articles. Take care to wipe in one direction by use of a soft cloth damped with soap and liquid (non-scratching) detergent.
![]() Some detergents or cleaning agents may give damage the surface. Do not use aggressive detergents, cleaning powders/creams, or sharp objects.
Some detergents or cleaning agents may give damage the surface. Do not use aggressive detergents, cleaning powders/creams, or sharp objects.![]() Do not use steam cleaning products for cleaning purposes.
Do not use steam cleaning products for cleaning purposes.
Cleaning of the control panel
Clean the control panel and control switches by use of a damp cloth and wipe it dry using a dry cloth.![]() The Control panel may get damaged! Do not remove the control switch to clean the control panel.
The Control panel may get damaged! Do not remove the control switch to clean the control panel.
Cleaning the oven  No oven cleaner or other special cleaning agents are required to clean the oven. It is recommended to wipe the oven by use of a damp cloth when it is still lukewarm.
Cleaning and removal of the oven door
Do not use hard and aggressive cleaning agents for cleaning the oven door; these substances may scratch the surface and give damage the window
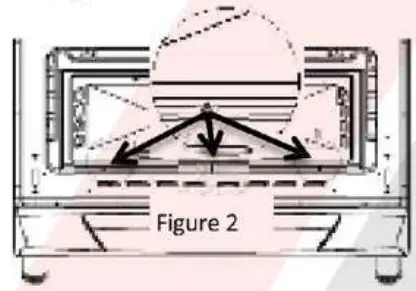
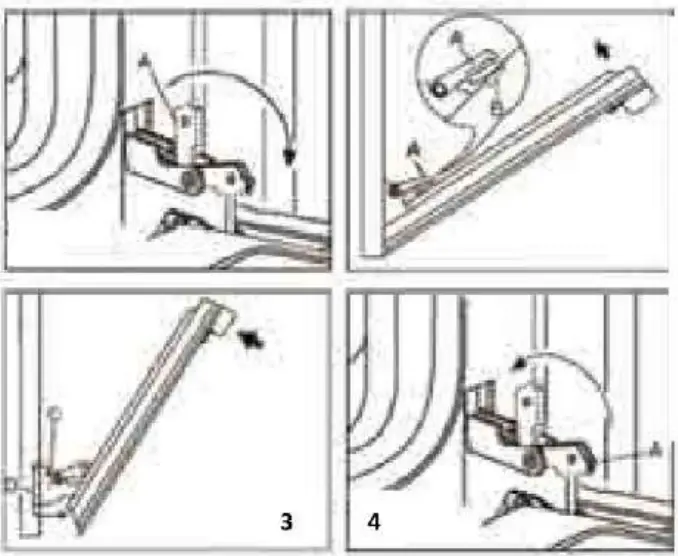 | Remove; the oven door Turn part A shown in figure 1 in the direction of the arrow. As shown In Figure 2, Insert Part A into part B. |
| Push forward in the direction of the arrow and pull toward you the oven door as shown in figure 3. |
Replacement of the oven lamp![]() Hot surfaces may cause burns!
Hot surfaces may cause burns!
- Open the oven door.
In order to eliminate electric shock, disconnect the power and allow it to cool down prior to removal of the oven lamp.
![]() An oven lamp is a special electric lamp resistant to 300°C. For specifications of the lamp, see Technical specifications, page 3.
An oven lamp is a special electric lamp resistant to 300°C. For specifications of the lamp, see Technical specifications, page 3.![]() Oven lamps may be supplied from the Authorized Service Centers. The position of the lamp may be different from the one indicated in the figure.
Oven lamps may be supplied from the Authorized Service Centers. The position of the lamp may be different from the one indicated in the figure.
If your oven has a round lamp:
- Disconnect the mains’ power.
- Turn the glass door anticlockwise and remove it.
- Turn the oven lamp anticlockwise and replace it with the new one.
- Put the glass door in place again.

Recommended solutions for the problems
The product does not operate.
- The plug of the product (earthed) is possibly not plugged into the socket. Make sure it is plugged into the socket.
- The fuse blows or fails. Inspect the fuses in the fuse board. If it is disengaged, engage it again
Steam goes out when the oven operates
- Steam going out of the oven during operation is normal. It is not a failure
Clanging is heard when the product is getting hot and cold.
- The metal parts may make a sound due to expansion at the time of heating. It is not a cause of failure
The oven is not getting warm.
- No power supply. Make sure that power is available at home and inspect the fuses in the fuse board. If required, engage the fuses again.
- For versions equipped with timers, the timer is not set. Set the time or bring it to the manual (hand) symbol.
- The function and/or temperature switch are not set. Set the function and/or temperature switch.
The oven light does not turn on
- No power. Make sure that power is available at home and inspect the fuses in the fuse board. If required, engage the fuses again.
- The oven light is damaged. Replace the oven light.
Problems with the gas oven
- Burner burns late when Ignition is performed. Control the gas pressure whether your product operates at the set pressure (see the nameplate in the rear).
- The burner turns off when it burns for a while. Control the gas pressure whether your product operates at the set pressure (see the nameplate in the rear).
- Do not use the cylinder regulator asset.
If the problem is not eliminated although you have applied the instructions given in this section, consult the dealer or authorized service center. Do not try to repair any failed product yourself.
![]() www.alhafidh.com
www.alhafidh.com
©Alhafidh Group Trading fzco.2019


