
 Einhell TE-VC 2230 SA Wet and Dry Vacuum Cleaner
 Safety information
 Safety information
- Important: Read the operating instructions before assembling and using the appliance for the first time.
- Check that the mains voltage is the same as the mains voltage specified on the rating plate. Pull out the power plug in the following circumstances: Whenever the appliance is not in use, before opening the appliance and before all cleaning and maintenance work.
- Never clean the appliance with solvents.
- Never pull the plug out of the socket by pulling the cable.
- Never leave the appliance unattended when operational.
- Keep away from children.
- Take care to ensure that the power cable does not get damaged by being run over, crushed, pulled or suchlike.
- Do not use the machine if the power cable is in a less than perfect condition.
- If the power cable has to be replaced, the replacement must comply with the design specifications of the manufacturer. Power cable: H 05 VV – F 3 x 1.5 mm2
- Never vacuum the following: Burning matches, smoldering ash and cigarette butts, combustible, caustic, inflammable or explosive substances, vapor or liquids.
- This appliance is not suitable for vacuuming dust which can be harmful to health.
- Store the appliance in a dry indoor location.
- Never use the appliance if it is damaged.
- Only allow the appliance to be serviced by an authorized after-sales service outlet.
- Only use the appliance to carry out work for which has been designed.
- Take extra care when cleaning steps.
- Use only genuine accessories and spare parts.
- This appliance is not intended for use by persons (including children) with reduced physical, sensory or mental capabilities, or lack of experience and knowledge, unless they have been given supervision or instruction concerning use of the appliance by a person responsible for their safety. Children should be supervised to ensure that they do not play with the appliance.
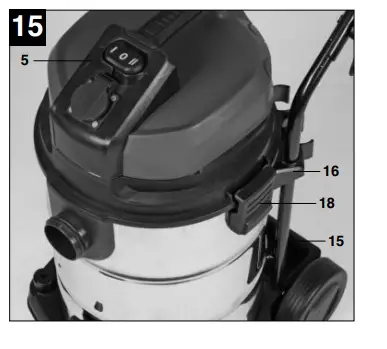
Layout and items supplied (Fig. 1-4/15)


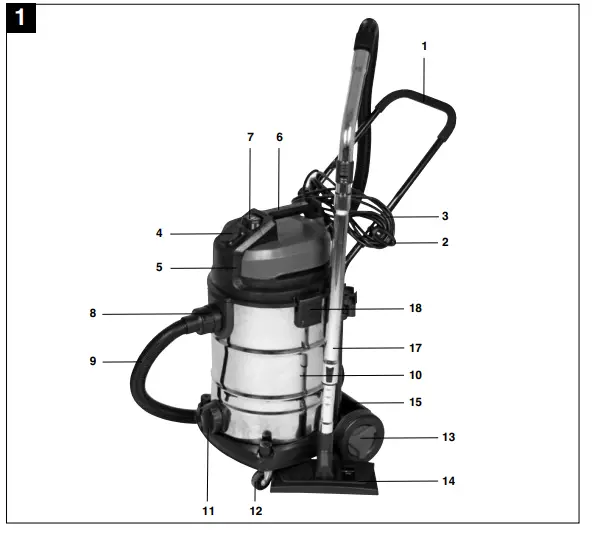
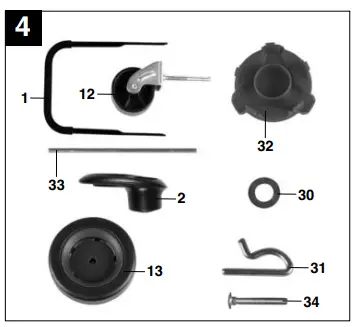
- Handle
- Hook for cable store
- Power cable
- Automatic socket-outlet for electric tools
- Head
- Handle
- ON/OFF/Automatic switch
- Suction hose connection
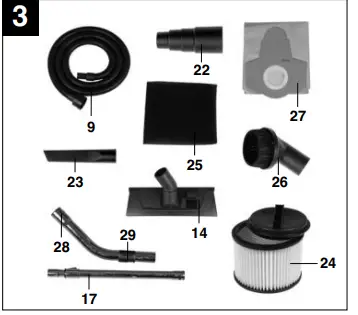
- Flexible suction hose
- Tank
- Water drain screw
- Castors
- Wheels
- Dual purpose nozzle
- Accessory compartment
- Holder for handle
- Suction tube
- Locking hook
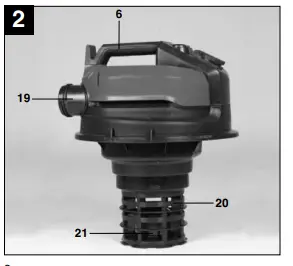
- Blow connector
- Filter cage
- Safety float valve
- Electric tool adapter
- Crevice nozzle
- Pleated filter with cover
- Foam filter
- Upholstery nozzle
- Dirt bag
- Handle
- Air regulator
- 4 x Washers for fitting the wheels
- 2 x Split pins for fitting the wheels
- 2 x Covers for fitting the wheels
- Axle for fitting the wheels
- 2 x Screws for fitting the handle
Intended use
The wet and dry vacuum cleaner is designed for wet and dry vacuuming using the appropriate filter. The appliance is not suitable for the vacuuming of combustible, explosive or harmful substances.
The machine is to be used only for its prescribed purpose. Any other use is deemed to be a case of misuse. The user / operator and not the manufacturer will be liable for any damage or injuries of any kind caused as a result of this.
Please note that our equipment has not been designed for use in commercial, trade or industrial applications. Our warranty will be voided if the machine is used in commercial, trade or industrial businesses or for equivalent purposes.
Technical data
- Mains voltage: 230 V ~ 50 Hz
- Power input: 1150 watts
- Max. power consumption of the automatic socket- outlet:3400 watts
- Max. power consumption of the automatic socket- outlet:2250 watts
- Container volume: 30 l
- Weight: 11.1 kg
Before starting
Important!
- Before you connect the appliance to the mains supply make sure that the data on the rating plate are identical to the mains data.
- The appliance may only be connected to a shock-proof socket.
Assembling the appliance
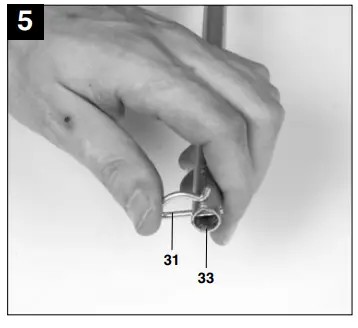
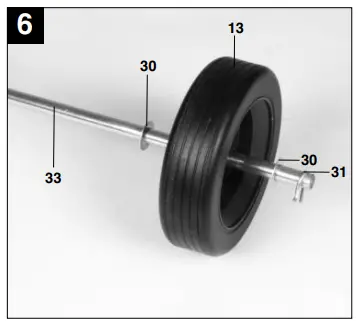
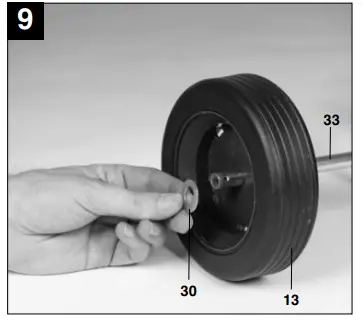
Fitting the wheels (Fig. 4-11/13)
Place a split pin for fitting the wheels (31) through the appropriate hole in the axle (33) and fit a washer (30) and a wheel (13) to the axle (33) (Fig. 5-6).![]()
 Now slide the axle (33) through the guides provided for it on the underside of the tank (10) (Fig. 7).
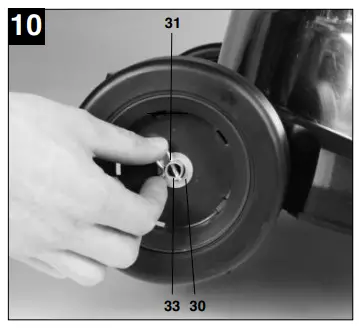
 Fit the second wheel (13) to the empty end of the axle (33) and secure it with the other washer (30) and the split pin (31) (Fig. 8-10)
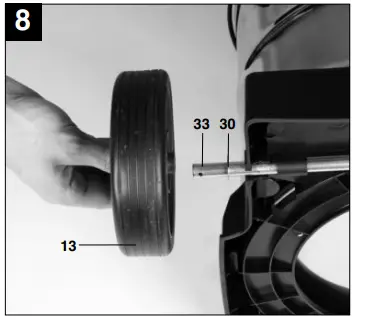
 Push the covers (32) on to the outside of the wheels (13) so that the detents engage on the covers (32) for the wheel (13). (Fig. 11).
Fitting the castors (Fig. 12/12) Fit the castors (12) into the appropriate mountings on the underside of the tank (10). Push the castors (12) firmly into the mounting until they engage with a clicking noise (Fig. 12).
Fitting the handle (Fig. 13/1)
Place the handle (1) into the handle mounts (a) of the tank and secure the handle with the supplied screws (34) as shown in Figure 13.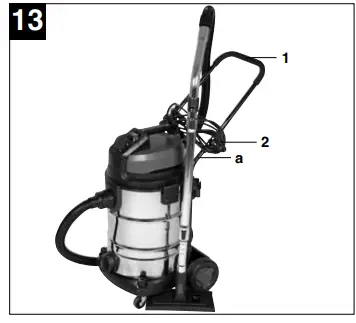
Fitting the appliance head (Fig. 5/14-15)
The appliance head (5) is fastened to the container (10) by the locking hook (18). To remove the appliance head (5), open the locking hook (18) and remove the appliance head (5). When fitting the appliance head (5), make sure that the locking hook (18) locks into place correctly.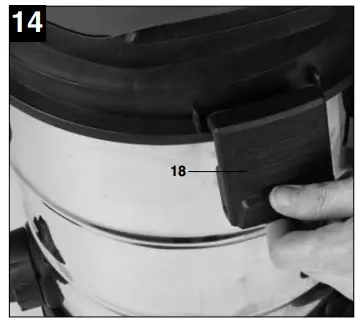
 Fitting the filter
Important!
Never use the wet and dry vacuum cleaner without a filter.
Check that the filter is securely fitted at all times.
Fitting the foam filter (Fig. 16/25)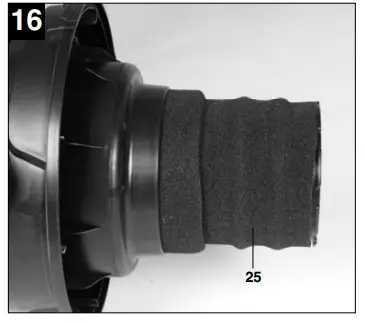 For wet vacuuming, slip the supplied foam filter (25) over the filter basket (Fig. 2/20). The pleated filter (24) already fitted upon delivery is not suitable for wet vacuuming.
Fitting the pleated filter (Fig. 17/24)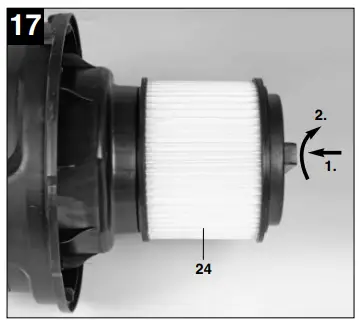 For dry-vacuuming, slip the pleated filter (Fig. 3/24) over the filter basket (Fig. 2/20). The pleated filter (24) is suitable for dry-vacuuming only.
Fitting the tank bag (Fig. 3/35)
Fit the dirt bag (27) as shown in Figure 18.
Fitting the suction hose (Fig. 1-3/18)
Connect the suction hose (9) to the corresponding connector on the wet and dry vacuum cleaner, depending on the application required.
Vacuuming
Connect the suction hose (9) to the suction hose connector (8).
Blowing
Connect the suction hose (9) to the blow connector (19).
Air regulator (Fig. 3/29)
The air regulator (29) can be fitted between the suction hose (9) and the suction tube (17). The suction power of the nozzle can be infinitely adjusted using the air regulator (29).
When wet vacuuming, make selective use of the air regulator to suck in air as well as liquids. This will help to take some strain off the equipment when vacuuming liquids.
Suction nozzles
Dual-purpose nozzle (Fig. 3/14)
The dual-purpose nozzle (14) is for vacuuming solids and liquids over medium to large areas.
Various attachments can be fitted to the combination nozzle depending on what you sort of work you wish to carry out:
Wet vacuuming
Use the attachment for wet vacuuming (Fig. 3/26).
Vacuuming smooth flooring
Use the attachment for smooth floors (Fig. 3/27).
Vacuuming carpets
Use the attachment for carpets (Fig. 3/28).
Fit the appropriate attachment into the combination nozzle (14) from underneath and secure it to the combination nozzle (14) using the side lugs (fig. 15).
Ensure that the attachments are perfectly secure.
Crevice nozzle (Fig. 3/23)
The crevice nozzle (23) is designed for vacuuming solids and liquids in corners, edges and other areas that are difficult to access.
Upholstery nozzle (Fig. 3)
The upholstery nozzle (26) is specially designed for vacuuming solids on upholstery and carpets.
Operation
ON/OFF switch (Fig. 2/7)
- Switch position 0:Off
- Switch position I:Normal operation
- Switch position AUTO:Automatic mode
Dry vacuuming
Use the pleated filter (24) for dry vacuuming (see point 5.2). The dirt bag (27) can be fitted in addition when removing particularly stubborn dirt (see point 5.3).
Always ensure that the filters are perfectly secure.
Wet-vacuuming
For wet-vacuuming, use the foam filter (25) (see point 5.2).
Check that the filter is securely fitted at all times.
Water drain screw (Fig. 1/11)
To make the tank (10) easier to empty after wet vacuuming, it is fitted with a water drain screw (11). Open the water drain screw (11) by turning it anti-clockwise and drain the liquid.
Important!
When wet vacuuming, the floating safety switch (21) closes when the maximum tank level is reached. In doing so, the suction noise of the equipment will change and become louder.
You must then switch off the equipment and empty the tank.
Important!
The wet and dry vacuum cleaner is not suitable for vacuuming of combustible liquids.
For wet vacuuming, use only the supplied foam filter.
Automatic mode
Connect the power cable on your electric tool to the automatic socket-outlet (4) and connect the suction hose (9) to the extractor connector on your electric tool. Check that the connections are secure and air-tight.
You can use the supplied electric tool adaptor (22) to connect the suction hose (9) to the electric tool. To do so, fit it between the suction hose and the extractor port on the electric tool.
Set the switch (7) on the wet and dry vacuum cleaner to position AUTO, automatic mode. The moment you switch on the electric tool, the wet and dry vacuum cleaner switches on as well. When you switch off the electric tool, the wet and dry vacuum cleaner switches off as well after a pre-set delay.
Blowing
Connect the suction hose (9) to the blow connector (19) on the wet and dry vacuum cleaner.
Cleaning, maintenance and ordering of spare parts
Important!
Always pull out the mains power plug before starting any cleaning work.
Cleaning
- Keep all safety devices, air vents and the motor housing free of dirt and dust as far as possible.
- We recommend that you clean the appliance immediately after you use it.
Cleaning the appliance head (5)
Clean the appliance regularly with a damp cloth and some soft soap. Do not use cleaning agents or solvents; these may be aggressive to the plastic parts in the appliance.
Cleaning the container (10)
The container can be cleaned with a damp cloth and some soft soap or under running water, depending on the amount of dirt.
Cleaning the filters
Cleaning the pleated filter (24)
Clean the pleated filter (24) regularly by carefully patting it and cleaning it with a fine brush or hand brush.
Cleaning the foam filter (25)
Clean the foam filter (25) with a little soft soap under running water and allow it to air-dry.
Maintenance
At regular intervals and before each use, check that the filters in the wet and dry vacuum cleaner are securely fitted.
Ordering replacement parts
Please quote the following data when ordering replacement parts:
- Type of machine
- Article number of the machine
- Identification number of the machine
- Replacement part number of the part required For our latest prices and information please go to www.isc-gmbh.info
Disposal and recycling
The unit is supplied in packaging to prevent its being damaged in transit. This packaging is raw material and can therefore be reused or can be returned to the raw material system.
The unit and its accessories are made of various types of material, such as metal and plastic. Defective components must be disposed of as special waste. Ask your dealer or your local council.


