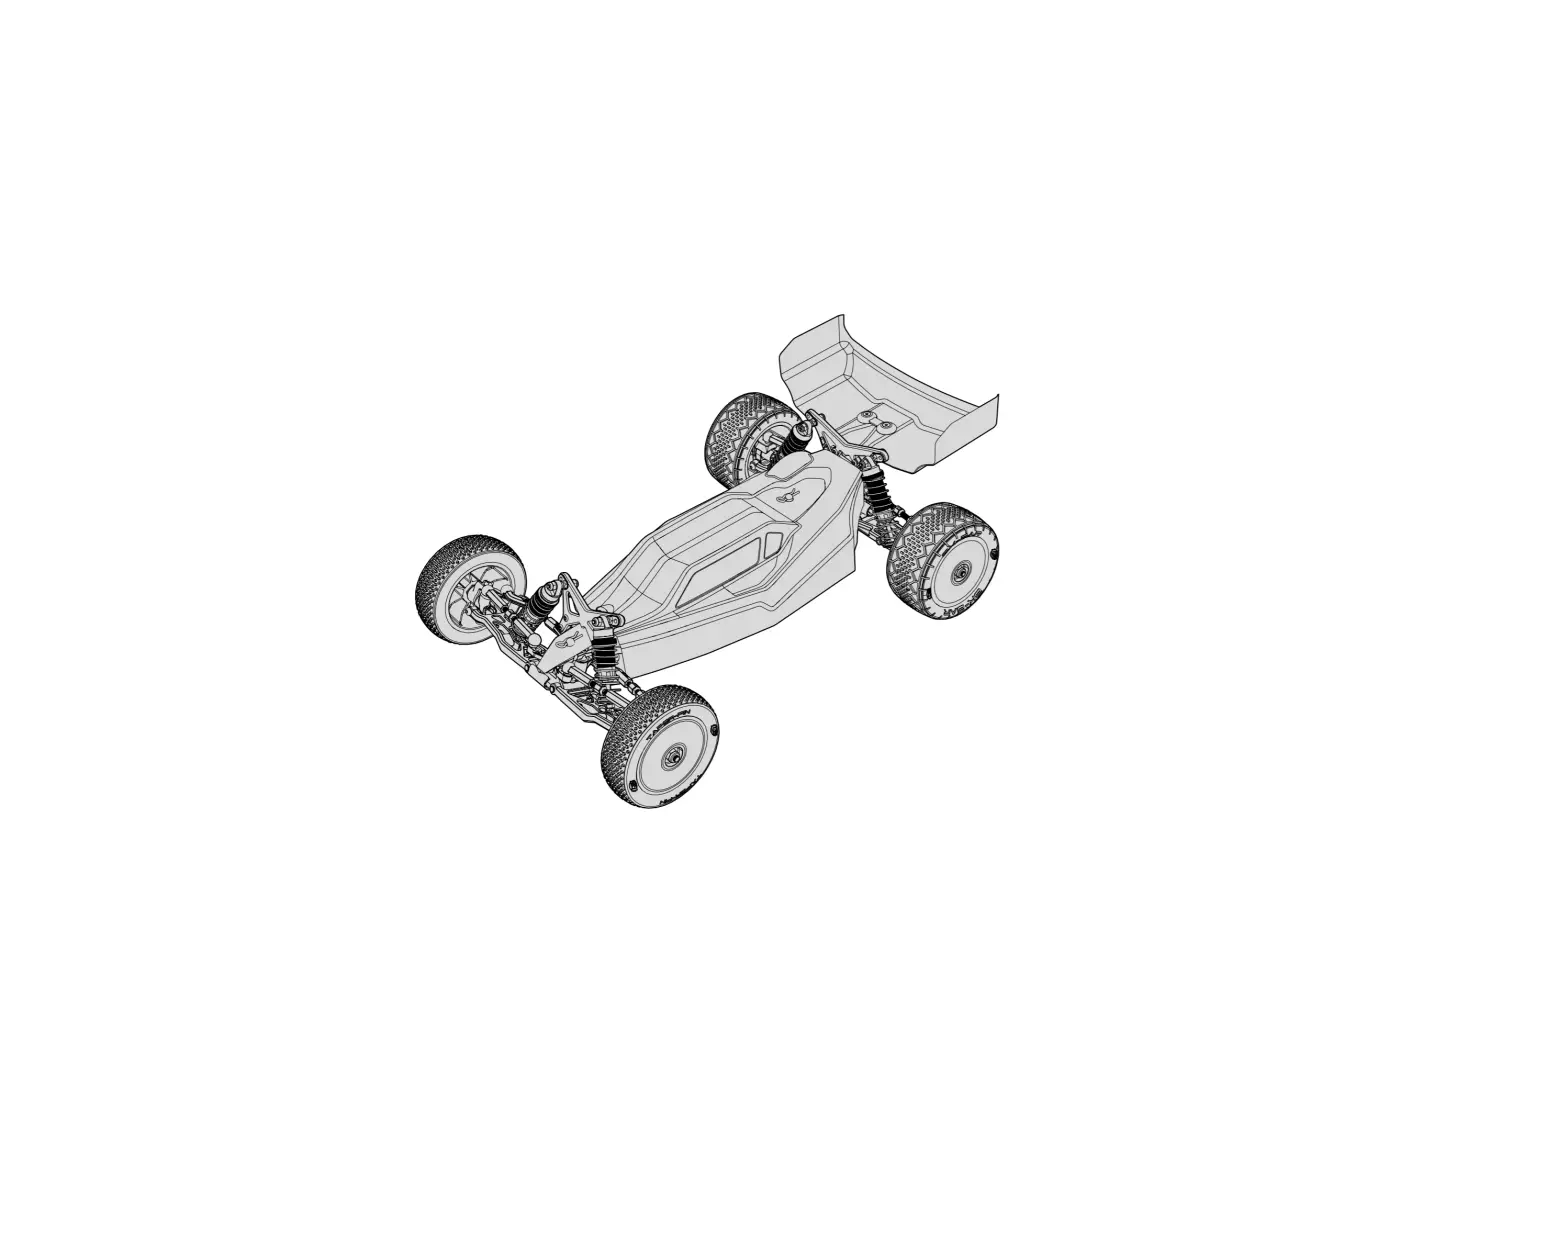
HORIZON LOS01025 Mini-B 1/16 Scale 2WD Buggy Pro Roller

Scan the QR code and select the Manuals and Support quick links from the product page for the most up-to-date manual information.
INSTRUCTION MANUAL
| NOTICE All instructions, warranties and other collateral documents are subject to change at the sole discretion of Horizon Hobby, LLC. For up-to-date product literature, visit horizonhobby.com or towerhobbies.com and click on the support or resources tab for this product. MEANING OF SPECIAL LANGUAGE |
WARNING AGAINST COUNTERFEIT PRODUCTS Always purchase from a Horizon Hobby, LLC authorized dealer to ensure authentic high-quality Spektrum product. Horizon Hobby, LLC disclaims all support and warranty with regards, but not limited to, compatibility and performance of counterfeit products or products claiming compatibility with DSM or Spektrum. |
Age Recommendation: Not for children under 14 years. This is not a toy.
SAFETY PRECAUTIONS AND WARNINGS
- Always keep a safe distance in all directions around your model to avoid collisions or injury. This model is controlled by a radio signal subject to interference from many sources outside your control. Interference can cause momentary loss of control.
- Always operate your model in open spaces away from full-size vehicles, traffic and people.
- Always carefully follow the directions and warnings for this and any optional support equipment (chargers, rechargeable battery packs, etc.).
- Always keep all chemicals, small parts and anything electrical out of the reach of children.
- Always avoid water exposure to all equipment not specifically designed and protected for this purpose. Moisture causes damage to electronics.
- Never place any portion of the model in your mouth as it could cause serious injury or even death.
- Never operate your model with low transmitter batteries.
REGISTER YOUR LOSI PRODUCT ONLINE
Register your vehicle now and be the first to find out about the latest option parts, product updates and more. Click on the Support tab at www.LOSI.com and follow the product registration link to stay connected.
RECOMMENDED ACCESSORIES
- Soft bristle brush for cleaning
- Startup Tool Set: Metric (DYN2834)
- Thread Lock
TOOLS INCLUDED
- 4-Way Wrench
- 1.5mm Hex L Wrench
- 2mm Hex L Wrench
Use only Dynamite® tools or other high-quality tools. Other tools can cause damage to the small screws and parts used on this model.
CONTENTS
| INCLUDED | REQUIRED COMPONENTS | RECOMMENDED COMPONENTS | PART NUMBER |
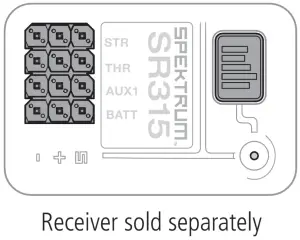
| Losi® Mini-B Roller | 2+ Channel Radio Control System | Spektrum DX5C DSMR 5CH TX Only, SR315 Receiver combo | SPM5115C |
| High Torque Steering Servo with 20T Output Gear | Spektrum™ SX107 Micro Analog Metal Gear Surface Servo | SPMSSX107 | |
| Motor / ESC | Dynamite® Brushless Motor/ESC 2-in-1 Combo, 6000Kv: Mini-T 2.0 | DYNS0501 | |
| Pinion | 18T | See parts list | |
| 2S Hardcase LiPo Battery | Spektrum 7.4V 800mAh 2S 50C Hardcase LiPo with EC2 | DYNB825H2 | |
| Charger | Spektrum SMART S1200 DC Charger, 1x200W | SPMXC1000 |
QUICK START
Please read the entire manual to gain a full understanding of the Mini-B vehicle, fine-tuning the setup and performing maintenance.
|
INSTALLING THE RECEIVER (NOT INCLUDED)
- Install servo tape to the receiver.
- Install the receiver to the chassis.
- Refer to transmitter/receiver manual for binding instructions.

- Connect the steering linkage to the ball on the servo arm.
- Connect the other end of the steering linkage to the ball on steering rack.

- Connect the servo wire to the steering port on the receiver.

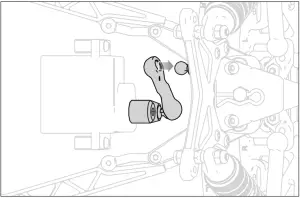
INSTALLING THE STEERING SERVO (NOT INCLUDED)
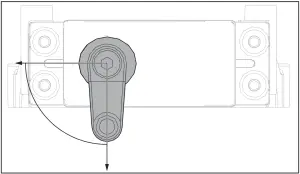
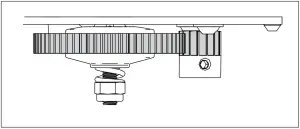
- Mount the servo SX107 with the output shaft toward the left side of the chassis a as shown in the image below.

- Center the steering servo using a servo checker. If no servo checker is available, the servo can be centered with the radio system. Power on the transmitter and ensure the steering trim is centered. Plug the servo into the receiver. Power on the receiver. The servo should power on and move to center.
- With the servo centered, install the recommended (LOS311010) servo horn so the ball is 90 degrees as shown in the image below.
NOTE: The included aluminum servo horn requires a servo with a 20T output gear.
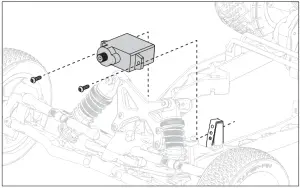
INSTALLING THE MOTOR ESC COMBO (NOT INCLUDED)
- Remove two screws and the gear cover.
- Install the recommended (DYNS0501) motor. Mount the motor on the center top and bottom holes of the mount.

- Slide the 18T pinion gear on the motor shaft. Match the tooth profile of the pinion gear to the tooth profile of the spur gear, then tighten the pinion gear to the motor shaft. Ensure the set screw for the pinion gear is tightened on to the flat spot on the motor shaft, or the pinion gear will come off. The pinion should be centered to the spur gear as shown in the image below.

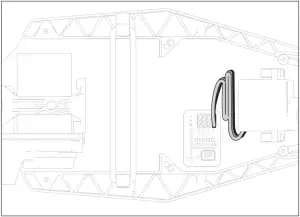
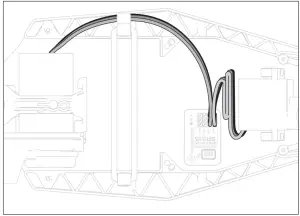
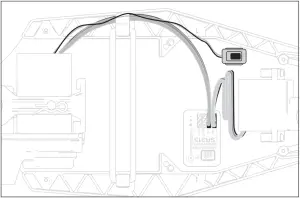
- Route the ESC wire down the side guard using the supplied clip to guide the wire to the receiver.

- Route the ON/OFF wire down the side guard using the supplied clip to guide the wire to mount the ON/OFF Switch.
- Install the gear cover.

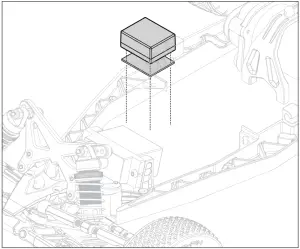
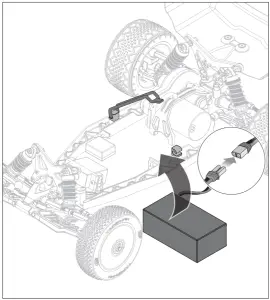
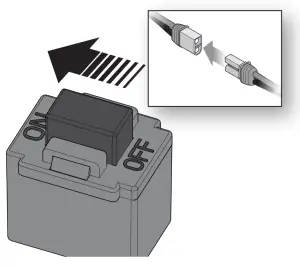
INSTALLING THE BATTERY AND POWERING ON THE VEHICLE
- If required, remove the body clips and lift the body.
- Remove the elastomer strap from the battery posts.
- Install the fully charged battery in vehicle.
- Re-secure the elastomer strap.
- Connect the battery to the ESC/receiver.
- Ensure the ESC/receiver is powered off.
- Power on the transmitter.
- Power on the ESC/receiver.
- Reinstall the body and the body clips.

BINDING
Refer to your transmitter/receiver manual for binding insturctions.
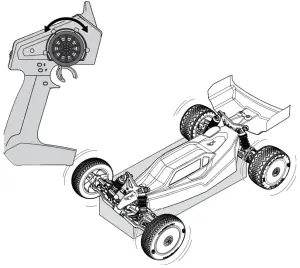
CONTROL TEST
Perform a control test with the vehicle wheels off the ground. If the wheels rotate after the vehicle is powered ON, adjust the Throttle Trim until they stop. To make the wheels move forward, pull the trigger. To reverse them, wait for the wheels to stop, then push the trigger.
When moving forward, the wheels should maintain a straight line without any steering wheel input. If not, adjust the Steering Trim, so the wheels maintain a straight line without having to turn the steering wheel.
DRIVING PRECAUTIONS
- Maintain sight of the vehicle at all times.
- Inspect the vehicle for loose wheel hardware.
- Inspect the steering assembly for any loose hardware. Driving the vehicle off road can cause fasteners to loosen over time.
- Do not drive the vehicle in tall grass. Doing so can damage the vehicle or electronics.
- Stop driving the vehicle when you notice a lack of power. Driving the vehicle when the battery is discharged can cause the receiver to power off. You may lose control of the vehicle.
- Do not apply the throttle in forward or reverse if the vehicle is stuck. Applying throttle in this instance can damage the motor or ESC.
- After driving the vehicle, allow the electronics to cool to ambient temperature before using the next battery pack.
RUN TIME
The condition of a battery pack is also an important factor in both run time and speed.
The battery connectors may become hot during driving. Batteries will lose performance and capacity over time.
Driving the vehicle from a stop to full speed repeatedly will damage the batteries and electronics over time. Sudden acceleration will also lead to shorter run times.
TO IMPROVE RUN TIMES
- Keep your vehicle clean and well maintained.
- Allow more airflow to the ESC and motor.
- Change the gearing to a lower ratio. A lower ratio lowers the operating temperature of the electronics. Use a smaller pinion gear or larger spur gear to lower the gear ratio.
GETTING STARTED
- Power on the transmitter

- Power on the ESC.

- Perform a test of the transmitter’s control of the vehicle with the vehicle’s wheels off the ground.

- Start driving slowly, and, if the vehicle does not go straight, adjust the steering trim dial on the transmitter.


OPERATION
|
TUNING, ADJUSTING AND MAINTAINING THE VEHICLE
- Examine your vehicle on a regular basis.
- Use a brush to remove dirt and dust.
- Look for damage to the suspension arms and other molded parts.
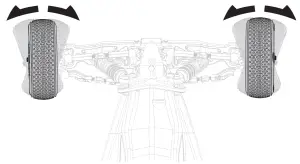
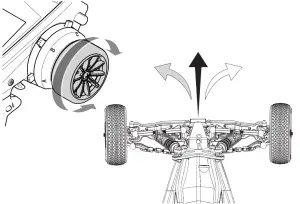
- Re-glue the tires to the wheels, if necessary.
- Use suitable tools to tighten fasteners.
- Make sure the camber and steering linkages are not bent. Replace any bent linkages.
- Adjust the Toe and Camber settings, if necessary.
- Remove the shocks and inspect them for damage. Rebuild the shocks if oil is leaking.
- Inspect electronics and batteries for exposed wires. Repair exposed wires with shrink-wrap or replace the wire.
- Make sure the ESC and receiver are secure on the chassis. Replace the double sided tape, if necessary.
- Check the spur gear for wear.
SERVICE/REPAIR
RADIO/SPEED CONTROL AND MOTOR
If any problems other than those covered in the troubleshooting section arise, please call the appropriate electronics service department at 877 504 0233. They will be able to give the problem additional specific attention and provide instructions for the solution.
MAINTENANCE
If any questions other than those covered in the troubleshooting or maintenance sections arise, please call the appropriate Horizon product support department at 877 504 0233.
CLEANING
Performance can be hindered if dirt gets in any of the moving suspension parts. Use compressed air, a soft paintbrush, or a toothbrush to remove dust or dirt. Avoid using solvents or chemicals as they can actually wash dirt into the bearings or moving parts, as well as cause damage to the electronics.
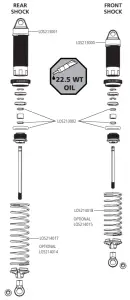
SHOCK CLEANING
Oil-filled shocks will require regular maintenance due to the oil breaking down or getting dirty. This maintenance should be performed after about every 3–5 hours of use, depending on the driving conditions.
- Remove the shock from the vehicle.
- Remove the bottom cartridge from the shock body and dispose of fluid.
- Disassemble the shock. Clean thoroughly with a plastic- and electronic-safe degreaser (DYNE50001). Dry parts before assembly.
- Re-assemble the shock and refill the shock body with silicone fluid (22.5 weight recommended, TLR74003).
- Slowly move the shaft and piston up and down to remove air bubbles.
- Move the piston to the midway point of the body and install the bottom cartridge.
- Wipe off any overflowing fluid.
- Re-install the shock on the vehicle.
RIDE HEIGHT ADJUSTMENT
Ride height is an adjustment that affects the way the vehicle jumps, turns and goes over bumps. Drop one end of the vehicle from approximately 6 inches (152 mm) in height onto a flat surface. When dropping the front of the vehicle, after the vehicle settles, make sure the front arms are equal and parallel to the flat surface.
Do the same with the rear to make sure both arms are parallel with the flat surface. Lowering the front ride height increases steering, but decreases traction. Lowering the rear ride height increases traction, but decreases steering.
TROUBLESHOOTING GUIDE
| PROBLEM | POSSIBLE CAUSE | SOLUTION |
| Vehicle does not operate | Battery not charged or plugged in | Charge battery/plug in |
| ESC switch not “On” | Turn on ESC switch | |
| Transmitter not “On” or low battery | Turn on/replace batteries | |
| Motor runs but rear wheels do not rotate | Pinion not meshing with spur gear | Adjust pinion/spur mesh |
| Pinion spinning on motor shaft | Tighten pinion gear setscrew on motor shaft flat spot | |
| Transmission gears stripped | Replace transmission gears | |
| Drive pin broken | Check and replace drive pin | |
| Steering does not work | Servo plug not in receiver properly | Make sure the steering servo plug is connected to the receiver steering channel, noting proper polarity |
| Servo gears or motor damaged | Replace or repair servo | |
| Will not turn one direction | Servo gears damaged | Replace or repair servo |
| Motor does not run | Motor wire solder joint is damaged | Resolder the motor wire with the proper equipment |
| Motor wire broken | Repair or replace as needed | |
| ESC damaged | Contact Horizon Hobby Product Support | |
| ESC gets hot | Motor over-geared | Use smaller pinion or larger spur gear |
| Driveline bound up | Check wheels and transmission for binding | |
| Poor run time and/or sluggish acceleration | Battery pack not fully charged | Recharge battery |
| Charger not allowing full charge | Try another charger | |
| Driveline bound up | Check wheels, transmission for binding | |
| Poor range and/or glitching | Transmitter batteries low | Check and replace |
| Vehicle battery low | Recharge battery | |
| Loose plugs or wires | Check all wire connections and plugs |
LIMITED WARRANTY
What this Warranty Covers
Horizon Hobby, LLC, (Horizon) warrants to the original purchaser that the product purchased (the “Product”) will be free from defects in materials and workmanship for a period of 2 years from the date of purchase.
What is Not Covered
This warranty is not transferable and does not cover (i) cosmetic damage, (ii) damage due to acts of God, accident, misuse, abuse, negligence, commercial use, or due to improper use, installation, operation or maintenance, (iii) modification of or to any part of the Product, (iv) attempted service by anyone other than a Horizon Hobby authorized service center, (v) Product not purchased from an authorized Horizon dealer, or (vi) Product not compliant with applicable technical regulations or (vii) use that violates any applicable laws, rules, or regulations.
OTHER THAN THE EXPRESS WARRANTY ABOVE, HORIZON MAKES NO OTHER WARRANTY OR REPRESENTATION, AND HEREBY DISCLAIMS ANY AND ALL IMPLIED WARRANTIES, INCLUDING, WITHOUT LIMITATION, THE IMPLIED WARRANTIES OF NON-INFRINGEMENT, MERCHANTABILITY AND FITNESS FOR A PARTICULAR PURPOSE. THE PURCHASER ACKNOWLEDGES THAT THEY ALONE HAVE DETERMINED THAT THE PRODUCT WILL SUITABLY MEET THE REQUIREMENTS OF THE PURCHASER’S INTENDED USE.
Purchaser’s Remedy
Horizon’s sole obligation and purchaser’s sole and exclusive remedy shall be that Horizon will, at its option, either (i) service, or (ii) replace, any Product determined by Horizon to be defective. Horizon reserves the right to inspect any and all Product(s) involved in a warranty claim. Service or replacement decisions are at the sole discretion of Horizon. Proof of purchase is required for all warranty claims. SERVICE OR REPLACEMENT AS PROVIDED UNDER THIS WARRANTY IS THE PURCHASER’S SOLE AND EXCLUSIVE REMEDY.
Limitation of Liability
HORIZON SHALL NOT BE LIABLE FOR SPECIAL, INDIRECT, INCIDENTAL OR CONSEQUENTIAL DAMAGES, LOSS OF PROFITS OR PRODUCTION OR COMMERCIAL LOSS IN ANY WAY, REGARDLESS OF WHETHER SUCH CLAIM IS BASED IN CONTRACT, WARRANTY, TORT, NEGLIGENCE, STRICT LIABILITY OR ANY OTHER THEORY OF LIABILITY, EVEN IF HORIZON HAS BEEN ADVISED OF THE POSSIBILITY OF SUCH DAMAGES. Further, in no event shall the liability of Horizon exceed the individual price of the Product on which liability is asserted. As Horizon has no control over use, setup, final assembly, modification or misuse, no liability shall be assumed nor accepted for any resulting damage or injury. By the act of use, setup or assembly, the user accepts all resulting liability. If you as the purchaser or user are not prepared to accept the liability associated with the use of the Product, purchaser is advised to return the Product immediately in new and unused condition to the place of purchase.
Law
These terms are governed by Illinois law (without regard to conflict of law principals). This warranty gives you specific legal rights, and you may also have other rights which vary from state to state. Horizon reserves the right to change or modify this warranty at any time without notice.
WARRANTY SERVICES
Questions, Assistance, and Services
Your local hobby store and/or place of purchase cannot provide warranty support or service. Once assembly, setup or use of the Product has been started, you must contact your local distributor or Horizon directly. This will enable Horizon to better answer your questions and service you in the event that you may need any assistance. For questions or assistance, please visit our website at www.horizonhobby.com, submit a Product Support Inquiry, or call the toll free telephone number referenced in the Warranty and Service Contact Information section to speak with a Product Support representative.
Inspection or Services
If this Product needs to be inspected or serviced and is compliant in the country you live and use the Product in, please use the Horizon Online Service Request submission process found on our website or call Horizon to obtain a Return Merchandise Authorization (RMA) number. Pack the Product securely using a shipping carton. Please note that original boxes may be included, but are not designed to withstand the rigors of shipping without additional protection. Ship via a carrier that provides tracking and insurance for lost or damaged parcels, as Horizon is not responsible for merchandise until it arrives and is accepted at our facility. An Online Service Request is available at http://www.horizonhobby.com/content/servicecenter_render-service-center. If you do not have internet access, please contact Horizon Product Support to obtain a RMA number along with instructions for submitting your product for service. When calling Horizon, you will be asked to provide your complete name, street address, email address and phone number where you can be reached during business hours. When sending product into Horizon, please include your RMA number, a list of the included items, and a brief summary of the problem. A copy of your original sales receipt must be included for warranty consideration. Be sure your name, address, and RMA number are clearly written on the outside of the shipping carton.
| NOTICE: Do not ship Li-Po batteries to Horizon. If you have any issue with a Li-Po battery, please contact the appropriate Horizon Product Support office. |
Warranty Requirements
For Warranty consideration, you must include your original sales receipt verifying the proof-of-purchase date. Provided warranty conditions have been met, your Product will be serviced or replaced free of charge. Service or replacement decisions are at the sole discretion of Horizon.
Non-Warranty Service
Should your service not be covered by warranty, service will be completed and payment will be required without notification or estimate of the expense unless the expense exceeds 50% of the retail purchase cost. By submitting the item for service you are agreeing to payment of the service without notification. Service estimates are available upon request. You must include this request with your item submitted for service. Non-warranty service estimates will be billed a minimum of ½ hour of labor. In addition you will be billed for return freight. Horizon accepts money orders and cashier’s checks, as well as Visa, MasterCard, American Express, and Discover cards. By submitting any item to Horizon for service, you are agreeing to Horizon’s Terms and Conditions found on our website http://www.horizonhobby.com/content/service-center_render-service-center.
WARRANTY AND SERVICE CONTACT INFORMATION
| Country of Purchase | Horizon Hobby | Contact Information | Address |
| United States of America | Horizon Service Center (Repairs and Repair Requests) | servicecenter.horizonhobby.com/RequestForm/ | 2904 Research Rd Champaign, Illinois 61822 USA* |
| Horizon Product Support (Product Technical Assistance) | [email protected] 877-504-0233 | ||
| Sales | [email protected] 800-338-4639 | ||
| European Union | Horizon Technischer Service | [email protected] +49 (0) 4121 2655 100 | Hanskampring 9 D 22885 Barsbüttel, Germany |
PARTS LISTINGS
| PART # | ENGLISH |
| LOS210019 | Body, Wing, Blue/White |
| LOS210020 | Body, Wing, Black/White |
| LOS210022 | Wing, Precut, Clear (2) |
| LOS210023 | Body, Wing, Yellow/White |
| LOS211011 | Front Bulkhead, Front Brace, Left/Right |
| LOS211012 | Servo Mount, Servo Saver |
| LOS211013 | Bellcrank, Drag Link, Set |
| LOS211016 | Gear Cover with Plug |
| LOS211020 | Chassis & Mud Guards |
| LOS211021 | Waterfall, Front Body Post |
| LOS211022 | Battery Strap, Elastomer |
| LOS212011 | Wheel Hex, Pin (2) |
| LOS212012 | Rear Axle (2) |
| LOS212013 | Dogbone (2) |
| LOS212014 | Front Axle (2) |
| LOS212015 | Slipper Hardware |
| LOS212016 | Spur Gear with Slipper Pads 60T 0.5M |
| LOS212018 | Differential Gear, Idler Gear |
| LOS212019 | Outdrive Sun Spider Gear Set |
| LOS212020 | Top Shaft |
| LOS212021 | Transmission Case & Motor Plate |
| LOS212022 | Losi .5 Mod Pinion Gear, 18T, 2mm |
| LOS213000 | Front Shock Set Complete |
| LOS213001 | Rear Shock Set Complete |
| LOS213002 | Shock O-Ring Set |
| LOS214003 | Suspension Arm Set, Front/Rear |
| LOS214005 | Caster Block & Front Camber Block |
| LOS214006 | Spindle & Hub Set |
| LOS214008 | Shock Standoff Bushing |
| LOS214009 | Rear Pivots & Bumper |
| LOS214010 | Front Pivot & Bumper |
| LOS214012 | Front/Rear Shock Tower, Wing Stay |
| LOS214013 | Adjustable Link Set |
| LOS214014 | Rear Shock Springs (3 pair) |
| LOS214015 | Front Shock Springs (3 pair) |
| LOS214016 | Rod End Set |
| LOS214017 | Rear Shock Springs (3pr) |
| LOS214018 | Front Shock Springs (3pr) |
| LOS216002 | Ball Stud (4) |
| LOS216003 | Screw Set, Button Head |
| LOS216004 | Screw Set, Flat Head |
| LOS216005 | King Pin Set |
| LOS217001 | 4 x 7 x 2.5mm Ball Bearing (4) |
| LOS214016 | Rod End Set |
| LOS214017 | Rear Shock Springs (3pr) |
| LOS214018 | Front Shock Springs (3pr) |
| LOS41018 | BK Bar, Rear Mounted, White (2) |
OPTIONAL PARTS
| PART # | ENGLISH |
| DYNC2030 | Prophet Sport Mini 50W Charger |
| DYNT2010 | Machined Nut Driver Set (4), Metric |
| DYNB825H2 | 7.4V 800mAh 2S 50C Hardcase LiPo |
| DYNC0095 | Adapter: EC2 Device/Banana Plug |
| DYNS0501 | Brushless Motor/ESC Combo: 6000Kv |
| LOS210021 | Body, Wing, Clear |
| LOS216001 | Body Clips (6) |
| LOS311001 | Front Pivot, Aluminum |
| LOS311002 | Bellcrank Drag Link Aluminum |
| LOS311003 | Caster Black, 0 Deg, L/R, Aluminum |
| LOS311005 | Hub Set, Rear, Aluminum |
| LOS311006 | Pivot Block Set, Rear, Aluminum |
| LOS311007 | Front Brace Set, Aluminum |
| LOS311008 | Servo Mount Set, Aluminum |
| LOS311009 | Camber Black, Front, Aluminum |
| LOS311010 | Servo Arm, Aluminum |
| LOS312004 | Hex Set, Rear Axle, Aluminum |
| LOS312005 | Adjustable Motor Plate |
| LOS312007 | Slipper Plate, HD |
| LOS314004 | Shock Assembly, Front, Aluminum (2) |
| LOS314005 | Shock Assembly, Rear, Aluminum (2) |
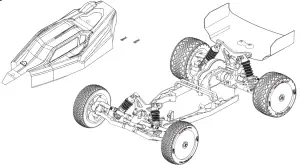
EXPLODED VIEW


©2021 Horizon Hobby, LLC.
Losi, Mini-B, Dynamite, Prophet, EC2, and the Horizon Hobby logo are trademarks or registered trademarks of Horizon Hobby, LLC.
The Spektrum trademark is used with permission of Bachmann Industries, Inc.


