![]() User manual
User manual
Wired remote controller MWR-WG00JN
MWR-WG00JN Air Conditioner
- Thank you for purchasing this Samsung Product.
- Before operating this unit, please read this user manual carefully and retain it for future reference.
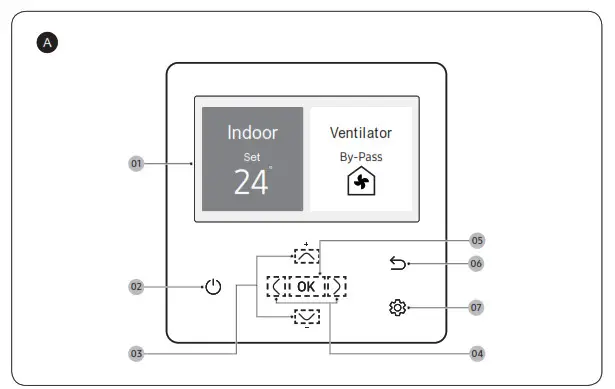
A Remote Controller Overview
- Operation status display
Displays the operation/function settings and statuses. - Operation On/Off button (LED display)
Turns the air conditioner/ventilator power On/Off - Up/Down button
Moves between items vertically or changes the set temperature. - Left/Right button
Moves between items horizontally or changes the item value. - OK button
Saves your new settings. - Save & Return button
Saves your new settings and returns to the previous step. - Option button
Selects the detailed setting function. NOTE
NOTE
• The operation mode display on the remote controller changes depending on the selected language.
• Some functions may not be available, depending on the indoor unit specifications.
• You can see the operation status on the LED display.
ON: Operating,
Blinking: An error occurred,
OFF: Turns off
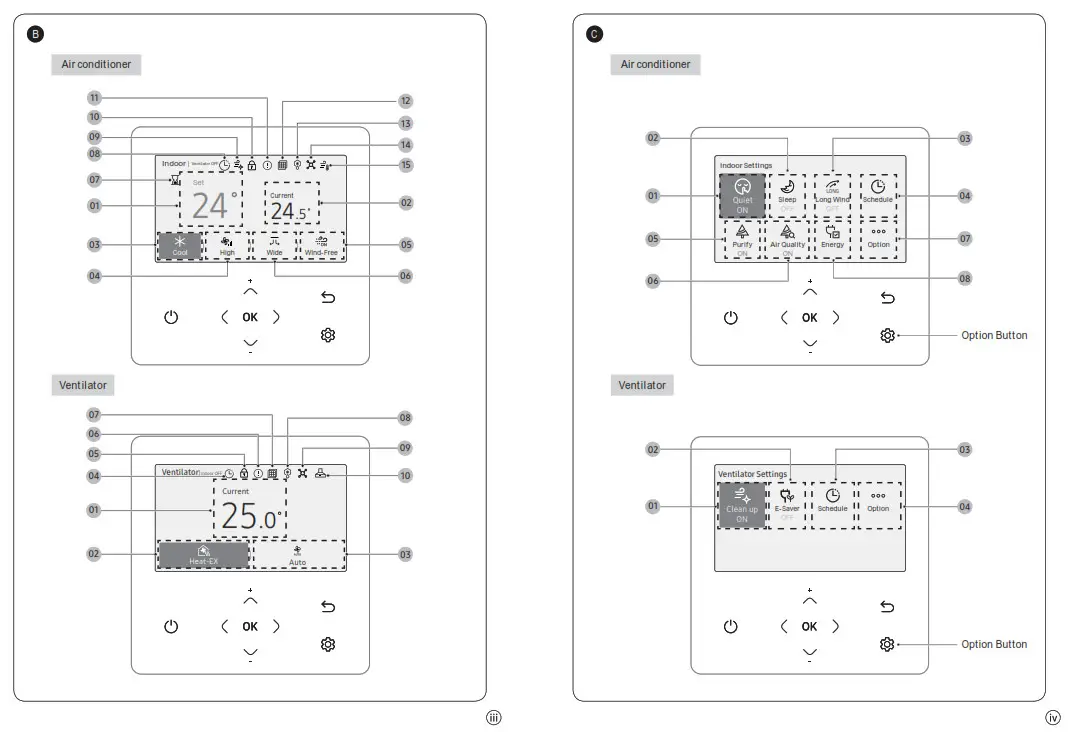
B Home Screen Overview
Air conditioner
- Set temperature display
- Current temperature display
- Operation mode display
– Displays any of Auto, Cool, Dry, Fan, and Heat. - Fan speed display
– Displays any of Auto, Turbo, High, Medium, and Low. - Wind-Free display
- Air flow direction display
– Displays any of Fix, Spot, Mid, Wide, Swing, and Individual. - Activation Time Setting display
– When Energy Saving Timer is activated.
– When Override time is activated. - Schedule indicator
– When a General Schedule is set.
– When a Setback Schedule is set. - Clean indicator
- Lock indicator
- Check indicator
- Filter reset indicator
- Defrost indicator
- Central Control indicator
- Discharge temperature indicator
Ventilator
- Current temperature display
- Operation mode display
– Displays any of Heat-EX, Auto, By-Pass, Quiet, and Away. - Fan speed display
– Displays any of Auto, Turbo, High, and Low. - Schedule indicator
– When a General Schedule is set.
– When a Setback Schedule is set. - Lock indicator
- Check indicator
- Filter reset indicator
- Defrost indicator
- Central Control indicator
- Range hood (Exhaust hood) indicator NOTE
• Unavailable functions are marked inactive and they cannot be set.
• The locations of icons may differ depending on the function.
• When you do not press any button for 7 seconds, the function of the position is automatically selected.
C Settings Screen Overview
Press the![]() button to enter the Settings screen and then select the desired function or option.
button to enter the Settings screen and then select the desired function or option.
Air conditioner
- Quiet display
– Displays the Quiet function. - Sleep display
– Displays the Sleep function. - Long Wind display
– Displays the Long Wind function. - Schedule display
– Displays any of Timer, Weekly schedule, Yearly schedule, and Holiday. - Purify display
– Displays the Purify function. - Air Quality display
– Displays the Air Quality. - Option display
– Displays the Option. - Energy display
– Displays any of Energy Usage, Energy Saving, and Energy Settings.
Ventilator
- Clean up display
– Displays the Clean up function. - E-Saver display
– Displays the E-Saver function. - Schedule display
– Displays any of Timer, Weekly schedule, Yearly schedule, and Holiday. - Option display
– Displays the Option. NOTE
• Unavailable functions are marked inactive and they cannot be set.
• In the menu with the > in the Option menu, you can select a menu with the button.
• When you do not press any button for 180 seconds with the option active, the settings are not saved and the Home screen appears.
The lowest set temperature is limited to 20 degree in the UAE according to UAE.S 5010-5:2016.
Safety Information
This content is intended to protect the user’s safety and prevent property damage. Please read it carefully for correct use of the product.![]() WARNING
WARNING
Hazards or unsafe practices that may result in severe personal injury or death.![]() CAUTION
CAUTION
Hazards or unsafe practices that may result in minor personal injury or property damage.![]() Follow directions.
Follow directions.![]() Do NOT attempt.
Do NOT attempt.![]() Make sure the machine is grounded to prevent electric shock.
Make sure the machine is grounded to prevent electric shock.![]() Unplug the appliance.
Unplug the appliance.![]() Do NOT disassemble.
Do NOT disassemble.
FOR INSTALLATION![]() WARNING
WARNING![]() The installation of this appliance must be performed by a qualified technician or service company.
The installation of this appliance must be performed by a qualified technician or service company.
- Failing to do so may result in electric shock, fire, explosion, problems with the product, or injury. You must connect the product with rated power upon installation.
- Failing to do so may result i n problems with the product, electric shock, or fire.
![]() Do not install this appliance near heater, inflammable material. Do not install this appliance ins humid, oily or dusty location, in allocation exposed to direct sunlight and water (rain drops). Do not install this appliance in allocation where gas may leak.
Do not install this appliance near heater, inflammable material. Do not install this appliance ins humid, oily or dusty location, in allocation exposed to direct sunlight and water (rain drops). Do not install this appliance in allocation where gas may leak.
- Failing to do so may result in electric shock or fire.
![]() CAUTION
CAUTION![]() Install the product on a hard and even place that can support its weight.
Install the product on a hard and even place that can support its weight.
- If the place cannot support its weight, the product may fall down and it may cause product damage.
FOR POWER SUPPLY![]() WARNING
WARNING![]() Do not bend or pull the power cord excessively. Do not twist or tie up the power cord.
Do not bend or pull the power cord excessively. Do not twist or tie up the power cord.
- Failing to do so may result in electric shock or fire.
FOR OPERATION![]() WARNING
WARNING
If the appliance generates a strange noise, a burning smell or smoke, unplug the product immediately and contact your nearest service centre.
- Failing to do so may result in electric shock office.
To reinstall the air conditioner, please contact your nearest service centre.
- Failing to do so may result i n problems with the product, water leakage, electric shock, or fire.
- Delivery service for the product is not provided. If you reinstall the product in another location, additional construction expenses and an installation fee will b e charged.
If the malfunction diagnosis indicate or appears or malfunctions, then stop operation immediately.
- If you detect any burning smells from the product or it malfunctions, then immediately turn off the air
conditioner/Ventilator(ERV) and power, and then contact the service centre. Continuing to use the device in this state can cause electrical shock, fire, or damage to the product. - If the E836 indicator appears, then it means that it is time to contact the service centre for periodic inspection. Neglecting these periodic inspections can result in malfunctions (only applicable to GHP model).
![]() Do not attempt to repair, disassemble, o r modify the product yourself.
Do not attempt to repair, disassemble, o r modify the product yourself.
- Failing to do so may result in electric shock, fire, product malfunction, o r injury.
![]() CAUTION
CAUTION![]() Do not allow water to enter the product.
Do not allow water to enter the product.
- Failing to do so may result in fire or explosion.
![]() Do not operate the product with wet hands.
Do not operate the product with wet hands.
- Failing to do so may result in electric shock.
Do not spray volatile material such as insecticide onto the surface of the product.
- Aswell a s being harmful to humans, it may also result in electric shock, fire, or product malfunction.
Do not give strong impact to the product and do not disassemble the product.
Do not use this product for other purposes.
- This product is designed to be used only for system air conditioner.
Do not press the buttons with any sharp objects.
- Failing to do so may result in electric shock o r part damage.
FOR CLEANING![]() WARNING
WARNING![]() Do not clean the product by spraying water directly onto it. Do not use benzene, thinner, alcohol or acetone to clean the product.
Do not clean the product by spraying water directly onto it. Do not use benzene, thinner, alcohol or acetone to clean the product.
- Failing to do so may result in discoloration, deformation, damage, electric shock, office.
Remote Controller Operation
You can use the air conditioner easily by selecting a mode and then by controlling the temperature, fan speed, and air flow direction.
Use the![]() buttons t o select the desired menu, press the OK button, use the
buttons t o select the desired menu, press the OK button, use the ![]() buttons to select the desired item, and then press the OK button.
buttons to select the desired item, and then press the OK button.
Operation modes
You can change the current mode t o Auto, Cool, Dry, Fan, and Heat.
Controlling temperature
You can control the temperature in each mode as follows:
| Mode | Temperature control |
| Auto/Cool/ Dry | Adjust by 1 °C (1 ° F ) between 18 °C (65 °F) and 3 0 ° C (86 °F). |
| Fan | You cannot control the temperature. |
| Heat | Adjust by 1 °C (1 ° F ) between 16 °C (61 ° F ) and 3 0 ° C (86 °F). |
![]() NOTE
NOTE
- The set temperature range available on the remote controller may change depending on the set temperature range that indoor unit supports.
Controlling fan speed
You can select the following fan speeds i n each mode:
| Mode | Available fan speeds |
| Auto/Dry | |
| Cool/ Heat | |
| Fan |
NOTE
 Turbo appears active only on the indoor unit that supports the Turbo fan speed.
Controlling air flow direction
You can control air flow direction.
| General models | |
| 360 cassette model |
- For 360-cassette indoor unit
| Mode | Wired remote controller display | Indoor unit indicator |
| Spot | ||
| Mid | ||
| Wide | ||
| Swing |  |
- If 360-cassette indoor units and other indoor units are installed together, the air flow direction does not change on the indoor units other than 360-cassette when Spot, Mid, or Wide is started as the airflow direction.
- You can select individual air flow direction for each blade, when the individual indication appears active on the indoor unit that supports this mode.
![]() NOTE
NOTE
- The displayed flow direction icon may differ depending on the indoor model.
- The current air flow direction persists even if you change the current mode, or turn off and then turn on the remote controller.
- Blades that can be selected for Individual may differ depending on the product model.
- When Blade lock is set, the locked blade appears inactive.
Cooling Operation
The smart and powerful cooling functions of the Samsung air conditioner keep an enclosed space cool and comfortable.
Cool mode
Use the Cool mode to stay coot in hot weather.![]() NOTE
NOTE
- It is recommended to set the desired temperature between 24 °C (75 °F) and 26 °C (79 °F).
- To cool your room quickly, select a low temperature and a high fan speed.
- To save energy, select a high temperature and a low fan speed.
- As the indoor temperature approaches the set temperature, the compressor will operate at a low speed to save energy.
Wind-Free function
Use the Wind-Free function to enjoy mild cool breeze exuding from fine holes on the Wind-Free panel with the airflow blade closed, instead of getting cool wind directly. The automated control of the temperature and fan speed according to the indoor temperatures keeps your room cool and pleasant.![]() NOTE
NOTE
- If the Wind-Free function is cancelled, the air conditioner returns to the previous fan speed.
- You can adjust the set temperature during the Wind-Free function, and recommended set temperatures are 24 to 26 °C (75 to 79 °F). However, you cannot change the set temperature in the Fan mode.
- You can use the Wind-Free function when the Cool, Dry, or Fan mode is running.
- If the room temperature increases because of rise of external temperature, heat from cooking, or other reason, operate normal cooling first to lower the temperature, before operating Wind-Free to keep the desired temperature.
- If you select the Wind-Free function in the Fan mode, the compressor stops working so that cool air does not come out. However, mild breeze comes out and starts to clean the air in the room.
- During the Wind-Free operation, the cold air may be intermittently weakened depending on the temperature and humidity in the room. But the wind-free air currents are maintained and the weakened cold air is immediately recovered, consequently keeping the room comfortable. (During the Wind-Free operation, the airflow blades may open to control the indoor air condition smoothly, depending on the installation settings. In this case, as soon as the indoor temperature and humidity change, the air flow blades are closed and the Wind-Free operation restarts. For more information on the installation settings, see “Setting the indoor unit addresses and the installation options” in the installation manual of the indoor unit.)
| Change of the airflow blade bytemperature and humidity | |||
| Indoor temperature and humidity | Low | High | |
| Breeze is blown via the micro holes on the airflow blades | Breeze is blown via the micro holes on the airflow blades | Breeze comes from the air flow blade depending on the setting | |
| Airflow blade | Closed | Closed (default) | Opened (according to setting) |
• When the Wind-Free function runs while sleeping, you may feel cold air if the air conditioner is installed over the bed. In this case, set the desired temperature higher than the normal setting temperature.
Dehumidifying Operation
The dehumidifying function of the Samsung air conditioner keeps an enclosed space dry and comfortable.
Dry mode
Use the Dry mode in rainy or humid weather.![]() NOTE
NOTE
- You cannot change fan speed in the Dry mode.
- The greater the difference between room temperature and set temperature, the longer the needed time to dehumidify the air is.
Air Purifying Operation
The air purification function of the Samsung air conditioner keeps the air in an enclosed space purified.
Purify function
Use the Purify function to remove harmful materials in the air to provide you a clean and healthy environment.
This function is available in the Auto, Cool, Dry, Fan, and Heat modes.![]() NOTE
NOTE
- During the Air Purifying operation, dust is collected on the active filter panel.
- When the Purify function is additionally selected in the Fan mode, you cannot change the set temperature.
- When the Purify function is additionally selected while a specific mode is running, there islitle difference in electricity consumption and operating noise.
![]() Impurity level indications
Impurity level indications
- The indications are displayed only on the models that support the air purity level display function.
- The impurity levels for PM10, PM2.5, and PM1.0 appear as follows:
| Purity level | PM10 | PM2.5/PM1.0 | ||
| Colour | Concentration (g/m3) | Colour | Concentration (g/m3) | |
| Very Poor | Red | 151 or more | Red | 76 or more |
| Poor | Yellow | 81-150 | Yellow | 36-75 |
| Normal | Green | 31-80 | Green | 16-35 |
| Good | Blue | 30 or less | Blue | 15 or less |
- When you set AirQuality to ON, the screen saver displays the current air purity level details.
– You can set the screen saver launch time in Option > User mode. - Air purity level can only be displayed on indoor units supporting this function.
Heating Operation
The heating functions of the Samsung air conditioner keep an enclosed space warm and comfortable.
Heat mode
Use the Heat mode to stay warm![]() NOTE
NOTE
- While the air conditioner warms up, the fan may not operate for awhile at the beginning to prevent cold wind
- If the outdoor temperature is low and the humidity is high while the Heat mode is running, the heating performance of the air conditioner may decrease dueto frost or ice that forms on the outdoor heat exchanger. When this condition happens, the air conditioner runs the Defrost function for about 5 to 12 minutes to remove the frost and ice, both water and steam are released from the outdoor unit.
- While the Defrost function is running, the indoor unit provides no breeze to prevent cold wind
- The operation time of the Defrost function varies depending on the amount of the frost and ice and the humidity.
- While the Defrost function is running, none of other functions will work, even if you select them on the remote controller.
Quick Smart Features
There is avariety of useful functionality provided by the Samsung air conditioner.
Auto mode
Use the Auto mode when you want the air conditioner to automatically control the mode (Heat or Cool). The air conditioner will provide the most comfortable atmosphere that it can.![]() NOTE
NOTE
- You cannot change the fan speed.
- While the Cool mode is running, the air conditioner produces a strong cold air if there is a large difference between the set temperature and the current temperature. When the temperature difference becomes small the air conditioner automatically changes the air flow direction and keeps the room ata comfortable temperature.
Fan mode
Use the Fan mode to run the air conditioner like a common fan. The air conditioner provides a natural breeze.![]() NOTE
NOTE
- If the air conditioner will not be used for an extended period of time, dry the air conditioner by running it inthe Fan mode between 3 and 4 hours
Quiet function
Quiet function decreases the operation sound in the Auto, Cool, Dry, or Heat mode.![]() NOTE
NOTE
- You can control the set temperature, fan speed, and air flow direction.
- When you select Quiet enwinds-Free or Long Wind function, the previous function is cancelled.
Sleep function
Sleep function automatically
turns off the air conditioner after 6 hours without stopping the operation in the middle of the night.![]() NOTE
NOTE
- You can select this function only in the Cool and Heat modes.
- You can control the set temperature, fan speed, and air flow direction.
- When you select Sleep in Wind-Free or Long Wind function, the previous function is cancelled.
Long Wind function
Use the Long Wind function to quickly deliver long reaching air flow![]() NOTE
NOTE
- You can select this function only in the Cool, Dry, and Fan modes.
- You cannot control the fan speed and air flow direction.
- When you select Long Wind in the Wind-Free, Quiet, or Sleep function, the previous function is cancelled.
Ventilation (ERV) Operation
Operation modes
You can select the desired mode.
| Mode | Description |
| Heat EX | This mode minimizes energy loss by recovering energy from the exhaust air during indoor heating or cooling. |
| Auto | This mode automatically adjusts the ventilation functions depending on the degree of pollution in your indoor air. |
| By-Pass | This mode activates the intake of external air so that it comes indoors. |
| Quiet | This mode reduces the sound produced by the ventilator (ERV). |
| Away | This mode allows you to operate the ventilator (ERV) while you are away from home. |
![]() NOTE
NOTE
- Only when you select all the options of ventilator (ERV), you can use the above operation. (Only available when the wired remote controller is installed)
- If the operation status changed by another controller, the operation mode is cancelled.
Controlling fan speed
You can select the following fan speeds in each mode:
| Heat -Ex/Auto/ By-Pass | |
| Quiet/Away | |
![]() NOTE
NOTE![]() Auto appears active only on the ventilator that supports the Auto fan speed.
Auto appears active only on the ventilator that supports the Auto fan speed.
E-Saver function
Reduce your power consumption and save money on your electric bill.
- When the ventilator (ERV) and the air conditioners connected together
– This function compares the outdoor and indoor temperatures, and then automatically selects Heat-EX or By-Pass operation. - When the ventilator (ERV) is installed separately (depending on the option settings at installation), it operates as follows:
| ON/OFF Alternation operation | • The ventilator (ERV) turns On and Off in Quiet (Medium) mode every 30 minutes. |
| Outdoor air cooling operation for different temp. setting | • Operates when the View Master is for ERV+. • With the temperature control button, the default temperature for E-Saver can be set. • Depending on the set temperature, it automatically selects Heat-EX or By-Pass operation. |
![]() NOTE
NOTE
- When the air-conditioned is connected individually, E-Saver function is not available. Clean up function Prevent odor and dust from entering by making the airflow input bigger than the airflow output
Energy-Saving Operation
The Samsung air conditioner provides functions that allow you to reduce electricity consumption.
Schedule
Press the ![]() button, press the
button, press the ![]() button to select Schedule, and then press the OK button. You can set each of General Schedule, Setback Schedule, Override, Energy Saving Timer, Eco Setting and Activation Time Setting.
button to select Schedule, and then press the OK button. You can set each of General Schedule, Setback Schedule, Override, Energy Saving Timer, Eco Setting and Activation Time Setting.
| Type | Description | |
| General Schedule | Timer | • Turns the device on or off after a set time. – You can set the timer by 5 minute increments. |
| Weekly schedule | • Schedules the operation of the device on a set day and at a set time. – You can schedule on the weekly basis. You can also set the values for day, time, operation on/off, scheduled device, and operation status (operation mode, set temperature, fan speed). | |
| Yearly schedule | • Creates groups for the desired months for scheduling – You can schedule up to 8 groups on the yearly basis. | |
| Holiday | • Allows you not to make use of the schedule on holidays. | |
| Setback Schedule | • Controls the indoor unit with 4 different operation patterns. – Each pattern sets the values for time, operation (OFF, Cool, Heat, Auto), and the set temperature. | |
| Override | Allows you to run at a specific time the operation you set using Energy Saving Timer | |
| Energy Saving Timer | • When set to “Turn off” – If the indoor unit is turned on, the indoor unit turns off after the set time elapses. • When set to “Eco Setting” – If the current temperature continues to differ from the reference cooling or heating temperature set in Eco Setting, the indoor unit returns to the temperature set in Eco Setting after the set time elapses. • When set to “Setback Schedule” – If the most recently operated Setback Schedule status differs from the indoor unit status, the indoor unit returns to that Setback Schedule status after the set time elapses. When “Timer Reset” is set to “Enable”, the set time is re-counted if the indoor unit status changes. When a period of time is set in Activation Time Setting, the indoor unit only operates for that period of time. | |
| Type | Description |
| Eco Setting | Allows you to set the reference cooling and heating temperatures when “Energy Saving Timer” is set to “Eco Setting”. |
| Activation Time Setting | Allows you to make the Energy Saving Timer function operate only for the period of time you set |
![]() NOTE
NOTE
- Weekly schedule and Yearly schedule can cover settings up to 49.
Energy
Press the![]() button, press the
button, press the ![]() button to select Energy, and then press the OK button. You can see and set any of Energy Usage and Energy Setting.
button to select Energy, and then press the OK button. You can see and set any of Energy Usage and Energy Setting.
| Classification | Type | Description |
| Energy Usage | – | Displays the Instantaneous Power, Weekly Energy Usage, Monthly Energy Usage, Yearly Energy Usage, Energy Usage over Last Year, and Operation Time in graph format. • For accuracy of operation time, use the DMS time synchronization. • The weekly display follows the ISO 8601 standards. |
| Energy Setting | Set Outdoor Capacity | Controls the outdoor units operation capacity. |
| Target Energy Consumption | Sets the target energy consumption. | |
| Target Operation Time | Sets the target operation time. | |
| Alarm Popup | Sets whether or not to generate an alarm when the target energy consumption is reached. | |
| Usage Data Initialization | Initializes the entire energy function. |
Setting Options
How to set the Options
- Press the
 button.
 - Press the
 button to select Option, and then press the OK button.
 - See the following pages to select the desired menu
| Major | Step1 | Step 2 | Step 3 | Step 4 | Step 5 | Description | Default |
| General | Button lock | ON/OFF | |||||
| Filter reset | Indoor | ||||||
| Ventilator | |||||||
| Error list | – | ||||||
| Indoor unit information | _ | ||||||
| Indoor | Blade selection | 4-way cassette: Swing ON/Swing OFF 360 cassette: Spot/Mid/Wide | – | ||||
| Motion detect sensor | Set Motion detect sensor | ON/OFF | OFF | ||||
| Motion Mo detection type | Indirect Wind/Direct Wind | Indirect Wind | |||||
| Option | User mode | Language | Differs depending on the language | First value for the language pack | |||
| Daylight Savings Time | Daylight Savings Time | ON/OFF | OFF | ||||
| Unit | Day/Week | Week | |||||
| Week | Start Month | January to December | Mar | ||||
| Start Week | 1st to 4th, Final (final week) | F (final week) | |||||
| End Month | January to December | Oct | |||||
| End Week | 1st to 4th, Final (final week) | F (final week) | |||||
| Day | Start Month | January to December | Mar | ||||
| Start Day | 1-31 | 22 | |||||
| End Month | January to December | Sep | |||||
| End Day | 1-31 | 22 | |||||
| Air Purify Display | PM10 | ON/OFF | ON | ||||
| PM2.5 | ON/OFF | ON | |||||
| PM1.0 | ON/OFF | OFF |
| Major | Step 1 | Step 2 | Step 3 | Step 4 | Step 5 | Description | Default |
| Option | User mode | Lock | All lock | ON/OFF | OFF | ||
| Partial Lock Fuction | Operation Lack | ON/OFF | OFF | ||||
| Operation mode Lock | All mode Lod< | ON/OFF | OFF | ||||
| Auto mode Lock | ON/OFF | OFF | |||||
| Coot mode Lock | ON/OFF | OFF | |||||
| Drymode Lock | ON/OFF | OFF | |||||
| Heat mode Wck | ON/OFF | OFF | |||||
| Fan mode Lock | ON/OFF | OFF | |||||
| Temperature Lock | ON/OFF | OFF | |||||
| Fan speed Lock | ON/OFF | OFF | |||||
| Additional Mode Lock | Wind-Free Lock | ON/OFF | OFF | ||||
| Long Wind Lock | ON/OFF | OFF | |||||
| Quiet Lock | ON/OFF | OFF | |||||
| Sleep Lock | ON/OFF | OFF | |||||
| Schedule Lock | ON/OFF | OFF | |||||
| Wired remote controller | LED | ON/OFF | ON | ||||
| Button Mute | ON/OFF | OFF | |||||
| Wireless remote controller | ON/OFF | OFF | |||||
| Current time | Date | 2000 to 2099/1 to 12/1 to 31 | 2018.01.01. | ||||
| Time | 12-Hour/24-hour 12-hour format :1 to12, 24-hour format: 0 to 23, minutes: 00 to 59 | 12:00 AM | |||||
| Reset remote controller | _ | _ | |||||
| Display setting | Brightness | 10to100% | 100% | ||||
| Screen saver | Timer | 10 to 60 seconds | 30sec | ||||
| Brightness | 0,10, 30, 50, 70% | 30% | |||||
| Smart Reset | – | ||||||
| Reset All User modes | _ |
| Major | Step ‘I | Step 2 | Step 3 | Step 4 | Step 5 | Description | Default |
| Option | User mode | Auto changeover | Use of wired remote controller DSP | ON/OFF | OFF | ||
| Cooling Set temp./Heating Set temp. | 18°C to 30°C (Set temp range for auto operation of the indoor unit) | Indoor unit status value | |||||
| Primary | 0.5°C to 2°C(or1°F to 4°F) | Indoor unit status value | |||||
| Secondary | 0.5°C to 2°C(or1°F to 4°F) | Indoor unit status value | |||||
| Temperature limits | Lower Limit | Celsius: 8 to 30°C Fahrenheit: 47 to 86°F | 8°C | ||||
| Upper Limit | Celsius: 8 to 30°C Fahrenheit: 47 to 86°F | 30°C | |||||
| Easy tuning | -2 to +2 | 0 | |||||
| lighting | ndoor | ON/OFF | Indoor unit status value | ||||
| Clean | ON/OFF | Indoor unit status value | |||||
| Delay time | Use of ERV delay time | ON/OFF | OFF | ||||
| ERV delay time | 30 to 60 minutes | 30 |
![]() NOTE
NOTE
* When two wired remote controllers are connected, the brightness can be set within 10 to 50%.
Current Time Setting (Example)
- Press the button.
- Press the button to select Option, and then press the OK button.
- Press the button to select User mode, and then press the OK button.
- Press the button to select Wired remote controller, and then press the OK button.
- Press the button to select Current time, and then press the OK button.
- Press the button to select Time, and then press the OK button.
- Press the button to select Time format, Hour, Minute, and AM/PM, and then press the OK button.
Memo ………………..
![]()