
![]()
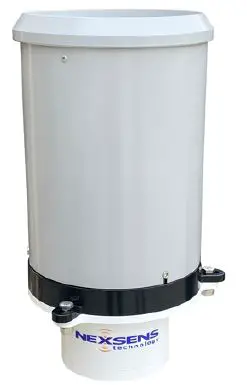
NEXSENS G2-Rain Alert System
IMPORTANT – BEFORE FIELD DEPLOYMENT: Completely configure new G2 systems with a web connection in a nearby work area. Operate the system for several hours and ensure correct sensor readings. Use this test run to become familiar with the features and functions.
Overview
- The G2-RAIN Alert System includes an integrated mo-dem. Power is provided internally through (2) D-Cell lithium batteries. An external power cable (optional ac-cessory) allows connection to an SP-Series solar panel for recharging the internal batteries and direct communica-tion (serial to PC). The integrated tipping bucket supplies accurate rainfall measurements (one tip per 0.01” rain).
- Data is accessed and stored on the WQData LIVE web datacenter. An easy-to-use dashboard and built-in sensor library automatically facilitate setup and configuration.
What’s Included?
(1) G2-RAIN-RTU
(1) G2 series battery pack (installed)
(1) Rain gauge
(1) SMA antenna
(1) 9/64” hex wrench
(1) Quick start guide
- To get started:
Go to WQDataLIVE.com- Create a new account or sign into an existing account.
- Choose or create the project that will contain the data logger by selecting the Projects link from the bottom right footer of the page.
- Open the project and go to the ADMIN tab located at the top of the project dashboard and click Settings.
- From there, choose the Project/Site pull down menu and select the site for the new data logger.
- If a site has not been created, select New Site.
- Enter the claim code listed below int o the space provided under Assigned Devices.
- Remove the siphoning tipping bucket by using the 9/64” hex wrench to loosen the (3) bolts connecting the bucket and RTU.
- Lift the bucket up gently.
- Remove the rubbing band from the tipping apparatus.
- Reinstall the bucket and tighten bolts.
 Lift bucket to remove the rubber band on the tipping apparatus.
- Attach the antenna to the copper SMA connector found on the bottom of the G2-RTU.
 Rotate the antenna clockwise onto the threads of the SMA connector.
 - Internal power- Use the included flathead screwdriver to turn the black power set screw clockwise on the bottom of the G2-RTU.
- Listen for the single audible beep to confirm power connection.
- After a few seconds:
- Two beeps = sufficient cellular signal
- Three beeps = insufficient cellular signal
- To power down, unscrew the set screw until the o-ring is visible.Turn the black power set screw clockwise to apply battery using internal batteries.
- External power- Connect the G2-RTU adapter cable to an SP-Series solar panel or an AC power adapter.
- Listen for the single audible beep to confirm power connection.
- After a few seconds:
- Two beeps = sufficient cellular signal
- Three beeps = insufficient cellular signal
 Connection of the G2-RTU external power cable and an SP-Series solar panel.
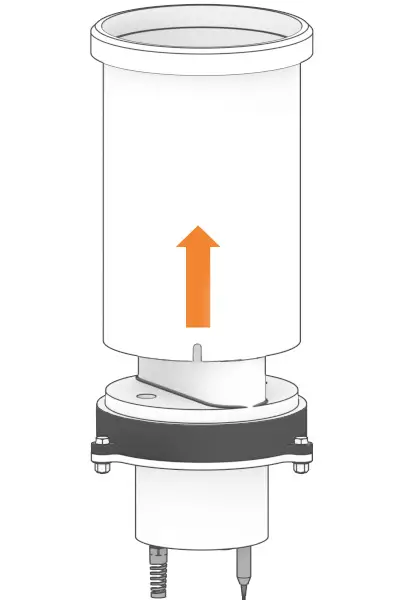 Lift bucket to remove the rubber band on the tipping apparatus.
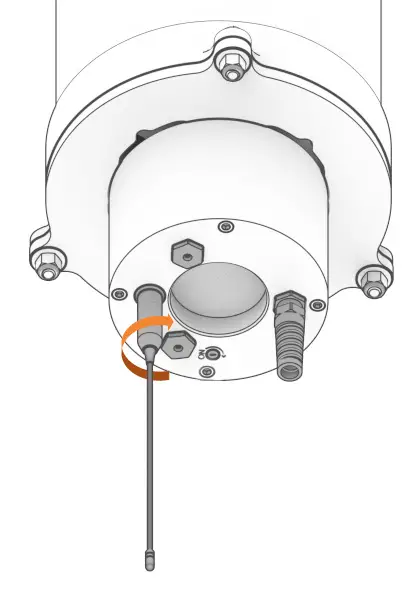 Rotate the antenna clockwise onto the threads of the SMA connector.
 Turn the black power set screw clockwise to apply battery using internal batteries.
 Connection of the G2-RTU external power cable and an SP-Series solar panel.
| Buzzer Event | Beep Type | Status |
| When power is applied | One short beep | System boot successfuul |
| During telemetry connection | Two short beeps | Connection successfully established |
| During telemetry connection | Three short beeps | No signal/connection failed |
For additional information, please reference the G2-RAIN Resource Library on the NexSens Knowledge Base. nexsens.com/g2rkb
937-426-2703
www.nexsens.com


