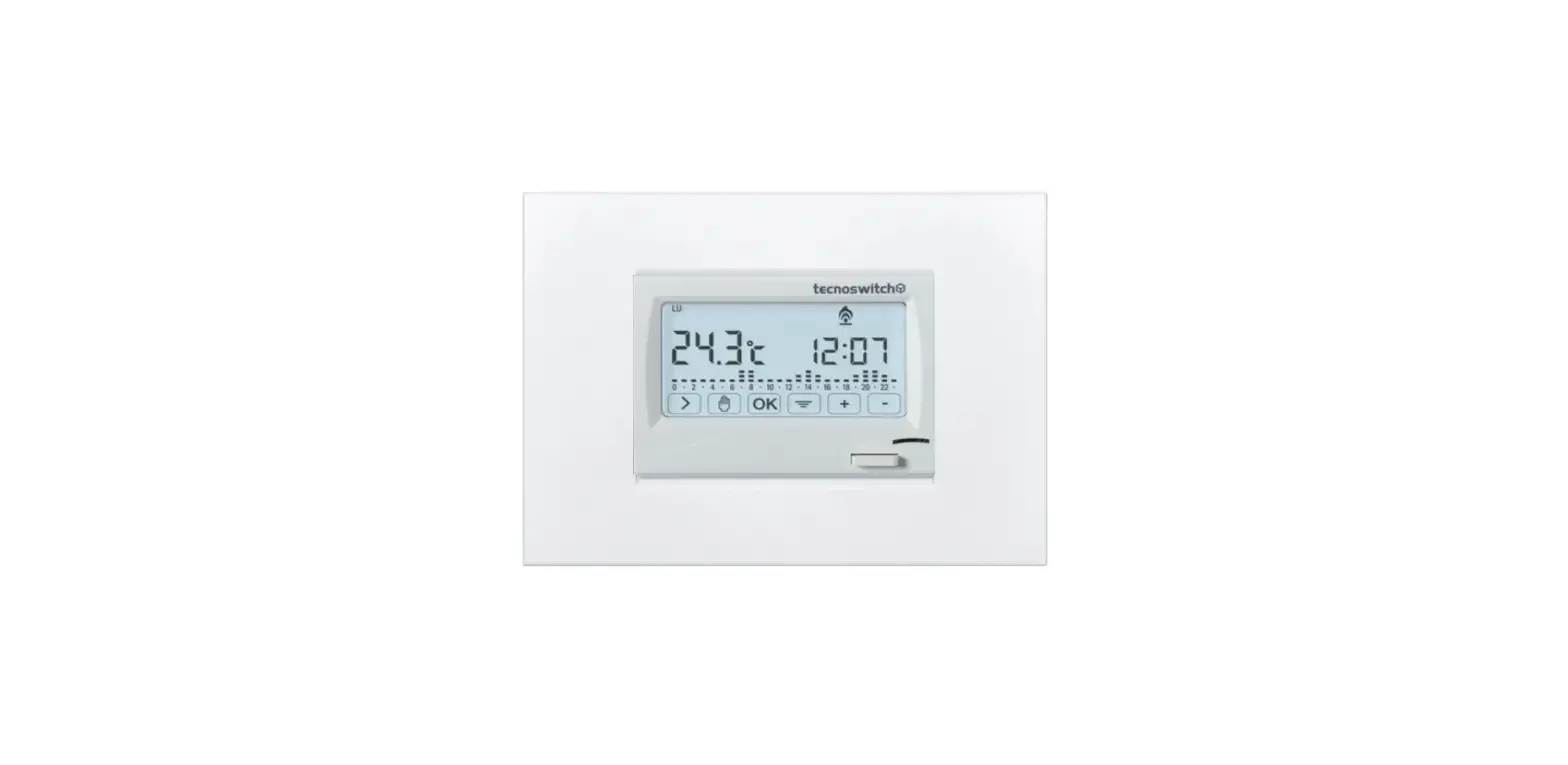

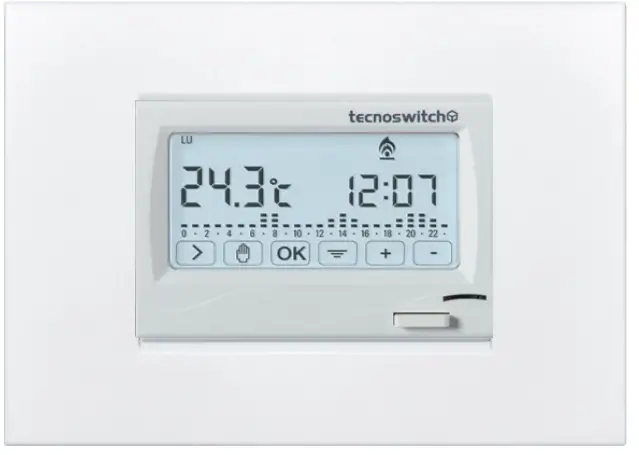
tecnoswitch CR615 Recessed Weekly Touch Programmable Thermostat
IN CONFORMlTY WITH NORMATIVES
EN 60730-1, EN 60730-2-9, EN 60730-2-7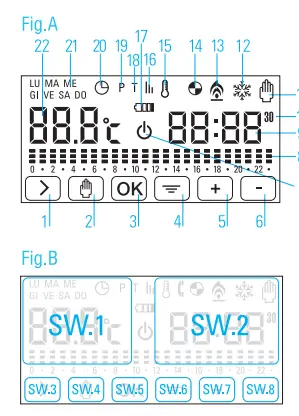
COMMAND AND INDICATIONS
Key/Display Legend (Fig.A)
 Move forward
 Manual mode/ ON-OFF
Auto mode/ Quit menu Confirm
 MENU
MENU Increase value
 Decrease vlue
 OFF
OFF Temprature thresholds
 Time
Time On/Off 30 minutes delay
- Manual Mode
 Cooling mode
 Heating mode
- Timed ON/OFF (COUNTDOWN MODE)
 Frost protection
 Statistics
 Low batteries
 Set temperature thresholds
 Set temperature levels
 Set day and time
 Days of week
 Ambient / Set temperature
Fig.B
- Area. SW1: Touch it to display the set temperature for 5 seconds
- Area. SW2: Touch it to show icons and turn on the backlight for 5 seconds

WARNINGS BEFORE INSTALLATION
- The device must be installed by qualified personnel.
- The device must be positioned about 1.5 meters above the floor, avoiding heat sources, windows and doors.
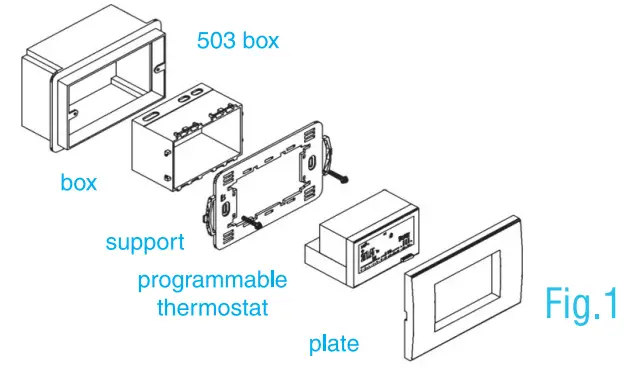
- The device must be installed in three modules recessed boxes type 503E.
- Two interchangeable faceplates are supplied, white and charcoal gray.
- The white front panel is pre-installed. If you want to change the color, follow the procedure described in the paragraph ‘FRONT PANEL REPLACEMENT
- Inserting the batteries incorrectly could damage the device.
- Before making any changes to the settings, you must activate the device by pressing on the display.
- The backlight wll light up and icons will appear. If you do not enter any command within 10 seconds the device will return to standby.
INSTALLATION
- Choose faceplates to use.
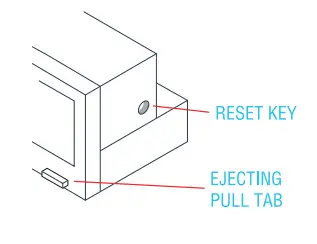
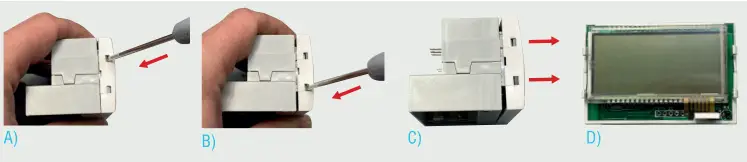
- Remove the device from its casing using the ejecting pull tab and remove the battery cover at the bottom of the appliance with a flat head screwdriver.
- Insert 2 batteries AA alkaline 1.5 V, respecting the polarity indicated on the bottom and reassemble the battery cover.
- Choose among the 4 universal supports supplied the one compatible with the plate in possession (SEE SUPPORT INSTRUCTIONS) and install the thermostat following the order indicated in Fig.1

FRONT PANEL REPLACEMENT
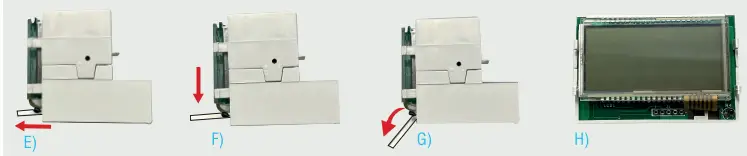
The device comes with a factory-installed white faceplate. To replace it with a different color, proceed as follows:
- Remove the faceplate from the device by lever with a flat head screwdriver into the two side slots and remove it from the device.

- Remove the ejecting pull tab (down to the right) by pulling it out first, then turn it down to pull it out of its housing.

- ASsemble the different colored taceplate and ejecting pull tab, folloWing the reverse procedure of the replacement procedure.
ELECTRICAL CONNECTONS
Connect the two wires of the heating/ cooling system to the screw terminals on the back of the device following the diagrams in Fig. 2A e Fig. 2B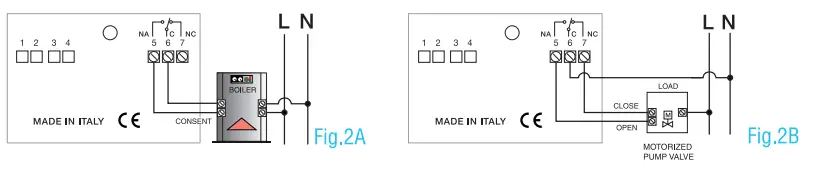
FACTORY SETTINGS
For quick and easy operation, the thermostat is factory pre-configured with optimized programming for the user.
Preset temperature levels: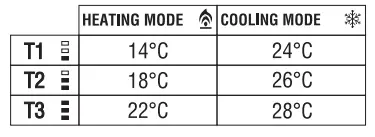
- Activation of frost protection function at 5°C
- Set temperature for manual mode 22°C
- Thermal differential 0,3°C
ON/OFF
Press![]() for 3 seconds to turn the device on/off. The icon
for 3 seconds to turn the device on/off. The icon ![]() shows that the thermostat is off.
shows that the thermostat is off.
DAY AND TIME SETTING
Press in sequence
- The menu key
- The icon flashes. Confirm with OK
- The time flashes. Use the keys +/ – to set the desired value and confirm with OK
- The minutes flash. Use the keys +/-to set the desired value and confirm with OK
- The icon LU (monday) flashes. Press the key repeatedly > until you select the desired day.
- Confirm with OK to complete the procedure.
MANUAL SETTING
- Press the key to activate/deactivate manual mode.
- Use the keys +/- to set the desired temperature.
DAILY PROGRAMMING OF TEMPERATURES
Follow the sequence below to program your device:
- Press the menu key
- Press the key up to position on P and confirm with OK
- The icon LU (monday) tlashes. Confirm with OK
- The time 00.00 appears on the display and segments flash at the time slot 0
- Use the keys +/ – to set, in the selected time slot, the desired temperature level (T1/T2/T3)
- Press the keyto move to the next time slot and set the desired temperature in the same way
- Repeat steps 5 and 6 until the time slot of 23.00, then confirm with OK.
- The icon LU (Monday)- MA (Tuesday) flash alternately. Now you can:
- copy the newly set program to the next day (Tuesday) by pressing OK
- customize Tuesday’s Schedule by pressing the key > , repeating the procedure described in points 4, 5, 6, 7
Follow the same procedure to copy/set the others days until D0 (Sunday).
RESET
Remove the device from its casing using the ejecting pull tab, down to the right of the device. Press with a sharp object the RESET button located inside the hole on the right side of the device.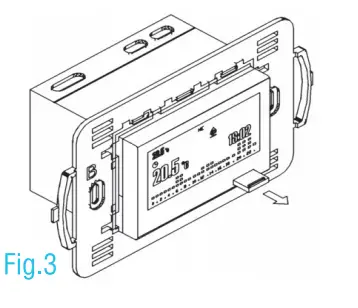 Pursuant to Legislative Decree No. 49 of March 14, 2014 Implementation of Directive 2012/19/EU on waste electrical and electronic equipment (WEEE) he ”crossed out wheelie bin” WEEE Symbol on the appliance show that the product at the end of its usetul lite must be collected separately from other waste
Therefore, the user must provide the equipment with the essential components at the recycling centre tor electronic and electrotechnical devices or return
It to the dealer when you purcnase an equilvalent appliance In one to one reason, or 1 to zero tor equipment witn a side lower than 25cm. The correct recycling helps to avoid possible negative effects on the environment and on health favoring the recycling of the materials that make up the equipment. Ihe illegal disposal of the product by the user inVOlves administrative sanctions as per Legislative Decree No. 49 of March 14, 2014.
Tecno Switch reserves the right to make changes to its products in each moment and without further notice. Tecno Switch declines all responsibility for damage to things or persons derived from an incorrect or improper use of its products.
For more information consult the installer manual on our website (tecnoswitch.com)
Contact Us
tecnoswitch.com
Via P. Leone Dehon, 99/105 76123 Andria (BT) ITALY
arealed.it
tel (+39) 0883 555323
fax (+39) 0883 555323

![Honeywell Ret97c Series Touchscreen Programmable Thermostat [rth7600] User Manual](https://static-data1.manualsee.com/1/img/115/17244/2020/12/Honeywell-RET97C-Series-Touchscreen-Programmable-Thermostat-RTH7600.jpg "Honeywell Ret97c Series Touchscreen Programmable Thermostat [rth7600] User Manual")


