![]()
 MANUAL
PLEASE READ THIS MANUAL BEFORE USE
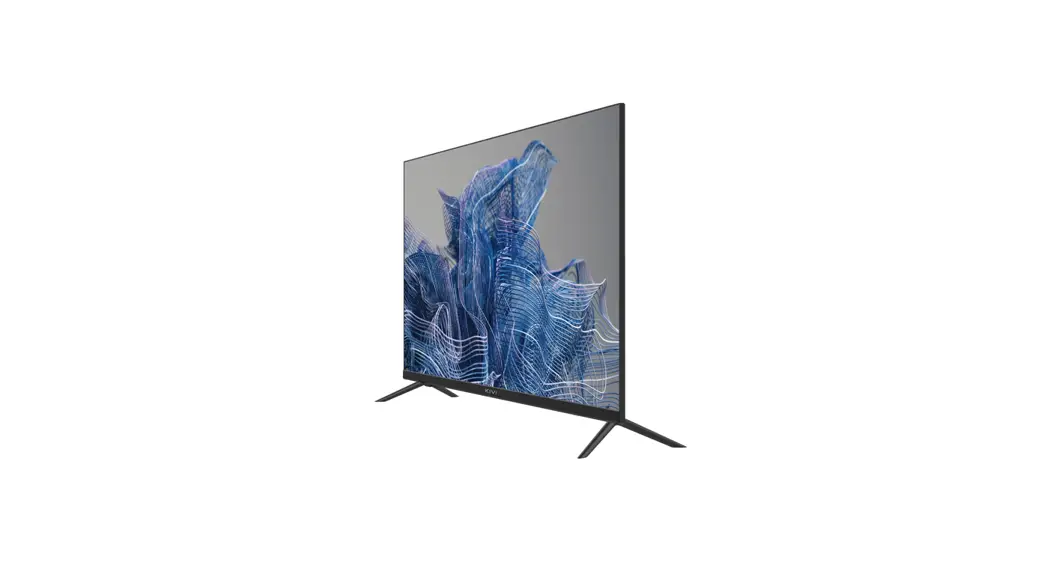
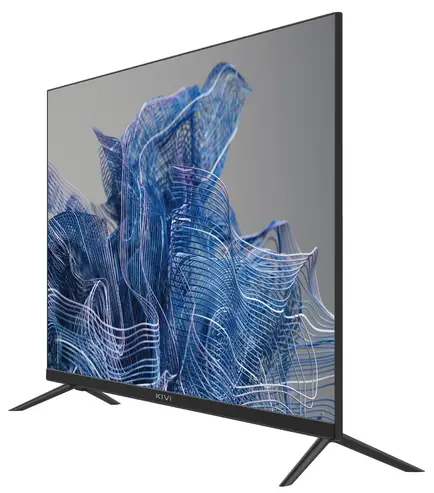
32H740NB Smart TV
Hello there! It’s me, your KIVI color LED-TV, and I will tell you how to use me safely.
If you still have any questions about my settings, functionality, or have any complaints or suggestions, please contact the support service.
To chat, scan the QR-code.
 | https://m.me/104873292165527 |
 | https://telegram.me/HelperKIVI_bot |
 | https://tinyurl.com/kivibot |

If it is more convenient for you to read online, scan this QR code or follow the link doc.kivismart.com/manual and download the online version
GENERAL INFORMATION ABOUT ME
| PRODUCT NAME | KIVI COLOR LCD TV |
| Warranty period | 1 year |
| Service life* | 3 years |
| Operating temperature, °C | +10 – +35 |
| Relative humidity while storing, % | 45 – 75 |
| Temperature while storing, °C | +5 – +40 |
| Atmospheric pressure, KPA / mmHg | 86 – 106 / 650 – 800 |
| Relative humidity while operating, % | 55 – 70 |
| Electricity consumption in off mode | <1 W or missing |
Recommendation only for countries where EU directives apply. This device complies with the standards and meets the requirements of Directive 2014/53 / EU.
* Service life – the calendar period of use of products for their intended purpose, starting from commissioning, during which the manufacturer (importer/supplier-legal entity accepts the claims) guarantees safety, ensures the possibility of its use and is responsible for any defects caused by its fault.
** The manufacturing plant depends on the state of sale. Detailed information about the origin of the product in your region can be found on the label, packaging, or roduct.![]() TO BE SAFE WITH ME:
TO BE SAFE WITH ME:
Make sure that all screws in the supports and bracket are properly tightened.
I do not recommend using unlicensed software.
Use a certified cable with the HDMI logo.![]() TO TRANSPORT ME:
TO TRANSPORT ME:
I will be in an upright position, full completeness and packaging. Do not place the box on the side of the display.
Hold me by the top and bottom of the body, not by the display or stand. kivismart.com
ATTENTION
![]() DON’T USE ME IF:
DON’T USE ME IF:
- The power cord, plug, or screen is damaged.
- I fallen myself or your favorite cat fallen on me.
![]() TO USE ME EFFECTIVELY AND SAFELLY:
TO USE ME EFFECTIVELY AND SAFELLY:
- Read and follow all instructions and precautions.
- If your outlet doesn’t fit, please, contact a specialist.
- Please connect me to power supply using a voltage stabilizer or relay only.
![]() TO KEEP ME CLEAN:
TO KEEP ME CLEAN:
- Wipe me with a cloth designed for the care and maintenance of the LCD screens.
- Do not spray liquids directly on me.
- If you touch me with greasy or sticky hands, turn me off, apply screen cleaner to a microfiber cloth, and wipe medown.
![]() This symbol indicates that I have double isolation between the mains voltage and dangerous parts for you.
This symbol indicates that I have double isolation between the mains voltage and dangerous parts for you.![]() Friends, unfortunately, I am not eternal. Therefore, at the end of my term, I shall be handed over to the receiving point of electrical and electronic equipment. For more detailed information about receiving and disposal points, please contact local municipal authorities or a household waste disposal company.
Friends, unfortunately, I am not eternal. Therefore, at the end of my term, I shall be handed over to the receiving point of electrical and electronic equipment. For more detailed information about receiving and disposal points, please contact local municipal authorities or a household waste disposal company.
Depending on the viewing location, the brightness and color of the panel may change, and tiny dark or colored dots may appear during operation. These nuances are a feature of LCD technology. However, if viewing an image makes you feel uncomfortable, please contact our support![]()
WHO AM I? MY FEATURES
FEATURES
| Model | 32H 730N B 32H 740N B | 40F 730N B 40F 740N B | 43U 730N B 43U 740N B | 50U 730N B 50U 740N B | 55U 730N B 55U 740N B | 65U 730N B 65U 740N B |
| Diagonal screen size, inches/cm | 32/81 | 40/102 | 43/109 | 50/127 | 55/140 | 65/165 |
| Resolution | HD 1366х768 | FHD 19201080 | UHD 3840×2160 | |||
| USB 2.0 | 2 | 3 | ||||
| HDMI | 3 | 4 | ||||
| HDMI | HDMI 1.4a | HDMI 2.1 | ||||
| Wi-Fi | b/g/n | a/b/g/n/ac | ||||
| VESA standard, mm | 200×100 | 200×200 | 300×300 | 400×300 | ||
| VESA bolts | M4 | M6 | M6 | M6 | M6 | M6 |
| Width, height, depth, mm | 720x425x62 | 899x512x62 | 962x558x83.5 | 1116x643x80 | 1231x720x82 | 1450x842x83 |
| Dimensions with stand, mm | 720x465x180 | 899x574x231 | 962x620x233 | 1116x706x265 | 1231x774x265 | 1450x905x333 |
| Net weight, kg | 4,2 | 6,4 | 7,5 | 9,1 | 11 | 16,7 |
*Indicators of power supply, power consumption related to the operation of “Home” TV Mode, indicators mode “store” may differ upwards.
**The complete set, appearance and specifications of the product may differ or may be changed by the manufacturer without prior notice
INSTALL MY ANTENNA AS SHOWN BELOW
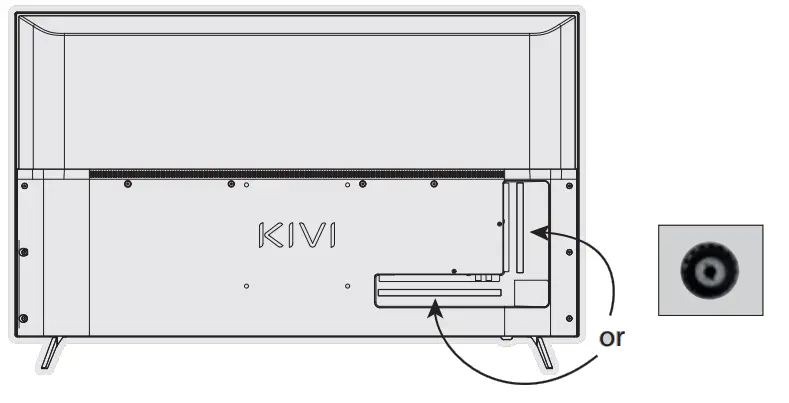
INPUT IMPEDANCE: 75Ω
For stable reception of digital TV channels, I recommend using an external antenna with an amplifier (the gain ratio of 30 dB or more).![]() NOTE:
NOTE:
The manufacturer, importer, or supplier are not responsible for damage to my components due to high voltage supply through the antenna port.
![]()
The terms HDMI, HDMI High-definition Multimedia Interface, and the HDMI logo are trademarks or registered trademarks of HDMI and Microsoft Administrator, Inc.
Manufactured under DOLBY LABORATORIES license. The DOLBY, DOLBY AUDIO, and Double D symbols are trademarks of DOLBY and laboratories.
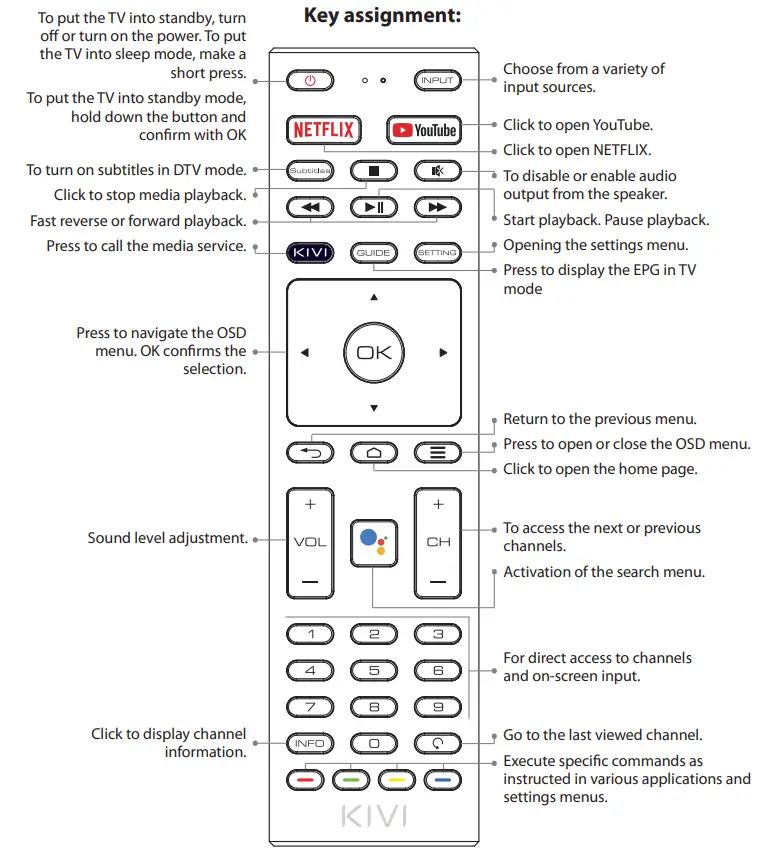
REMOTE CONTROL
Remote control (RC18)
![]() NOTE:
NOTE:
- The manufacturer may change The complete set and appearance may differ or may be changed by the manufacturer without prior notice.
- Remote control has CE certification.
- TVs come with RC18 remotes for models 32H730NB, 40F730NB, 32H740NB, 40F740NB and RC20 for models 43U730NB, 50U730NB, 55U730NB, 65U730NB,
- 3U740NB, 50U740NB, 55U740NB, 65U740NB.
![]() Remote control (RC) range — up to 10 meters..
Remote control (RC) range — up to 10 meters..![]() To make it work – insert the alkaline batteries and point it at me.
To make it work – insert the alkaline batteries and point it at me.![]() Do not mix new batteries with old ones, and do not leave the remote control near a heat source.
Do not mix new batteries with old ones, and do not leave the remote control near a heat source.![]() If you don’t use the remote control for more than one month, get the batteries out of there.
If you don’t use the remote control for more than one month, get the batteries out of there.
I HAVE TO APOLOGIZE FOR SOME INCONVENIENCES!
Unfortunately, the standard Google Gboard keyboard temporarily does not support the remote control-pointer.
THEREFORE:
Open Settings using the notification window that appears when you click on the pointer button on the remote control.
Connect the Wi-Fi, log in to Google Play, and install the necessary app for the pointer to work correctly.
After installing it, click on the pointer button on the remote contro
If you have already connected me to the Internet before – wait about 5-10 minutes, while the Ieanback app will appear in the general list of programs (the “+” icon in the main menu).
After that, press the pointer button on the remote control
IF ANYTHING:
When using a remote control pointer in applications, not all buttons and symbols are supported.
You can adjust the speed of the pointer by pressing the buttons simultaneously:
– Speed increase – pointer button ![]() + right;
+ right;
– Speed reduction – pointer button![]() + left.
+ left.
Detailed instructions with images are also available on the website kivismart.com, in the “24/7 support” section
CONNECTION PORTS
CONNECTING DEVICES
I am compatible with most devices for video and audio playback and can be connected to a Bluray, game console, stereo system, etc.
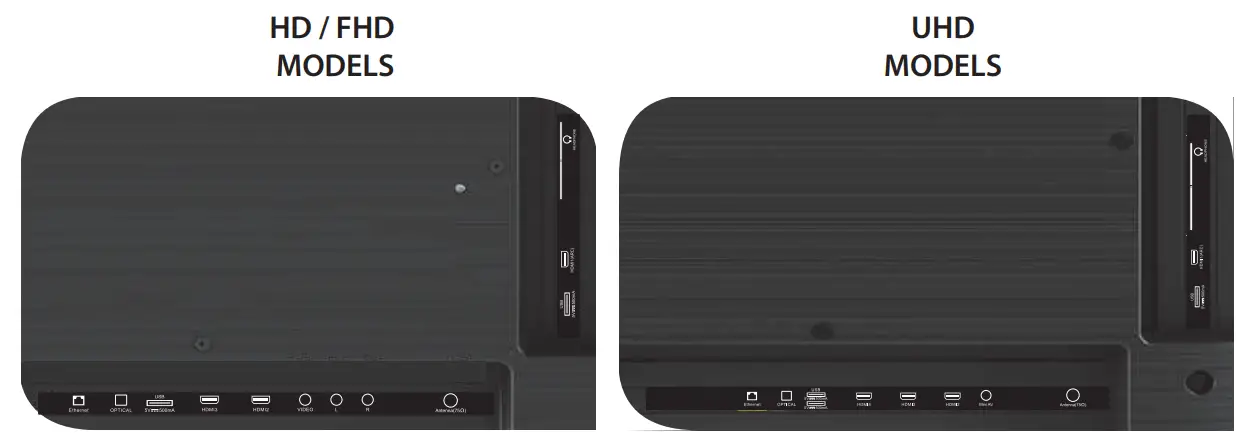
USB HDMI Antenna CI Mini AV IN
Input for USB devices (500mA) HDMI input
Antenna connection port
CAM module connection port
Composite audio/video input-UHD
L/R Composite audio input
VIDEO Composite video input
LAN Ethernet input
HEADPHONE Headphone output (3.5 mm)
OPTICAL OUT Optical output![]() NOTE:
NOTE:
- All external devices should not be connected after you turn me off.
- The maximum load on the USB port should not exceed 0.5 A.
- The TV supports ARC, CEC. 2K supports HDMI 1.4 a, 4K supports HDMI 2.1 and eARC.
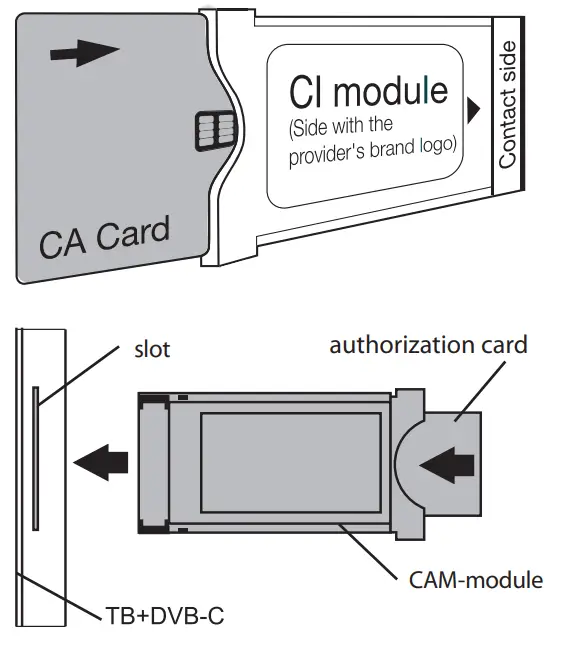
CONNECTING A CI CONDITIONAL ACCESS CARD
A CAM module with a CI conditional access card can be attached to a digital cable broadcasting service provider along with information for use.
The names of individual menu modes, the designations of some connectors and places of application, and the performance of individual ergonomic control functions may differ slightly from those described and depicted in this manual.
SETTINGS AND FUNCTIONS OF MY SYSTEM
FIRST TIME!
REMEMBER, TO MAKE EVERYTHING WORK, FOLLOW THE TIPS.
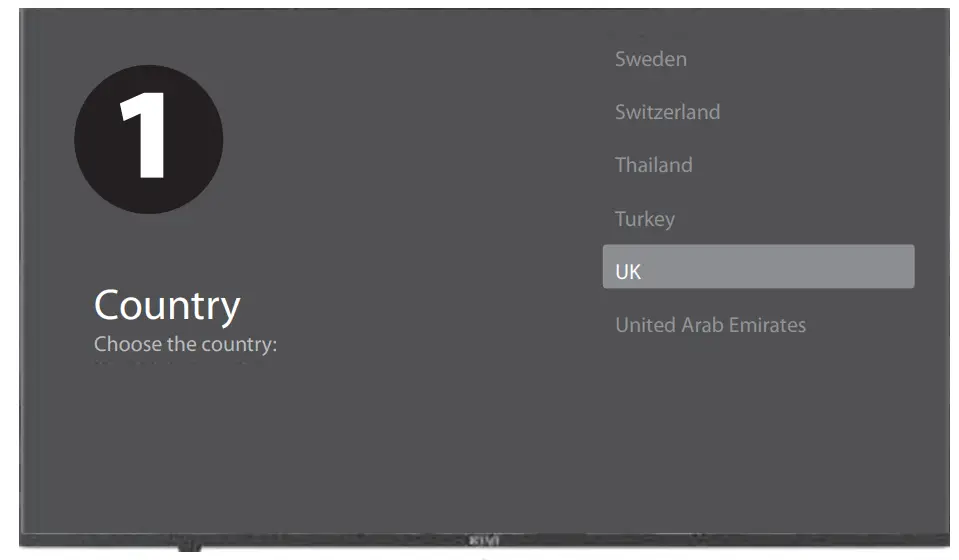
After you turn me on for the first time, I’ll show you the installation wizard with the settings, and you press![]() to select the system language and click OK to confirm the selection.
to select the system language and click OK to confirm the selection.
Now you need to connect me to the remote control. Press the left ![]() button and the Menu button
button and the Menu button ![]() simultaneously. Press OK in 5 minutes. And Presto! The remote control works via Bluetooth, and I can enter text under your voice dictation. If you don’t need all this, click the Back button or on the right to skip it.
simultaneously. Press OK in 5 minutes. And Presto! The remote control works via Bluetooth, and I can enter text under your voice dictation. If you don’t need all this, click the Back button or on the right to skip it.
You can also connect your Android to me and continue configuring it from your smartphone. If not, click – “Skip”.
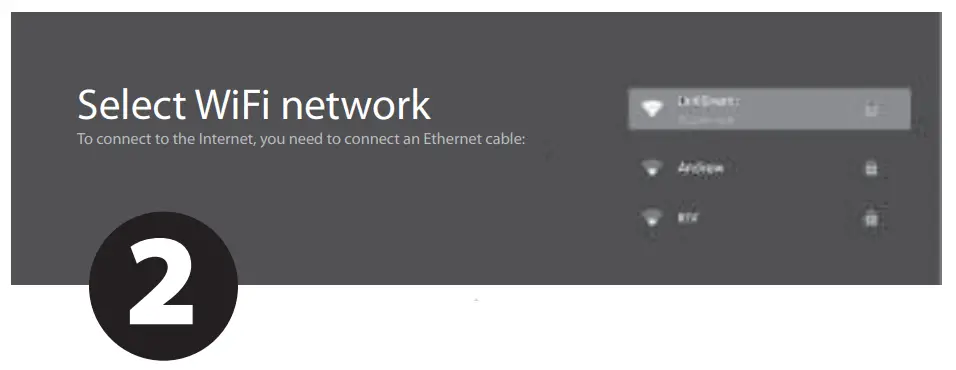
Let’s move on! To make it more interesting with me, I need the Internet. So press![]() to connect Wi-Fi, click OK and enter the network password.
to connect Wi-Fi, click OK and enter the network password.
You can also use Ethernet (wired internet connection).
To use Google and all its products, click “Accept” and log in to your Google account.
Now enter the 4-digit system password and remember it. You will need it when you want to restrict access to me for your little mischievous children (parental control).
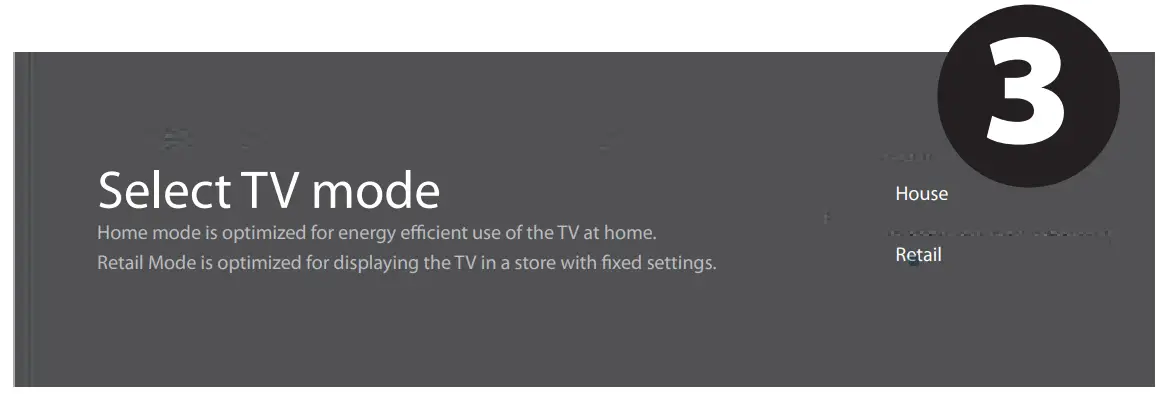
To select My Mode, press ![]() and the OK button.
and the OK button.
If you activate the Chromecast feature, I will be able to stream content from smartphones connected to your home network.
To select the tuner mode for the search, press ![]() and the OK button.
and the OK button.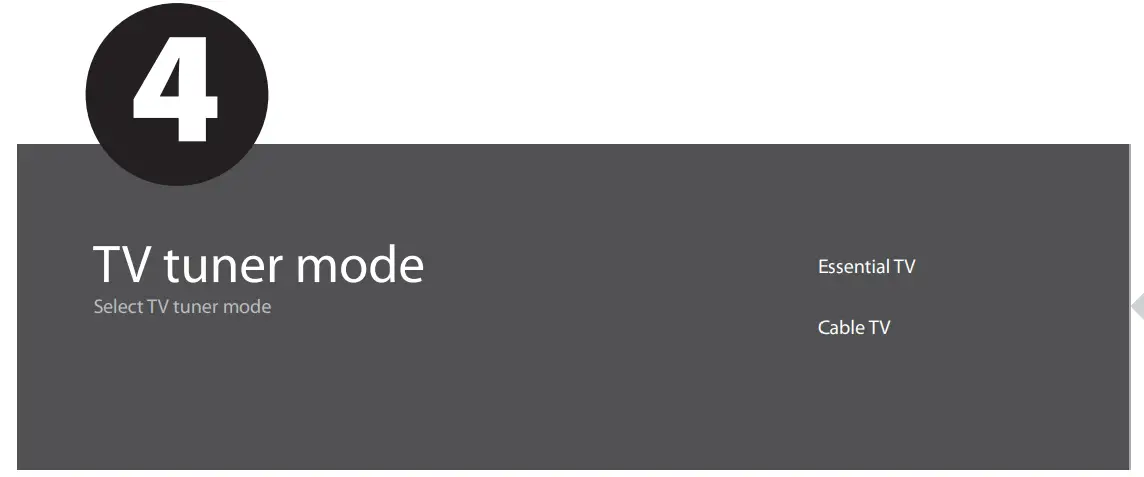 Phew! It is almost done. Now I start scanning the channels. Just in case, make sure that the
TV antenna or provider cable is connected according to the instructions.
SETTINGS AND FUNCTIONS OF MY SYSTEM
SETTING ARE ALMOST DONE TO DO THIS, PLEASE, FOLLOW THE INSTRUCTIONS ON THE SCREEN.
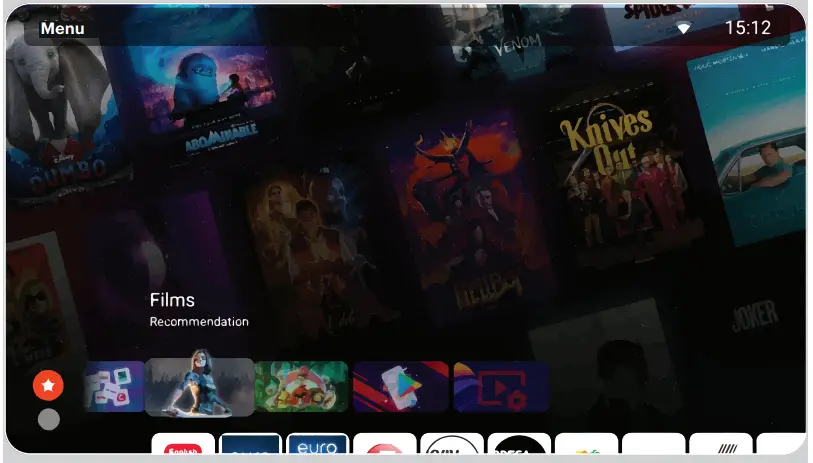
HOW TO GET ALONG WITH THE MAIN SCREEN:
Click the HOME button – I you and I are at my place, on the main menu page.
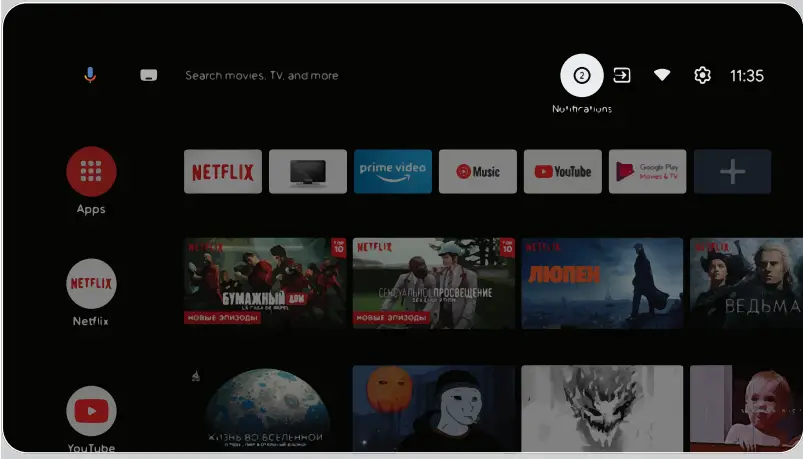
![]() Click to open the Google Assistant, launch voice search, or use voice input.
Click to open the Google Assistant, launch voice search, or use voice input.![]() Click to visit the programs that you use most often.
Click to visit the programs that you use most often.
Applications – click to go to the programs and applications screen, where all installed programs are listed.![]() Notifications – show notifications.
Notifications – show notifications.![]() Input – select the input source.
Input – select the input source.![]() Network and Internet – network settings, such as Wi-Fi.
Network and Internet – network settings, such as Wi-Fi.![]() Settings – System parameters.
Settings – System parameters.
HOW TO SET UP CHANNELS:
Select “Channels” on the channel source screen.
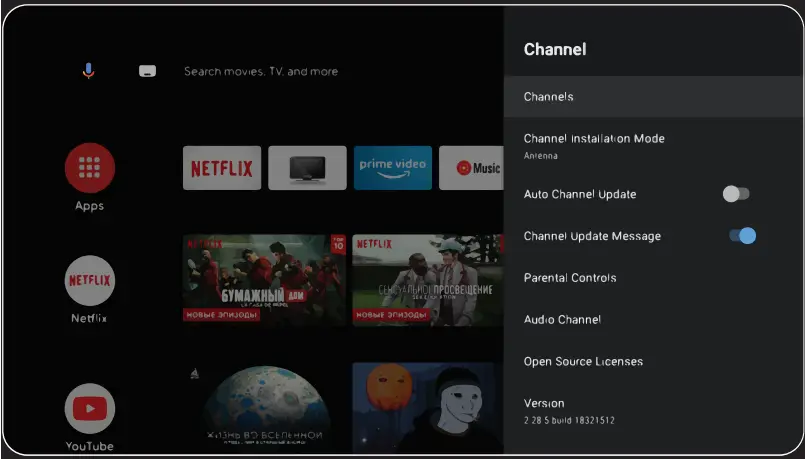
Select “antenna” signal sources.
I receive analog (ATV) or digital (DVB-T/DVB-T2) television.
If you set the value CabІe TV — I can receive analog and QAM signals.
To add the desired channel to your favorites list, while viewing it, press the Options button on the remote control, then Up and select the appropriate item.
To view the list of selected channels, click OK I after the list of channels appears, while viewing.
ANTENNA
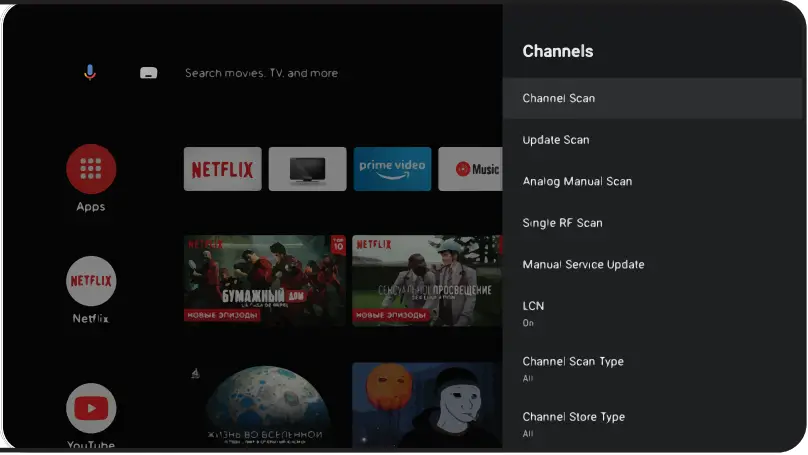
Main menu -> click the Settings button-> Channel -> Channels – > Scanning channels.
Start scanning y in the selected mode.
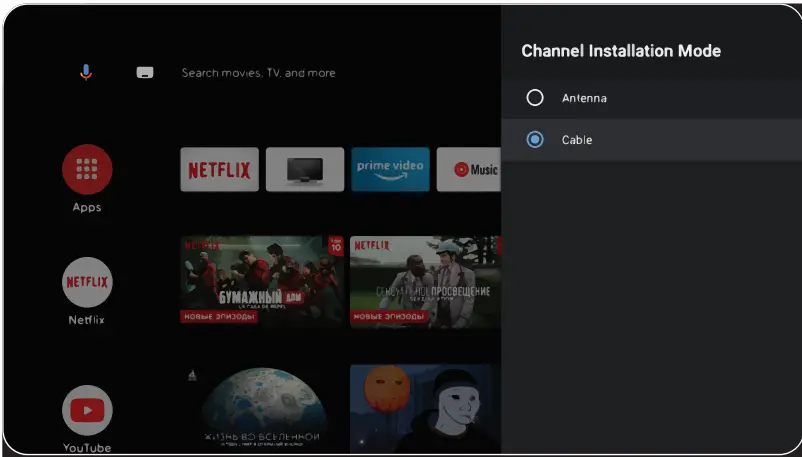
Main menu -> Inputs – Cable TV – on remote control Options – Settings – Channel – Channels
CABLE
Select the channel scanning mode with a choice of local operators and the default scanning mode. Channel scanning: automatic search with the ability to set some parameters (Advanced, Full, Fast). Single RF channel scanning: manual scanning.
SIGNAL SOURCES
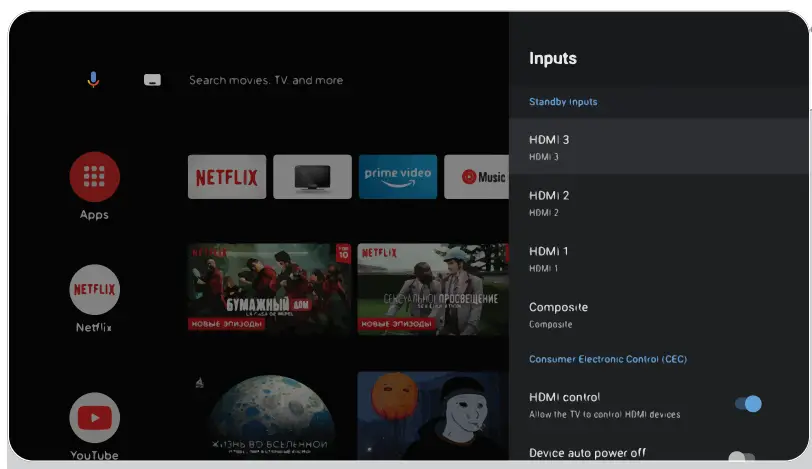
Login – set me up using external devices.
Manage HDMI devices – activate the HDMI CEC function submenu.
CEC/ARC — Consumer Electronics Control, consumer electronics management. ARC — updated CEC technology and stands for Audio Return Channel, a reversible audio channel. If you connect an ARC/CEC enabled device to the ARC HDMI port — get the ability to control power, volume, and other functions using the remote control.
Automatically turn off the device – disconnect HDMI devices with me. Automatically turn on the TV — automatically turn on the TV with an HDMI device.
HDMI EDID version — installation of EDID version.

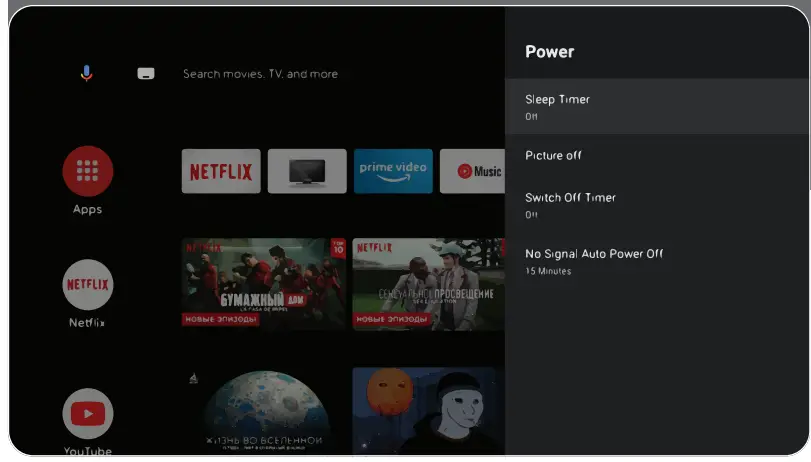
BRIEFLY ABOUT MY POWER:
If you fall asleep, I fall asleep. Auto power off is when you and I fall asleep with you in 10, 20, 30, 40, 50, 60, 90, 120 minutes. Shutdown timer – turns off my power after 30-240 minutes. No image – turn off my Starlight.
CHECK UP, CHECK UP! ARE YOU RECEIVING ME?
SOUND:
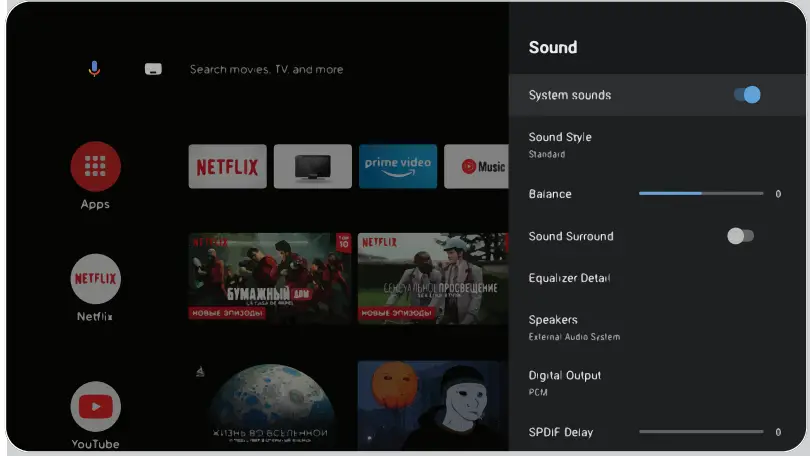
Sound style – you can choose between modes:
User, Standard, Live Sound, Sports, Film, Music, News.
Equalizer – if you are a sound engineer and want to adjust the sound manually.
Speakers – choose between audio output sources.
ARC support. To enable ARC Settings – >Sound- >Speakers and select “External audio system”.
Digital output – choose between sound modes: Auto, Skip, PCM, DoІby DigitaІ PІus, DoІby DigitaІ.
Digital SPDIF delay – adjust the digital audio output.
Automatic volume control.
To restore the values of the image parameters, click Reset settings – OK.
REMOTE CONTROL AND ACCESSORIES
In this menu, you can connect Bluetooth devices. Read more in the remote control section.
PLEASE, REMEMBER:
connection of the remote control via Bluetooth refers to KIVI remote controls with support for this function only.
CHECK UP, CHECK UP! CAN YOU SEE THE IMAGE CLEARLY?
IMAGE:
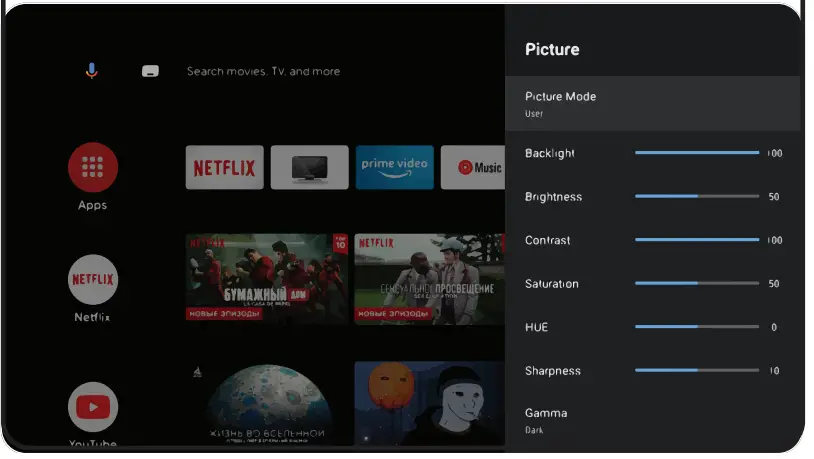
Image mode — here you can choose between the following modes: User, Standard, Saturated, Sport, Film, Game, Energy-saving.
Adjustment – here you can adjust the tone / sharpness / gamma / color temperature/ video settings / color settings.
HDR – to enable recognition of HDR files.
Enhanced video codec – to activate receiving 4K content from external devices.
Advanced video settings – management of additional technologies. In particular, ALL, MEMC and others.
And, of course, if you want everything to be new – default reset;
![]() NOTE
NOTE
The above screenshots, description, and specifications, depend on the configuration, region, software, software updates by third parties, the actions of third-party forces, and installation of non-licensed software. The description, characteristics, illustrations, and pictures presented in this manual are made for visualization and reference and sometimes may not match.
The product’s appearance, characteristics, packaging, software, and set of applications may differ or be changed by the manufacturer without notice to the end user.
KIVI MEDIA LAUNCHER¹
Consists of categories: Home screen – > Menu, Applications, Fitness, Games, Movies, Cartoons, TV channels, Outputs, Inputs, Settings
The menu screen contains Categories: Applications, TV channels, Movies, Sports, Cartoons, Sports, Games, Settings.
When you change categories, the screen, and the screen saver change.
To activate TV channels, agree to the user’s condition and enter your phone number.
After entering your phone number, confirm activation with the code from the SMS.
KIVI media settings are launched using the menu button on the remote control.
KIVI media features²: quick access to my main settings and Wi-Fi, the ability to set photo or video as the background.
MULTIMEDIA PLAYER
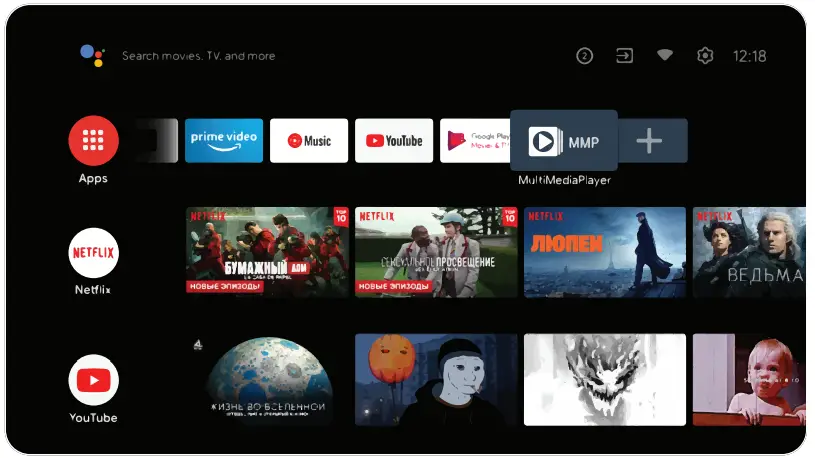
This is about playing media files from an internal memory or USB device.
In the main menu, select multimedia PІayer to display videos, photos, or text.
When using a USB flash drive, see the corresponding files in the USB section.![]() I am compatible with wired and wireless joysticks, controllers, keyboards, mice, and other devices that support the Android
I am compatible with wired and wireless joysticks, controllers, keyboards, mice, and other devices that support the Android
TV system. As well as joysticks for Microsoft Xbox One, Microsoft
Xbox 360, Sony DuaІShock 4, and Logitech F310/F510/F710
- The launcher is launched using the KIVI media button.
- The range of Kivi media services will depend on the country and will be updated from time to time.
WHEN SOMETHING GOES WRONG
In addition to hardware-related malfunctions, if there are any non-standard operations, power me off for 30 seconds.
| Unstable or missing broadcast / cable TV signal
| 1. I’m on the antenna, but I cannot find channels, and I broadcast channels with image distortion or audio interruptions.
| 1. For stable reception of DVB-T2 (digital) and ATV (analog) signals, use an external antenna with an amplifier (gain 30 dB and more). Additional power to the antenna input is already transmitted and cannot be supplied via my USB ports. Point your antenna toward the nearest TV tower. If you are using a room antenna, raise it higher, rotate it around your own axle, and move it around the room. Make sure that you have selected an antenna in the settings ->Channel -> channel setup mode menu. Configure the channels manually. For a stable image and sound, the indicators shall be from 50% or higher. |
| 2. I’m cable, but I don’t find channels, and I broadcast channels with image distortion or audio interruptions. | Check the integrity of the cable. 2. If you are using cable TV (DVB-C) or a common house antenna, I recommend connecting without a splitter. If possible, connect me to another antenna cable. Make sure that you have selected an antenna in the Settings -> Channel -> Channel setup mode menu. Configure the channels manually. Check the integrity of the cable. Use a signal amplifier. | |
| Sound is not played on external speakers | 1. Connecting speakers via Bluetooth | 1. Connect Bluetooth speakers via the Settings menu – Remote controls and accessories – Add a device. |
| 2. Connect speakers via HDMI | 2. Connect the speakers to me via the HDMI (ARC) Jack. In the Settings menu -> Sound -> Speakers — select “External audio system”. In the Settings menu –> Device Settings -> Inputs – > HDMI EDID version – set the value to “EDID 1.4”. | |
|
| In Settings menu -> Device Settings – > Sound -> digital output – select Auto, Skip, PCM, etc. | |
| 3. Connect speakers via AUX (3.5 mm headphone jack) | 3. Make sure that the audio cable is inserted all the way into the 3.5 jack. | |
| 4. Connecting speakers via optics | 4. Attach the speakers to the OPTICAL connector. In the Settings menu – > Device Settings – > Sound -> Digital output-> select Auto, Skip, PCM, etc. Use the VOL button on the remote control to turn down the sound volume until it is completely turned off. Use the remote control from the speakers to increase the sound to the desired level. |
![]() IMPORTANT!
IMPORTANT!
The use of the web browser as a means of viewing videos or listening to music may cause it to close and malfunctions in my operation. Use multimedia programs adapted to the content. For example, YouTube, Netfix, and so on.

Full troubleshooting instructions are available via the QR code.
Scan the QR code using your smartphone or Viber camera.