
![]() INSTRUCTIONS FOR USE
INSTRUCTIONS FOR USE
X500Pro
FOLDABLE DRONE
Instruction Manua
Accreditation standard: GB/T26701-2011
![]() Camera with 500 m
Camera with 500 m
Image
transmission range
(Please ensure your mobile phone supports 5G WiFi )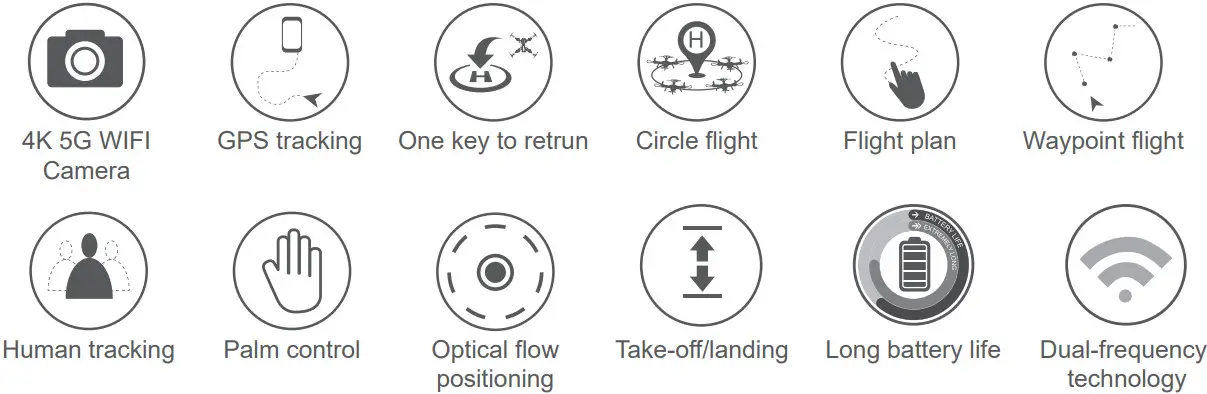
Important safety information
Thank you for purchasing this SYMA product. To ensure that you operate the aircraft correctly, please read these instructions carefully before first use and store them in a safe place for future reference. Safety Guide
- This product is suitable for users aged 14 years or above. Not Safe for users under the age of 14 to use without adult supervision.
- Rechargeable batteries are to be removed from the toy before being charged.
- Batteries are to be inserted with the correct polarity.
- Batteries are only to be charged by adults or by children at least 14 years old.
- Non-rechargeable batteries should not be recharged; Batteries should be inserted with a correct polarity; Different types of batteries, new or used batteries should not be mixing.
- Turn off the drone/transmitter and remove the batteries when not in use.
- The supply terminals are not short-circuited.
- Keep away from the rotating blades (rotating blades may cause bodily injuries or damage to property).
- Attention: Please assemble the aircraft with the guidance of adults.
- Do not look directly into the LED lights of the drone as it can damage your eyes.
- Exhausted batteries are to be removed from the aircraft.
- Please store the smaller-sized drone accessories in places that are out of reach of children.
- This drone is very powerful. For all first-time flights, the left joystick must be slowly pushed up in order to prevent the drone from ascending too fast to avoid unnecessary collision and possible damage and injury.
- When the flight is ended, first turn off the power of the remote control. Then turn off the power of the drone.
- Avoid placing the batteries in places with high temperatures and exposure to heat.
- Please keep a safe distance from the spinning propellers to avoid injury.
- To ensure the electromagnetic environment requirement of the aviation radio (station), using remote controls in the zone, which is in a radius of about 5000m zones from the circle center of the airport runway, is forbidden. All users also should abide by the regulation of the radio set forth by government and regulatory agencies including the duration and area.
- Pay attention to keeping a distance of 2-3 meters from the user or other people when the aircraft is flying, and avoid the aircraft landing to hit the head, face or face, or body of another person.
- Attention: Drone assembly under adult supervision.
- The packing has to be kept since it contains important information.
- Don’t use or leave the battery near a heat source such as a fire or heater.
- After flying, don’t charge batteries at once to avoid batteries too heat to cause a fire, make sure it cools down before charging.
- Don’t hit or let batteries fall down when charging to avoid an inner short-circuit.
- Only use the included adaptor for charging. Please replace them with new batteries in time if the batteries aging.
- After full charging, please take off the adaptor in time, otherwise, batteries will discharge and charge again, this way will shorten the batteries’ service life.
- Remove and insert the battery correctly.
Repair and maintenance
- Use a clean and soft cloth to clean the product.
- Keep away the product from heat sources.
- Avoid water exposure to this product. Moisture may cause damage to the aircraft’s electronic parts.
- Transformers used with the aircraft should be examined regularly, such as the cord, plug, enclosure, and other parts, ln case of any damages is found, please stop using it unless it is repaired or replaced.
About this product
Specifications
| Aircraft |
| Aircraft weight | Approx. 215g |
| Aircraft Size | 305x280x65 mm |
| Range | 500 m |
| Altitude | 100 m |
| Image transmission range | 500 m |
| Flight time | Hovers indoors for 24-25 minutes |
| Operating conditions | 0°C to 40°C |
| Video transmission frequency | 5 GHz |
| Motor | 1503 Brushless motor |
| Battery | 7.6 V 1700 mAh |
| Charging time | About 3 hours |
| Remote control | |
| Operating frequency | 2.4 GHz |
| Range | 500 m |
| Operating conditions | 0°C to 40°C |
| Charging time | About 1 hour |
| Package contents | |
| Aircraft | 1 |
| Remote control | 1 |
| USB charging cable | 2 |
| Clockwise/anticlockwise propellers | 4 |
| Instructions | 1 |
Download the SYMA AIR app and watch the video tutorial
Installing the SYMA AIR app
Scan the QR code with your mobile device or download the app from your app store.
 https://itunes.apple.com/cn/app/syma-air/id1286588607?mt=8 |  |  |
| i0s | Android (Google play) | Android |
* Note: For best results, use a device with iOS 8.0/Android 5.0 or later.
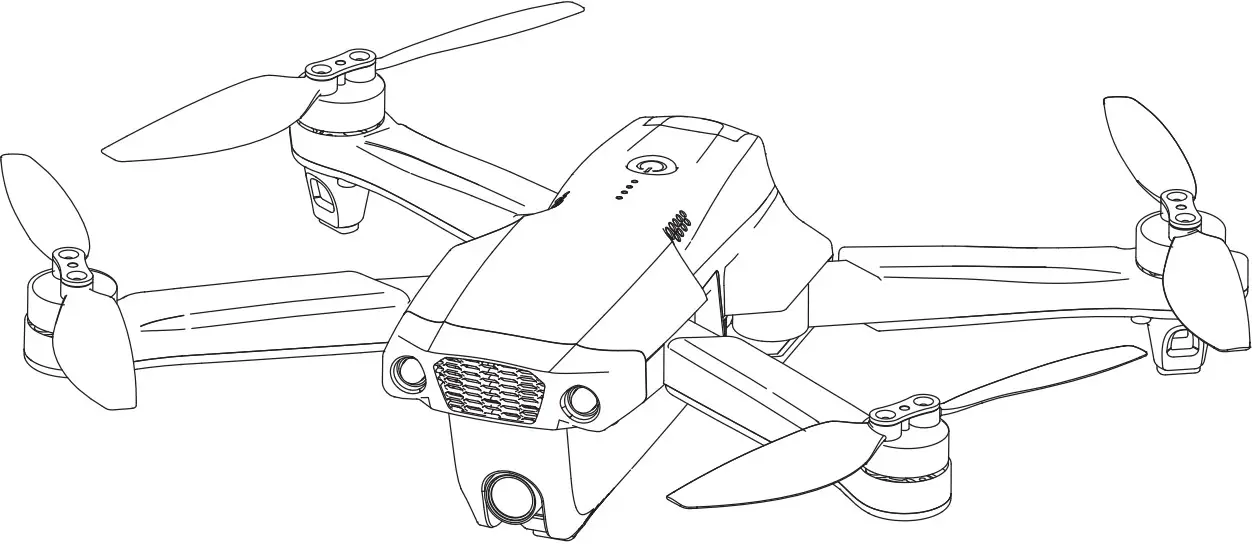
Aircraft components
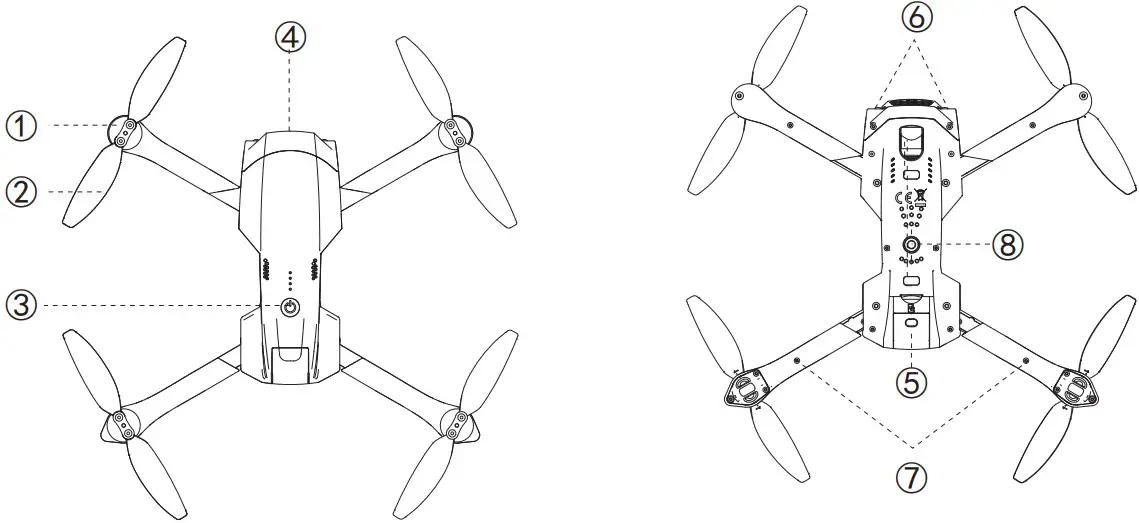
- Motor
- Propeller blades
- Power switch
- Front Camera
- Battery
- Front LED indicator
- Rear LED indicator
- Bottom camera
Remote control
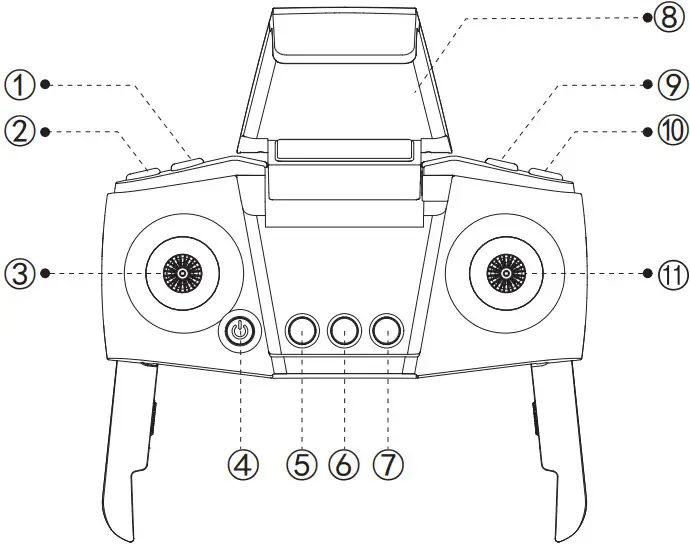
- Photo button
- Record button
- Left joystick
- On / Off button
- One Key Take Off / Landing
- Calibrating the compass
- Home button
- Phone holder
- Lens up
- Lens down
- Right joystick
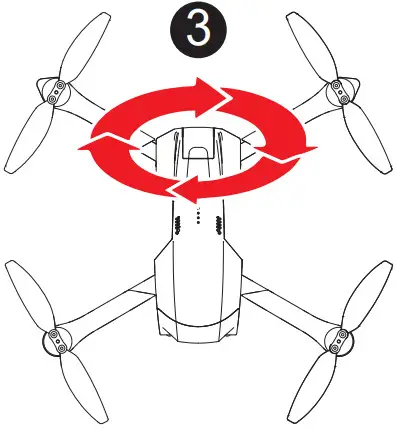
Assembling the product
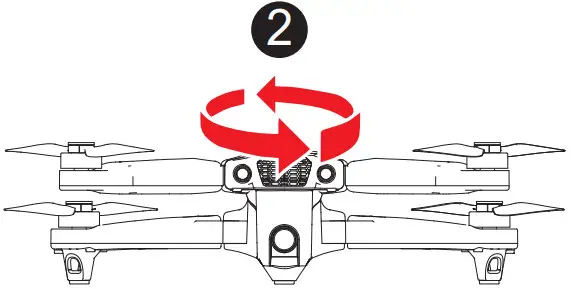
Installing the propellers
| Clockwise propellers | Anticlockwise propellers |
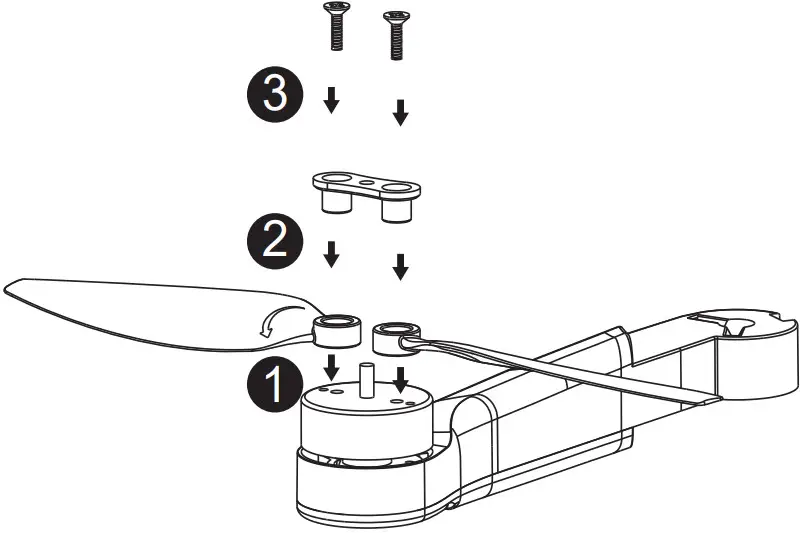 | 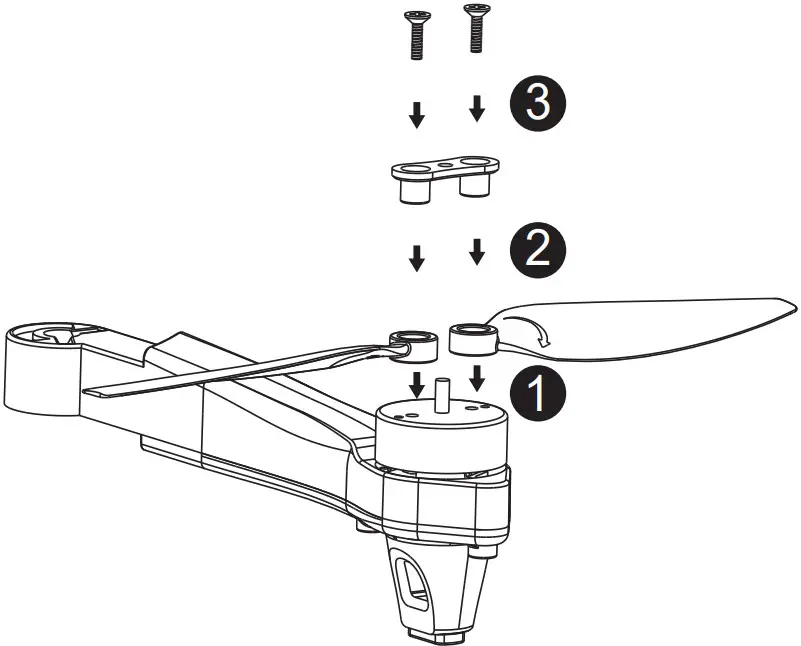 |
- Attach the propellers as shown in the diagrams above. Ensure that they are attached in the correct orientation.
- Ensure that the clockwise and anticlockwise propellers are attached to the correct arms. The aircraft will not fly correctly if the propellers are attached in the wrong position.
 The propellers are made from delicate material. Pay attention when attaching them to the aircraft.
- Only use propellers that are supplied by the manufacturer.
- The propellers are consumable parts. If necessary, purchase replacements from the manufacturer.
This toy is only to be connected to equipment bearing either of the following symbols:
Inserting a memory card (optional accessory)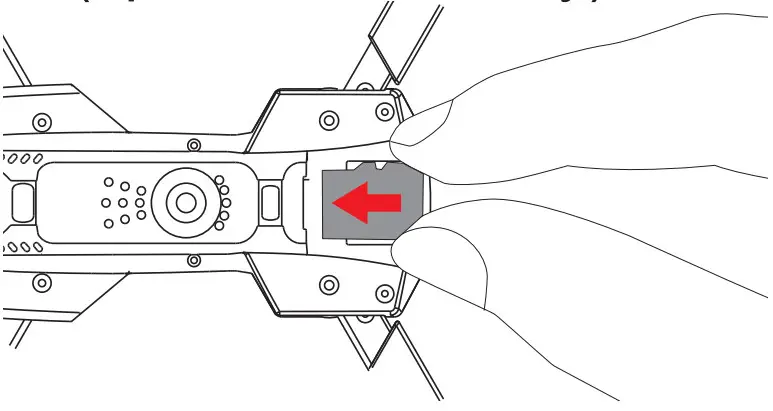
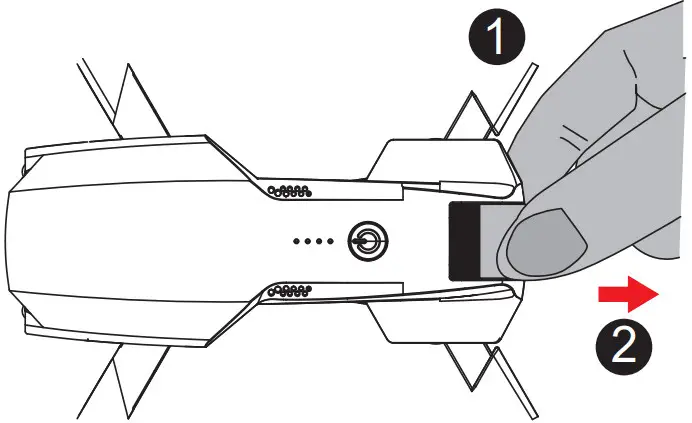
Charging the aircraft battery Remove the battery
Charge the battery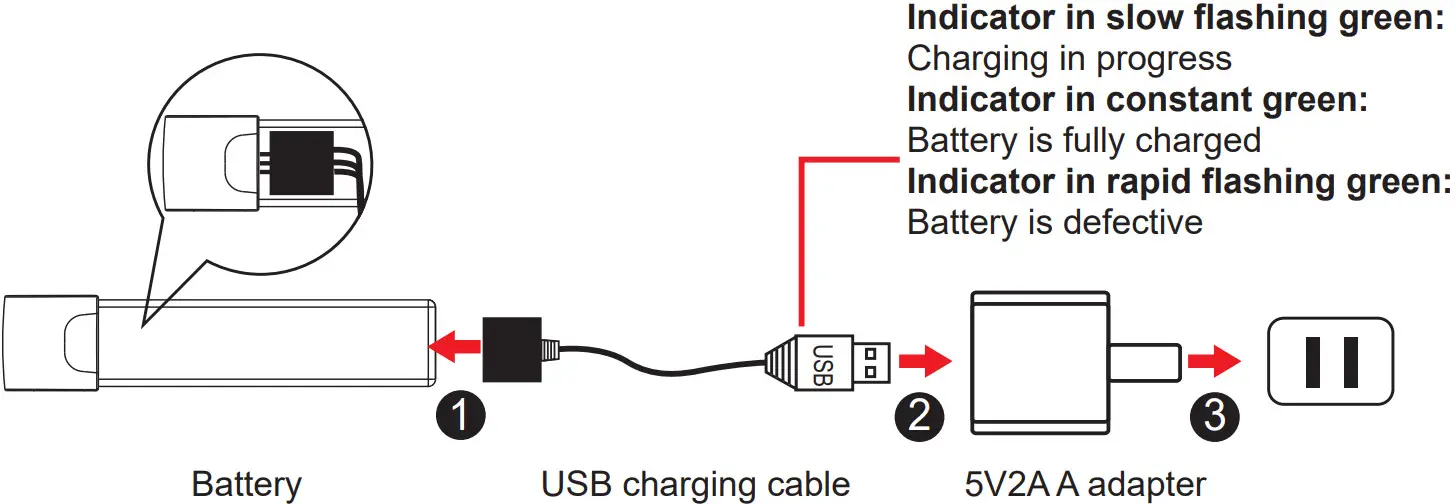 * Charge the aircraft with the USB charging cable that came with the product.
* The battery will take longer to charge when you use an adapter with a smaller rated current.
Insert the battery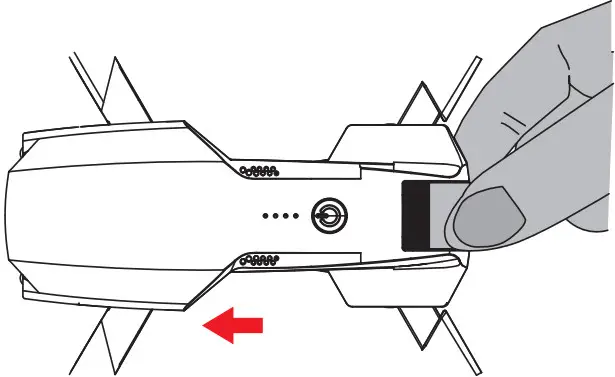 * Ensure that the battery holder clicks into place.
* Do not short circuit or compress the battery, as this may cause an explosion.
* Do not disassemble the battery or store it in a hot environment.
* If you do not plan to use the aircraft for at least 10 days, discharge the battery to 40%-50%. This helps to prolong the lifespan of the battery.![]() * Rechargeable batteries should be removed from the aircraft before charging charged.
* Rechargeable batteries should be removed from the aircraft before charging charged.
* Rechargeable batteries should only be charged under the supervision of adults. and keep away from flammable materials.
* Exhausted batteries should be removed from the aircraft.
* Caution: Risk of explosion if the battery is replaced with incorrect ones, please install the batteries according to the instructions.
Failure to follow all the instructions may result in serious injury, and irreparable damage to the battery, and may cause a fire, smoke, or explosion.
- Always check the battery’s condition before charging or using it.
- Replace the battery if it has been dropped, or in case of odor, overheating, discoloration, deformation or leakage.
- Use only the supplied charging cable.
- The battery temperature must never exceed 60 C (140°F) otherwise the battery could be damaged or ignite.
- Never charge on a flammable surface, near flammable products, or inside a vehicle ( preferably place the battery in a non-flammable and nonconductive container ).
- Never leave the battery unattended during the charging process. Never disassemble or modify the housing’s wiring, or puncture the cells. Always ensure that the charger output voltage corresponds to the voltage of the battery. Do not short-circuit the batteries .
- Never expose the battery to moisture or direct sunlight, or store it in a place where temperatures could exceed60 C (drone in the sun, for example)
- Always keep it out of reach of children .
- Improper battery use may result in a fire, explosion, or another hazard.
- Non-rechargeable batteries are not to be recharged. Rechargeable batteries are only to be charged under adult supervision .
- Different types of batteries or new and used batteries are not to be mixed.
- Batteries are to be inserted with the correct polarity.
- The supply terminals are not to be short-circuited. Regular examination of transformer or battery charger for any damage to their cord, plug, enclosure, and othe parts and they must not be used until the damage has been repaired.
- The packaging has to be kept since it contains important information.
Attaching the phone holder
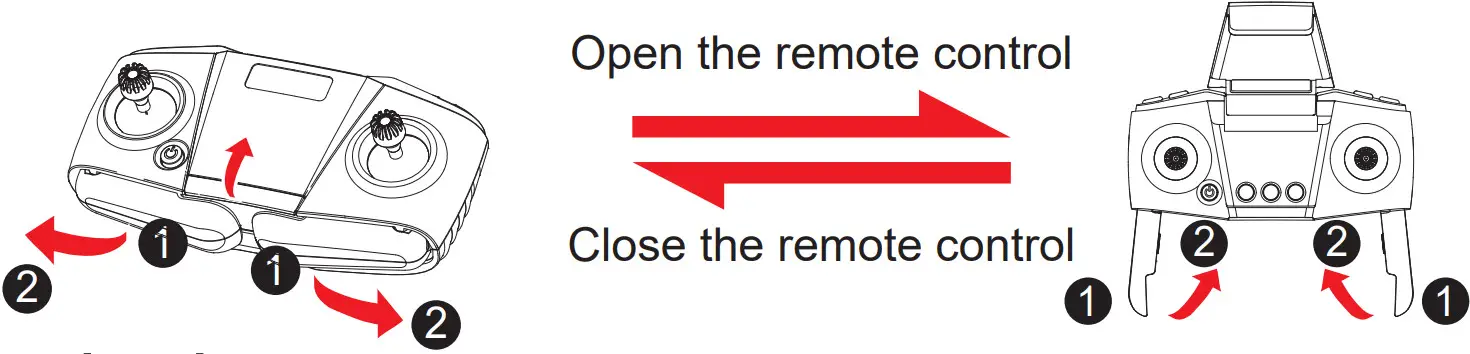
Inserting the remote control batteries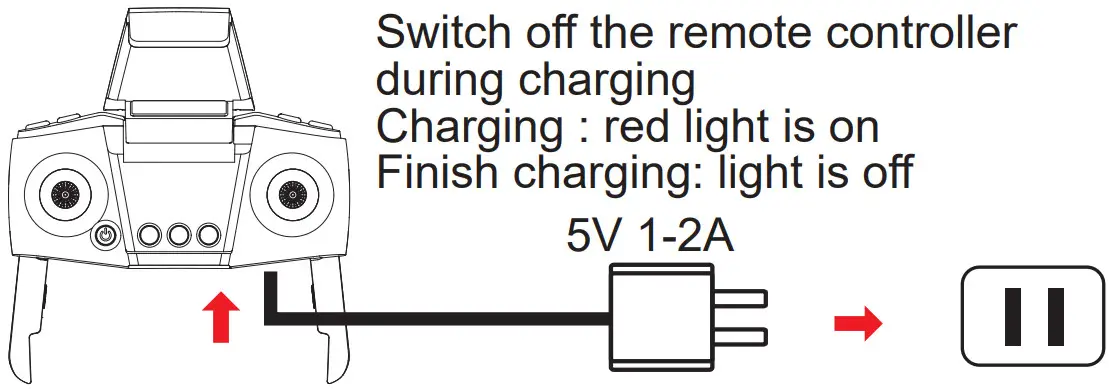
* When installing the batteries, ensure that you match the + and – ends of the battery with the + and – signs on the controller.![]() * During the battery installation, it must be ensured that the polarities of the batteries are matched with that of the battery box. No battery shall be installed with the opposite polarity.
* During the battery installation, it must be ensured that the polarities of the batteries are matched with that of the battery box. No battery shall be installed with the opposite polarity.
* Please do not use new and old batteries together.
* Please do not use different types of batteries together.
* The controller Do not use rechargeable batteries.
* Exhausted batteries are to be removed from the Remote control.
Flight preparation and turning the aircraft on/off
Pairing the remote control with the aircraft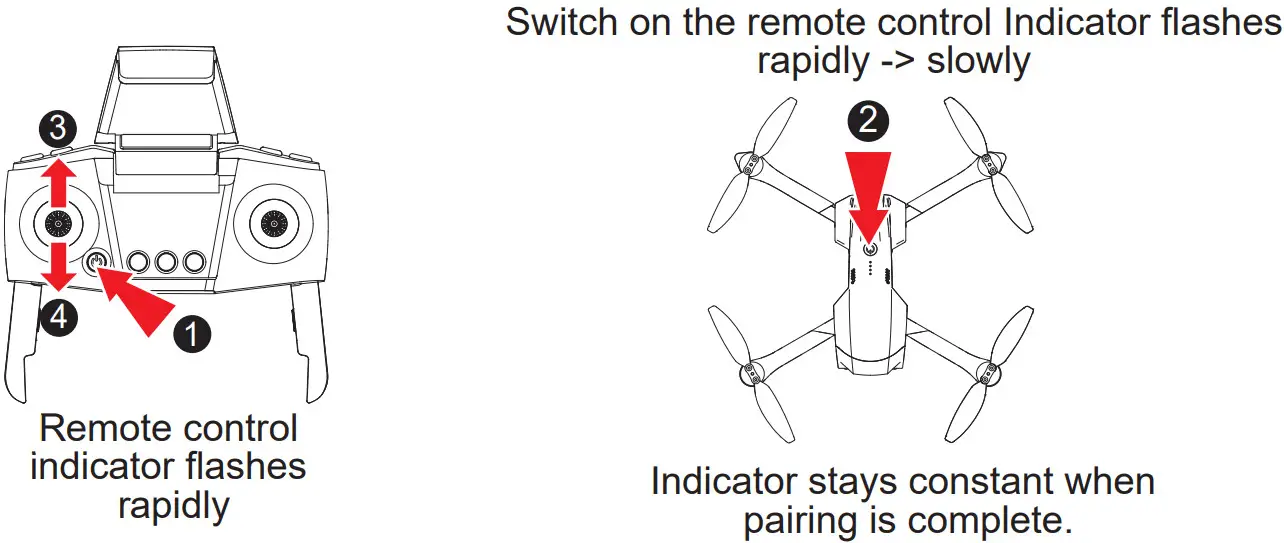
![]() * When you switch on the remote control, the indicator will flash rapidly for approximately 20 secs to indicate that the remote control is waiting for a signal. The indicator will then flash slowly to indicate that the pairing mode has been disabled.
* When you switch on the remote control, the indicator will flash rapidly for approximately 20 secs to indicate that the remote control is waiting for a signal. The indicator will then flash slowly to indicate that the pairing mode has been disabled.
Calibrating the compass
 |  |  |
| Press to calibrate the compass | Hold the aircraft horizontally and rotate 360 degrees a few times. The indicator flashes from slowly to rapidly. | Hold the aircraft vertically and rotate 360 degrees for few times. Indicator flashes from rapidly to constant. |
![]()
- Do not calibrate the compass near strong electromagnetic fields or large pieces of metal, e.g. magnetite, car parks, or buildings with underground steel reinforcements.
- When holding the aircraft horizontally, the angle of inclination must not exceed 30 degrees.
Searching for satellites
The rear indicator will change from orange to green when the aircraft has locked onto a satellite and recorded the take-off location. The aircraft is now ready to fly.![]()
* It should take approximately one minute for the aircraft to lock on to a satellite. If the aircraft fails to find a satellite, recalibrate the compass.
* Before take-off, place the aircraft in an open space away from obstacles and ensure that GPS mode is enabled.
* When the rear green indicator flashes rapidly, this indicates that the GPS signal is weak. If this occurs, land the aircraft manually and restart the satellite search.
Turning the aircraft on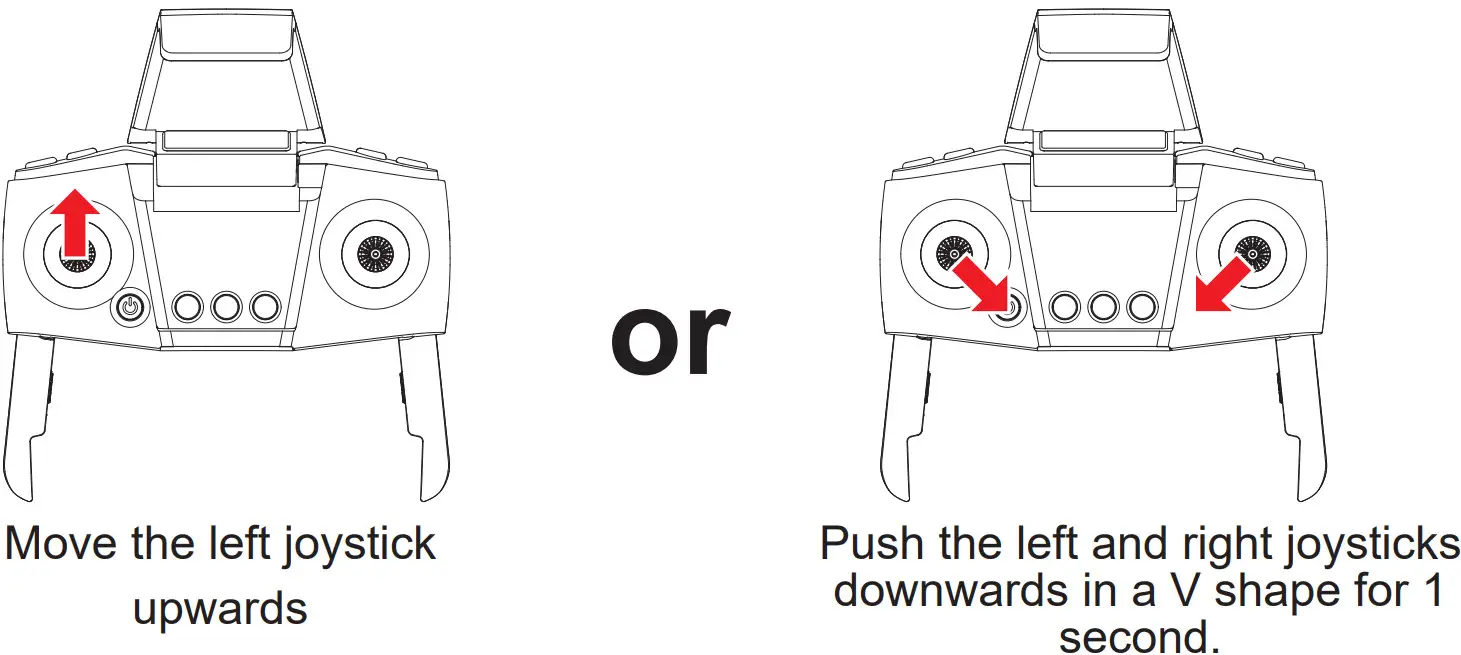
Turning the aircraft off
Method one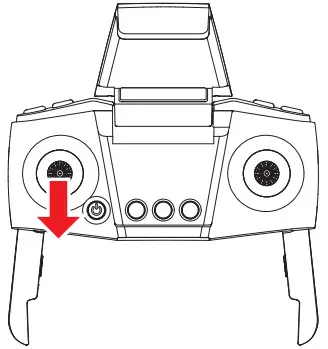 | Method two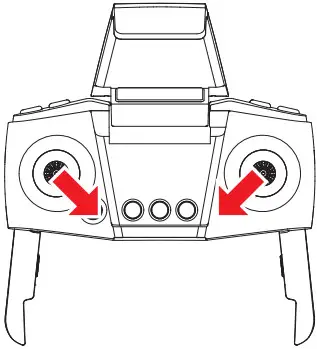 | Method three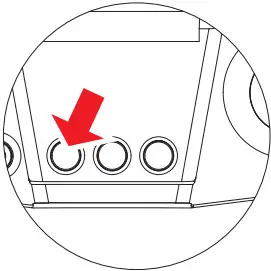 |
| Push the left joystick downwards for 2-3 seconds. | Push the left and right joysticks downwards in a V shape for 2 seconds. | Press the take-off/landing button to make the aircraft land automatically and switch off. |
![]()
* The aircraft will switch off automatically if its angle of inclination exceeds 90 degrees.
* Maximum radio-frequency power transmitted < 10 dBm. Frequency range:2408MHz – 2478MHz
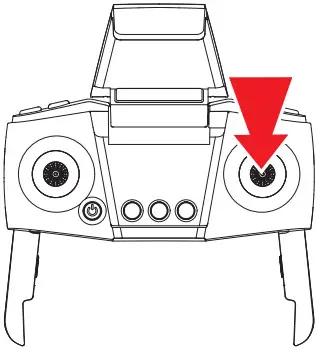
Using the remote control
Flight modes
![]() Optical flow positioning
Optical flow positioning
The front indicator is constant white, the rear indicator is constant yellow.![]()
* If the rear indicator starts to flash rapidly, this indicates that the optical signal is weak and the aircraft cannot determine its position.
* Performance may be impaired in dark surroundings, areas with reflective surfaces (e.g. water), or at altitudes of more than 6 m.
* Optical flow positioning only supports altitudes of less than 6 m.![]()
GPS mode
The front indicator is constant white, the rear indicator is a constant green.![]()
* When the battery level is normal, the aircraft can fly to a distance of 500 m at a maximum altitude of 100 m.
* When the battery level is low, the aircraft can fly to a distance of 20 m at a maximum altitude of 20 m.
* If the rear indicator starts to flash rapidly, this indicates that the GPS signal is weak and the aircraft cannot determine its position.
* GPS mode cannot be used indoors.![]() Headless mode
Headless mode
The indicator on the aircraft will flash once every 4 seconds.
- Configuring the forward’s direction
When you switch on the aircraft for the first time, the direction in which the front side of the aircraft is pointing will be set as the forward direction. - Enabling headless mode
① After pairing the remote control with the aircraft, hold down the right joystick for approximately 3 seconds. The remote control will beep 8 times to indicate that headless mode is enabled. To disable headless mode, hold down the right joystick again for approximately 3 seconds.
② In headless mode, you do not need to determine the aircraft’s orientation. You can move the joysticks on the remote control to make the aircraft move in the corresponding direction.
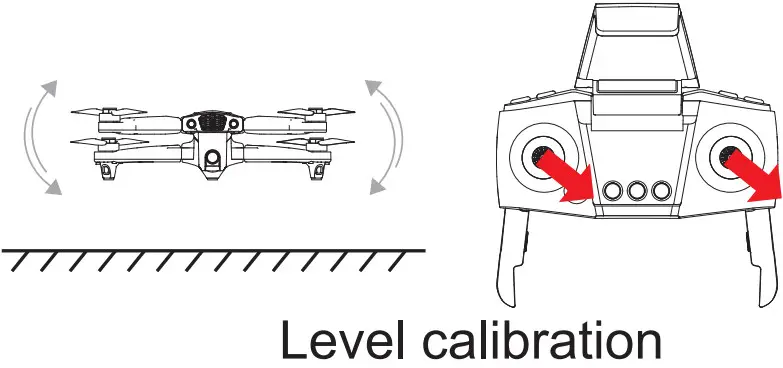 Place the aircraft on a level surface and move the left and right joysticks to the lower right corner for approximately 3 seconds. The indicator will flash rapidly and then stay constant to indicate that the calibration process is complete.
* The aircraft cannot be calibrated if the angle of inclination is greater than 10 degrees.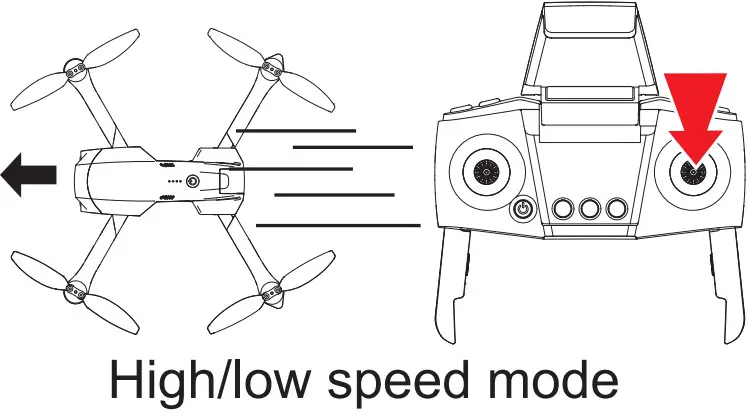 Briefly press the right joystick to switch between high and low-speed modes.
- Low-speed mode is enabled by default when the aircraft is switched on.
- The remote control beeps twice when the high-speed mode is enabled and once when the low-speed mode is enabled.

- When the drone is under standby mode, Press the take-off/landing button to make the aircraft take off automatically and hover at a height of 1.5 m.
- When the aircraft is under active mode, it will automatically land on the ground if you press the one key landing
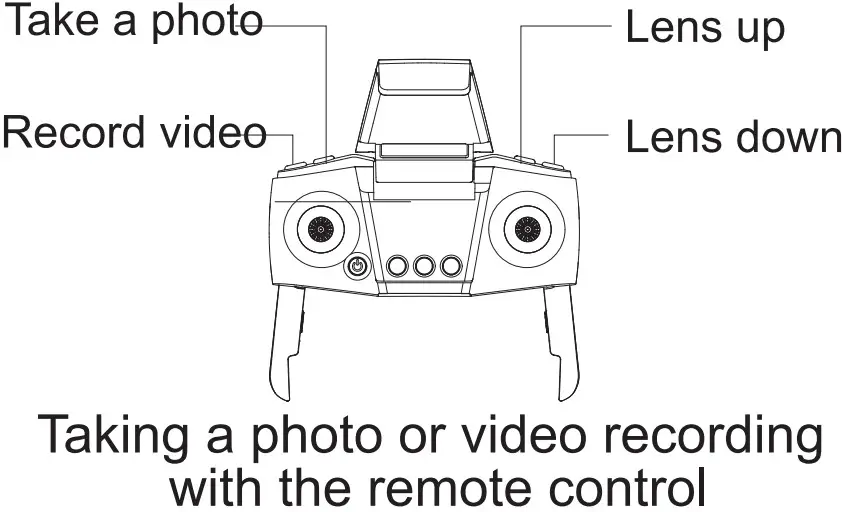
- Take a photo: Press the photo button. The indicator on the aircraft will flash to indicate that a photo is taken.
- Record video: Press the record button. The indicator on the aircraft will flash twice to indicate that the recording is in progress. Press the record button again to end the recording. The indicator on the aircraft will turn on to indicate that the recording is complete.
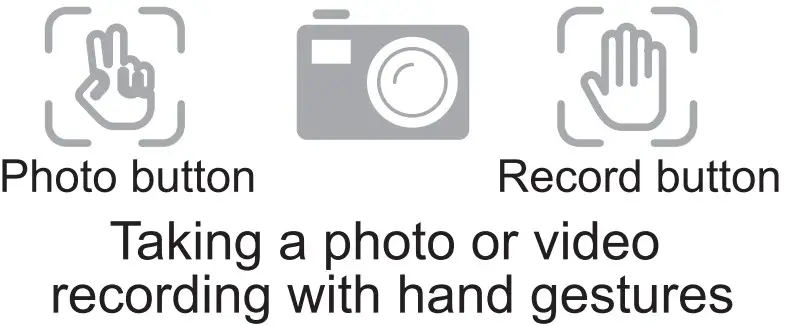
- Take a photo: Position your hand approximately 1.5 m away from the front lens and hold the go, hand gesture for 3 seconds.
- Record video: Position your hand approximately 1.5m away from the front lens and hold the d-hand gesture for 3 seconds.
![]()
* Photo and video recording gestures cannot be used when the bottom camera is on.
* The camera may accidentally take a photo or start a video recording if there are surrounding objects that resemble the or gestures.
* If there is no memory card in the aircraft, photos, and video recordings will be saved to your phone.
* If there is a memory card inserted in the aircraft, photos, and video recordings will be saved to the memory card and your phone.
* The aircraft supports memory cards with a capacity of up to 64 GB.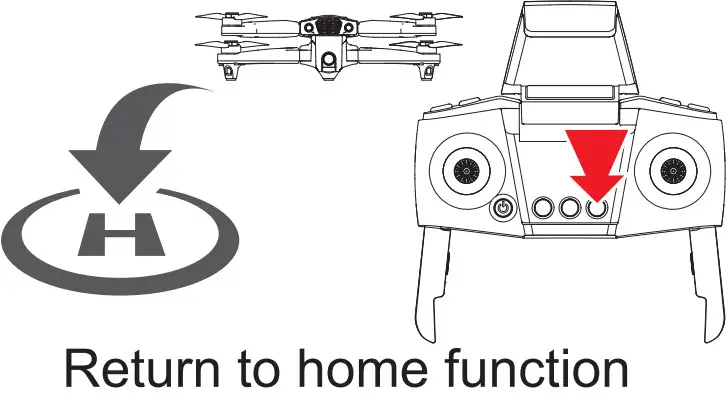
In GPS mode (when the ![]() indicator is constant), hold the return to home, so the aircraft will return to its take-off position automatically. During the return flight, you can use the joystick to control the aircraft to ascend, descend and move left/right in order to avoid obstacles. To terminate the return flight, hold the return to the home button.
indicator is constant), hold the return to home, so the aircraft will return to its take-off position automatically. During the return flight, you can use the joystick to control the aircraft to ascend, descend and move left/right in order to avoid obstacles. To terminate the return flight, hold the return to the home button.
* If the aircraft is flying at an altitude less than 20 m, it will automatically ascend to an altitude of 20 m before returning home.
* If the aircraft is flying at an altitude of more than 20 m, it will return home at the same altitude.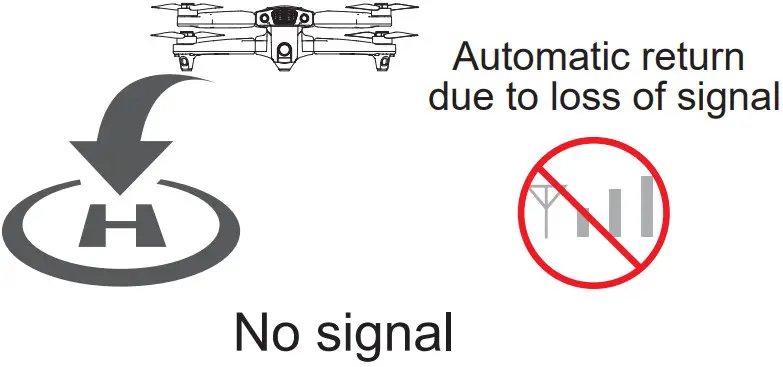 If the remote control signal is lost for more than 20 seconds, the aircraft will automatically return to the take-off position. If the signal is restored during the return flight, you can hold the return to the home button to terminate the return flight.
* The aircraft cannot automatically avoid obstacles during the return flight.
* The automatic return to home function is not available when the GPS signal is weak (flashing ![]() indicator).
indicator).
* If the aircraft does not receive a GPS signal and lost contact with the remote control for more than 20 seconds, it will not be able to return to home but will land automatically.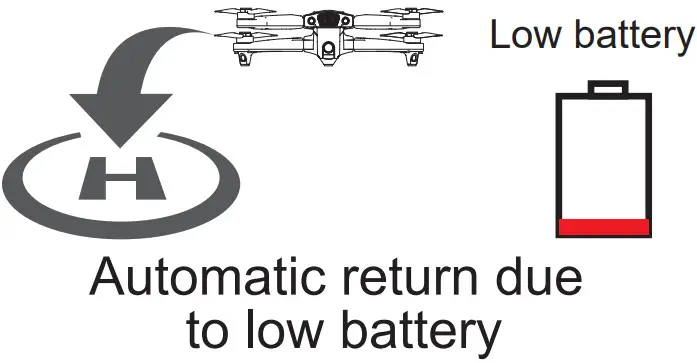 When the aircraft battery is low, the aircraft will automatically return to the take-off position. During the return flight, you can use the joystick to control the aircraft to ascend, descend and move left/right in order to avoid obstacles.
* If the aircraft is further than 20 m from the landing position, the return flight cannot be terminated.
* If the aircraft is less than 20 m from the landing position, the return flight can be terminated.
Landing position: The initial unlock/take-off position.
Smart app features
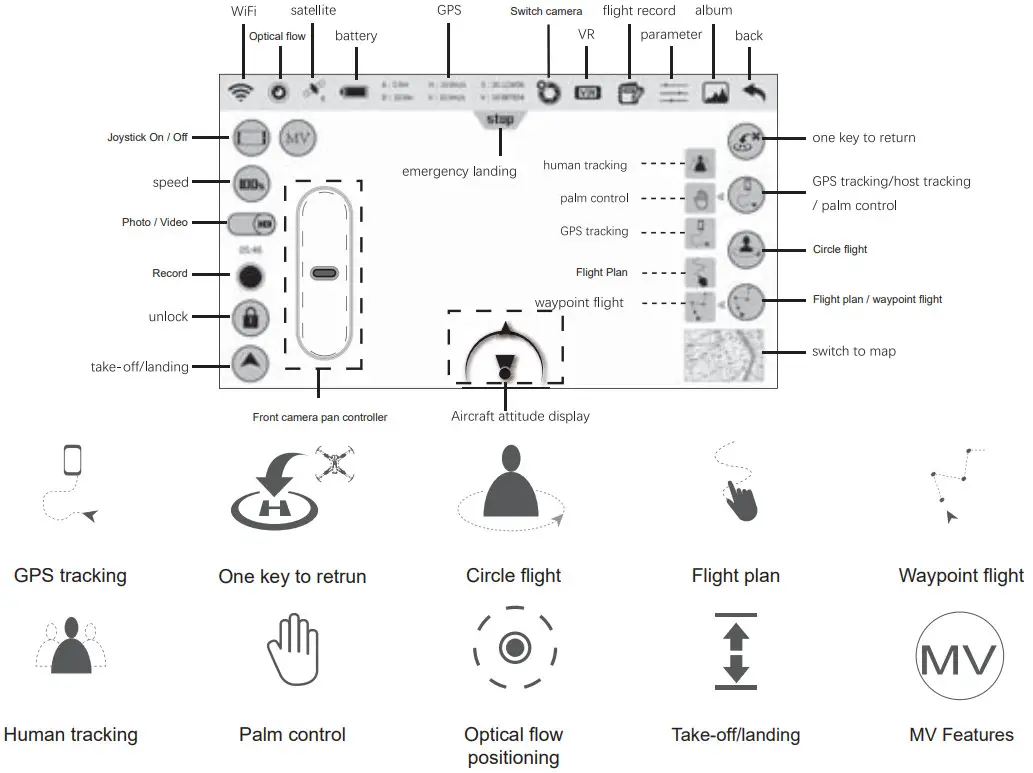 * Before using the smart app features, watch the video tutorial in the SYMA AIR app or on the SYMA website.
* Ensure that you pre-configure the flight altitude and distance in the SYMA AIR app.
Understanding the aircraft LED indicators
| No. | Indicator status | Meaning |
| 1 | Front indicator = constant white, rear indicator = constant yellow | Optical flow positioning |
| 2 | Front indicator = constant white, rear indicator = constant green | GPS mode |
| 3 | Front and rear indicators flash once every 4 seconds | Headless mode |
| 4 | Front and rear indicators flash twice every 1.5 seconds | Recording in progress |
| 5 | Front and rear indicators flash rapidly | Pairing or level calibration in progress |
| 6 | Front and rear indicators flash twice every second | Low battery |
| Front and rear indicators flash once every second Signal lost | Signal lost | |
| 8 | Front indicator = constant, rear indicator = flashing slowly | GPS fault |
| 9 | Front indicator = constant, rear indicator = flashing rapidly | Poor GPS reception |
Troubleshooting
| Problem | Cause | Cause Solution |
| The aircraft does not respond. | 1. Undervoltage protection was enabled. 2. The remote control battery level is low and the power indicator is flashing. | 1. Charge the aircraft battery. 2. Change the batteries in the remote control. |
| The aircraft’s response is intermittent. | 1. The remote control batteries are nearly empty. 2. There is interference from the remote control on the same frequency. | 1. Change the batteries. 2. Move to a different area where there is no interference. |
| The aircraft drifts to one side whilst hovering. | The aircraft is not calibrated level to the ground. | Calibrate the aircraft. |
| The aircraft does not travel in a forwards direction in headless mode. | The aircraft was involved in a collision. | Reconfigure the forward direction. |
| The aircraft does not hover properly/the aircraft keeps moving up and down. | 1. The aircraft is not calibrated level to the ground. 2. The air pressure is unstable due to poor weather conditions. 3. A violent collision corrupted the gyroscope’s data. | 1. Calibrate the aircraft. 2. Avoid flying in poor weather. 3. Calibrate the aircraft. |
Accessories (available separately)
The following section contains a list of optional accessories that are available to purchase. Accessories can be purchased from your local retailer. Please indicate your preferred color when making your purchase.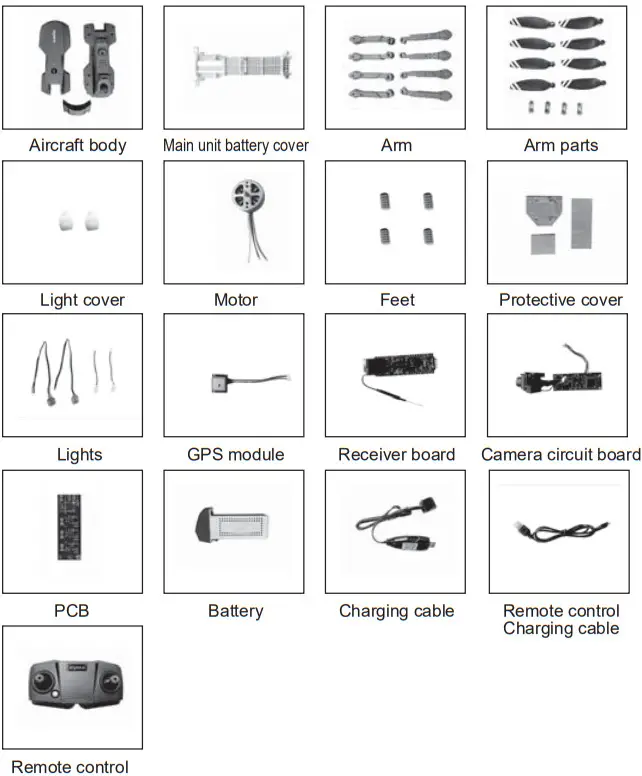 Warning: Changes or modifications to this unit not expressly approved by the party responsible for compliance could void the user’s authority to operate the equipment.
NOTE: This equipment has been tested and found to comply with the limits for a Class B digital device, pursuant to Part 15 of the FCC Rules. These limits are designed to provide reasonable protection against harmful interference in a residential installation. This equipment generates, uses and can radiate radio frequency energy and, if not installed and used in accordance with the instructions, may cause harmful interference to radio communications. However, there is no guarantee that interference will not occur in a particular installation. If this equipment does cause harmful interference to radio or television reception, which can be determined by turning the equipment off and on, the user is encouraged to try to correct the interference by one or more of the following measures:
- Reorient or relocate the receiving antenna.
- Increase the separation between the equipment and receiver.
- Connect the equipment to an outlet on a circuit different from that to which the receiver is connected.
- Consult the dealer or an experienced radio/TV technician for help Changes or modifications not expressly approved by the party responsible for compliance could void the user’s authority to operate the equipment.
This device complies with Part 15 of the FCC Rules. Operation is subject to the following two conditions:
(1) This device may not cause harmful interference, and
(2) This device must accept any interference received, including interference that may cause undesired operation.
“This device complies with FCC radiation exposure limits set forth for the general population (uncontrolled exposure). This device must not be collocated or operating in conjunction with any other antenna or transmitter.”
RF Exposure Warning Statements:
This equipment complies with FCC radiation exposure limits set forth for an uncontrolled environment.
This equipment shall be installed and operated with a minimum distance of 20cm between the radiator & body.
All transmission frequencies of U-NII-2A and U-NII-2C comply with 47 CFR FCC Part15.407(g) and the manufacturer declares that their transmission is maintained within the U-NII-2A, U-NII-2C bands.
Remote Control
RF frequency band: 2408-2478MHz
Transmitter power: 6.804dBm(Max.)
Product Name: Drone
Model Number: X500PRO
Brand Name: SYMA
2.4G and 5G WIFI
RF frequency band(5G): 5250MHz-5350MHz
5470MHz-5725MHz
Transmitter power(5G):13.82dBm
RF frequency band(2.4G): 2417MHz
Transmitter power(2.4G): 17.29dBm(Max.)
Product Name: Drone
Model Number: X500PRO
Brand Name: SYMA
Hereby, [GUANGDONG SYMA MODEL AIRCRAFT INDUSTRIAL CO., LTD], declares that this [DRONE] is in compliance with Directive 2014/53/EU. The full text of the EU declaration of conformity is available at the following internet address:
http://www.symatoys.com/down/declaration-of-conformity.html
SIMPLIFIED EU DECLARATION OF CONFORMITY
European Representative:
CET PRODUCT SERVICE LTD.
Osterholzallee 144
71636 Ludwigsburg Germany Phone:
+4971416432236
Email: [email protected]
British Representative:
CET PRODUCT SERVICE LTD.
Beacon House Stokenchurch Business Park,
last one Rd, Stokenchurch
High Wycombe HP14 3FE UK Tel:
+447419325266
E-mail: [email protected]
United States Representative:
Duvin Trade Inc
5800 Wood Sorrel Dr, Littleton, Co, 80123, United States
Phone: 718-312-0558
E-mail: [email protected]
SYMA is a trademark of Guangdong Syma Model Aircraft Industrial Co., Ltd. registered in the United States and/or other countries
Manufacturer:
Guangdong SYMA Model Aircraft Industrial Co., Ltd.
Address: No.2 West Xingye Road, the intersection of North Xingye Road,
Laini Industrial Park, Chenghai District, Shantou City,
Guangdong Province, China,
Postal Code: 515800
Contact Us
Please do not hesitate to contact us if you need further support![]() [email protected]
[email protected]![]() +1 718-312-0558(US)
+1 718-312-0558(US)
+44 (0)7723708421(UK)
+4933545519201(DE)
![]()
https://qrs.ly/stc7z62
For online support, please scan this code with Facebook Messenger
![]() The company has the right to the final interpretation of this user manual.
The company has the right to the final interpretation of this user manual.
WARRANTY
LIMITED 2-YEAR WARRANTY AND FREE LIMITED REPLACEMENT PARTS FOR 2 YEARS
Symatoys.com.cn warrants to the original buyer only that its products will be free from defects in material and workmanship for 2 years from the date upon which the product is shipped, either directly from symatoys.com.cn or from an Authorized Re-seller’s location, to the buyer.
The following conditions must be eligible for warranty coverage:
- During the warranty, the period product is used as intended by the manufacturer.
- The Product has not been disassembled or modified.
- The labels and serial numbers show no signs of tampering or altering.
- Buyer has a warranty code obtained by registering their product online prior to making a claim.
EXCEPTIONS: THE LIMITED WARRANTY SHALL NOT APPLY TO:
- Damage caused by normal wear and tear
- Accident, negligence, abuse, misuse, misapplication, or wilful damage by buyer (or its agents), or acts of nature
- Crash or burning caused by non-manufacturing factors
- Damage caused by authorized modification or disassembly not authorized by the instruction manual
- Damage. caused by incorrect use or operation
- Damage caused by a mismatch or misuse of battery or charger
- Failure of the operator to follow the operating instruction or use outside the product operating parameters
- Damage caused by operating the product in or around electromagnetic interference (i.e., radio transmitting tower, high-voltage wire, substation, etc.)
- Damage caused by operating the product where there may be interference caused by other wireless devices
- Operating the product with load capacity in excess of the sale weight listed in the manual
- Operating the product with aged. damaged or unauthenticated third-party components
- Operating the product with a defective battery
PROCEDURE:
Any claims for breach of the foregoing limited warranty shall only be valid if the buyer makes such claim in writing within 2 years of the date of shipment of the product to which the claim is. To make a warranty claim, please email [email protected] with your full name. address. phone number, order number. vehicle type. part type and purchase date and product issue.
LIMITED REMEDY:
Symatoys.com.cn’s sole liability and buyer’s sole remedy for any breach of the foregoing warranty shall be at symatoys.com.cn’s option to exchange the product with a new product or a refurbished product that is functionally equivalent to the original product, or issue a credit or refund to the purchase price the product. Any replaced products shall be warranted as set forth herein, provided that the period within which buyer may make further claims shall be limited to the remainder of the original period for the applicable product or 2 years, whichever is longer (although the warranty period shall be suspended during any period of replacement)
DISCLAIMER:
THE WARRANTY AND REMEDIES ARE EXCLUSIVE AND IN LIEU OF ALL OTHER WARRANTIES. AND Symatoys.com.cn DISCLAIMS ALL OTHER WARRANTIES, EXPRESS OR IMPLIED, INCLUDING WITHOUT LIMITATION THE IMPLIED WARRANTIES OF MERCHANTABILITY AND FITNESS FOR A PARTICULAR PURPOSE, NON-INFRINGEMENT AND ANY WARRANTIES ARISING OUT OF COURSE OF DEALING, COURSE OF PERFORMANCE AND TRADE USAGE.
Symatoys.com.cn IS NOT RESPONSIBLE FOR DIRECT, SPECIAL. INCIDENTAL OR CONSEQUENTIAL DAMAGES RESULTING FROM ANY BREACH OF WARRANTY OR CONDITION, OR UNDER ANY OTHER LEGAL THEORY. INCLUDING BUT NOT LIMITED TO LOSS OF USE; LOSS OF REVENUE: LOSS OF ACTUAL ANTICIPATED PROFITS (INCLUDING LOSS OF PROFITS ON CONTRACTS); LOSS OF THE USE OF MONEY, LOSS OF ANTICIPATED SAVINGS; LOSS OF BUSINESS COSS OF OPPORTUNITY; LOSS OF GOODWILL, LOSS OF REPUTATION; LOSS OF DAMAGE TO COMPROMISE OR CORRUPTION OF DATA; OR ANY INDIRECT OR CONSEQUENTIAL LOSS OR DAMAGE HOWSOEVER CAUSED INCLUDING THE REPLACEMENT OF EQUIPMENT AND PROPERTY
, ANY COSTS OF RECOVERING OR REPRODUCING ANY DATA STORED IN OR USED WITH THE PRODUCT, OR ANY FAILURE TO MAINTAIN THE CONFIDENTIALITY OF INFORMATION STORED IN THE PRODUCT.
Some states do not allow the exclusion or limitation of incidental or consequential damages. so the above limitation or exclusion may not apply to you. In addition, some states do not allow limitations on how long an implied warranty lasts. so the above limitation may not apply to you.
FREE REPLACEMENT PARTS FOR 2 YEARS:
Symatoys.com.cn shall also make available any spare part needed for registered vehicles free of charge for 2 years from the date of purchase, with the exception of batteries, and motors. circuit boards and transmitters. Shipping charges may apply Limit one part type request per registered vehicle (e.g., registrants are entitled to one extra set of batteries per registered vehicle). To request spare parts. please email warranty Osymatoys.com.cn with your warranty code. vehicle name/model, current shipping address purchase date, and part type
GET YOUR WARRANTY CODE AT
symatoys.com.cn/pages/warranty-signup
HAVE YOUR ORDER NUMBER AND/OR VEHICLE UPC READY


