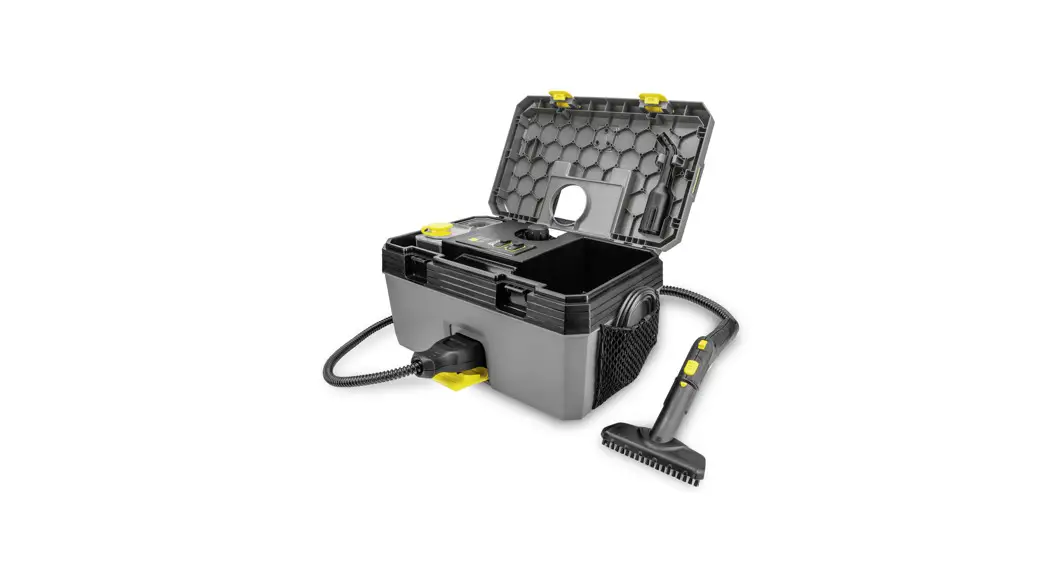
![]() 1.092-301.0 SG 4 2 Steam Vacuum Cleaner
1.092-301.0 SG 4 2 Steam Vacuum Cleaner
Instruction Manual
General notes
![]() Read these original instructions and the enclosed safety instructions before using the device for the first time. Act in accordance with them. Keep both books for future reference or for future owners
Read these original instructions and the enclosed safety instructions before using the device for the first time. Act in accordance with them. Keep both books for future reference or for future owners
- If the operating instructions and safety instructions are not observed, the device can be damaged and dangers could arise for users and other persons.
- Notify the dealer immediately in the case of shipping damage.
- Check the package contents when unpacking for missing accessories or for damage.
Environmental protection
![]() The packing materials can be recycled. Please dispose of the packaging in accordance with the environmental regulations.
The packing materials can be recycled. Please dispose of the packaging in accordance with the environmental regulations.![]() Electrical and electronic appliances contain valuable, recyclable materials and often components such as batteries, rechargeable batteries, or oil, which – if handled or disposed of incorrectly – can pose a potential threat to human health and the environment. However, these components are required for the correct operation of the appliance. Appliances marked by this symbol are not allowed to be disposed of together with the household rubbish.
Electrical and electronic appliances contain valuable, recyclable materials and often components such as batteries, rechargeable batteries, or oil, which – if handled or disposed of incorrectly – can pose a potential threat to human health and the environment. However, these components are required for the correct operation of the appliance. Appliances marked by this symbol are not allowed to be disposed of together with the household rubbish.
Notes on the content materials (REACH) Current information on content materials can be found at: www.kaercher.com/REACH
Intended use
- The appliance is intended for cleaning with steam and can be used with appropriate accessories as described in these operating instructions.
- This device is suitable for commercial use.
- This device is not suitable for industrial use.
Symbols on the device
 | Steam ATTENTION – risk of scalding |
| Risk of burns from hot surfaces! |
Overview of the device
Description of the device
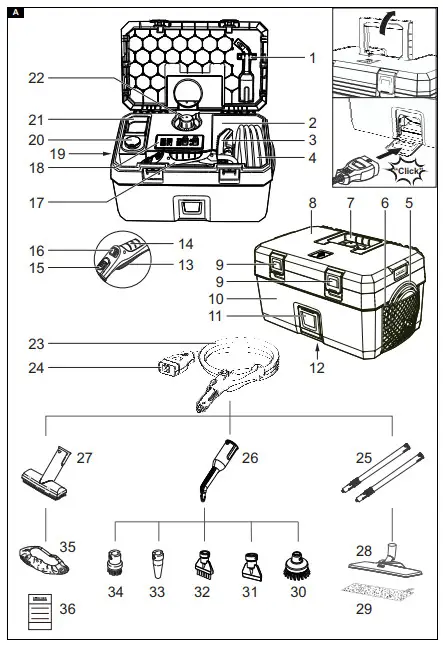
Illustration A
| 1 Storage position for spotlight nozzle | 19 Storage net for accessories |
| 2 Accessory compartment | 20 Reservoir cap |
| 3 Position of the manual nozzle in the accessory compartment | 21 Fresh water tank (removable) |
| 4 Position of the steam hose in the accessory compartment | 22 Safety lock (steam boiler) |
| 5 Mains cable | 23 Steam hose |
| 6 Storage net for mains cable | 24 Steam connector |
| 7 Carrying handle (foldable) | 25 Extension tube (special accessory) |
| 8 Device cover | 26 Spotlight nozzle |
| 9 Device cover lock | 27 Manual nozzle |
| 10 Casing | 28 Floor nozzle with slats (special accessory) |
| 11 Device socket cover | 29 Floor cleaning cloth (special accessory) |
| 12 Type plate | 30 Round brush (large) (special accessory) |
| 13 Steam switch | 31 Flat nozzle |
| 14 Steam gun | 32 Flat brush |
| 15 Locking button | 33 Power nozzle |
| 16 Lock (child lock) | 34 Round brush (small) |
| 17 Position of the steam gun in the accessory compartment | 35 Microfibre cover cloth |
| 18 Control panel | 36 Descaler |
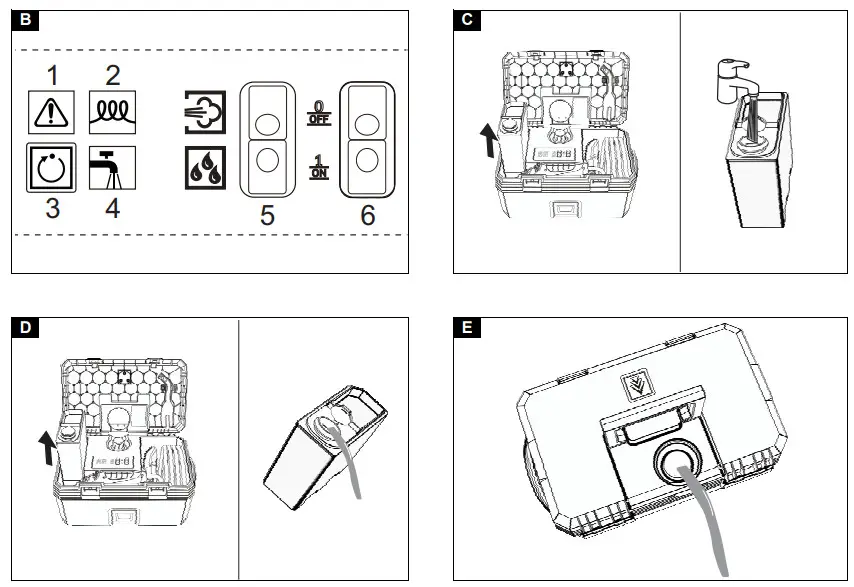
Control panel
Illustration B
- Indicator light – descaling (red)
- Indicator light – heating: Heating process (red), standby (green)
- Reset button – descaling
- Indicator light – water shortage (red)
- Switch – mode: Steam operation (above), VAPOHYDRO (below)
- Switch – heating (on/off)
Safety devices
Safety devices protect the user and may not be disabled or functionally circumvented.
Pressure regulator
The pressure regulator keeps the boiler pressure as constant as possible during operation. The heating is switched off when the maximum operating pressure in the boiler has been reached and switched on again when the pressure in the boiler drops due to steam removal.
Water shortage thermostat
The heating temperature rises when the water in the boiler runs out. The water shortage thermostat switches the heating off and the “Water shortage” indicator light lights up red. The heating cannot be switched on again until the boiler has cooled down or is refilled.
Safety thermostat
- If the water shortage thermostat fails and the device overheats, the safety thermostat switches the device off
- Before resetting of the safety thermostat, contact the responsible KÄRCHER Customer Service.
Safety lock
- The safety lock seals the steam boiler against the steam pressure present. If the pressure regulator is defective and overpressure occurs in the steam boiler, an pressure relief valve opens in the safety lock and steam escapes through the lock
- Before re-commissioning the device, contact the re- sponsible KÄRCHER Customer Service.
Cleaning methods
Freshening textiles
Always check the compatibility of the textiles at a concealed point before using the device on textiles: First steam the textile, allow it to dry and then check it for any change in colour or shape.
Cleaning of coated or painted surfaces
Wax, furniture polish, plastic coatings or paint can come off or stains may occur when cleaning painted or plasticcoated surfaces such as e.g. kitchen and living room furniture, doors, parquet or linoleum. To clean these surfaces, steam a cloth briefly and wipe it over the surfaces.
Glass cleaner
Preheat the window pane in seasons with particularly low temperatures. To do this, lightly steam the entire glass surface at a distance of approx. 50 cm. This avoids tension on the surface that can lead to glass breakage.
Initial startup
Installing accessories
- Open the cover of the device socket and plug the steam connector tightly into the device.
- Connect the accessory (floor nozzle, manual nozzle or spotlight nozzle) to the steam gun. Push the parts together until the locking button on the steam gun engages
- Use extension tubes (special accessories) if necessary. Push the parts together until the respective locking button engages.
- Press the locking button to separate the accessories.
Filling water
Note
Do not fill with pure distilled water! Use a maximum of 50% distilled water mixed with tap water.
- Unlock and open the device cover.
- Check that the safety lock is seated tightly
- Remove the fresh water tank. Illustration C
- Open the reservoir cap of the freshwater tank.
- Pour approximately 1.5 liters of tap water into the freshwater tank. Do not use detergents!
- Close the reservoir cap.
- Fit the fresh water tank.
- Close and lock the device cover.
Operation
Switching on the device
- The heating switches on periodically during use (indicator light lights up red) to maintain the pressure in the boiler.
- If the device is switched on without water, the “Heating” indicator light lights up red until the water shortage thermostat switches the heating off. The “Water shortage” indicator light then lights up red. 1. Plug the mains plug into a mains socket. 2. Unlock and open the device cover.
Note
The device cover must remain open during operation so that the indicator lights can be seen. 3. Switch on the device with the Heating switch. The indicator light lights up red.
Note
The full heating capacity is only available if the steam connector is connected to the device when it is heating up. The system is ready for operation. when the “Heating” indicator light lights up green. 4. Switch off the heating at the switch when transporting the device. 5. Press the steam switch, steam comes out. Always point the steam gun at a cloth first until the steam flows out evenly.
VAPOHYDRO
- In wet areas, the dirt can also be washed away in- stead of being picked up with the cloth. To do this, use the VAPOHYDRO mode to maintain a high level of moisture in the steam jet. A hot water stream is emitted, which has the greatest rinsing effect.
- We recommend using the VAPOHYDRO in conjunction with the spotlight nozzle for e.g. cleaning in the bathroom
- When working with cloths (floor nozzle, manual nozzle), use the steam operation mode to maintain a low level of moisture in the steam jet. This improves the dirt-dissolving power of the steam. Note
In VAPOHYDRO mode, the boiler empties faster, which means that it can only be used for a short time. 1. Switch the VAPOHYDRO on/off with the Mode switch.
Refilling water
Note
The “Water shortage” indicator light lights up red when the water in the freshwater tank is used up. Note If the pump does not deliver water despite a full fresh water tank, the boiler must be descaled.
- Remove the fresh water tank.
- Open the reservoir cap of the freshwater tank
- Pour approximately 1.5 liters of tap water into the freshwater tank.
- Close the reservoir cap.
- Insert the fresh water tank, the “Water shortage” indicator light goes out. The “Heating” indicator light lights up red and after the end of the heating process is green, the system is then ready for operation.
Disconnecting accessories![]() DANGER
DANGER
Danger from hot water Risk of scalding Never disconnects accessories while steam is being released as hot water may drip out. Allow the device to cool down first.
Switching off the device
- Switch off the heater via the Heating switch.
- Close and lock the device cover.
- Fold down the cover of the device socket and pull the steam connector out of the device.
- Pull the mains plug out of the socket. Storing the device
Note Always let the brushes cool down to prevent deformation of the bristles.
- Unlock and open the device cover.
- Remove the fresh water tank, open the reservoir cap, pour out the water, close the reservoir cap and reinsert the fresh water tank. Illustration D
- Latch the spotlight nozzle into the storage position in the device cover.
- Place the steam gun with the steam hose, manual nozzle, and small parts in the accessory compartment.
Using accessories
Note
Detergent residues or care emulsions on the surface to be cleaned can cause streaks during steam cleaning, but these disappear after repeated use.
Steam gun
Application examples for the steam gun without accessories:
- Eliminate odors and creases from hanging clothes by steaming them at a distance of 10-20 cm.
- Damp dusting by briefly steaming cloth and wiping it over furniture.
Spotlight nozzle
- The cleaning effect increases the closer the nozzle is held to the dirty area since the temperature and pressure of the steam are greatest at the emission point.
- The spotlight nozzle with the various attachments is suitable for cleaning hard-to-reach areas, such as e.g. corners, joints, etc., blinds, central heating, toilets, stainless steel, windows, mirrors, fittings, coated and enameled surfaces, and for loosening stains.
- The power nozzle increases the speed of the emitted steam. It is therefore well suited for cleaning particularly stubborn dirt, blowing out corners, joints, etc.
Note The round brush is not suitable for cleaning sensitive surfaces.
Floor nozzle
Floor nozzle with slats (special accessory)
● For hygienic cleaning of smooth surfaces, as the surface temperature is higher.
● For a hygienic cleaning result, steam directly over the hard surface at a working speed of max. 30 cm / second.
Using the floor cleaning cloth (special accessory)
Turn and change the floor cleaning cloth regularly to improve dirt absorption. 1. Fasten the floor cleaning cloth to the floor nozzle. To do this, fold the floor cleaning cloth lengthways and place the loor nozzle on it, open the retaining clips, place the ends of the cloth in the openings and stretch tightly, and close the retaining clips.
![]() CAUTION Danger from retaining clips Risk of crushing Do not put your fingers between the retaining clips.
CAUTION Danger from retaining clips Risk of crushing Do not put your fingers between the retaining clips.
Manual nozzle
Suitable for small washable surfaces, shower cubicles, mirrors, or furniture fabrics. 1. Pull the microfibre cover cloth over the manual nozzle.
Window nozzle (special accessory)
Order number 2.863-025.0
- Steam the glass surface evenly at a distance of approx. 20 cm.
- Switch off the steam supply.
- Pull off the glass surface in strips from top to bottom with the squeegee
- ipe the squeegee and the lower edge of the win- dow dry after each run.
Textile care nozzle (special accessory)
Order number 2.863-233.0 For freshening hanging textiles e.g. jackets or curtains with two functions:
- De-linting garments with the thread lifter.
- Steaming and removing creases from textiles (also removes odors).
Note
Steam flows out when the steam switch is activated. Always point the steam gun at a cloth first until the steam flows out evenly.
Transport
![]() CAUTION Failure to observe the weight Risk of injury and damage Be aware of the weight of the device during transportation.
CAUTION Failure to observe the weight Risk of injury and damage Be aware of the weight of the device during transportation.
- Carry the device by the carrying handle and extension tube (special accessory).
- When transporting the device in vehicles, secure it to prevent it from slipping or overturning in accordance with the respective valid guidelines.
Storage
![]() CAUTION Failure to observe the weight Risk of injury and damage Be aware of the weight of the device during storage. The device may only be operated indoors.
CAUTION Failure to observe the weight Risk of injury and damage Be aware of the weight of the device during storage. The device may only be operated indoors.
Care and maintenance
![]() DANGER Danger of electric shock Injuries due to touching live parts Switch off the device. Remove the mains plug.
DANGER Danger of electric shock Injuries due to touching live parts Switch off the device. Remove the mains plug.![]() DANGER Danger from hot water, steam and hot surfaces Risk of scalding and burns Allow the device to cool down prior to all work on the device.
DANGER Danger from hot water, steam and hot surfaces Risk of scalding and burns Allow the device to cool down prior to all work on the device.
Rinsing the boiler
Rinse the steam cleaner boiler at the latest after every 5th filling of the boiler.
- Remove the accessories from the accessory compartment.
- Disconnect the steam hose from the device
- Fill the steam boiler with water and shake it vigorously. Lime residue which has been deposited on the bottom of the steam boiler will be released as a result
- Pour out the water. Illustration E
Descaling the boiler
In order to remove lime adhering to the boiler wall, we recommend cleaning the boiler with the KÄRCHER Bio Descaler RM 511. The KÄRCHER Bio Descaler RM 511 is a citric acid-based product that is completely biodegradable.
ATTENTION
Danger from unsuitable descaler Risk of damage Only use descalers that have been approved by KÄRCHER in order to prevent damage to the device. Do not use vinegar or similar agents.
ATTENTION Danger from descaling solution Risk of damage Never fill the descaling solution into the fresh water tank, as this will damage the pump.
- Pull the mains plug out of the socket.
- Unscrew the safety lock and completely empty the water from the steam boiler.
- Completely dissolve a bag of descaler in 0.5 liters of warm water, stirring constantly.
- Pour the descaling solution into the kettle. Do not screw the safety lock onto the device during the descaling process.
 DANGER Danger from inhalation of aerosols Health risk Does not use the device while the descaler is still present in the boiler.
 - Let the descaling solution work for approx. 8 hours (overnight)
- Pour out the descaling solution. Rinse the boiler at least two more times with cold water to ensure that there are no more residues in the device. Insert the safety lock.
- Unlock and open the device cover
- Switch on the device
- Press the reset button until the “Descaling” indicator light goes out. The device is now ready for use.
Note After approx. 20 hours of operation, the “Descaling” indicator light indicates the next required descaling. 10. Close and lock the device cover.
Troubleshooting guide
![]() DANGER Danger of electric shock Injuries due to touching live parts Switch off the device. Remove the mains plug.
DANGER Danger of electric shock Injuries due to touching live parts Switch off the device. Remove the mains plug.![]() DANGER Danger from hot water, steam and hot surfaces Risk of scalding and burns Allow the device to cool down prior to all work on the device.
DANGER Danger from hot water, steam and hot surfaces Risk of scalding and burns Allow the device to cool down prior to all work on the device.![]() DANGER Danger from improper repair work Risk of injury and damage ave repair work carried out by the authorised customer service only. The “Water shortage” indicator light lights up red 1. Refill water. The “Descaling” indicator light lights up red 1. Descale the device.
DANGER Danger from improper repair work Risk of injury and damage ave repair work carried out by the authorised customer service only. The “Water shortage” indicator light lights up red 1. Refill water. The “Descaling” indicator light lights up red 1. Descale the device.
Customer Service department
If the malfunction cannot be corrected, the device must be checked by the Customer Service department.
Warranty
The warranty conditions issued by our relevant sales company apply in all countries. We shall remedy possible malfunctions on your appliance within the warranty period free of cost, provided that a material or manufacturing defect is the cause. In a warranty case, please contact your dealer (with the purchase receipt) or the next authorized customer service site. (See overleaf for the address)
Accessories and spare parts
Only use original accessories and original spare parts. They ensure that the appliance will run fault-free and safely. Information on accessories and spare parts can be found at www.kaercher.com.
Special accessories
Only special accessories approved by the manufacturer may be used.
| Description | Order number |
| Bio descaler RM 511 (3x 100 g pow- der) | 6.295-987.0 |
| Cotton terry cloth kit | 6.370-990.0 |
| Extension tube for floor nozzle (2 pieces required) | 4.127-024.0 |
| Floor nozzle with slats | 2.885-465.0 |
| Textile care nozzle | 2.863-233.0 |
Declaration of Conformity
EU Declaration of Conformity
We hereby declare that the machine described below complies with the relevant basic safety and health requirements in the EU Directives, both in its basic design and construction as well as in the version placed in circulation by us. This declaration is invalidated by any changes made to the machine that are not approved by us.Product: Steam cleaner Type: 1.092-xxx
Currently applicable EU Directives
2009/125/EC
2014/30/EU
2014/35/EU
Harmonized standards used
EN 55014-1: 2017 + A11: 2020
EN 55014-2: 2015
EN 60335-1
EN 60335-2-54
EN 61000-3-2: 2014
EN 61000-3-3: 2013
EN 62233: 2008
National standards used
TRD 801
The signatories act on behalf of and with the authority of the company management.

Documentation supervisor:
S. Reiser
Alfred Kärcher SE & Co. KG
Alfred-Kärcher-Str. 28 – 40
71364 Winnenden (Germany)
Ph.: +49 7195 14-0
Fax: +49 7195 14-2212
Winnenden, 2020/10/01
Declaration of Conformity (UK)
We hereby declare that the product described below complies with the relevant provisions of the following UK Regulations, both in its basic design and construction as well as in the version put into circulation by us. This declaration shall cease to be valid if the product is modified without our prior approval. Product: Steam cleaner Type: 1.092-xxx
Currently applicable UK Regulations
S.I. 2010/2617 (as amended)
S.I. 2016/1091 (as amended)
S.I. 2016/1101 (as amended)
Designated standards used
EN 55014-1: 2017 + A11: 2020
EN 55014-2: 2015
EN 60335-1
EN 60335-2-54
EN 61000-3-2: 2014
EN 61000-3-3: 2013
EN 62233: 2008
National standards used
TRD 801
The signatories act on behalf of and with the authority of the company management.

Documentation supervisor:
S. Reiser
Alfred Kärcher SE & Co. KG
Alfred-Kärcher-Str. 28 – 40
71364 Winnenden (Germany)
Ph.: +49 7195 14-0
Fax: +49 7195 14-2212
Winnenden, 2020/10/01
Technical data
| Electrical connection | ||
| Mains voltage | V | 220-240 |
| Phase | ~ | 1 |
| Power frequency | Hz | 50 |
| Degree of protection | IPX4 | |
| Protection class | I | |
| Heating capacity | W | 2250 |
| Pump power | W | 50 |
| Device performance data | ||
| Tank capacityl | l | 1,5 |
| Boiler capacity | 1 | 0,5 |
| Maximum operating pressure | MPa (bar) | 0,4 (4,0) |
| Maximum working temperature | °C | 145 |
| Heating-up time | min | 3 |
| Steam volume (max.) | g/min | 50 |
| Dimensions and weights | ||
| Typical operating weight | kg | 7,5 |
| Length x width x height | mm | 460 x 298 x 265 |
| Mains cable | ||
| Power cord type | 2mm² | H05VVF 3×1,0 |
| Part number (EU) | 1 | 6.647757.0 |
| Part number (GB) | 1 | 6.647831.0 |
| Cable length | m | 50 |
 THANK YOU! MERCI! DANKE! GRACIAS!
![]() Registrieren Sie Ihr Produkt and profitieren Sie von vielen Vorteilen. Register your product and benefit from many advantages. Enregistrez votre produit et benOficier de nombreux avantages. Registre su producto y aproveche de muchas ventajas.
Registrieren Sie Ihr Produkt and profitieren Sie von vielen Vorteilen. Register your product and benefit from many advantages. Enregistrez votre produit et benOficier de nombreux avantages. Registre su producto y aproveche de muchas ventajas.
www.kaercher.com/welcome ![]()
![]() Bewerten Sie Ihr Produkt und sagen Sie uns Ihre Meinung.
Bewerten Sie Ihr Produkt und sagen Sie uns Ihre Meinung.
Rate your product and tell us your opinion.
Évaluer votre produit et dites-nous votre opinion.
Reseñe su producto y díganos su opinión.
| www.kaercher.com/dealersearch Alfred Kärcher SE & Co. KG Alfred-Kärcher-Str. 28-40 71364 Winnenden (Germany) Tel.: +49 7195 14-0 Fax: +49 7195 14-2212 |  http://kaer.ch/er/=TwSoJtl9IUOwZyAe1rHDyw http://kaer.ch/er/=TwSoJtl9IUOwZyAe1rHDyw |
![]() Register your product
Register your product![]() www.kaercher.com/welcome
www.kaercher.com/welcome
References
 Cleaning equipment and pressure washers | Kärcher International
-
Cleaning equipment and pressure washers | Kärcher International
-
Dealer Search | Kärcher International
-
Home Garden Warranty Registration Karcher North America USA | Kärcher
-
Lieferkette und Produkte | Kärcher
-
Kärcher totaaloplossingen voor al uw reinigingsproblemen: Karcher hogedrukreinigers, veegmachines, schrobmachines, stofzuigers, carwash, ... | Kärcher


