
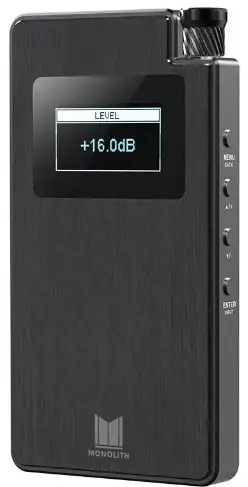
Monolith 124460 Portable Headphone Amplifier and Dac
SAFETY WARNINGS AND GUIDELINES
- Please read this entire manual before using this device, paying extra attention to these safety warnings and guidelines. Please keep this manual in a safe place for future reference.
- This device is intended for indoor use only.
- Do not expose this device to water or moisture of any kind. Do not place drinks or other containers with moisture on or near the device. If moisture does get in or on the device, immediately turn it off and allow it to fully dry before reapplying power.
- Do not touch the device or any connected cables with wet hands.
- Do not subject the product to extreme force, shock, or fluctuations in temperature or humidity.
- Do not expose this device to excessively high temperatures. Do not place it in, on, or near heat sources, such as a fireplace, stove, radiator, etc. Do not leave it in direct sunlight.
- Do not place or install this device in an area where it can be exposed to excessive amounts of dust, humidity, oil, smoke, or combustible vapors.
- This device contains a Lithium battery. Dispose of this device only in accordance with local, state, or federal regulations for electronic waste.
- Charge the battery before first use and at least once every three months.
- Clean using a soft, dry cloth only. Do not use chemical cleaners, solvents, or detergents. For stubborn deposits, moisten the cloth with warm water.
- This device has no user serviceable parts. Do not attempt to open, service, or modify this device.
FEATURES
- Dual AK4493 32-bit Digital-to-Analog Converter with support for up to 768kHz PCM and 22.4MHz DSD (Direct Stream Digital™)
- Dual THX® AAA-788 amplifier modules with bipolar class-AB output stages, each providing 220mW of power into 32Ω at less than -140dB THD
- Dirac Sensaround® provides a natural soundscape where listeners can enjoy their favorite media in a way that seems to spread instruments, voices, and objects out into space, enveloping the listener exactly as the artist intended
- Six layer printed circuit board for the highest level of analog and digital signal integrity
- Highest quality NDK low noise, low jitter oscillators
- Input options include USB and optical digital audio inputs, as well as an unbalanced analog stereo audio input
- Unbalanced stereo headphone output
- Built-in 4000mAh rechargeable battery provides up to 10 hours of audio playtime
- Includes USB wall charger for recharging the internal battery..
CUSTOMER SERVICE
The Monoprice Customer Service department is dedicated to ensuring that your ordering, purchasing, and delivery experience is second to none. If you have any problem with your order, please give us an opportunity to make it right. You can contact a Monoprice Customer Service representative through the Live Chat link on our website www.monoprice.com during normal business hours (Mon-Fri: 5am-7pm PT, Sat-Sun: 9am-6pm PT) or via email at [email protected]
PACKAGE CONTENTS
Please take an inventory of the package contents to ensure you have all the items listed below. If anything is missing or damaged, please contact Monoprice Customer Service for a replacement.
- 1x Portable headphone amplifier
- 1x Protective sock
- 1x USB wall charger (5 VDC, 2A)
- 1x Micro USB cable (Type-A to micro Type-B)
- 1x User’s manual
- 1x Thank you card
PRODUCT OVERVIEW
Top View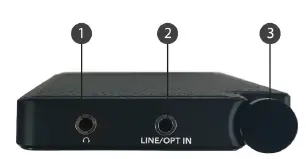
- HEADPHONES: 3.5mm unbalanced headphone output jack.
- LINE/OPT IN: Combination 3.5mm unbalanced analog stereo input and 3.5mm digital optical (mini TOSLINK®) input.
- POWER/VOLUME: With the unit powered off, turn the knob clockwise until it clicks to turn the unit on. With the unit powered on, turn the knob fully counterclockwise until it clicks to turn the unit off. With the unit powered on, turn the knob clockwise or counterclockwise to increase or decrease the volume level
Bottom View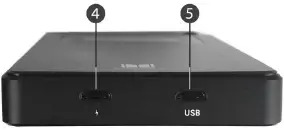
- CHARGE: Micro USB charging port to connect to the included micro USB cable and USB wall charger.
- USB: Micro USB digital audio input.
Side View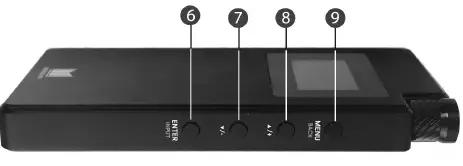
- ENTER/INPUT: Momentarily press the button to select options. Press and hold the button to enter the Input Selection Menu.
- DECREASE: Momentarily press the button to select the previous menu or to decrease the value of an edited option.
- INCREASE: Momentarily press the button to select the next menu or to increase the value of an edited option.
- MENU/BACK: Momentarily press the button to enable the Main Menu. Momentarily press the button to exit.
CHARGING
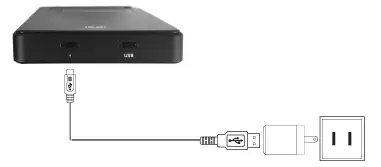
- Plug the included micro USB cable into the CHARGE port on the amplifier, then plug the other end into the USB port on the included USB wall charger.
- Plug the USB wall charger into a nearby AC power outlet. A charge indicator will animate on the display while charging is in progress. When charging is complete, the screen will go blank.
AUDIO INPUT CONNECTIONS
Analog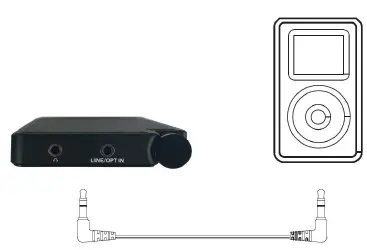
- Audio input cables are sold separately.
- Turn the amplifier and the source device off before making audio connections.
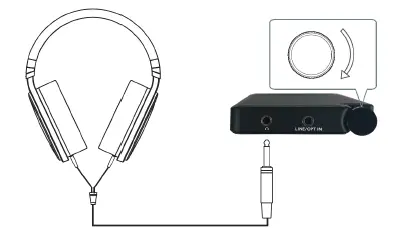
- Use a 3.5mm-to-3.5mm stereo audio cable (e.g., PID 9765) to connect the headphone output of an mp3 player or smartphone to the LINE/OPT IN jack on the amplifier.
- Use a 3.5mm-to-RCA stereo audio cable (e.g., PID 9768) to connect the RCA stereo audio output of an audio source device (e.g., CD player) to the LINE/OPT IN jack on the amplifier
Digital Optical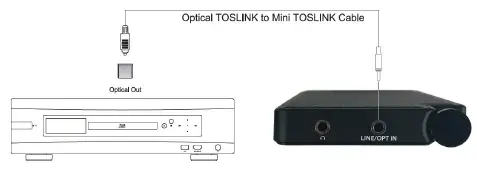
- Audio input cables are sold separately.
- Turn the amplifier and the source device off before making audio connections.
- Use a TOSLINK®-to-mini-TOSLINK digital optical cable (e.g., PID 1557) to connect the optical output of an audio source device (e.g., DVD player) to the LINE/OPTUT IN jack on the amplifier.
- Use a TOSLINK-to-TOSLINK digital optical cable (e.g., PID 1419) and a TOSLINK-to-mini-TOSLINK adapter (e.g., PID 2671) to connect the optical output of an audio source device (e.g., DVD player) to the LINE/OPT IN jack on the amplifier.
- Multi-channel audio is not supported. The amplifier support LPCM 2-channel input only.
USB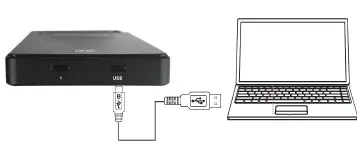
- Turn the amplifier and the source device off before making audio connections.
- Use the included micro USB cable to connect a computer to the USB audio input on the amplifier.
- No drivers are required when connecting to a Mac® OS X® or Windows® computer. You may need to select USB audio output in your computer’s System Preferences or Control Panel.
- Using USB input allows you to use audio playback software of your choice.
- Multi-channel audio is not supported. The amplifier support LPCM 2-channel input only
INPUT SELECTION
Automatic
By default, the amplifier will automatically select the most recently connected input. This feature can be disabled in the SETTINGS section of the Main Menu.
Manual
- Press and hold the MENU/INPUT button on the amplifier to display the Input Selection Menu on the display.
- Use the INCREASE and DECREASE buttons to highlight the desired input, then momentarily press the MENU/INPUT button to select the highlighted entry.
OPERATION
- Turn the amplifier off by turning the POWER/VOLUME knob fully counterclockwise past the click.
- Connect an audio source device to one of the inputs by following the instructions in the AUDIO INPUT CONNECTIONS section above.
- If automatic input selection is disabled, select the desired input by following the Manual instructions in the INPUT SELECTION section above.
- Plug a pair of headphones with 3.5mm plug into the HEADPHONES jack on the amplifier.
- If your audio source device has a volume control, put the volume at the midpoint.
- Start audio playback on your audio source device.
- Turn the POWER/VOLUME knob clockwise to a point just past the click to turn the amplifier on.
- Slowly turn the POWER/VOLUME knob clockwise to increase the volume to a comfortable listening level. If the POWER/VOLUME knob is fully clockwise and the volume level is still too low, increase the output volume level on your audio source device. Use the two volumes to find the desired listening level.
MAIN MENU
- Momentarily press the MENU/BACK button to display the Main Menu.
- Use the INCREASE and DECREASE buttons to cycle forward or backward through the list of available menus.
- Momentarily press the ENTER/INPUT button to select the displayed menu.
- Momentarily press the MENU/BACK button to return to the Main Menu.
- The submenus are EQ [1/4], DRC [2/4], DIRAC [3/4], and SETTINGS [4/4].
- After about 30 seconds of no button input while any menu or submenu is displayed, the Display will revert back to the Home Screen.
EQ MENU
The EQ Menu allows you to set the parameters for the Shelf EQ and up to three Parametric EQs (PEQs).
Shelf EQ
The Shelf EQ is the equivalent of the Bass and Treble controls on a conventional amplifier, but with more control over the amount of gain and the specific frequencies. The LF GAIN value applies to all frequencies below the selected frequency, while the HF GAIN value applies to all frequencies above the selected frequency.
- Momentarily press the MENU/BACK button. The Display will show MAIN MENU [1/4] EQ.
- Momentarily press the ENTER/INPUT button. The Display will show EQ MENU [1/4] SHELF EQ.
- Momentarily press the ENTER/INPUT button. The Display will show SHELF EQ with a pointer to the left of the LF GAIN label.
- Use the INCREASE or DECREASE buttons to increase or decrease the LF GAIN value from -6.0dB to +6.0dB in 0.5dB increments.
- Momentarily press the ENTER/INPUT button. The Display will change to show the pointer to the left of the FREQ label.
- Use the INCREASE or DECREASE buttons to increase or decrease the FREQ value from 60Hz to 200Hz in 10Hz increments.
- Momentarily press the ENTER/INPUT button. The Display will change to show the pointer to the left of the HF GAIN label.
- Use the INCREASE or DECREASE buttons to increase or decrease the HF GAIN value from -6.0dB to +6.0dB in 0.5dB increments.
- Momentarily press the ENTER/INPUT button. The Display will change to show the pointer to the left of the FREQ label.
- Use the INCREASE or DECREASE buttons to increase or decrease the FREQ value from 5kHz to 12kHz in 1kHz increments.
- Momentarily press the ENTER/INPUT button. The Display will cycle back to show the pointer to the left of the LF GAIN label.
- Momentarily press the MENU/BACK button three times to return to the Home Screen. Alternatively, wait about 30 seconds and the Display will automatically return to the Home Screen. The Home Screen will display an EQ ON label, indicating that EQ is enabled.
PEQ
The Portable Headphone Amplifier features three Parametric EQs (PEQs), which you can use to boost or cut frequencies with more precision than the Shelf EQ offers. Rather than boosting or cutting all frequencies above or below a particular point, you can boost or cut a specific range of frequencies within a bell curve.
This gives a greater amount of boost or cut to the frequency at the center of the curve and a smaller amount to frequencies the further they get from the central frequency. This allows you to accentuate particular sounds, voices, or instruments in an audio mix. It is also useful if the speakers, headphones, or even any item within the room has a resonant frequency that rattles.
- With PEQ you can set which frequency is at the apex of the curve, the amount of gain or attenuation, and the width of the curve.
- Perform the following steps to set first of the three available PEQs. The concept is the same for the other two PEQs.
- Momentarily press the MENU/BACK button. The Display will show MAIN MENU [1/4] EQ.
- Momentarily press the ENTER/INPUT button. The Display will show EQ MENU [1/4] SHELF EQ.
- Momentarily press the INCREASE button. The Display will show EQ MENU [2/4] PEQ 1.
- Momentarily press the ENTER/INPUT button. The Display will show PEQ 1 with a pointer to the left of the ENABLE label.
- If the value for ENABLE is OFF, momentarily press the INCREASE button to change the value for ENABLE to ON.
- Momentarily press the ENTER/INPUT button. The Display will show PEQ 1 with the pointer to the left of the FREQ label.
- Use the INCREASE or DECREASE buttons to increase or decrease the FREQ value in the range 50Hz to 15.0kHz. The FREQ value can be adjusted in 1Hz increments above 50Hz, 10Hz increments above 100Hz, and 0.1kHz increments above 1kHz.
- Momentarily press the ENTER/INPUT button. The Display will show PEQ 1 with the pointer to the left of the GAIN label.
- Use the INCREASE or DECREASE buttons to increase or decrease the GAIN value from -6.0dB to +6.0dB in 0.5dB increments.
- Momentarily press the ENTER/INPUT button. The Display will show PEQ 1 with the pointer to the left of the Q label.
- Use the INCREASE or DECREASE buttons to increase or decrease the Q value from 0.5 octaves to 5.0 octaves in 0.1 octave increments.
- Momentarily press the ENTER/INPUT button. The Display will show PEQ 1 with the pointer to the left ENABLE label.
- Momentarily press the MENU/BACK button three times to return to the Home Screen. Alternatively, wait about 30 seconds and the Display will automatically return to the Home Screen. The Home Screen will display an EQ ON label, indicating that EQ is enabled.
DRC
DRC is an acronym for Dynamic Range Compensation. For audio material, Dynamic Range generally refers to the difference between the quietest and loudest portions of the audio signal. In theory, humans have an audio Dynamic Range of about 140dB, however in practice, our ears adjust to the prevailing volume level in the same way our eyes adjust to light levels, making it difficult to see in the dark if exposed to bright light. Dynamic Range Compensation is used to reduce the amount of difference between the quietest and loudest portions of the audio signal. This is generally perceived negatively by audiophiles and, because Monolith™ by Monoprice products are true audiophile products, the feature is disabled by default. The DRC feature built into this Portable Headphone Amplifier starts with an LPF/HPF to split low and high frequencies (24dB/octave filters at 140Hz). This is followed by two independent stereo compressors and a mixer to combine the compressed low and high frequency bands. The DRC operates on the pre-volume control signal, so the DRC threshold level refers to the level of the incoming signal source.
- The Threshold value determines at which point the DRC takes effect.
- The Ratio value determines how much compression is added to the signal. The lowest setting (1.2:1) will have minimal effect, while the highest level (8.0:1) will have an audible “squashing” effect on your mix.
- LF Offset is essentially a separate gain stage for just the LF signal below 140Hz. You can reduce or enhance the bass using the DRC similar to how studio and concert sound engineers use multiband compression
Perform the following steps to configure and use the DRC feature:
- Momentarily press the MENU/BACK button. The Display will show MAIN MENU [1/4] EQ.
- Momentarily press the INCREASE button once. The Display will show MAIN MENU [2/4] DRC.
- Momentarily press the ENTER/INPUT button. The Display will show DRC with a pointer to the left of the ENABLE label.
- If the value for ENABLE is OFF, momentarily press the INCREASE button to change the value for ENABLE to ON.
- Momentarily press the ENTER/INPUT button. The Display will show DRC with the pointer to the left of the THRESHOLD label.
- Use the INCREASE or DECREASE buttons to increase or decrease the THRESHOLD value from -32dB to -2dB in 1.0dB increments.
- Momentarily press the ENTER/INPUT button. The Display will show DRC with the pointer to the left of the RATIO label.
- Use the INCREASE or DECREASE buttons to increase or decrease the RATIO value from 1.2:1 to 8.0:1 in 0.1 ratio increments.
- Momentarily press the ENTER/INPUT button. The Display will show DRC with the pointer to the left of the LF OFFSET label.
- Use the INCREASE or DECREASE buttons to adjust the LF OFFSET value from -12dB to +12dB in 1.0dB increments.
- Momentarily press the ENTER/INPUT button. The Display will show DRC with a pointer to the left of the ENABLE label.
- Momentarily press the MENU/BACK button two times to return to the Home Screen. Alternatively, wait about 30 seconds and the Display will automatically return to the Home Screen. The Home Screen will display a DRC ON label, indicating that DRC is enabled.
SPECIFICATIONS
| Model | 24460 |
| Inputs | 1x unbalanced 3.5mm TRS, 1x Optical, 1x USB |
| Playable Frequency Response | 1Hz ~ 20kHz ±0.5dB |
| Signal-to-Noise Ratio (A-Weighted) | > 117dB |
| Dynamic Range | > 117dB |
| Total Harmonic Distortion | < 0.001% |
| Crosstalk | < 100dB |
| Maximum Output Voltage | 3.7 Vrms |
| Maximum 3.5mm Analog Input Voltage | 2.0 Vrms |
| 3.5mm Analog Input Impedance | 10 kilohms |
| Optical Sampling Frequency | 32 ~ 96 kHz |
| Maximum Optical Resolution | 24 bits |
| USB Sampling Frequency | 32 ~ 192 kHz |
| Direct Stream Digital™ Support | DSD64, DSD128 |
| Battery Capacity | 4000mAh |
| Charging Power | 5 VDC, 2A |
| USB Wall Charger Input Power | 100 ~ 240 VAC, 50/60 Hz |
| Dimensions | 5.4″ x 2.8″ x 0.6″ |
| Weight | 0.5 lbs. |
TECHNICAL SUPPORT
Monoprice is pleased to provide free, live, online technical support to assist you with any questions you may have about installation, setup, troubleshooting, or product recommendations. If you ever need assistance with your new product, please come online to talk to one of our friendly and knowledgeable Tech Support Associates. Technical support is available through the online chat button on our website www.monoprice.com during regular business hours, 7 days a week. You can also get assistance through email by sending a message to [email protected]
FAQS
Do i have to download the dac driver for my windows 10 pc ?
yes you can do that download the dac driver for my windows 10 pc
How should i connect my phone for the besy quality? I dont have a headphone jack. Can i connect through a usb cable ot get a headphone adapter?
The best option would be going with a USB to 3.5mm adapter to connect to this.
Does this have balanced output?
No. It only outputs unbalanced 3.5 mm. It sounds amazing though. I use mine to drive B&W P9 SIgnature headphones and it sounds very clean.
Is it in Mono with Dirac Sensuround ii ?
No it is not. in Mono with Dirac Sensuround
What types of cables i need to purchase in order o use it with my mp3, windows pc, and to use it as preamp between my pc and speakers?
The only cables you need to buy to be able to use this portable headphone amplifier are a couple of auxiliary 3.5mm cables.
Powerful enough to drive Focal Elex?
The amp and dac combo does work off of different impedance, but based on that, if they are compatible, then yes they should be able to drive the Focal Flex.
What usb is needed to charge the type?
Micro USB. Googling manuals is your friend.
Will this work with an iPhone with iOS?
Yes it will. work with an iPhone with iOS
Does anything need to be download ,to sound at its best ?
Not really. anything need to be download ,to sound at its best
Powerful enough to run meze emyprean?
Yes, these will work with those headphones.
Does this have balanced output?
No. It only outputs unbalanced 3.5 mm. It sounds amazing though. I use mine to drive B&W P9 SIgnature headphones and it sounds very clean.
So is it safe to say this is basically a portable thx 789 ?
Not owning the 789 I cannot respond to your question.
Is the Analog input digitized before it enters the amp circuit?
It depends on the source Analog input digitized before it enters the amp circuit
Do i need to download a driver in my windows 10 usb on my pc ?
there are no drivers needed.
Powerful enough to run meze emyprean?
Yes, these will work with those headphones.


