KARCHER CV 300 Commercial Dual Motor Upright

WARNING
This product and accessories may contain a chemical known to the State of California to cause cancer and birth defects or other reproductive harm.
For more information about this regulation: www.P65Warnings.ca.gov
Warranty Registration
Thank you for purchasing a Kärcher North America product. Warranty registration is quick and easy. Your registration will allow us to serve you better over the lifetime of the product.
To register your product go to : http://warranty.karcherna.com/
For customer assistance: 1-800-444-7654
How To Use This Manual
This manual contains the following sections:
- How to Use This Manual
- Safety
- Operations
- Maintenance
- Parts List
The HOW TO USE THIS MANUAL section will tell you how to find important information for ordering correct repair parts.
Parts may be ordered from authorized dealers. When placing an order for parts, the machine model and machine serial number are important. Refer to the MACHINE DATA box which is filled out during the installation of your machine. The MACHINE DATA box is located on the inside of the front cover of this manual.
- Model:
- Date of Purchase:
- Serial Number:
- Dealer:
- Address:
- Phone Number:
- Sales Representative:
The model and serial number of your machine is located on the back of the machine.
The SAFETY section contains important information regarding hazardous or unsafe practices of the machine. Levels of hazards are identified that could result in product damage, personal injury, or severe injury resulting in death.
The OPERATIONS section is to familiarize the operator with the operation and function of the machine.
The MAINTENANCE section contains preventive maintenance to keep the machine and its compo-nents in good working condition.
They are listed in this general order:
- Filters
- Blockages
The PARTS LIST section contains assembled parts illustrations and corresponding parts list. The parts lists include a number of columns of information:
- ITEM – column refers to the reference num-ber on the parts illustration.
- PART NO. – column lists the part number for the part.
- REF NO. – reference number.
- DESCRIPTION – column is a brief descrip-tion of the part.
- NOTES – column for information not noted by the other columns.
NOTE: If a service or option kit is installed on your machine, be sure to keep the KIT INSTRUCTIONS which came with the kit. It contains replacement parts numbers needed for ordering future parts. The manual part number is located on the lower right corner of the front cover.
IMPORTANT SAFETY INSTRUCTIONS
When using an electrical appliance, basic precaution must always be followed, including the following:
READ ALL INSTRUCTIONS BEFORE USING THIS MACHINE.
WARNING: To reduce the risk of fire, electric shock, or injury:
- Do not leave appliance when plugged in. Unplug from outlet when not in use and before servicing.
- Do not use outdoors or on wet surfaces.
- Do not use near small children. Do not allow to be used as a toy. Close attention is necessary when used by or near children.
- Use only as described in this manual. Use only manufacturer’s recommended attachments.
- Do not use with damaged cord or plug. If appliance is not working as it should, has been dropped, damaged, left outdoors, or dropped into water, return it to a service center.
- Do not pull or carry by the cord, use cord as a handle, close a door on cord, or pull cord around sharp edges or corners. Do not run appliance over cord. Keep cord away from heated surfaces.
- Do not unplug by pulling on cord. To unplug, grasp the plug, not the cord.
- Do not handle plug or appliance with wet hands.
- Do not put any object into openings. Do not use with any opening blocked; keep free of dust, lint, hair, and anything that may reduce air flow.
- Keep hair, loose clothing, fingers and all parts of body away from openings and moving parts. Do not place fingers or other body parts under vacuum unless unplugged.
- Do not pick up anything that is burning or smoking, such as cigarettes, matches, or hot ashes.
- Do not use without dust bag and/or filters in place. Do not wash filters.
- Turn off all controls before unplugging.
- Use extra care when cleaning on stairs.
- Do not use to pick up flammable or combustible liquids such as gasoline or use in areas where they may have been present.
- Do not operate this machine near flammable fluids, dust or vapors.
- Maintenance and repairs must be done by qualified personnel.
- Use only identical replacement parts. See instructions for servicing of appliances.
- Do not use machine as a step.
- If used on plush carpet or carpet with thick padding, do not leave machine in one place with machine turned on.
- Do not re-use bags. Once full, discard and replace with a new bag.
- Always turn off this appliance before connecting or disconnecting motorized nozzle.
- Do not touch the brush roller while the machine is plugged in. Brush may unexpectedly restart. To reduce the risk of injury from moving parts, unplug before servicing.
- The vacuum has an electronic overload protection. The power head could shut itself off if used on certain carpets. If that should occur, turn off the machine, unplug it and look for a blockage. If there is no blockage, reduce the load on the brush roller by adjusting the brush height to a higher level (up to 4)
- Store the vacuum in a dry place at room temperature. When the vacuum is not in use, you should wrap the cord on the cable hooks.
- Any other servicing should be performed by an authorized service representative.
READ AND SAVE THESE INSTRUCTIONS
Important Safeguards
Accidents due to misuse can only be prevented by those using the machine. To guard against injury, basic safety precautions should be observed, including the following:
Read and follow all safety instructions.
WARNING: ELECTRICSHOCK COULD OCCUR IF USED OUTDOORS OR ON WET SURFACES
The vacuum cleaner is designed to be safe when used to perform cleaning functions. Should damage occur to electrical or mechanical parts, cleaner should be repaired by a competent service center before using in order to avoid further damage to machine or physical injury to user.
A damaged power cord could cause electrical shock and/or fire. To minimize this possibility observe the following precautions:
- Do not run cleaner over power cord.
- Avoid closing doors on power cord pulling it around sharp edges, or placing sharp-edged objects upon it.
- Wind cord no tighter than is necessary to retain it on the cord hooks.
- When disconnecting power cord from electrical outlet, grasp the plug. Pulling it out by the cord itself can damage cord insulation and internal connections to plug.
Your vacuum cleaner creates suction and contains a revolving brush. To avoid bodily injury from suction or moving parts, vacuum cleaner brush should not be placed against, or in close proximity of loose clothing, jewelry, hair or body surfaces while cleaner is connected to electrical outlet. Cleaner should not be used to vacuum clothing while it is being worn. Keep children away from machine when in operation or plugged in.
If used on plus carpet or carpet with thick padding, turn off unit when handle is in upright position. When using accessory tools, keep floor bush off carpet by keeping handle in locked position and lowering handle with on hand to raise bush off floor. Operate accessories with other hand.
Always plug your cleaner into a standard wall outlet. Use of extension cord or light socket with inadequate current-carry capacity could result in electric shock or fire hazard.
Disconnect cleaner from electrical outlet before servicing, such as changing bags or belts. You could receive bodily injury from moving parts of machine should switch accidentally turned on. Disconnect cleaner from elec-trical outlet before detaching powerhead.
Do not use your vacuum cleaner in areas where flammable and/or explosive vapor or dust is present to avoid possibility of fire or explosion. Some cleaning fluids can produce such vapors. Areas on which cleaning fluids have been used should be completely dry and thoroughly aired before being vacuumed.
To avoid fire hazard, do not pick up matches, fireplace ashes, or smoking material with cleaner.
Keep your work area well lighted to avoid picking up harmful materials (such as liquids, sharp objects, or burning substances) and avoid tripping accidents.
Use care when operating the cleaner on irregular surfaces such as stairs, as falling cleaner could cause bodily injury and/or mechanical damage. Proper storage of machine in an out-of-way area immediately after use will also prevent accidents caused by tripping over cleaner.
Store your vacuum indoors in a cool, dry area not exposed to the weather to avoid electrical shock and/or cleaner damage.
Exercise strict supervision to prevent injury when using vacuum cleaner near children or when child is allowed to operate vacuum cleaner. Do not allow children to play with vacuum cleaner and never leave cleaner plugged in and unattended.
SAVE THESE INSTRUCTIONS
GROUNDING INSTRUCTIONS
This appliance must be grounded, if it should malfunction or breakdown, grounding provides a path of least resistance for electric current to reduce the risk of electric shock. This appliance is equipped with a cord having an equipment–grounding conductor and grounding plug. The plug must be inserted into an appropriate outlet that is properly installed and grounded in accordance with all local codes and ordinances.
WARNING
Improper connection of the equipment-grounding conductor can result in a risk of electric shock. Check with a qualified electrician or service person if you are in doubt as to whether the outlet is properly grounded. Do not modify the plug provided with the appliance if it will not fit the outlet; have a proper outlet installed by a qualified electrician.
This appliance is for use on a nominal 120-volt circuit, and has a grounded plug that looks like the plug illus-trated in sketch A. A temporary adaptor looks like adaptor illustrated in sketches B and C, may be used it connect this plug to a 2-pole receptacle as shown in sketch B if a properly grounded outlet is not available. The temporary adaptor should be used only until a properly grounded outlet (sketch A) can be installed by a qualified electrician.
The green colored rigid ear, lug or the like extending from the adaptor must be connected to a permanent ground such as a properly grounded outlet box cover. Whenever the adaptor is used, it must be held in place by a metal screw.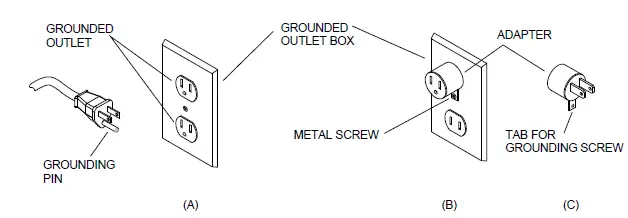
Operations
Technical Specifications
Vacuum Portion: (Carry unit)
| ITEM | DIMENSION/CAPACITY |
| Vacuum Motor | High Performance, single stage |
| Vacuum Motor Rated Power | 1000 Watts |
| Vacuum Motor Maximum Power | 1200 Watts |
| Suction | 225 Mbar (2300 mm WS) |
| Waterlift | 92 in (234 cm) |
| Air Flow | 102 cfm (48 l/s) |
| Filter Bag Capacity | 3.5 liters, 3 layer, enclosed, top-loading |
| Weight -CV300 -CV380 | 17 lbs (7.7 kg) 17.4 lbs (7.9 kg) |
| Dimensions – Height | 48 in (123 cm) |
| Housing | Injection molded, high impact ABS and PP plastic |
| Cable | 40 in (12 M) 18/3 SJT |
Power Head: (Detachable Head unit)
| ITEM | DIMENSION/CAPACITY |
| Brush Motor Rated Power – 12 in (30 cm) – 15 in (38 cm) | 175 Watt 200 Watt |
| Working Width of Powerhead | |
| -CV300 | 12 in (30 cm) |
| -CV380 | 15 in (38 cm) |
| Brush Drive | Non-slip Tooth Belt, enclosed, electronic safety clutch and speed control. |
| Brush Speed | 2700 rpm (5400 brush contacts per minute) |
| Wheels | 2 in (5.2 cm) dia. rubberized |
Components/Controls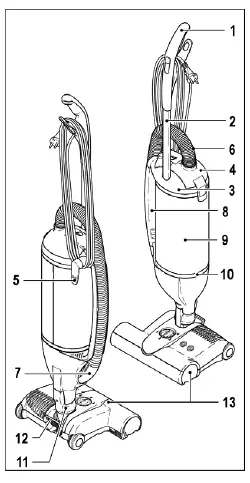
- Handle
- Tube
- Dust Bag Housing
- Filter Cover
- Cable Hook
- Hose
- Hose Handle
- Carrying Handle
- Exhaust Filter
- Filter Retaining Rings
- Neck
- Foot Pedal
- Power Head (12″ – 15″)

- A. On/Off Switch
- B. Power Cord
- C. Cable Hook
Assembly
CAUTION: Please read all instructions before using this machine.
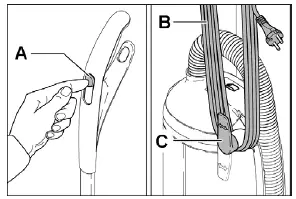
- Carefully attach the brush nozzle to the vacuum cleaner through the fitting at the bottom of the vacuum until it locks. [See below]
- Push the black end of the hose [A] into the connection on the filter cover [B].
- Insert the hose handle [C] into the suction opening on the side and press the hose into its place on the side of the machine, as shown.
Machine Operation
Your vacuum is operated with an electric power brush. The machine can be used in the upright position.
CAUTION
- When locking the vacuum in the upright position, please ensure the bag housing is clicked in place; face forward to the center, or the unit could overturn.
- Please ensure that the On/Off switch is in the OFF position. Turn the cable hook to release the power cable and plug into the walls main outlet.
- Now you may start your machine by moving the power switch to the ON position.
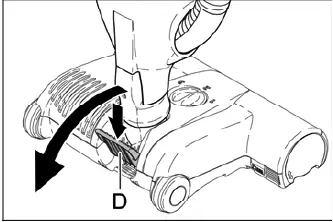
To use the power head (12” or 15” model):
- Press the foot pedal [D] on the rear of the power head and lower the machine handle to an angled position. The brush motor will then turn on.

CAUTION
When using the hose and attachments, keep the machine in upright position.
The hose handle can be removed from he side of the vacuum and can be used with or without attachments. Also maintain a grasp on the machine when using the hose as it could tip if the hose is pulled too far.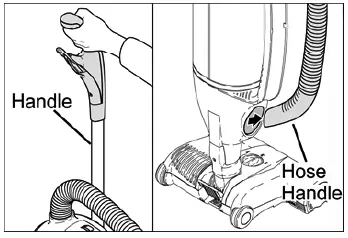
The machine can also be used without the power head. You can easily carry the machine by using the carrying handle.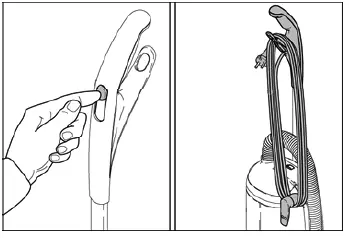 When you have finished using the machine, turn it off by moving the power switch to the OFF position. Then unplug the power cable and wind it into the cable hook and handle.
CAUTION
Important instructions for use on the power head.
The brush roller is off and stopped when the machine is in the upright position and the handle is completely locked in place.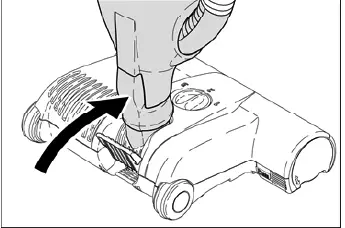
NOTE: If you have the machine handle at an angle, the brush roller will spin.
Leaving the machine in a stationary position for an extended period of time while the brush roller is spinning may cause damage to your carpet.
Recommended items to be aware of with regard to your vacuum:
- Be sure NOT to allow carpet edges or fringe into the brush.
- This machine could cause damage to loosely woven carpets or rugs, wool loop carpets, long piled carpets, or very soft and sensitive floor coverings.
- We do NOT recommend using the power head to clean old or especially valuable hand-crafted carpets.
- If you have uneven flooring, the metal part underneath the machine may scratch the surfaces.
- Please carry the machine over high thresh-olds.
Power Head
- The rotating design of the swivel neck allows the power head to move in any direction, making it easily maneuverable around obstacles.
- The power head also has an adjustable brush height and to-the-edge brush action for effective all around cleaning.
Foot Pedal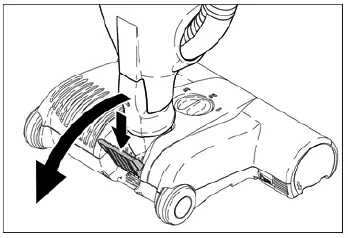
- By pushing the foot pedal and lowering the handle, you activate the power head and the brush begins spinning.
WARNING: Failure to use the Foot Pedal will cause damage to the unit.
Indicator Lights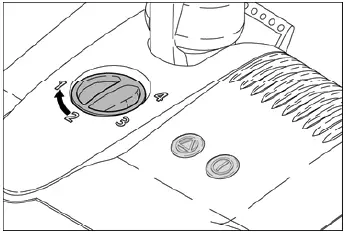
The electronic brush control constantly monitors the status of the brush, communicating the status through the lights on top.
Green On/Off Light: Brush is on and spinning.
Red Light: The brush is not fully engaged in the carpet. The height adjustment should be lowered. If the height adjustment is at its lowest setting, the brush is worn and needs to be replaced.
NOTE: Recommend selecting a brush height that is only one level beneath that at which the green and red lights are on.
Red Light Flashing: The brush is blocked. Turn off the power head, disconnect it from the power source, and then remove the blockage.
Brush Roller
- To remove the brush roller, press the button and turn the bearing downward.

- Turn the brush slightly to the right and pull it out.
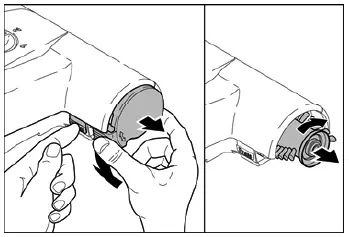
We recommend to regularly remove threads and hair, which have been wound around the brush roller.
Filters
When the orange bag full indicator is showing, airflow is reduced. This could be because the filter bag is full, the filters are clogged or there may be a blockage.
Changing The Filter Bag
- Remove the filter bag by opening the latch on the side of the bag housing.
- Close the filter bag with the sealing cap and lift it out.

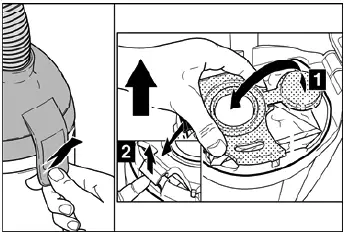
The procedure to replace the bag is illustrated on the front of each bag.
NOTE: You cannot close the bag housing if the bag is fitted incorrectly.
Changing Filters
Motor Protection Filter
NOTE: This filter can only be accessed by removing the filter bag.
- Lift the motor protection filter up by the bracket.
- Replace with new.
NOTE: Make sure filter fits in position tightly. - Put filter bag back in place.

The filter should be changed when it is dirty, at minimum. No later then replacing 20 filter bags.
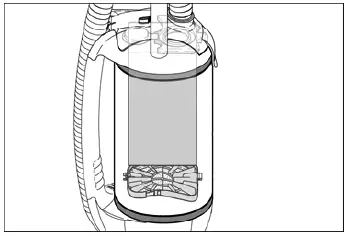
Exhaust Filter
NOTE: Recommended to replace every time you replace the Motor Protection Filter.
- Carefully remove the filter retaining rings and put them to the side.
- Pull the enforcement strips of the filter out of the housing slot.
- Remove the filter from the housing.
- Replace with new in reverse order.

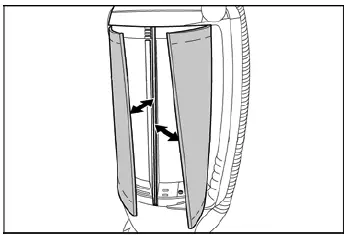
Be sure the filter is fitted correctly in the housing slot and retaining rings are installed correctly.
NOTE: If the filter is NOT installed correctly it will be ineffective.
CAUTION: Use ONLY replacement parts procured from the manufacturer to ensure effectiveness and safety.
DO NOT wash any filters.
Maintenance
Removing Blockages
If your bag full indicator light remains lit after you have changed bags and/or filters this is an indication that there may be a blockage somewhere in your unit.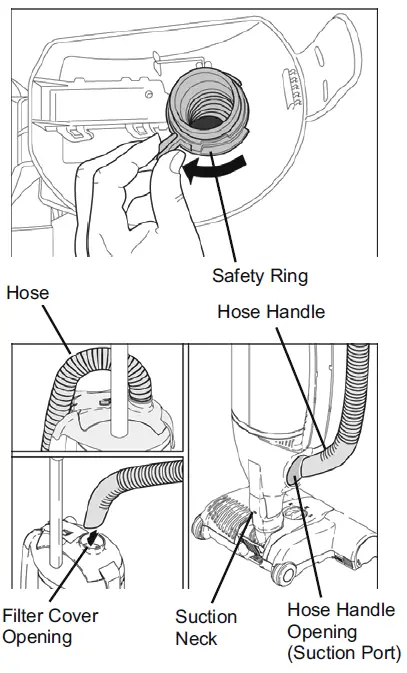
It is important to keep all areas of the system free from blockage, as this may damage your unit or its compo-nents.
- Check for suction at the end of hose. If you can only feel a small amount of suction, there is a block in your hose.
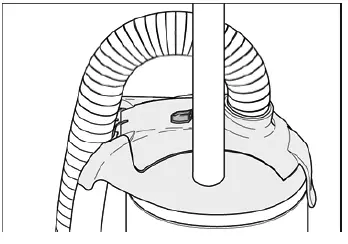
To remove:
- Loosen the safety ring on the lid.
- Remove the hose from the machine.
- Reverse the airflow through the hose by putting the hose handle in the connecting tube of the filter cover.
- Stretch the hose in the spot where the blockage may be and open/close the end of hose until blockage is removed.
- Check the suction port at the opening for the hose handle. Remove any debris you may find.
- Check the suction neck of the power head. Remove any debris you may find.
- Check the trap-door on the bottom of the power head. Remove any debris you may find.
- Check between the suction neck and trap-door within the power head, as obstacles may become lodged in the travel path. Remove any debris you may find.
CAUTION: Never clean down the hose with a stick or pointed object.
Parts-Tools, Bags & Filters
Power Head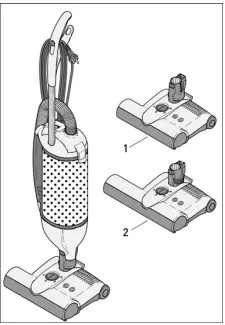 Optional Attachments
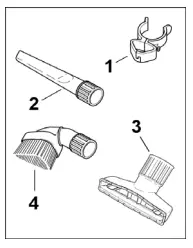 Spare Parts
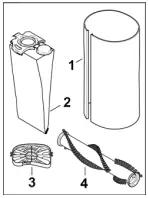
Power Head
| ITEM | PART NO. | REF NO. | DESCRIPTION | NOTES |
| 1 | 86324000 | 9964AX | POWER HEAD 12” | CV300 Only |
| 2 | 86324010 | 9965AX | POWER HEAD 15” | CV380 Only |
Optional Attachments
| ITEM | PART NO. | REF NO. | DESCRIPTION | NOTES |
| 1 | 86409710 | 1081sw | CLIPS, ATTACHMENT, BLACK | |
| 2 | 86319300 | 1092sw | CREVICE NOZZLE, BLACK | |
| 3 | 86319290 | 1491sw | UPHOLSTERY NOZZLE, BLACK | |
| 4 | 86409700 | 1094gs | ROUND BRUSH VSM-TK, GRAY BLACK |
Spare Parts
| ITEM | PART NO. | REF NO. | DESCRIPTION | NOTES |
| 1 | 86322140 | 7095KA | EXHAUST FILTER, BLACK | |
| 2 | 86333980 | 7029N | FILTER BAG (10/PK) | |
| 3 | 86284770 | 7012 | FILTER, MOTOR PROTECTION | |
| 4A | 86004950 | 5010WI | BRUSH ROLLER 12” | CV300 Only |
| 4B | 86138490 | 2838WI | BRUSH ROLLER 15” | CV380 Only |
Upper Housing
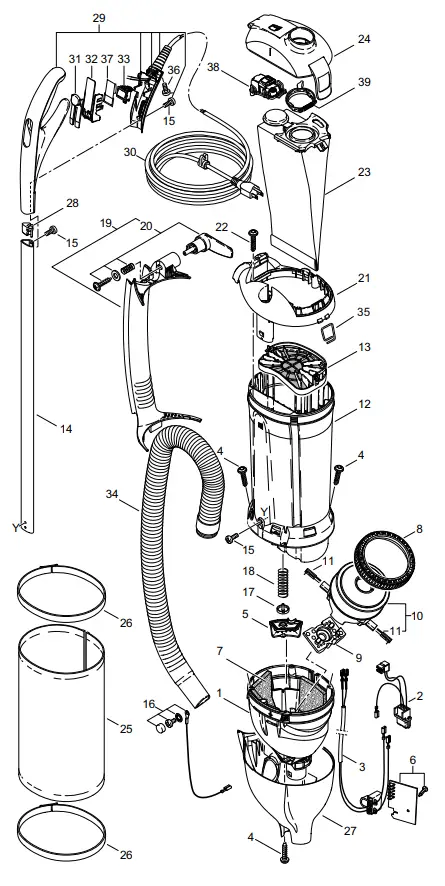
| ITEM | PART NO. | REF NO. | DESCRIPTION | NOTES |
| 1 | 86137750 | 7135GS | AIR DUCT, GRAY BLACK | |
| 2 | 86146820 | 7065 | INTERNAL WIRING ET | |
| 3 | 86142920 | 7096 | INTERNAL CABLE | |
| 4 | 86144780 | 01016ER | SCREW STS 4X16-T20 | |
| 5 | 86146510 | 7057HG | VALVE COVER | |
| 6 | 86139960 | 7102ER | PRINTED CIRCUIT BOARD 120V | |
| 7 | 86145180 | 7098 | SOUND INSULATION | |
| 8 | 86146380 | 1047 | VAC MOTOR SEAL | |
| 9 | 86144740 | 7009 | RUBBER MOUNTING | |
| 10 | 86143660 | 7041ER | VAC MOTOR 120V | |
| 11 | 86138380 | 05140S | CARBON BRUSH SET | |
| 12 | 86362910 | 7001WI | DUST BAG HOUSING | |
| 13 | 86284770 | 7012 | MOTOR FILTER | |
| 14 | 86142510 | 7080ER | HANDLE TUBE | |
| 15 | 86144830 | 0127ER | SCREW M 4X10K | |
| 16 | 86146830 | 7068ER | INTERNAL WIRING | |
| 17 | 86146490 | 7025 | VALVE DISC | |
| 18 | 86362770 | 7028ER | VALVE SPRING | |
| 19 | 86405920 | 7090bg | HOSE DUCT, BASALT GRAY | |
| 20 | 86405930 | 7027kg | CABLE HOOK, KARCHER GRAY | |
| 21 | 86405940 | 7092bg | COVER, DUST BAG HOUSING, BASALT GRAY | |
| 22 | 86144790 | 01017ER | SCR, 4X20-T20 STS | |
| 23 | 86333980 | 7029N | FILTER BAG (10/PK) | |
| 24 | 86405950 | 7091bg | FILTER COVER BASALT GREY | |
| 25 | 86322140 | 7095KA | EXHAUST FILTER, BLACK | |
| 26 | 86322150 | 7017sw | EXHAUST FILTER CLAMP, BLACK | |
| 27 | 86411140 | 7169KA1 | LOWER HOUSING, BASALT GRAY | |
| 28 | 86146250 | 7076HG | TUBE PLUG | |
| 29 | 86322170 | 7163SW | HANDLE GRIP CLP., BLACK | |
| 30 | 86405970 | 7126ge | CABLE 120V, US, YELLOW | |
| 31 | 86405980 | 7035zg | SLIDING BUTTON, ZINC YELLOW | |
| 32 | 86322200 | 7178SW | HANDLE FRAME, BLACK | |
| 33 | 86145480 | 5138 | ROCKER SWITCH, 2 POL. | |
| 34 | 86142670 | 7050SB | HOSE DUCT | |
| 35 | 86369810 | 7024ER | SPRING LATCH FILTER COVER SET | |
| 36 | 86363370 | 01036ER | SCREW M4 X 14 | |
| 37 | 86309880 | 7142 | PROTECTION FILM | |
| 38 | 86141670 | 7094ER | FILTER INDICATOR, CPL. | |
| 39 | 86144630 | 7018OR | RETAINING RING, CPL. |
12” Power Head
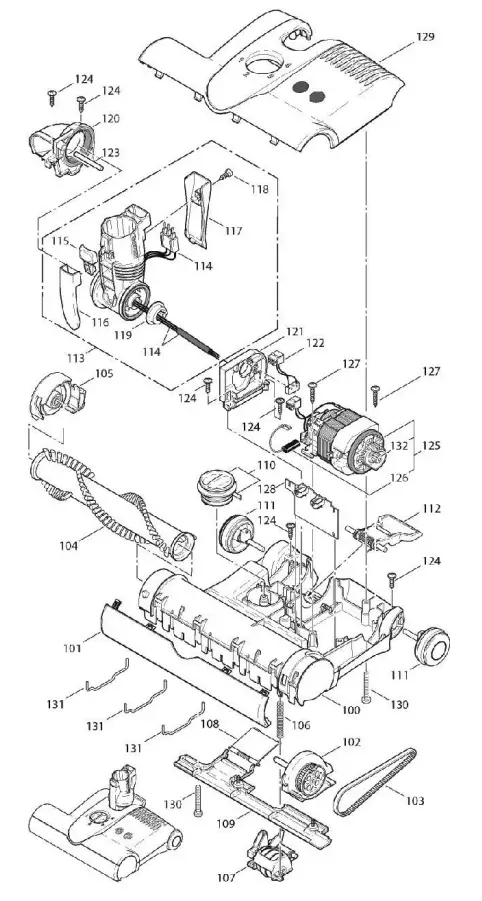
| ITEM | PART NO. | REF NO. | DESCRIPTION | NOTES |
| 100 | 86322210 | 2324SW | CHASSIS ET1 12”, BLACK | |
| 101 | 86322220 | 2302sw | BUMPER 12”, BLACK | |
| 102 | 86322230 | 2314gs | BEARING BLOCK LEFT CPL. GS | |
| 103 | 86138220 | 2923 | BELT 333 3M HTDII-6 | |
| 104 | 86004950 | 5010WI | BRUSH ROLLER 12” | |
| 105 | 86322240 | 2313sw | BEARING BLOCK RH, BLACK | |
| 106 | 86145260 | 2929 | SPRING | |
| 107 | 86137840 | 2316sw | PILE ADJUSTMENT ASSMBLY, BLACK | |
| 108 | 86406010 | 2909ZG | ACCESS DOOR, ZINC YELLOW | |
| 109 | 86322260 | 2304gs | REAR BOTTOM PLATE CPL GS | |
| 110 | 86406020 | 2931ZG | BUTTON, PILE ADJUSTMENT, ZINC YELLOW | |
| 111 | 86322280 | 2306SW | WHEEL, BLACK | |
| 112 | 86406040 | 2937ZG | FOOT PEDAL, ZINC YELLOW | |
| 113 | 86322290 | 2310gs | SWIVEL NECK ASM KARCHER GS | |
| 114 | 86322300 | 0877ER | WIRING SWIVEL NECK | |
| 115 | 86139080 | 1737ER | BUTTON, RELEASE | |
| 116 | 86322320 | 2962gs | SEGMENTS, TS-NECK | |
| 117 | 86322330 | 2961GS | SOCKET COVER GS | |
| 118 | 86144820 | 01027ER | SCR F 3.9X9.5 DIN 7981 | |
| 119 | 86138140 | 2954 | SWIVEL NECK BEARING | |
| 120 | 86145400 | 2311 | SWIVEL NECK SUPPORT, RH | |
| 121 | 86145410 | 2312 | SWIVEL NECK SUPPORT, LH | |
| 122 | 86350180 | 0880 | SWITCH SWIVEL NECK | |
| 123 | 86137930 | 2928 | AXLE | |
| 124 | 86144810 | 01021ER | SCR F3.9X13 DIN 968 | |
| 125 | 86143500 | 2973ER | MOTOR, BRUSH, 120V, 175W | |
| 126 | 86138390 | 05141S | BRUSH SET, CARBON VAC MTR | |
| 127 | 86144800 | 01020ER | SCR, F3.9X21 DIN 968 | |
| 128 | 86423660 | 2684ER | CONTROLLER BOARD ET-1, 120V, 175W | |
| 129 | 86411150 | 2337BGKA | COVER POWER HEAD ET1 CV300, BG | |
| 130 | 86147170 | 0176ER | SCREW M4 X 30 | |
| 131 | 86146800 | 5402 | WIRE TIE,BOTTOM PLATE,CENTER | |
| 132 | 86309030 | 2319 | BRUSH MOTOR PULLEY FM |
15” Power Head
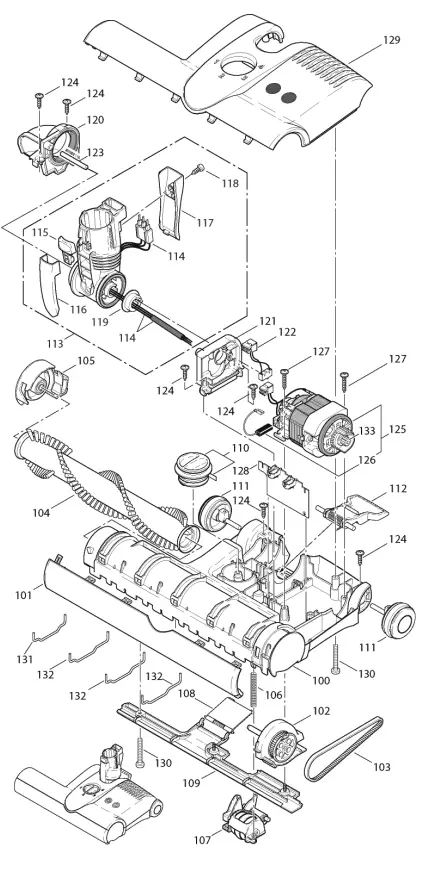
| ITEM | PART NO. | REF NO. | DESCRIPTION | NOTES |
| 100 | 86322350 | 2325SW | CHASSIS, ET2 15″ BLACK | |
| 101 | 86322360 | 2303sw | BUMPER, ET2,CPL 15” BLACK | |
| 102 | 86322230 | 2314gs | BEARING BLOCK LEFT CPL. GS | |
| 103 | 86138220 | 2923 | BELT 333 3M HTDII-6 | |
| 104 | 86138490 | 2838WI | BRUSH ROLLER, CPL. | |
| 105 | 86322240 | 2313sw | BEARING BLOCK, RIGHT BLACK | |
| 106 | 86145260 | 2929 | SPRING | |
| 107 | 86137840 | 2316SW | PILE ADJUSTMENT ASSMBLY BLACK | |
| 108 | 86406010 | 2909zg | ACCESS DOOR ET, ZINC YELLOW | |
| 109 | 86324930 | 2305gs | REAR BOTTOM PLATE, CPL. 15″ GS | |
| 110 | 86406020 | 2931zg | BUTTON, PILE ADJUSTMENT, ZINC YELLOW | |
| 111 | 86322280 | 2306sw | WHEEL, BLACK | |
| 112 | 86406040 | 2937zg | FOOT PEDAL, ZINC YELLOW | |
| 113 | 86322290 | 2310gs | SWIVEL NECK ASM KARCHER GS | |
| 114 | 86322300 | 0877ER | WIRING SWIVEL NECK | |
| 115 | 86139080 | 1737ER | BUTTON, RELEASE | |
| 116 | 86322320 | 2962GS | SEGMENTS, TS-NECK | |
| 117 | 86322330 | 2961GS | SOCKET COVER GS | |
| 118 | 86144820 | 01027ER | SCR F 3.9X9.5 DIN 7981 | |
| 119 | 86138140 | 2954 | SWIVEL NECK BEARING | |
| 120 | 86145400 | 2311 | SWIVEL NECK SUPPORT, RH | |
| 121 | 86145410 | 2312 | SWIVEL NECK SUPPORT, LH | |
| 122 | 86350180 | 0880 | SWITCH SWIVEL NECK | |
| 123 | 86137930 | 2928 | AXLE | |
| 124 | 86144810 | 01021ER | SCR F3.9X13 DIN 968 | |
| 125 | 86143500 | 2973ER | MOTOR, BRUSH, 120V, 175W | |
| 126 | 86138390 | 05141S | BRUSH SET, CARBON VAC MTR | |
| 127 | 86144800 | 01020ER | SCR, F3.9X21 DIN 968 | |
| 128 | 86423670 | 2689ER | CONTROLLER BOARD ET-2, 120V, 200W | |
| 129 | 86411160 | 2348BGKA | COVER POWER HEAD ET2 CV380, BG | |
| 130 | 86147170 | 0176ER | SCREW M4 X 30 | |
| 131 | 86146790 | 5401 | WIRE TIE,BOTTOM PLATE,OUTER | |
| 132 | 86146800 | 5402 | WIRE TIE,BOTTOM PLATE,CENTER | |
| 133 | 86309030 | 2319 | BRUSH MOTOR PULLEY FM |
Instrucciones de funcionamiento (SPA)
MODELS: CV 300
1.012-059.0
CV 380 1.012-060.0


