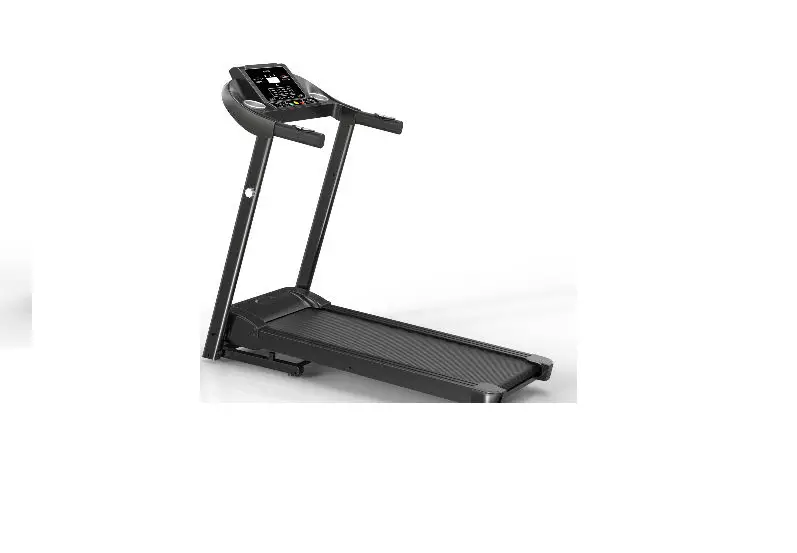
DONGGUAN JOGWAY FITNESS T451 Motorized Treadmill

IMPORTANT SAFETY INFORMATION
When using this product, basic precautions should always be followed, including the follow-ing: Please read the instruction carefully before starting to use this product.
A Danger – To reduce the risk of electric shock
- Always unplug this product from the electrical outlet immediately after using and before cleaning .
Warning – To reduce the risk of burns, fire, electric shock, or physical injury:
- The product should never be left unattended while plugged in. Unplug the product from the outlet when not in use.
- Close supervision is necessary when this product is used by or near children, invalids, or disabled persons.
- Be sure to use the product only for its intended use as described in this manual. Do not use any attachment not recommended by the manufacturer in order to avoid any danger or accidents.
- Never operate the product if it has a damaged cord or plug, if it is not working properly, if it has been damaged, or dropped into water. Please return the product to the service center of seller for examination and repair.
- Do not carry this product by the supply cord or use the cord as a handle.
- Keep the cord away from hot surfaces or ground.
- Never operate the product with the air vents blocked. Keep the air vents free of lint, hair, etc.
- Never drop or insert any objects into any openings.
- Do not use or operate outdoors.
- Do not operate where aerosol (spray) products are being used or where oxygen is thin.
- Before turning the product power off, tum all controls to the off position then remove the plug from the outlet.
- Connect the product to a properly grounded outlet only.
- If the treadmill is foldable, when user finishes using the treadmill, the elevation needs to be back to original position.
- When user is using the treadmill, it cannot be folded at the same time.
- Keep a safety zoom of 2000mm x 1000mm away from the treadmill.
- This machine is only intended for household use.
- For the treadmill with folding function and electric elevation, be sure that the elevation is 0 before folding (To avoid interference of the components).
- Stop using the treadmill if you feel faint, dizzy, or short of breath.
- Wear appropriate exercise clothes when using the treadmill. Do not wear loose clothes that could become caught in the treadmill. Athletic support clothes are recommended for both men and women. Always wear athletic shoes. Never use the treadmill with bare feet, wearing only stockings, or in sandals.
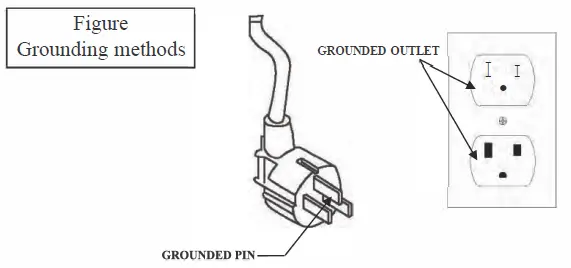
A GROUNDING INSTRUCTIONS
The products must be grounded first. If malfunction or breakdown occurs, grounding will provide a path of least resistance for electric current to reduce the risk of electric shock. The product is equipped with a cord having an equipment-grounding conductor and a ground-ing plug.
The plug must be plugged into an appropriate outlet that is properly installed and grounded in accordance with all local codes and ordinances.
Danger – Improper connection of the equipment-grounding conductor can result in a risk of electric shock. Check with a qualified electrician or serviceman if you are in doubt as to whether the products are properly grounded. Do not modify the plug provided with the prod-uct -if it will not fit the outlet, have a proper outlet install by a qualified electrician.
The products is has a grounding plug that looks like the plug illustrated in the figure . Make sure that the product is connected to an outlet having the same configuration as the plug. There is no need to use any adapter for this product.
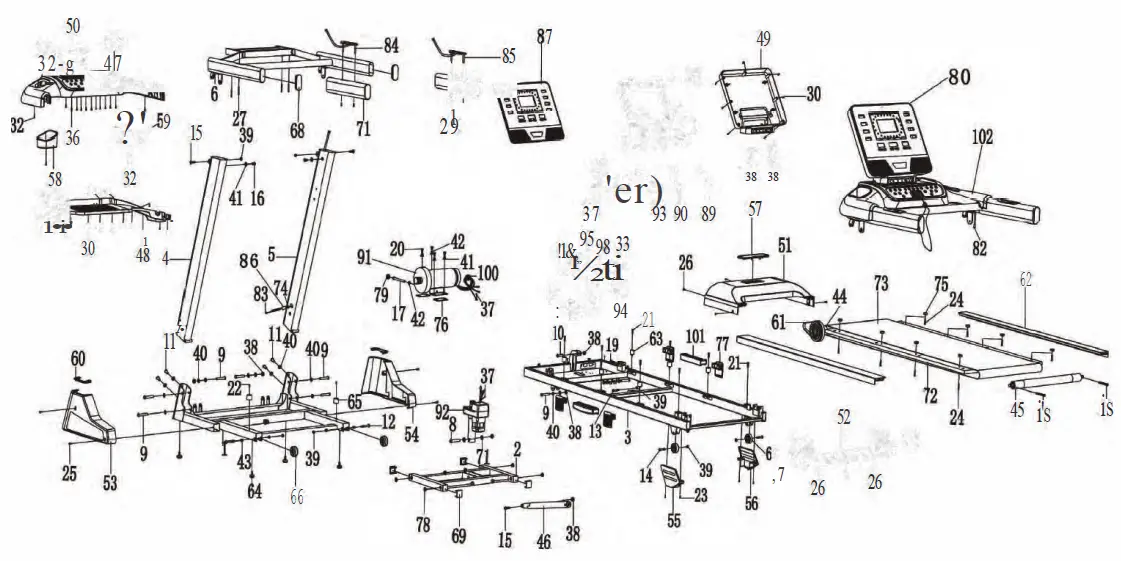
PARTS LIST
| No. | Description | QTY |
| BASE | ||
| 2 | INCLINE RACK | |
| 3 | MAINFRAME | |
| 4 | LEFT UPRIGHT | |
| 5 | RIGHT UPRIGHT | |
| 6 | CONSOLE RACK | |
| 7 | COMPUTER RACK | 1 |
| 8 | BOLT Ml0*60MM | I |
| 9 | BOLT M10*55MM | 8 |
| 10 | BOLT Ml0*40MM | |
| 11 | BOLT M10*20MM | 4 |
| 12 | BOLT M8*50MM | 2 |
| 13 | BOLT M8*45MM | 1 |
| 14 | BOLT M8*40MM | 2 |
| 15 | BOLT M8*28MM | 3 |
| 16 | BOLT M8*15MM | 2 |
| 17 | BOLT M8*90MM | |
| 18 | BOLT M8*65MM | 2 |
| 19 | BOLT M8*55MM | 1 |
| 20 | BOLTM8*15MM | 6 |
| 21 | SCREW M6*25MM | 8 |
| 22 | SCREW M6*20MM | 2 |
| 23 | SCREW M6*10MM | 4 |
| 24 | SCREW M5*2 SMM | 8 |
| 25 | SCREW M5*12MM | 4 |
| 26 | SCREW MS* lOMM | 8 |
| 27 | SCREW M4*40MM | 4 |
| 28 | SCREW M4*2OMM | 6 |
| 29 | SCREW M4*35MM | 4 |
| 30 | SCREW M4*12MM | 26 |
| 31 | SCREW M4*25MM | 2 |
| 32 | SCREWM4*1 0MM | 12 |
| 33 | SCREW M4*1.5MM | 2 |
| 34 | SCREWM4*1 SMM | 4 |
| 35 | SCREW M4*12MM | 2 |
| 36 | SCREW M4 *6MM | 26 |
| 37 | SCREW M4 *SMM | 4 |
| 38 | NUTMl0 | 6 |
| 39 | NUTMS | 8 |
| 40 | FLAT WASHER 20* 10.5*Tl.5MM | 16 |
| 41 | FLAT WASHER 17*8.5*Tl.5MM | 9 |
| 42 | SPRING WASHER | 4 |
| 43 | STOP COLLAR 12*8.S*I0MM | 4 |
| 44 | FRONT ROLLER | |
| 45 | REAR ROLLER | |
| 46 | AIR CYLINDER | |
| 47 | CONSOLE PLASTIC HOUSING-UPPER | |
| 48 | CONSOLE PLASTIC HOUSING-BOTTOM | |
| 49 | COMPUTER BACK COVER | |
| 50 | CONNECTION COVER | |
| 51 | MOTOR COVER | |
| No. | Description | QTY |
| 52 | REAR END CAP | |
| 53 | BASE COVER-L | |
| 54 | BASE COVER-R | |
| 55 | FRAME WHEEL COVER-L | |
| 56 | FRAME WHEEL COVER-R | |
| 57 | BRAND LOGO HOLDER | |
| 58 | BOTTLE HOLDER-L | |
| 59 | BOTTLE HOLDER-R | |
| 60 | UPRIGHT COVER | 1 |
| 61 | MOTOR BELT | 2 |
| 62 | SIDE RAIL | 1 |
| 63 | DECK CUSHION | 2 |
| 64 | BASE FOOT PAD | 6 |
| 65 | BASE CUSHION | 4 |
| 66 | BASE WHEEL | 2 |
| 67 | FRAME WHEEL | 2 |
| 68 | HANDRAIL END CAP | 2 |
| 69 | BASE CAP | 2 |
| 70 | PLASTIC BUSHION DIA.20 | 4 |
| 71 | HANDRAIL FOAM | 2 |
| 72 | RUNNING DECK | 2 |
| 73 | RUNNING BELT | |
| 74 | CABLE GROMMET | 1 |
| 75 | FOOT RAIL FASTENER | 1 |
| 76 | MOTOR RUBBER PAD | 8 |
| 77 | SPRING CUSHION | 2 |
| 78 | PLASTIC BUSHION DIA.18 | 4 |
| 79 | CABLE CLIP | 8 |
| 80 | CONSOLE PCB | |
| 81 | CONTROLLER | |
| 82 | CONTROL L=650MM | |
| 83 | CONTROL L=1500MM | |
| 84 | HANDRAIL BUTTON-L | |
| 85 | HANDRAIL BUTTON-R | |
| 86 | MAGNETIC RING | |
| 87 | COMPUTER FRONT COVER | |
| 88 | PHOTONIC SENSOR | |
| 89 | AUDIO CABLE | |
| 90 | SAFETY KEY | |
| 91 | MOTOR | |
| 92 | INCLINE MOTOR | |
| 93 | POWER CORD | |
| 94 | POWER CORD JACK | |
| 95 | POWER SWITCH | |
| 96 | CIRCUIT BREAKER | |
| 97 | RED CABLE L=280MM | |
| 98 | BLACK CABLE L=280MM | |
| 99 | BROWN CABLE L=lO0MM | |
| 100 | MAGNETIC RING | |
| 101 | SPRING CUSHION | 2 |
| 102 | COMPUTER SET | 1 |
ASSEMBLY INSTRUCTIONS
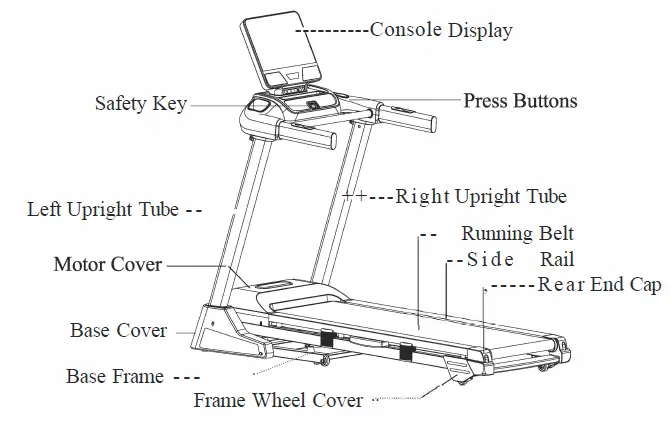
Product Illustration
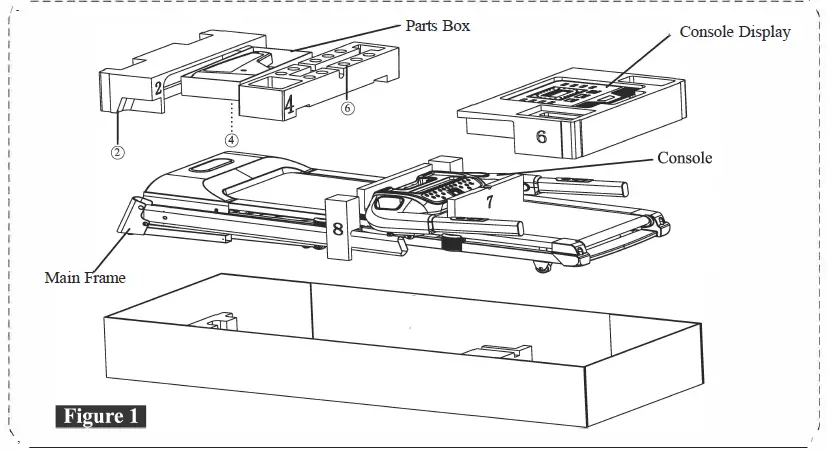
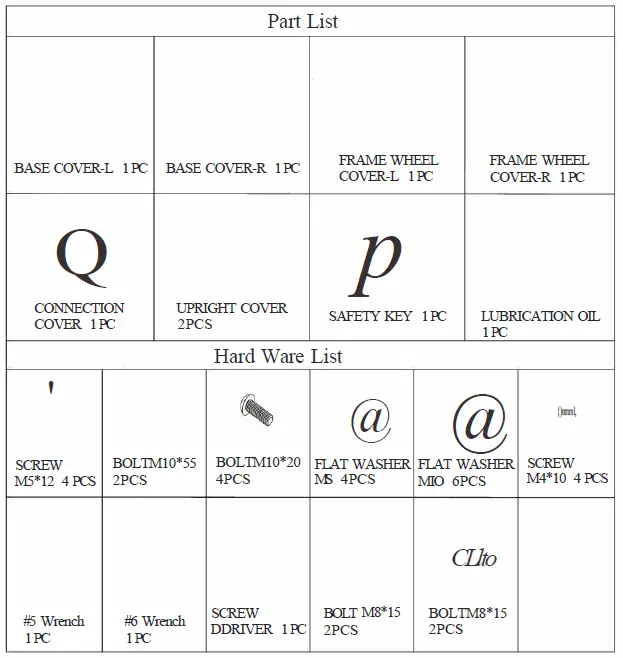
A. After opening the carton, you will find the parts as shown in Figure 1, then take out foam No.2, 4, and 6, and check whether the spare parts in the Parts Box and Hard Ware are complete according to Figure 2.
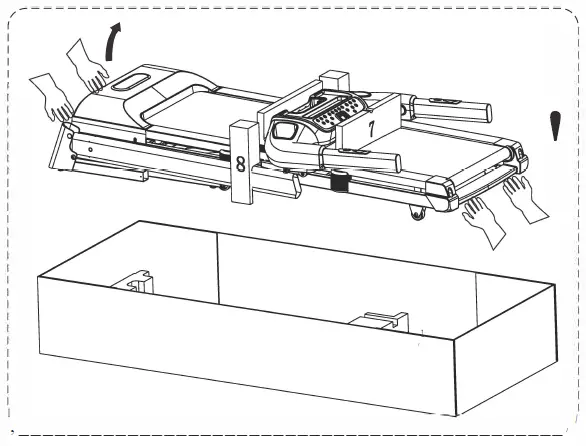
B. Once you remove the foam, need two people to hold the front and back of the treadmill respectively as shown in the below picture and lift it out from the box together and lay it on a flat floor.
C. Once the treadmill carried out, cut off the strap from the base frame.
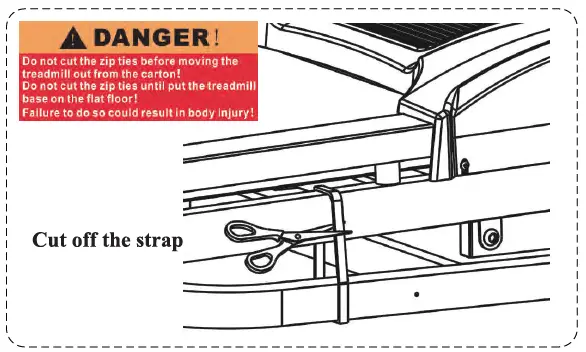
(Note: The strap is used to prevent the cylinder from bouncing up. Be sure to lift the treadmill out of the box before cutting it off.)
D. Remove protecting PE bags from all parts.
STEP 2
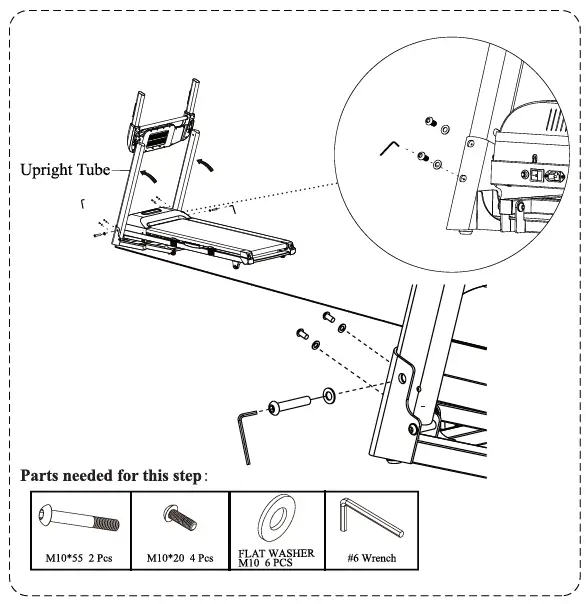
Need two people to lift the left and right upright tubes upward as shown in the below picture , use #6 mm wrench to fasten the L and R upright tubes onto both sides of the frame from the sides with 2 sets of M10*55 bolts and Ml0 flat washer, then to fasten the L and R upright tubes from the front with 4 sets of Ml 0*20 bolt and Ml0 flat washer.
(Tips: Do not tighten the bolts or screws on this step.)
STEP 3
Lift the console up as below pictures, then use # 5 mm wrench to install the con-sole rack onto L & Rupright tubes with 2 sets of M8*15 bolt and MS flat washer.
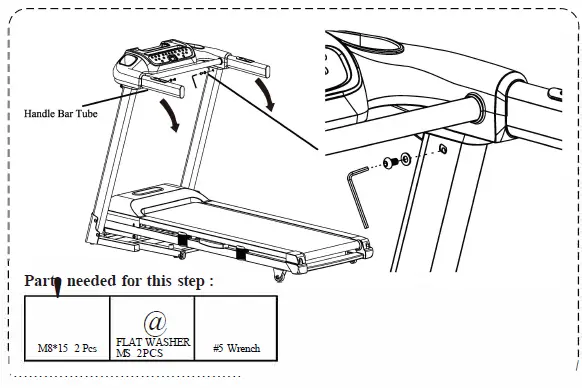
Use# 6 mm wrench to fasten all the screws or bolts on Step 2.
STEP 4
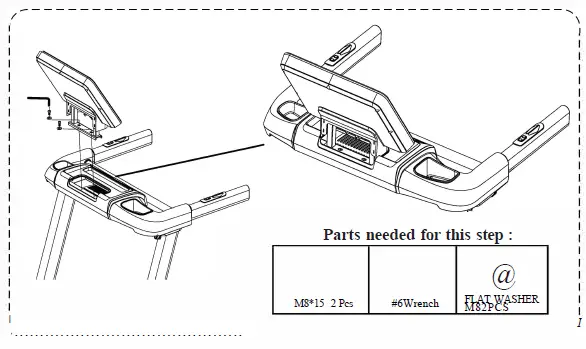
A. Assemble Console Dis-play
Use # 6 mm wrench to install console display onto console with 2 sets of M8*15 bolt and M8 flat washer.
B. To Connect Signal Wire Connect the cable extent from console with the cable extent from console display as below pictures: (Wl=WA,B2=BB, B3=BC)
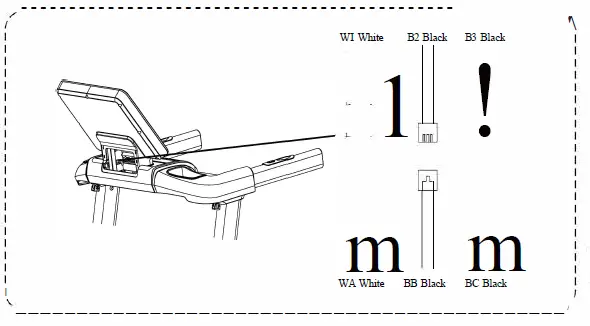
(Note: A wrong connection would cause malfunction.)
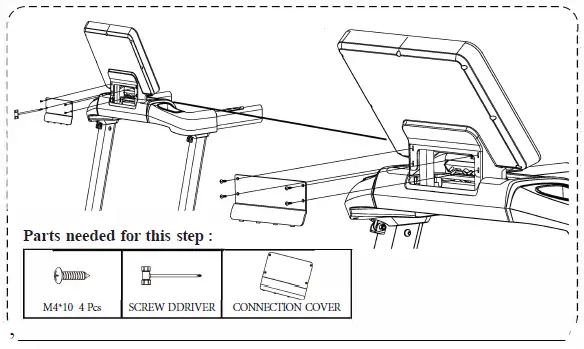
STEP 5
Use the screwdriver to install connection cover onto console with 4 pcs of bolt M4*10.
STEP 6
Use the screwdriver to install the left base cover to the left upright with 2 pcs M5*12 bolts, then install the left upright cover on by hand. Do the same for the right base cover.

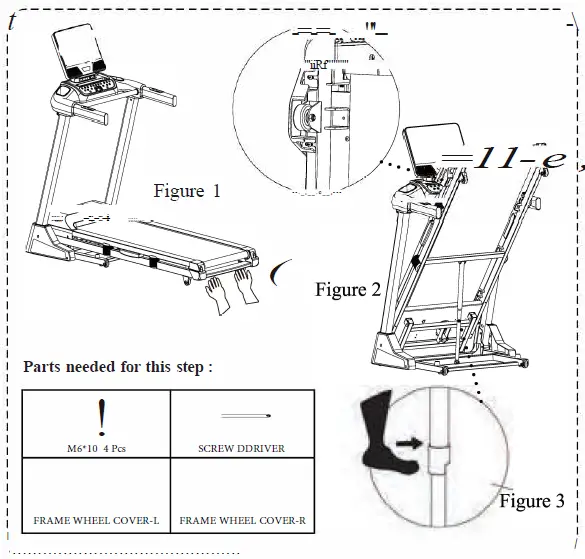
Lift the end of the running deck upward to fold the tread-mill as Figure 2, use the screwdriver to loose the 4 pcs of M6*10 bolts from L & R side of mainframe near the end cap , and then clamp the L & R frame wheel cover in and tighten up all M6*10 bolts again. If you want to put the treadmill in the work position, Firstly pull the folding knob outward as Figure 3 shows, and then lay down the running deck light onto the floor.
Preparation Work
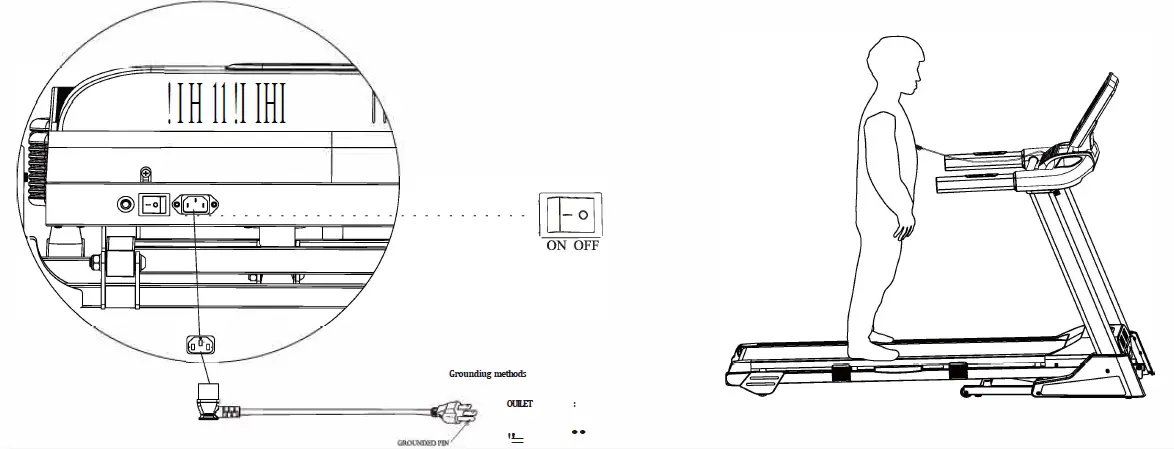
A. Be sure to switch on the product only when confirmed all screws are fastened and all wires are well connected. Plug the power cord and tum on the power switch as the below picture showed. The plug must be plugged into an appropriate outlet that is properly installed and grounded in accordance with all local codes and ordinances.
B. Before exercising, standing on both side of side rail as the below picture showed, attach the Safety Key to the Computer and Clip the other end of the Safety Key to your clothing (the tread-mill will not operate without the Safety Key). The Treadmill will start at 0.6 MPH after the count-down. If you are a new user, stay at a slow speed and hold onto the Hand Grips until you become comfortable.