
SONOFF POWR316 Smart Power Meter Switch
Product Introduction
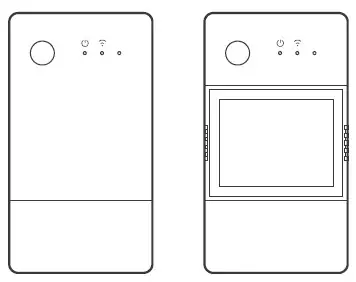
POW Origin
POW Elite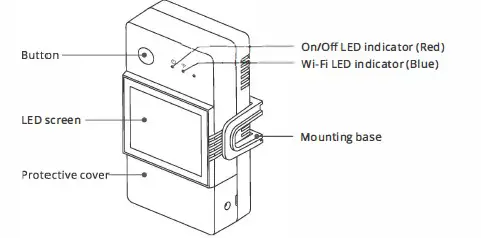
The device weight is less than 1 kg. An installation height of less than 2m is recommended.
Wi-Fi LED indicator status instruction
| LED indicator status | Status instruction |
| Blue LED indicator flashes(one long and two short) | Pairing mode |
| Blue LED indicator keeps on | Device is oline |
| Blue LED indicator quick flashes once | Fail to connect to router |
| Blue LED indicator quick flashes twice | Connected to router but fail to connect to server |
| Blue LED indicator quick flashes three times | Firmware updating |
Features
POW Origin/Elite is a DIY smart switch with power monitoring, which can monitor the current, voltage, power and cumulative power consumption of household appliances in real time. Manual control can be performed directly on the App interface.
- Remote Control
- Power Metering
- Over-load Protection
- Share Control
- Inching Mode

- Voice Control
- Timer Schedule
- LAN Control
- Smart Scene
- Screen Display (POW Elite)
Device Installation
1. Power off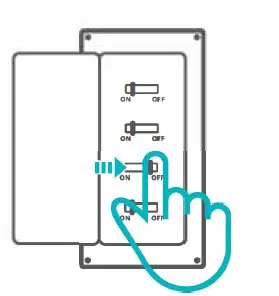
Please install and maintain the device by a professional electrician. To avoid electric shock hazard, do not operate any connection or contact the terminal connector while the device is powered on!
2. Wiring instruction
2-1 Remove protective cover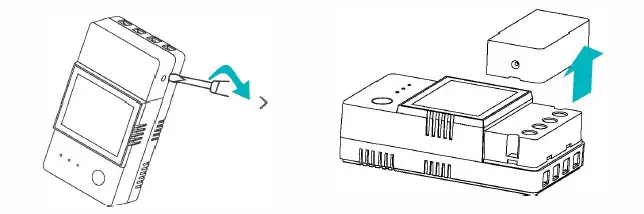
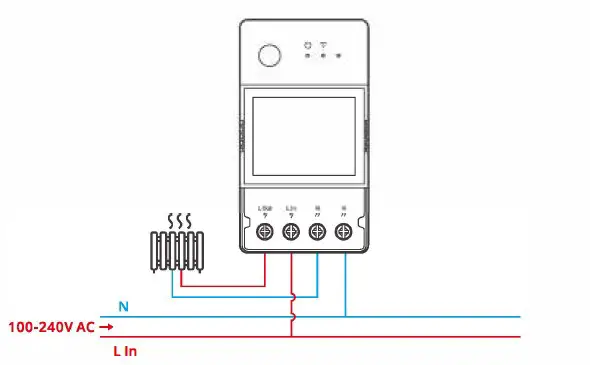
Make sure all wires are connected correctly.
2-3 35mm rail installation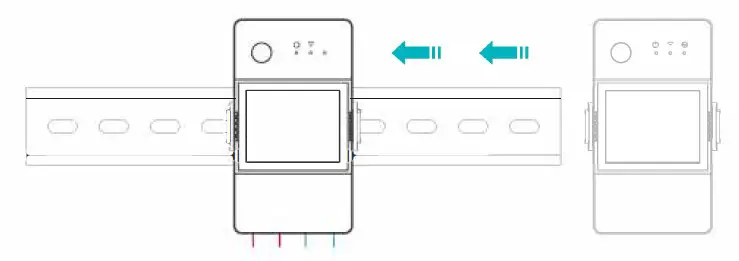
First fix the guide rail at the position where the equipment needs to be installed, and then slide the device base buckle against the side of the guide rail.
Download the eWelink App

Paring method
1. eWelink App Pairing
1-1. Power on
After powering on, the device will enter the Bluetooth Pairing Mode during the first use. The Wi-Fi LED indicator changes in a cycle of two short and one long flash and release.
The device will exit the Bluetooth Pairing Mode if not paired within 3mins. If you
want to enter this mode, please long press button for about 5s until the Wi-Fi LED indicator changes in a cycle of two short and one long flash and release.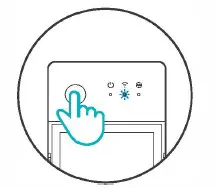
Add device
Method 1: Bluetooth Pairing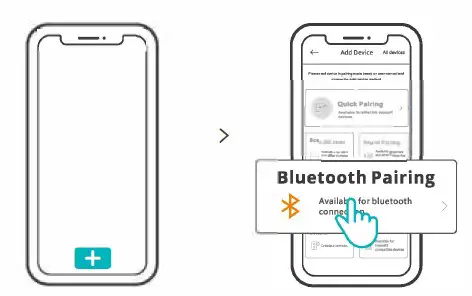
Tap “+” and select “Bluetooth Pairing”, then operate following the prompt on the App.
Method 2: Scan QR code
In the Pairing mode, tap “Scan QR code”to add the device by scanning the QR code on its back.
Amazon Frustration-Free Setup ( FFS)
Applicable situation: The account you use to purchase this device on Amazon.com is the same as the account you sign in the smart speaker (with Certified for Humans badge).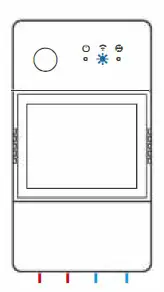
Power on the device, it will enter the FF S pairing mode by default (Wi-Fi LED indicator flashes twice short and one long).
When you hear “New plug found” about 1-2 mins after powering on, refresh the device list in the Alexa App and you will see the device is added successfully.
- The device will exit FFS pairing mode if it had not been paired within 3-5mins. If it needs to enter the paring mode again, please long press the device button for about 5s until the Wi-Fi LED indicator flashes twice short and one long, then release.
- If the device is failed to been paired through FFS pairing mode for a long time, please pair the device by method (1) eWelinkApp pairing.
- The method of FFS pairing can only use to add devices to Alexa App.
- If you want to synchronize this device between eWelinkApp and Alexa App, please connect the accounts of eWelink and Alexa through Account Linking, scan the QR code or enter the URL to check the guideline of Account Linking.
Specifications
| Model | POWR316, POWR320,POWR316D, POWR320D |
| Input | POWR316, POWR316D: 100-240V- 50/60Hz 16A Max POWR320, POWR320D: 100-240V- 50/60Hz 20A Max |
| Output | POWR316, POWR316D: 100-240V- 50/60Hz 16A Max POWR320, POWR320D: 100-240V – 50/60Hz 20A Max |
| Wi-Fi | IEEE802.11 b/g/n2.4GHz |
| LED screen size | POWR316D, POWR320D: 43x33mm |
| App supported systems | Android & iOS |
| Operating temps | 10T40 (-10’C-40’C) |
| Working humidity | 5%-95% RH, non–condensing |
| Shell material | PCV0 |
| Dimension | POWR316, POWR320: 98x54x27.Smm POWR316D, POWR320D: 98x54x31mm |
| High voltage connector wire | POWR316, POWR316D: 1.0mm’ to 4.0mm’ POWR320, POWR320D: 1.5mm’ to 6.0mm’ |
| Rated impulse voltage | 2500V |
| Remark | External preliminary protection with Max. C 20 A circuit breaker in the supply line required under all circumstances. |
LAN control
A communication method to control the devices directly without going through the Cloud, which requires your smartphone and device connect to the same WIFI.
Operation notifications, operation records, firmware upgrades, smart scenes, devices sharing and devices delete are not supported when there is no external network connection.
Switch Network
Select the “Wi-Fi Settings” in the “Device Settings” interface on the eWelink App to change.
Factory Reset
Deleting the device on the eWelink app indicates you restore it to factory setting.
Common Problems
Fail to pair Wi-Fi devices to eWelinkAPP
- Make sure the device is in pairing mode. After three minutes of unsuccessful pairing, the device will automatically exit pairing mode.
- Please turn on location services and allow location permission. Before choosing the Wi-Fi network, location services should be turned on and location permission should be allowed. Location information permission is used to obtain Wi-Fi list information. If you click Disable, you will not be able to add devices.
- Make sure your Wi-Fi network runs on the 2.4GHz band.
- Make sure you entered a correct Wi-Fi SSID and password, no special characters contained.Wrong password is a very common reason for pairing failure.
- The device shall get close to the router for a good transmission signal condition while pairing.
Wi-Fi devices “Offline” issue, Please check the following problems by the Wi-Fi LED indicator status:
The LED indicator blinks once every 2s means you fail to connect to the router.
- Maybe you entered the wrong Wi-Fi SSID and password.
- Make sure that your Wi-Fi SSID and password don’t contain special characters, for example, the Hebrew, Arabic characters, our system can’t recognize these characters and then fail to connect to the Wi-Fi.
- Maybe your router has a lower carrying capacity.
- Maybe the Wi-Fi strength is weak. Your router is too far away from your device, or there may be some obstacle between the router and device which blocks the signal transmission.
- Be sure that the MAC of the device is not on the blacklist of your MAC management.
The LED indicator flashes twice on repeated means you fail to connect to the server.
- Make sure the Internet connection is working. You can use your phone or PC to connect to the Internet, and if it fails to access, please check the availability of the Internet connection.
- Maybe your router has a low carrying capacity. The number of devices connected to the router exceeds its maximum value. Please confirm the maximum number of devices that your router can carry. If it exceeds, please delete some devices or get a lager router and try again.
- Please contact your ISP and confirm our server address is not shielded:
eu-disp.coolkit.cc (in EU)
us-disp.coolkit.cc (in the US)
If none of the above methods solved this problem, please submit your request via help&feedback on the eWelink App.
FCC Warning
Changes or modifications not expressly approved by the party responsible for compliance could avoid the user’s authority to operate the equipment.
This device complies with part 15 of the FCC Rules. Operation is subject to the following two conditions: (1) This device may not cause harmful interference, and (2) this device must accept any interference received, including interference that may cause undesired operation.
FCC Radiation Exposure Statement:
This equipment complies with FCC radiation exposure limits set forth for an uncontrolled environment. This equipment should be installed and operated with minimum distance20cm between the radiator & your body. This transmitter must not be co-located or operating in conjunction with any other antenna or transmitter.
Note: This equipment has been tested and found to comply with the limits for a Class B digital device, pursuant to part 15 of the FCC Rules. These limits are designed to provide reasonable protection against harmful interference in a residential installation. This equipment generates, uses and can radiate radio frequency energy and, if not installed and used in accordance with the instructions, may cause harmful interference to radio communications. However, there is no guarantee that interference will not occur in a particular installation. If this equipment does cause harmful interference to radio or television reception, which can be determined by turning the equipment off and on, the user is encouraged to try to correct the interference by one or more of the following measures:
- Reorient or relocate the receiving antenna.
- Increase the separation between the equipment and receiver.
- Connect the equipment into an outlet on a circuit different from that to which the receiver is connected.
- Consult the dealer or an experienced radio/TV technician for help.


