
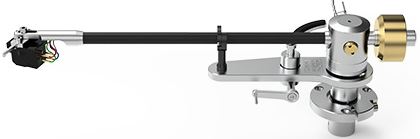
ACOUSTIC SIGNATURE TA-500 NEO Tonearm
Product Information
The Acoustic Signature TA-500 Neo is a tonearm that comes with an extended warranty of 5 years. The extended warranty applies exclusively to NEO products manufactured from October 2020. The
tonearm comes with an adjustment template, counterweight, toolset, screws, anti-skating weight, additional weight, cable, and manual. The tonearm has a pivot to spindle distance of 222mm and requires a turntable with a 24mm thru hole combined with 3 M3 threads around it at a Radius of 20.5mm. These are Rega mounting dimensions. A SME mounting version is also available as an option.
Product Usage Instructions
- Before connecting the tonearm to your Hi-Fi system, switch off all components of your system.
- To apply for the extended warranty, register your product including serial number and some purchase information on the ACOUSTIC SIGNATURE website at
www.acoustic-signature.com/en/product-warranty-registration/. The registration has to occur no later than one month after the date of purchase. - Mount the TA-500 Neo tonearm on your turntable’s mounting plate that has a 24mm thru hole combined with 3 M3 threads around it at a Radius of 20.5mm, with the pivot to spindle distance of 222mm. Make sure that the threads are positioned as shown in the instruction manual.
- Use the adjustment template to adjust the tonearm’s position and height.
- Attach the counterweight to the tonearm and adjust it according to your cartridge’s weight.
- Attach the cartridge to the headshell and mount it on the tonearm’s cartridge mounting plate.
- Adjust the VTA (Vertical Tracking Angle) using the VTA locking screw.
- Attach the anti-skating weight to the tonearm’s anti-skating lever.
- Connect the cable to the tonearm and your phono preamp or amplifier.
- Turn on your Hi-Fi system and enjoy your music!
Dear Acoustic Signature customer,
many thanks for your confidence in our product, the tonearm TA-500 Neo. With the purchase of your tonearm you acquired a precision instrument for the playback of records. To make it sound perfect, there is some attention necessary for setup and handling. The manufacturing of this tonearm and its assembly takes place completely in Germany at the highest engineering standards – this still guarantees highest quality after years. Understandably you want to start immediately as possible with listening to music. We kindly ask you however to read this guidance before the first use attentively, so that you can use your tonearm optimally.
We tried to put all the necessary information into this manual. If you still should have questions, which are not answered here, then feel free to contact us direct-ly at www.acoustic-signature.com or with e-mail: [email protected]
Your team of Acoustic Signature
Product/Warranty registration
PRODUCT REGISTRATION
ACOUSTIC SIGNATURE is introducing an extended warranty of 15 years for ACOUSTIC SIGNATURE turntables / 5 years for ACOUSTIC SIGNATURE tonearms (applies exclusively to NEO products manufactured from October 2020). By introducing the extended warranty you will benefit from our constantly optimized quality control process.
REGISTRATION ONLINE
To apply for the extended warranty you have to register your product including serial number and some purchase information on the ACOUSTIC SIGNATURE website at
www.acoustic-signature.com/en/product-warranty-registration/. The registration has to occur no later than one month after the date of purchase. The registration process is only on the website.
WARRANTY GUIDELINES
More information and our Warranty Guidelines can be found on our website at www.acoustic-signature.com/en/product-warranty-registration/
Setup
Parts
- TA-500 Neo tonearm
- Adjustment template (2 parts)
- Counterweight
- Toolset
- Screws
- Anti-skating weight
- Additional weight
- Cable
- Manual (not shown)

Getting started
Please switch off all components of your system before connecting the tonearm to your Hifi-system. Please follow now the mounting and adjustment steps, as described.
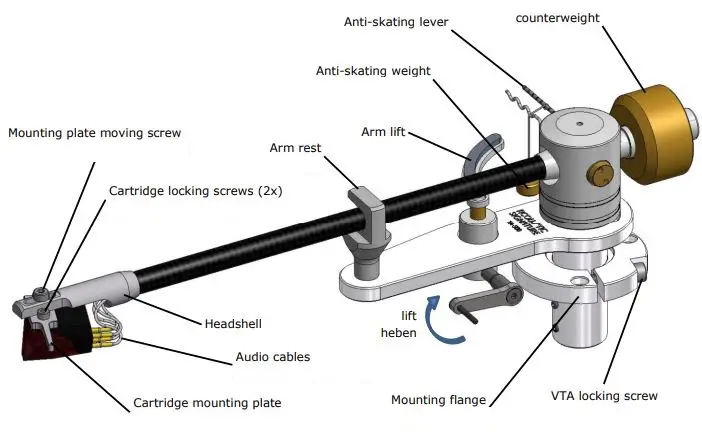
Parts identification
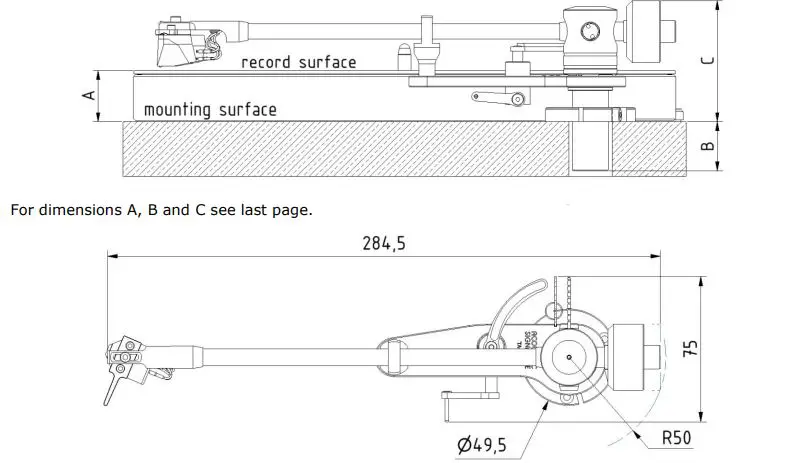
Mounting dimensions
Tonearm mounting
Preparing the arm mounting board
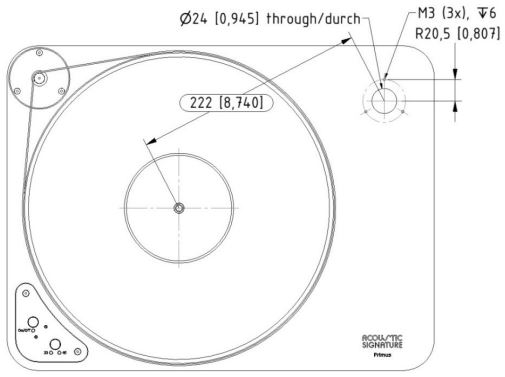
To mount the TA-500 Neo tonearm your turn-table needs to have a 24mm thru hole combined with 3 M3 threads around it at a Radius of 20.5mm, the pivot to spindle distance is 222mm (see drawing above). These are Rega mounting dimensions.
A SME mounting version is also available as an option. Please contact us.
Make sure that the threads are positioned as shown in the drawing above.
Fitting the tonearm

Take the provided 3 M3 screws and insert them into the marked 3 holes of the mounting flange (see picture above).
Use the provided Allen key to tighten the screws. To get easier access to the holes, it might be helpful to turn the complete tonearm within the mounting flange so the holes are free. Or you can take out the tonearm and assemble the mounting flange first.
Fitting the cartridge
Note: before mounting the cartridge please make sure that the stylus protection cover is in position
Color code for cartridge wire is:
- Red = signal right channel
- Green = ground right channel
- White = signal left channel
- Blue = ground left channel
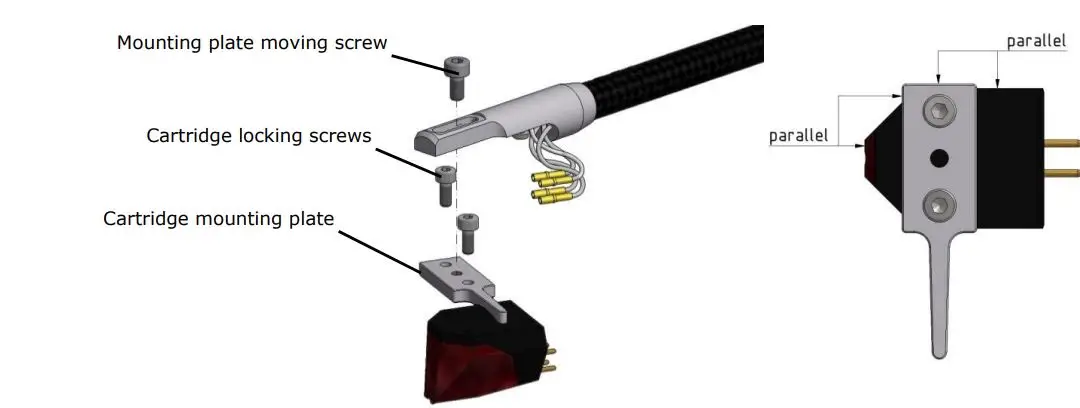
Please take a look at the assembly drawing above to mount your cartridge to the tonearm. We use a cartridge mounting plate to mount the cartridge on. You can either use the provided screws of the cartridge or the 2 pcs. M2.5 screws we supply with the tonearm. Mount the cartridge to the mounting plate, aligning it parallel either to the front or left side edge of the mounting plate. Then connect the audio cable pins to your cartridge. Take care for the correct color. Finally use the provided M3 screw to attach the assembly to the headshell.
Adjusting the cartridge
Before you can start aligning the cartridge you need to preset the tracking force and the height of the tonearm.
Adjusting the tracking force
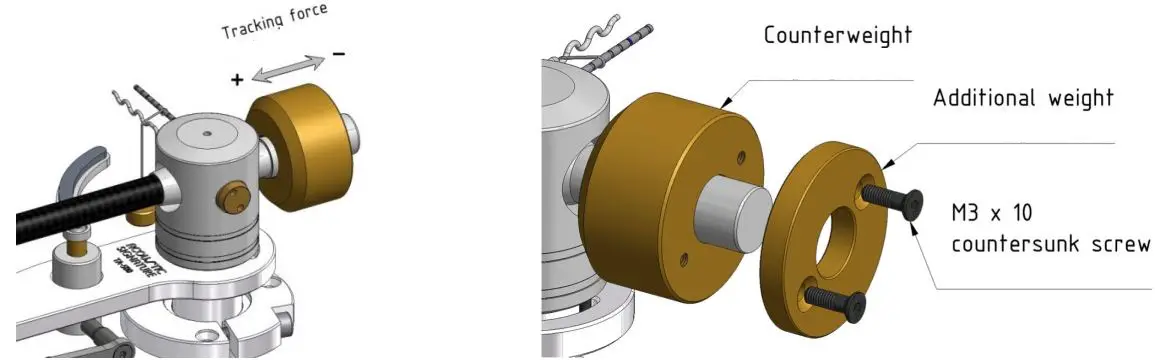
Tracking force will be adjusted by moving the counterweight forward (more weight) or backward (less weight). Search the manual of your cartridge for the right value and adjust it by using a weight scale (not provided).
For heavy cartridges, you can mount the enclosed additional weight onto the normal counterweight. Use the delivered countersunk screws M3 x 10.
Adjusting the arm height
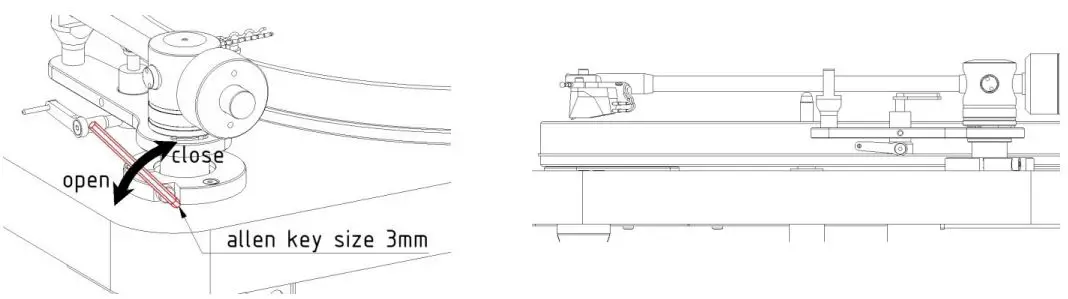
Adjust the arm height with cartridge fitted, so that the armtube is either parallel or slightly low-er at the front end.
You can do this by opening the red marked VTA locking screw with the provided Allen key size 3. Open it carefully and adjust the needed height and tighten the screw softly. Check if height is ok – if not redo the adjustment.
Note: Be aware, that when opening the VTA locking screw, the arm might fall down!
Adjusting the cartridge
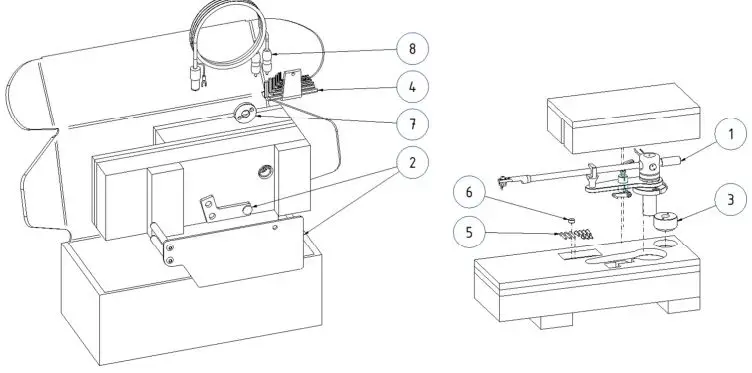
Assembling the template
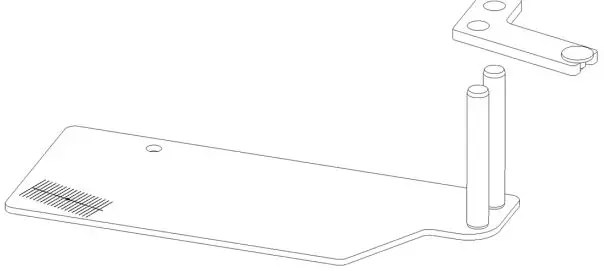
This is done by using the provided adjustment template. Take the two parts of the template and assemble it, as shown in the picture above, and place it on the platter.
The tip of the center pin must face downwards.
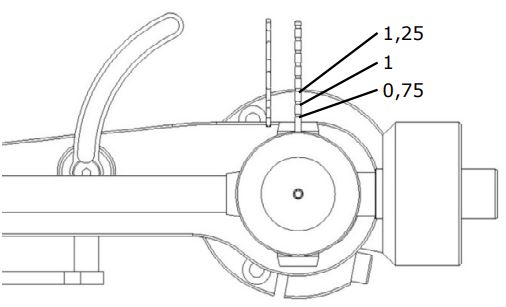
Aligning the template
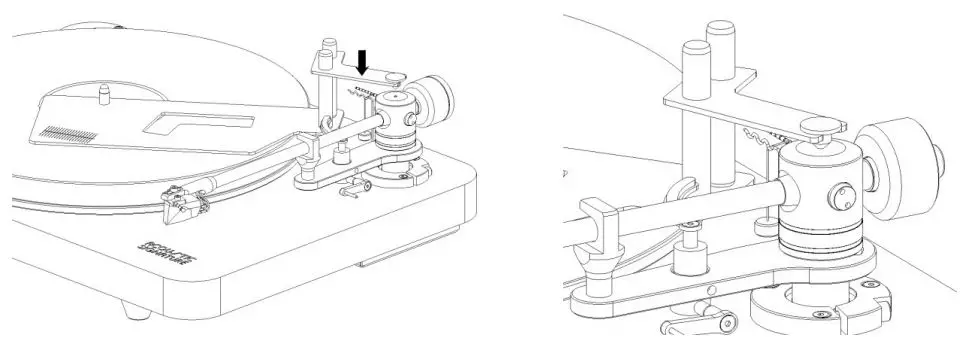
Move the tonearm forward or backward, so that the center pin fits exactly into the small drilled marking on top of the tonearm. Tighten the tonearm with its 3 screws in the mounting flange, when the position matches exactly. This ensures that the template is in the correct angle and dis-tance for adjusting the cartridge.
Adjusting the angle and position
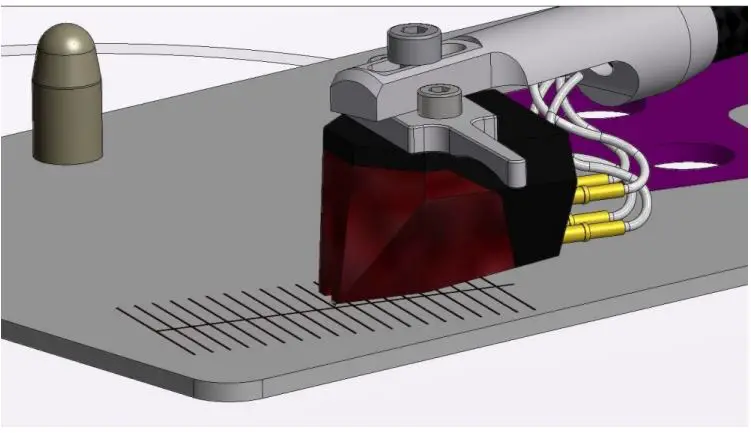
Lift down the cartridge and place the diamond tip of the cartridge on the reference point of the adjustment template and make sure that the edges of the cartridge are parallel to the marking lines printed on the template.
For proper adjustment it is important to look perpendicularly on top of the tonearm and the template.
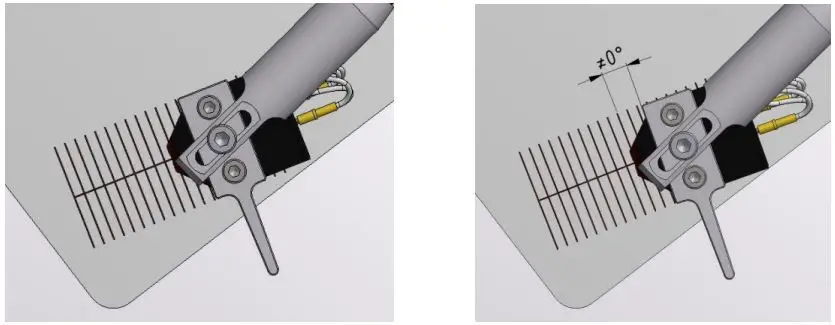
OK = Correct angle Kanten parallel
If you have to change the position of the dia-mond tip or the angle of the cartridge, unbolt the mounting plate moving screw on top of the head-shell and move or turn the cartridge into its cor-rect position.
After adjusting, fix the position of the cartridge by tightening the mounting plate moving screw.
Anti-skating
To adjust proper anti-skating put the provided the anti-skating weight with string attached over the wave-shaped deviating arm and fix the soft eye of the string on the anti-skating lever. Please adjust it according to the picture below.
We suggest having the anti-skating force lower than the tracking force.
Connecting the tonearm
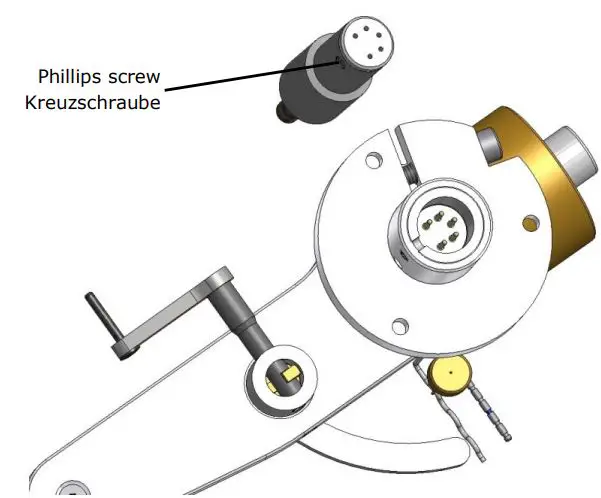
Looking from the bottom of your TA-500 Neo you can see the 5 pin plug and its alignment. The connector has a small Phillips screw on its cylin-der. This screw must face towards the cartridge when being inserted in the plug.
Please insert the connector carefully; otherwise the pins might be damaged.
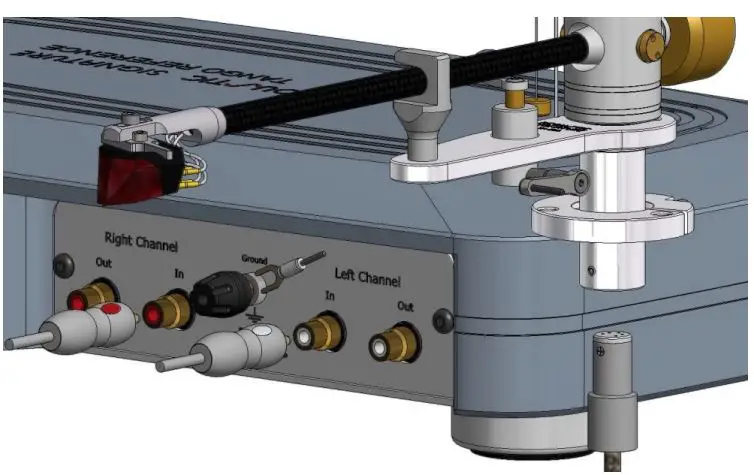
Finally connect the RCA-connectors and the ground connector to the matching input plugs of your phono pre-amplifier
| Technical data | TA-500 Neo | Technische Daten |
| Feature | Value / Wert | Merkmal |
| Cartridge balance weight | 6 g – 16 g | Justierbares Tonabnehmergewicht |
| Null point – inner radius | 61 mm / 2,4 in | Innerer Nullpunkt – Radius |
| Null point – outer radius | 121 mm / 4,78 in | Äusserer Nullpunkt – Radius |
| Material Signal cable | Copper / Kupfer | Material Signalkabel |
| Overhang | 17,3 mm / 0,68in | Überhang |
| Effective length | 239,3 mm / 9,42 in | Effektive Tonarmlänge |
| Mounting distance (from pivot to center of platter) | 222 mm / 8,74 in | Montageabstand (von Tonarm-lager zu Tellerachse) |
| Tilt angle (depends on cartridge) | 23,9° | Kröpfungswinkel (abhängig vom Ton- abnehmer) |
| Effective mass | 10 g | Effektive Masse |
| Weight | 349 g | Gewicht |
| Tonearm mounting versions | Rega style / SME style | Tonarmmontagevarianten |
| Output | 5-pin plug / 5-pol. Stecker | Ausgang |
| A = height from mounting surface to record surface | 21 mm – 46 mm / 0,83 in – 1,8 in | A = Höhe von Montagefläche Flansch zu Plattenoberseite |
| B = depth from mounting surface to end of pivot housing | 5 mm – 35 mm / 0,2 in – 1,38 in | B = Tiefe von Montagefläche zu Unterkante Lagergehäuse |
| C = height from mounting surface to highest point | 98 mm – 128 mm / 3,86 in – 5,04 in | C = Höhe von Montagefläche Flansch zu höchstem Punkt |
For dimensions A, B and C see page 4 / Für Abmessungen A, B und C siehe Seite 4.
Acoustic Signature
Made by AS-Distribution GmbH Hillenbrandstrasse 10
D-73079 Süssen / Germany Tel: +49 7162 20797-0
www.acoustic-signature.com
E-Mail: [email protected]


