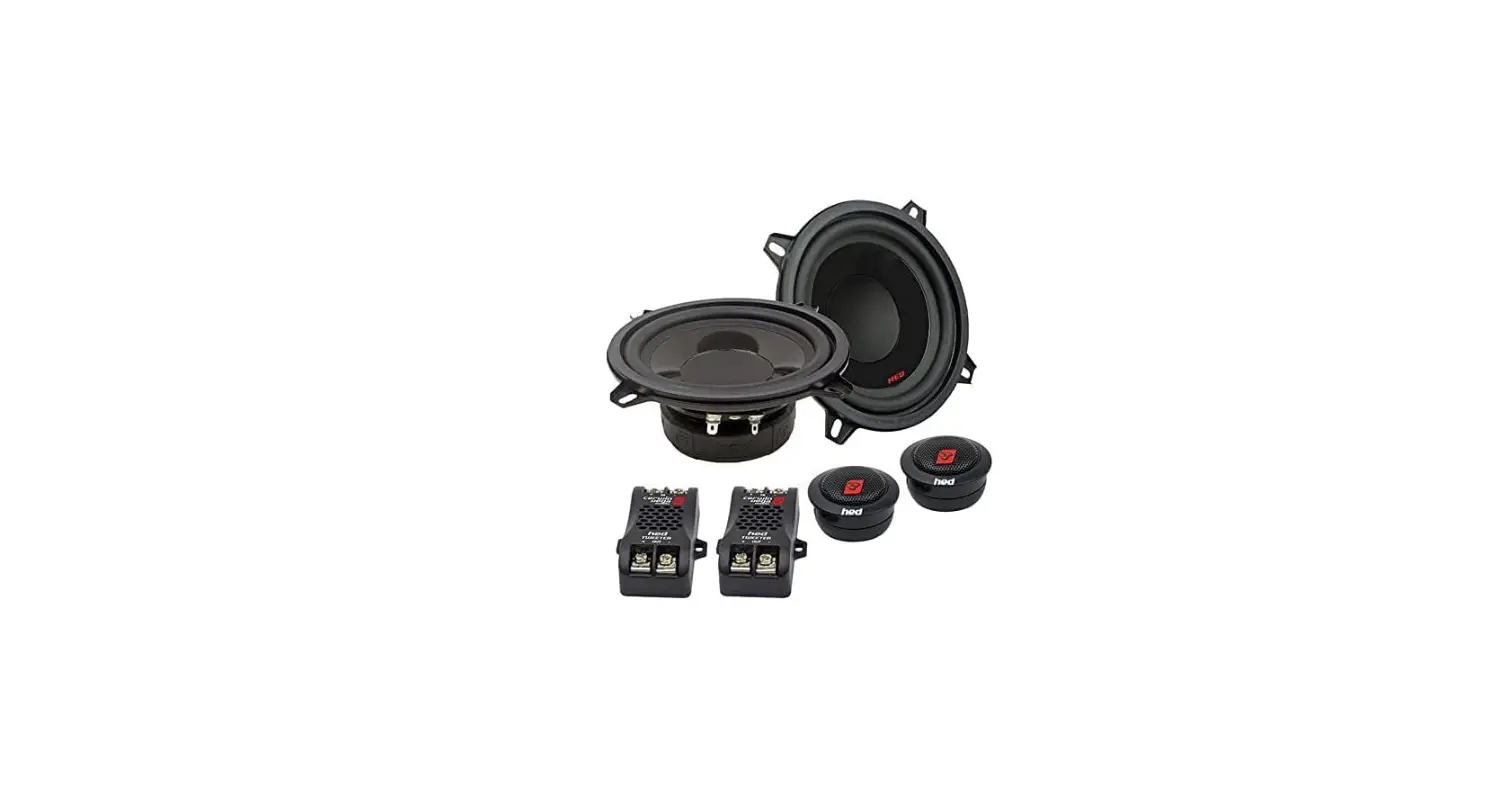
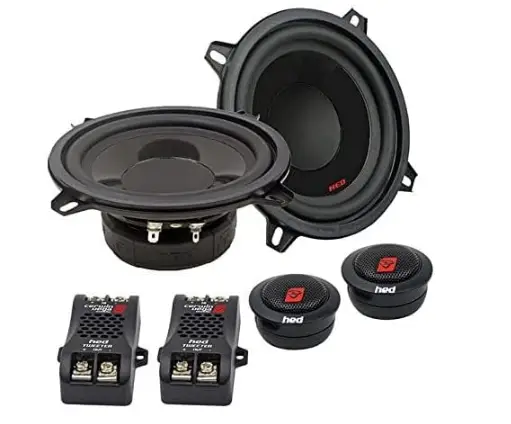
Cerwin Vega H7525C 5 25 2 Way Component Car Speakers Product
INTRODUCTION
Cerwin Vega Mobile Speakers Congratulations for purchasing Cerwin Vega Mobile speakers for your car audio system. You have chosen Cerwin Vega Mobile because you deserve the best!
Cerwin Vega Mobile speakers are designed and engineered to reproduce great sound quality for many years of listening enjoyment in your vehicle! We highly recommend that your new speakers be installed by an authorized Cerwin Vega Mobile dealer. Your authorized dealer can professionally assemble/disassemble the interior of your vehicle and set the proper speaker placement for ideal sound quality. If you decide to install the speakers by yourself, please thoroughly read through this manual before getting started. This manual will help familiarize yourself with these speakers and guide you through the installation process and procedures. Please contact your local authorized Cerwin Vega Mobile dealer if you have any questions regarding the instructions in this manual. If you require additional assistance, please contact the Cerwin Vega Mobile Technical Support Department during business hours at 213-261-4161.
INSTALLING THE SPEAKERS
Your new Cerwin Vega Mobile series speakers were designed with the flexibility to be installed in multiple locations. However, to ensure the best performance possible, it is important to isolate the front sound waves of the speaker from its rear sound waves. This is done by securely mounting the speaker to a flat surface known as a baffle. Make sure to seal the speaker to ensure there are no air leaks around its frame.
FEATURES & SPECIFICATION

DIMENSION

SELECTING A LOCATION
If your vehicle has existing factory locations, the easiest method would be to replace them with the exact same size speaker. The case where there is not a factory speaker location, there are many places where the speakers will fit in a vehicle, but they are not always the best locations for good sound. Make sure to take the time to select the best locations possible. Mounting the speakers so that they are equal distance from your ears will achieve the best results. If you experience any difficulties, please consult with your local authorized Cerwin-Vega Mobile dealer. They have the tools and know-how to help
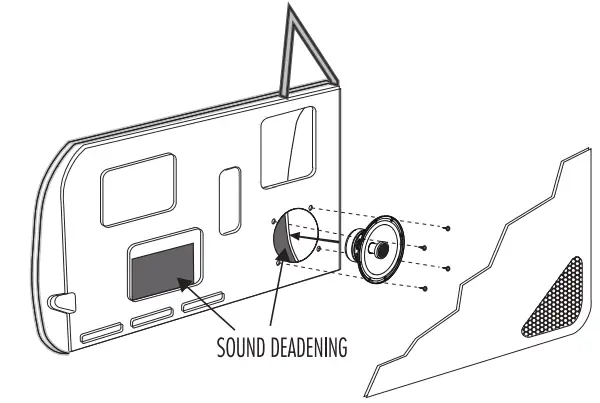
DOOR MOUNTING (if not using factory locations)
Prior to cutting, remove the panel from the door and check for clearance in the in the intended installation area, making sure the window will go all the way up and down without any interference. Avoid cutting any structural metal support or braces to mount the speakers. We HIGHLY recommend that for the BEST sound you put a sound deadening mat on the door “skin”. The more “damped” your car is the better it will ultimately sound!
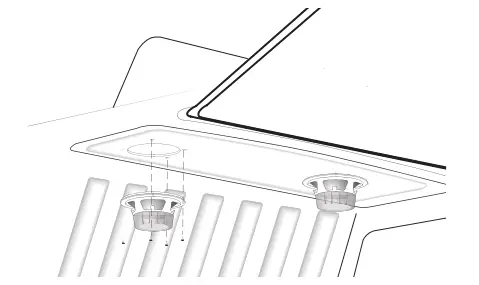
REAR DECK MOUNTING
There are two primary methods for mounting speakers in the rear deck of a vehicle, top and bottom mounting. Top mounting requires dropping the speakers in through the deck (interior) while bottom mounting secures the speakers from underneath (trunk). Either method requires a good seal around the frame for the best performance.
RUNNING NEW WIRING
In most cases when mounting new speakers you will use the factory supplied wiring, but if new wires have to be run there are some precautions that need to be taken. If the wire needs to run through metal, such as a door jamb, always use a grommet to prevent damage to your wires. Never run wire through bare metal! This can damage the source unit, amp, or even the speakers themselves. Safety of the wiring against short circuits is THE MOST IMPORTANT INSTALlATION CONCERN.
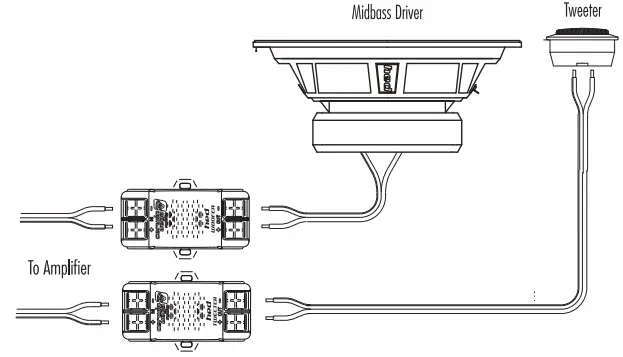
TWEETER INSTALLATION
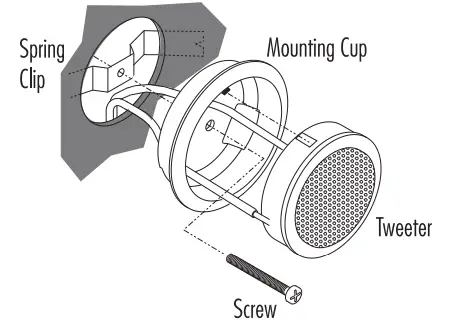
When flush or surface mounting tweeters, make sure the desired location can accommodate the hole sizes and depth required. The tweeter can also be surface mounted atop the dash, door, or rear deck. Mount cup using the provided hardware, flush mount illustration shown below. The flush mount bezel requires cutting a 1.85″ (47mm) round opening. Be sure there is AT LEAST 1 INCH (25.4mm) behind the panel so the tweeter has adequate clearance. Remember when using a hole saw the thickness of the saw teeth will add to the cut diameter. Mount the surface cup at the desired angle with provided screws in the tweeter mounting kit. Route speaker wires through tweeter cup, connect the tweeter to wires, and snap the tweeter into the cup by aligning the notches in the tweeter cup with the notches in the tweeter base. Be careful not to push on the center of the tweeter grill.
CROSSOVER INSTALLATION
Install in a well ventilated area whenever possible. If you must install the passive crossovers in the doors due to the use of factory wiring. As you “feed” into the door cavity, ensure that the crossover is installed behind the door panel instead of inside the door itself. This will offer the greatest capacity for avoiding any water damage caused by rain or moisture. Also avoid placing it near factory wiring looms to ensure no radiated noise problems. Connect the input side labeled “AMP” of each passive crossover to the amplifier’s speaker output terminals. Be sure to observe correct polarity for positive and negative terminals. Next, connect the middle terminals labeled “MID” to the midrange speaker. Be sure that the wiring is protected all the way to the terminal and that the wires are secure at both the speaker and passive crossover. Finally, connect the end terminals on the far right hand side labeled “TWT” to the tweeter. Be careful to observe the correct polarity when connecting the tweeter to its lead wires as these are smaller gauge and require care and patience to connect correctly.
WARRANTY
Thank you for purchasing a Gerwin Vega Mobile product and we hope to provide you with countless hours of listening enjoyment.
Please take a brief moment to register your new product. By registering your new product, you will receive benefits such as:
- Important product notifications that may pertain to your purchase.
- Confirmation and record of ownership in case of loss or theft.
- Knowledgeable customer service and technical assistance pertaining to your product.
Register your new product by completely filling out this Product and Warranty Registration card or register online at www.cerwinvegamobile.com Registration is voluntary and failure to register will not diminish your limited warranty rights.
Limited Warranty (U.S.A.)
Cerwin Vega Mobile warrants all of our amplifiers and speakers to be free of defects in materials and workmanship for a period of one (1) year.
This warranty is non-transferable and applies only to the original purchaser from an authorized Cerwin Vega Mobile dealer. If service is required and necessary under this warranty due to manufacturing defect or malfunction, then Cerwin Vega Mobile will repair and/or replace defective product with either new or remanufactured like product at no charge at our discretion.
Damage to product caused by the following will not be covered under this warranty: abuse, accident, misuse, neglect, modifications, repairing attempts, seller/installer misrepresentation.
This warranty does not cover any incidental, consequential, or cosmetic damage due to accidents or normal wear and tear, nor does it cover the cost of removing or reinstallation of the product.
Warranty is void if the product’s serial number has been removed, defaced, and/or tampered with.
Warranty Procedure
We recommend that you contact your Cerwin Vega Mobile authorized dealer where your original purchase was made to initiate all warranty claims. Our authorized dealers can guide you through the warranty procedure to ensure that your claim will be processed in a timely manner. All warranty returns must be accompanied with a proof of purchase (a copy of the original sales receipt) and be shipped freight prepaid to our facility with an RA (Return Authorization) number clearly marked on the outside of the package. Direct returns from consumers or non-authorized dealers will be refused if shipped without a valid RA number authorized by Cerwin Vega Mobile beforehand.
INTERNATIONAL
Products purchased outside of the U.S.A. are covered only by that country’s distributor and not by Cerwin Vega Mobile U.S.A. Please Ship All Warranty Claims With Pre-Authorized RA Number To:
CV&DA Holdings, Inc.
ATTN: Customer Service Department 3761 S. Hill St. Los Angeles, CA 90007 USA
Please Contact Customer Service for Further Warranty Information:
U.S.A. Tel: 213-261-4161
Fax: 213-947-4767
FAQs
The fundamental advantage of a 2-way speaker is that it has a passive crossover built into the speaker box, which enables the speaker to work as efficiently as possible. The sound quality is frequently better if a signal is solely separated into high frequencies and low frequencies.
Component systems are preferred by audiophiles due to the improved audio quality and fidelity they provide. And among component systems, 3-way systems are without a doubt the best. However, if you use component speakers frequently, you might not even notice the difference in output between high-quality 2-way and 3-way speakers.
No There is no need to play a speaker at half power or low volumes for a lengthy period of time in order to facilitate or ease into this, even if it is true that the suspension of a speaker will loosen up with time.
A driver that is in charge of simultaneously producing midrange and bass is what defines a two-way speaker. The benefits include low cost and a straightforward crossover, as well as a small size and minimal power amplifier requirements.
A crossover aids in providing the speaker with a more precise and balanced sound output. A two-way or three-way coaxial speaker has built-in crossovers. This is practical since it eliminates the requirement for individual crossings in a component system. But the sound quality will suffer as a result.
An active speaker has a separate amplifier for each driver, but a powered speaker uses one amplifier to power all the drivers (low and high frequencies).
A circuit that divides an audio signal into various frequency bands is known as a crossover. This enables distinct frequency bands of an amplifier’s output to be transmitted to various speakers rather than being supplied to just one.
The simplest approach to use your speakers is to connect them to your system and use them as you would normally. After 20 to 30 hours of continuous use, the speakers are typically considered suitably broken in, and they frequently continue to develop and improve for the first hundred or so hours.
A crossover of some kind is necessary for every speaker system. Component speaker sets include independent outboard crossovers, many of which have choices for the tweeter level. Every full-range, coaxial speaker already has a small crossover network integrated into it someplace, with the tweeter located in front of the woofer cone.
Although full-range speakers are less expensive and simpler to install, component speakers have higher sound quality. Since full-range speakers are used in the majority of OEM systems, upgrading usually just involves installing new speakers.


