![]() USER MANUAL B0990S
USER MANUAL B0990S
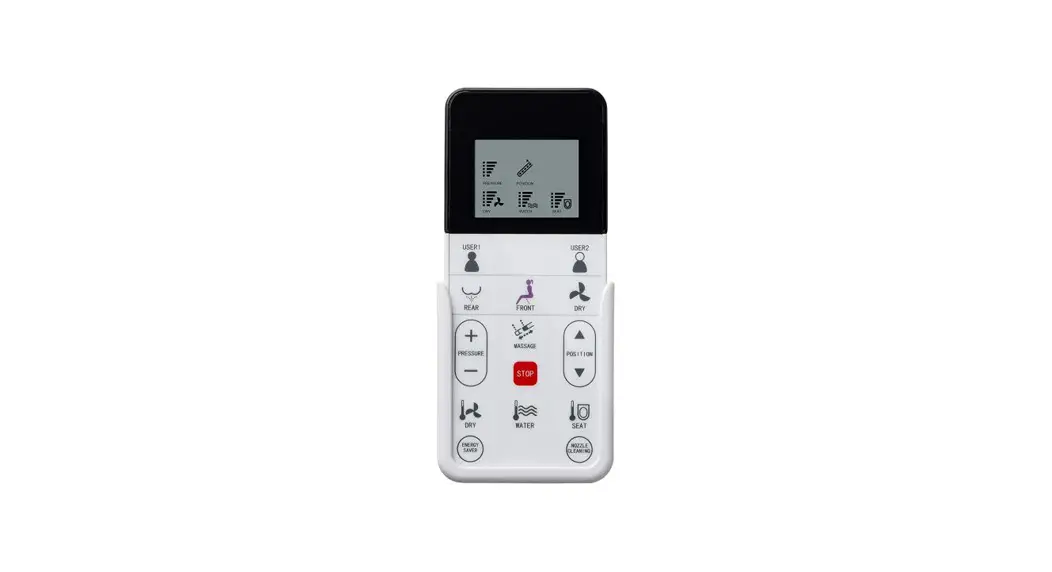
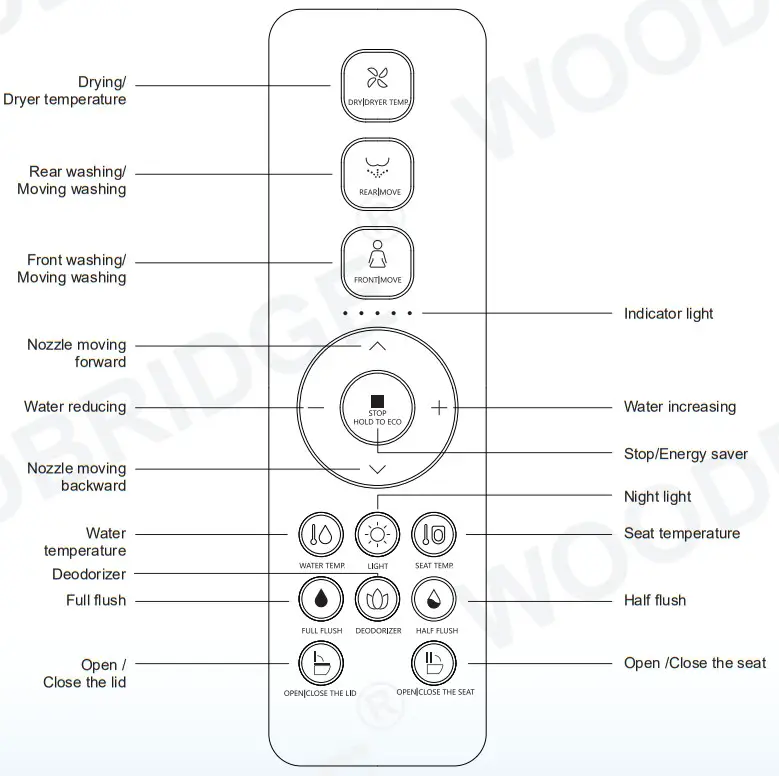
Remote Control Illustration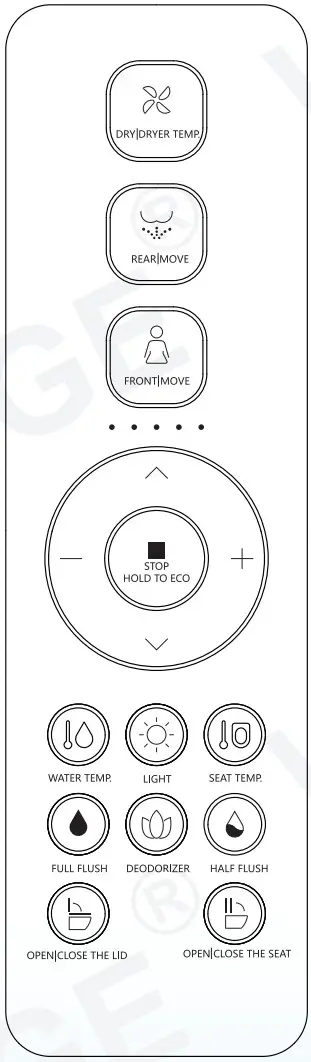
Thank you for choosing our product. Please read the instructions carefully before installation and keep it available for future maintenance or reference.
Customer Service Phone: 562-229-0088. (Monday – Friday 9 AM – 5 PM Pacific Time) Or Email: [email protected] www.woodbridgebath.com
Installation Preparation
Remote control installation
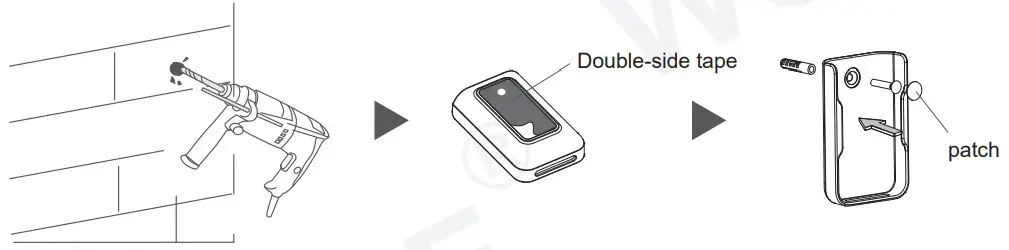
Remote control bracket installation 1 :
- Drill a 6 mm diameter hole in the wall to a depth of about 35 mm.
- Tear off the double-sided adhesive tape on the back of the hanger.
- Install the expansion pipe into the wall hole, and align it with the bracket hole. Attach the double-sided adhesive tape on the back of the bracket to the wall,lock the screw, and tear off the double-sided adhesive tape on the back of the patch and stick it on.
Remote control bracket installation 2 :
- Clean and wipe dry the pre- installed area of the remote control bracket on the wall.
- Tear off the double-sided adhesive tape on the back of the bracket.
- Stick to the wall vertically, tear off the double-sided adhesive tape on the back of the patch and stick it on.

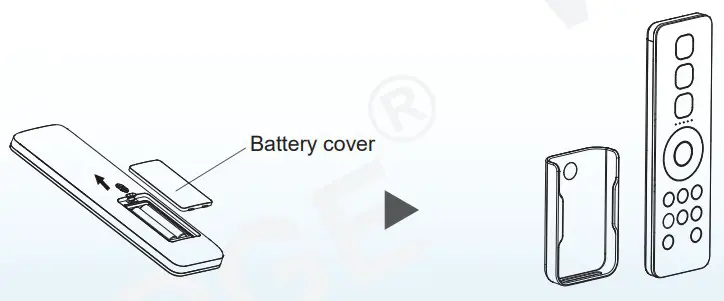
Battery installation:
- Install the new battery into the remote control and replace the battery cover.
- Put the remote control in the bracket.
Remote control instruction
Usage Instruction
Notice :
- Body should touch the seat and the buzzer rings “CLICK”, which means front cleaning, rear cleaning and drying function are in operation.
- Please stay backward when sitting on the seat. So that the cleansing position can easily aligned and there will be no splash.
- The nozzle will continue to spray for 1-2 seconds after user stands up during spray operation, so please press “STOP” button before standing up.
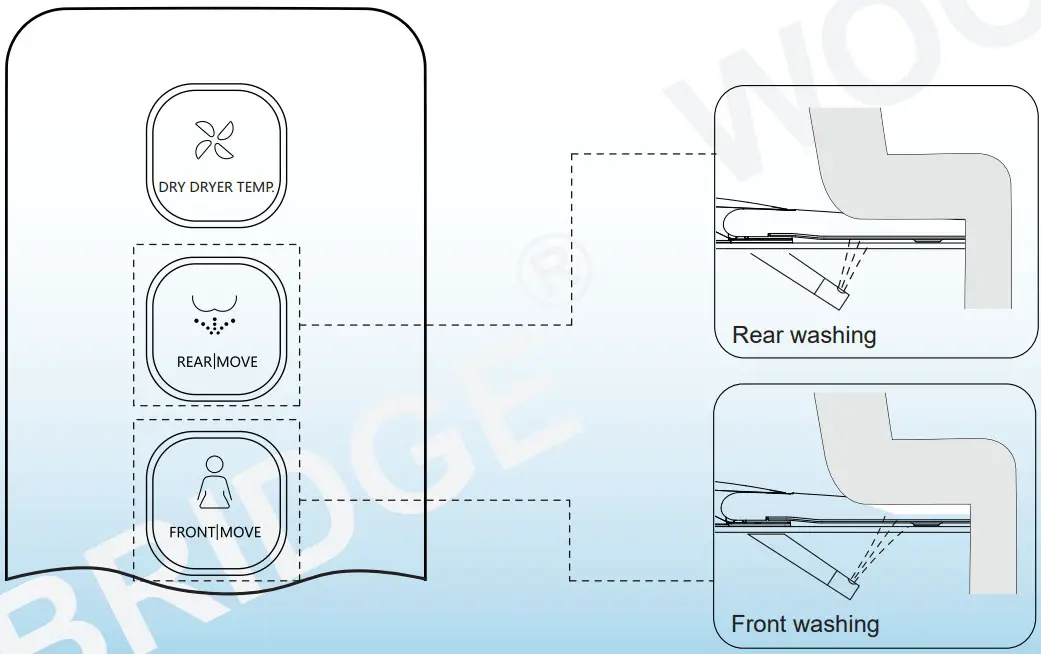
REARMOVE![]() ·Press “
·Press “![]() ” button, the indicator light is on showing current water temperature level, it starts rear cleaning; Press “
” button, the indicator light is on showing current water temperature level, it starts rear cleaning; Press “![]() ” button again to shift to moving cleaning (nozzle moves forward and backward to expand cleaning area). The cleaning will last for a circle and stop automatically, while it will stop immediately if the user press ” ” button.
” button again to shift to moving cleaning (nozzle moves forward and backward to expand cleaning area). The cleaning will last for a circle and stop automatically, while it will stop immediately if the user press ” ” button.
FRONTMOVE
![]() ·Press “
·Press “![]() ” button, the indicator light is on showing current water temperature level, it starts front cleaning; Press “
” button, the indicator light is on showing current water temperature level, it starts front cleaning; Press “![]() ” button again to shift to moving cleaning (nozzle moves forward and backward to expand cleaning area). The cleaning will last for a circle and stop automatically, while it will stop immediately if the user press ” ” button.
” button again to shift to moving cleaning (nozzle moves forward and backward to expand cleaning area). The cleaning will last for a circle and stop automatically, while it will stop immediately if the user press ” ” button.
Pulse flushing function (This function only applies to product with pulse cleaning mode.)
·During front/rear cleaning, long press “![]() ” or “
” or “![]() ” button to turn on/off pulse cleaning mode.
” button to turn on/off pulse cleaning mode.
DRY DRYER TEMP (Only applicable to implement with drying function)
![]()
①Press the ” ” button, the indicator light will light up, showing the current air temperature range. It will stop drying automatically after a cycle or after the human body leaves the seat.
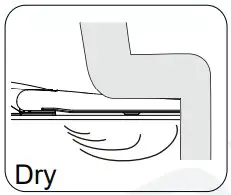
②In the process of drying, press the ” ” button to adjust the air temperature, and the indicator light will light up to display the wind temperature range. When the indicator light is not on, it is 0 grade (normal temperature range), and the range adjustment mode is 0-5 grade in turn.
![]()
Water volume adjustment
· Press ” + ” or ” – ” button when it is under function of rear clearing or front cleaning, the indicator light will be on showing current water volume level, adjust water volume by 3 levels.
Spray nozzle position adjustment
· Press ” ∧ ” or ” ∨ ” button when it is under function of rear clearing or front cleaning, the indicator light will be on showing current nozzle position, adjust nozzle position by 5 levels.

Energy saver
![]() Under energy saving mode, seat temperature is low(level 1) to achieve energy saving.
Under energy saving mode, seat temperature is low(level 1) to achieve energy saving.
(Note: If the seat temperature before energy saving is neutral, keep the neutral after energy saving)
Remark
Energy saving mode will be suspended and goes to function mode if someone uses the seat in the middle of energy saving. The seat starts to heat immediately (without closing the seat temperature), and the energy saving mode is restored after the human body leaves the seat.
Long press ” ” button to enter energy saving mode, long press ” ” button again to exit energy saving mode.
Water temperature adjustment
![]()
Short press the “![]() ” button to adjust the water temperature. The indicator will show the water temperature level if it’s on. When the indicator is off, the water level is 0. Short press this button to adjust water temperature level from 0 to 5 in cycle.
” button to adjust the water temperature. The indicator will show the water temperature level if it’s on. When the indicator is off, the water level is 0. Short press this button to adjust water temperature level from 0 to 5 in cycle.
![]()
Seat temperature adjustment
Short press the ” ” button to adjust the seat temperature. The indicator will show the seat temperature level if it’s on. When the indicator is off, the seat level is 0. Short press this button to adjust seat temperature level from 0 to 5 in cycle.![]()
Night light (Only for toilets with night light function)
![]() · Night light adjustment :Short press “
· Night light adjustment :Short press “![]() ” button to turn on/turn off night light. · Smart mode Press & HOLD “
” button to turn on/turn off night light. · Smart mode Press & HOLD “![]() ” button to enter into intelligent mode ( Night light will be on or off by detecting the lightness of surroundings). If the product is on intelligent mode, short press “
” button to enter into intelligent mode ( Night light will be on or off by detecting the lightness of surroundings). If the product is on intelligent mode, short press “![]() ” button to exit intelligent mode. (Night light factory default setting is intelligent mode)
” button to exit intelligent mode. (Night light factory default setting is intelligent mode)
Half flush/Full flush (Only for the toilet with auto flush function)
![]()
- Short press “
 ” button, the toilet starts half flushing.
 - Short press “
 ” button, the toilet starts full flushing.
 - Long press “” button to turn on/off auto flush function.
When the auto flush function is turned on, toilet will automatically flush after detecting user leaving the seat.

Open/Close by remote controller (Only for toilet with this function)
![]()
Short press “![]() ” button ,open or close the lid.
” button ,open or close the lid.
Short press “![]() ” button ,open or close the seat.
” button ,open or close the seat.
Press & HOLD “![]() ” button to turn on/off auto lid open/close function.
” button to turn on/off auto lid open/close function.
(This function is set to off by default and needs to be turn on by users if it’s needed.)
Deodorant set (Only for toilet with this function)
![]()
Short press “![]() ” button to turn on/off auto deodorization function.
” button to turn on/off auto deodorization function.
While the auto deodorization function is on, when it’s detected that the user is seated, it’ll start deodorizing and stops when user leaves. When warm air is working on, deodorization function is off. (This function is set to on by default.)
Water tank flush volume adjustment
(Only for toilets with water tank flush volume adjustment function)
- Press and hold the “” button, and press the water volume ” + ” button to enter the full flush volume plus 1 gear adjustment;
- Press and hold the “” button, and press the water volume ” – ” button to enter the full flush volume reduce 1 gear adjustment;
- Press and hold the “” button, and press the water volume ” + ” button to enter the half flush volume plus 1 gear adjustment;
- Press and hold the “” button, and press the water volume ” – ” button to enter the half flush volume reduce 1 gear adjustment.
Other operations
User code
- Users need to set user code when using multiple products to prevent remote control from interfering with each other. When making the adjustment, other products need to be powered off. Under the condition that the product is not powered, press the remote control code combination button (first press and hold the ” ” button, then press the ” ” button). The indicator light will light up and flash, and it enters the matching mode.
- (Radio frequency remote control) the remote control and the product is matched automatically. After the matching is well done, the indicator light of the remote control is on for 2 seconds. (When the product is rebooted or the remote control battery is replaced after power failure, the user code will not be reset and there is no need to reset. After entering the user code setting mode, press the combination buttons to exit the matching mode.)
- (IR remote control) Use the Pressure ” + ” and ” – ” buttons to select User 1-9 (as shown in the figure below). The indicator light displays the corresponding user code and flashes. And then press the code combination button again to get the matching finished. (Tips: if the product is rebooted or the remote control battery is replaced, it needs to be matched again. After entering the matching mode, there is no operation within 10 seconds, and it will exit the matching mode by itself.)
![]()
Quiet mode
· Press and hold the ” ” button and press the “![]() ” button to turn on/off quite mode.
” button to turn on/off quite mode.
Sterilization function
- When user is not seated and cleaning/drying is off, long press “ ” button to turn on plasma sterilization function. This function will stop automatically after 2 hours. During this mode, if any other button is pressed or user is seated, it’ll stop automatically. (This function only applies to product with sterilization function.)
Automatic pre-wetting button
- Press and hold the ” ” button and press the “” button to turn on or off the automatic pre-wetting function. After the automatic pre-wetting function is turned on, the pre-wetting function is performed when the user is detected to be seated. (This button combination is only for toilets with automatic pre-wetting function.)
Foot sense switch
- Press & HOLD” ” button to turn the foot sense function on or off. In the seated status, foot sense function is invalid. (This function only applies to product with foot sense function.)
Foot-sensing indicator light
- Press ” ” button first, and then press ” ” button to turn on/off the foot-sensing indicator light.
(This combination button only applies to the toilet with the foot-sensing indicator.)
Tips:
- The buzzer will sound “ BEEP ” when the user presses one button which means the main unit receives the signal and conduct the operation accordingly. If the buzzer doesn’t sound, it means the main unit doesn’t receive the signal, please adjust the remote control direction and repress the button.
- In case of power cut during nozzle spray operation, the nozzle cannot go back to place, please wait until the power is reset. In case of a power cut for a long period, please push the nozzle softly back by hand.
Do not push hard, to avoid damage to nozzle and electrical machine.
 https://qrco.de/bbbINl
Thank you for using Wood Bridge products!
Customer Service Phone: 562-229-0088. (Monday – Friday 9 AM – 5 PM Pacific Time)
Or Email: [email protected]
www.woodbridgebath.com
ASVFAC3300001A-1.0


