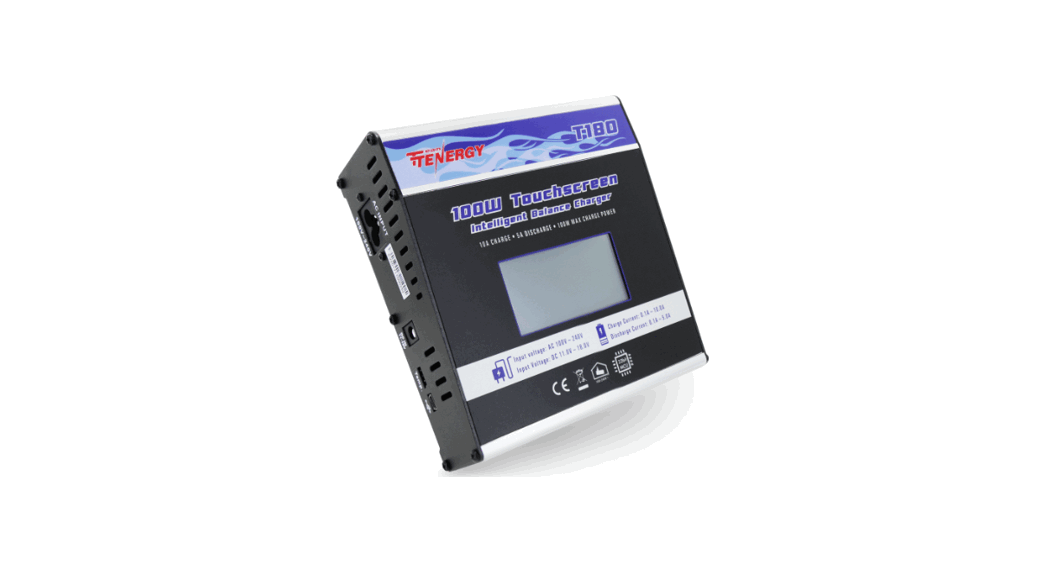
![]() T180 100W Touchscreen Intelligent Balance Charger
T180 100W Touchscreen Intelligent Balance Charger
Instruction Manual
T180
100W Touchscreen Intelligent Balance Chargar
![]() IMPORTANT SAFETY WARNING READ MANUAL in its entirely before use
IMPORTANT SAFETY WARNING READ MANUAL in its entirely before use
INSTRUCTION MANUAL
Technical Specifications
| Input Voltage | DC 11-18V |
| AC 100-240V | |
| Charge Current | 0.1-10.0A |
| Discharge Current | 0.1-5.0A |
| Charge Power | max. 100W |
| Dischge Power | max. 20W |
| Balance current | max. 350mA |
| Balance tolerance | ±0.01V |
| Charging Capability | NiMH/NiCd 1-16 cells |
| LiPo/LiFe/Li-ion 1-6 cells | |
| Pb battery voltage | 2-20V |
| Discharge | LiPo/LiFe/Lilon 2.0-4.2V/cell |
| Weight | 1.61 lb |
| Dimensions | 5.51 x 5.91 x 2.20 Inches |
Connection
Connection diagram in the balance charging/storage/discharge mode 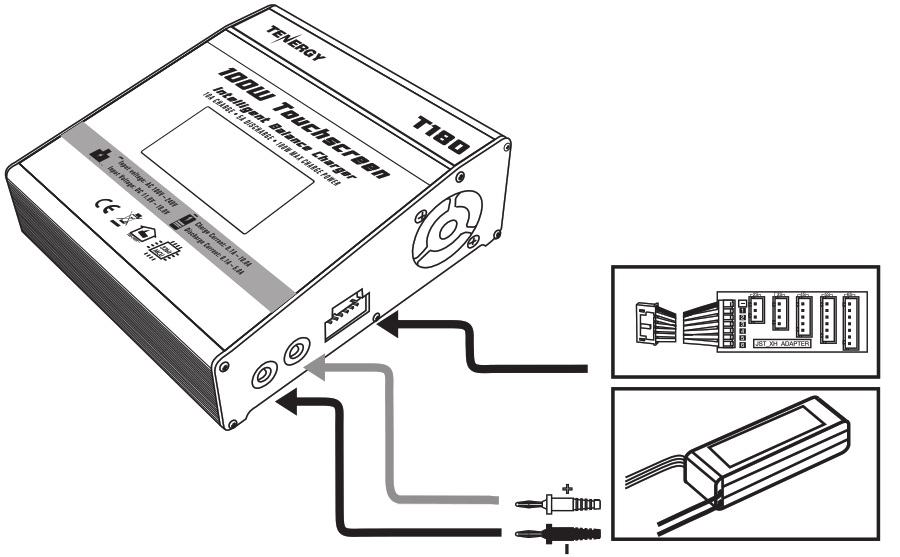
WARNING: Read the ENTIRE instruction manual to become familiar with the features of the product before operating.
WARNING: Never leave charger unattended, exceed maximum charge rate, charge with non-approved batteries or charge batteries in thewrong mode. Failure to comply may result in excessive heat, fire and serious injury.![]() CAUTION: Always ensure the battery you are charging meets the specifications of this charger and that the charger setting sare correct. Not doing so can result in excessive heat and other related product malfunctions, which can lead to user injury or property damage.
CAUTION: Always ensure the battery you are charging meets the specifications of this charger and that the charger setting sare correct. Not doing so can result in excessive heat and other related product malfunctions, which can lead to user injury or property damage.
Exterior:
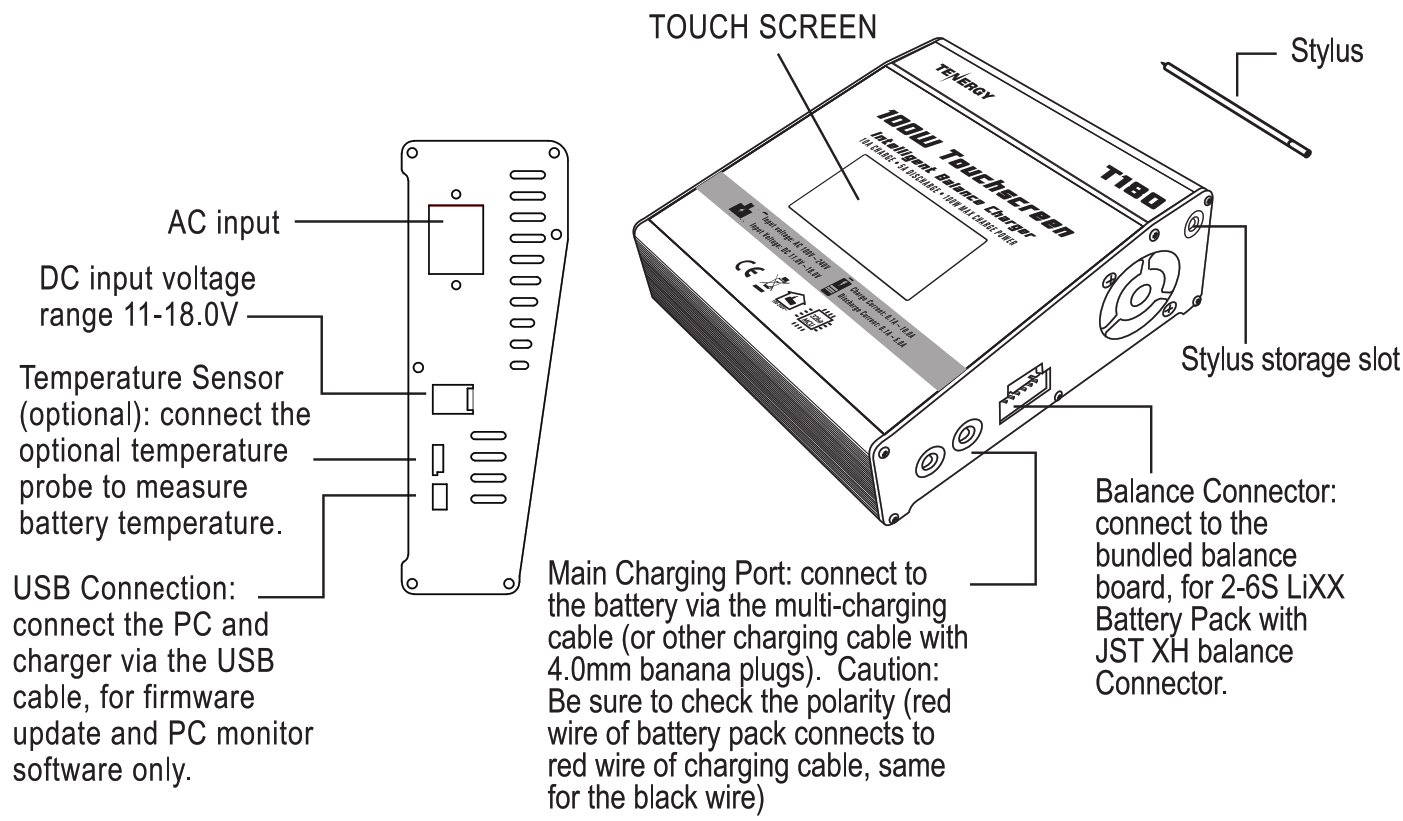
CAUTION: Always power on the charger before connecting a battery to the charger, or damage to the charger and the battery can result.
- Connect charger to power source.
- Connect balance board to charger (for LiXX batteries)
- Connect a battery to charger’s Main Charging Port using Multi-Charging Cable
- Connect the battery’s balance connector to the charger using the included balance board (for LiXX batteries only)
- Select the desired program/function mode
- Choose the desired program setting, and start the program
After power on the charger, the main menu will appear. Touching the left and right arrow keys to access various function screens as follows. 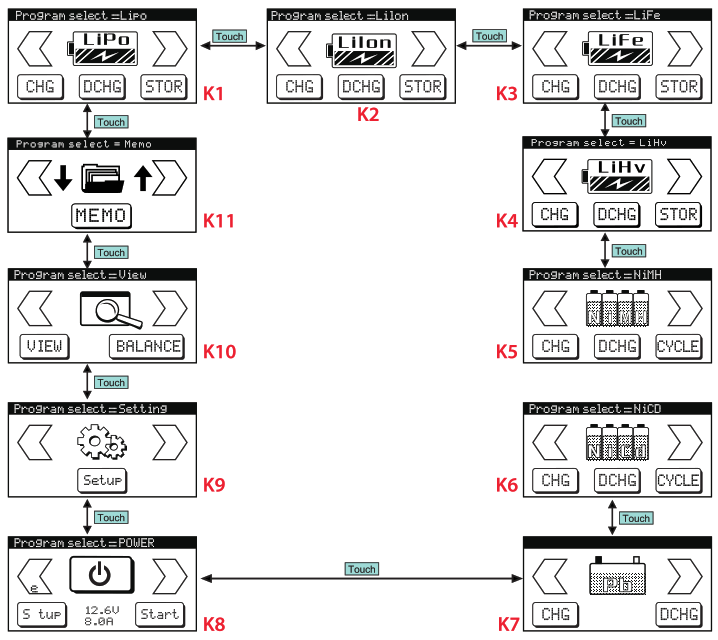
| K1. LiPo Battery Program K2. Li-ion Battery Program K3. LiFe Battery Program K4. LiHV Battery Program K5. NiMH Battery Program K6. NiCd Battery Program | K7. Pb Battery Program K8. Digital Power Mode K9. Setup Mode K10. Battery Status / Balance Mode K11. Memory Mode |
Initial Setup
Tips: Please set up user preferences in the Setup menu before using this charger for the first time. 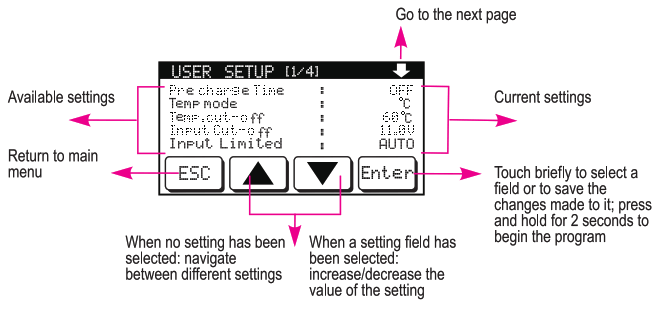
| Setting Name | Setting Descriptions | Options |
| Precharge Time | Turn on/off and select the pre-charge duration. Used only for Li)ttnbeltewriaehshthigl,tehracvaepaloxeosItage. Select longer duration for ‘V in Turn normal battery charging. Stop the precharge process if battery voltage does not show significant increase over time | 211,-.10srnins in lmin |
| Temp. Mode | Select the unit for temperature display | °C, °F |
| Temp. Cut-off | Select the temperature threshold that will trigger the overheating protection and turn off the charger (Optional temperature sensor accessory required) | 20-80°C / 68-176°F |
| Input Cut-off | Select the minimum DC input voltage required to power | 10.0-15.0V in 0.1V increments |
| Safe ty Timer | rencroxiframdmuzatio;the charger can operate before | 1-720mins in 1 min incremets |
| Back Light | Adjust the brightness of the touchscreen’s back light | Off I 10-100% in 10% increments |
| Melody/Full | Select the ringtone that indicates when a battery has been fully | 1 to 5 |
| Button Sound | Turn on/off the sound when onscreen buttons are pressed | off/ on |
| Buzzer Sound | Tpruorgnraon/mooffrttztercitb z(znerotpearrtoinrdicates completion of a running | off / on |
| User Name Setting | Allow you to display custom text on the charger’s start-up screen | Enter manually with on-screen keyboard, up to 16 characters |
| Factory Reset | Reset the charger to factory default settings | Yes / No |
Lithium-based Battery Program
This charger can accept 4 types of Lithium-based batteries: LiPo, Li-ion, LiFe (LiFePO4), and LiHV .
Warning:
- Check your battery carefully to identify its type in order to choose the correct program. Selecting the wrong program can damage your battery and/or result in explosion/fire!
- Only choose the LiHV program if your battery is specifically labeled as such. Using LiHV to charge standard LiPo will overcharge your battery and can lead to explosion/fire.
Each LiXX program has the 3 operating modes. Selecting each mode will take you to its setting screen.
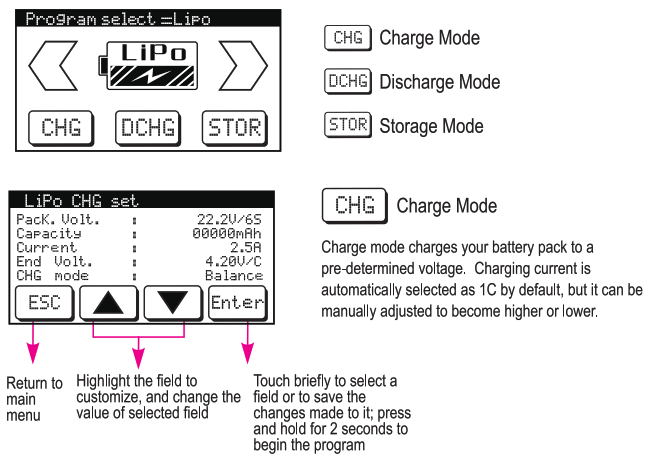
| Setting Name | Setting Descriptions | Option |
| Pack. Volt. | pinepcukt,tieeeneodmoiinl letarnoefethnee:attery | 1-6S |
| Capacity | Itnpe !lie Capacityof the battery rged | 50-50000mAh, in 5OrnAh increments |
| Current | Charging Current | 0.1 to 10A in 0.1A increments |
| End Volt. | Termination Voltage | 3.8V – 4.3V (LiPo) 3.8V — 4.2V (Li-ion) 3.3V—3.8V (LiFe) 3.85V — 4.4V (LiHV) |
| CHG Mode | Select between standard charging (without balancing), and balance charging | Balance , No _Balance |
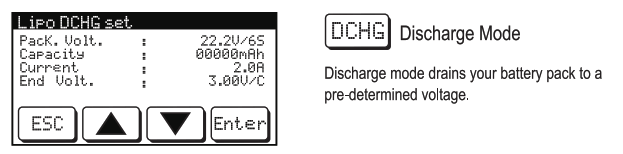
Available settings:
| Setting Name | Setting Descriptions | Option |
| Pack. Volt. | olnapcukleeneroirn1 (710etarnoefethnee:attery | 1-6S |
| Capacity | Inpti,it tohne Capacity of the battery | 50-50000mAh, in 50mAh increments |
| Current | Discharging Current | 0.1 to 5A in 0.1A increments |
| End Volt. | Termination Voltage | 3.7V-4.2V(LiPo) 3.6V-4.1V(Li-ion) 3.3V-3.6V(LiFe) 3.85V-4.35V(LiHV) |
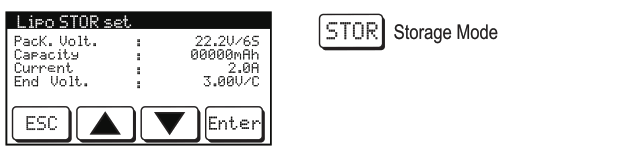 Storage Mode automatically charge or discharge your battery to about 40% of its total capacity, which is the optimal state-of-charge to preserve LiXX batteries in top condition.
Available settings:
| Setting Name | Setting Descriptions | Option |
| Pack. Volt. | pinapcukt,tesneodmoirni Zetageinosfethnee:attery | 1-60 |
| Capacity | Itnptut tge Capacity of the battery | 50-50000mAh, in 50mAh increments |
| Current | Charging Current | 0.1 to 5A in 0.1A increments |
| End Volt. | Termination Voltage | 3.7V – 4.2V (LiPo) 3.6V — 4.1V(Li-ion) 3.3V — 3.6V (LiFe) 3.85V — 4.35V (LiHV) |
*Changing the End Voltage in Storage Mode would also increase/decrease the end capacity level accordingly. Please keep the default setting unchanged if the 40% state-of-charge for storage is desired
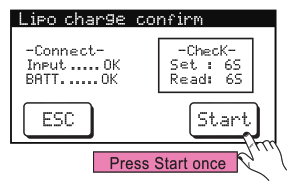 Confirmation Screen
A confirmation screen appears when you press and hold the START button in the previous screen. It tells you if the physical connection between the charger and your battery is valid. If an error is detected, an error screen will appear. If no problem is detected, you can either press “START” again to begin the program, or touch “ESC” to cancel.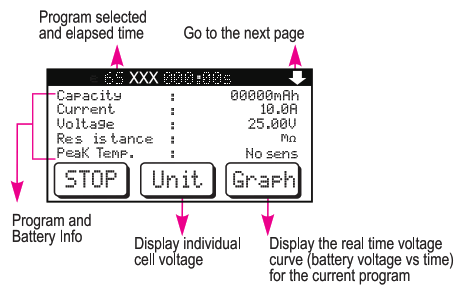
Operation Screen
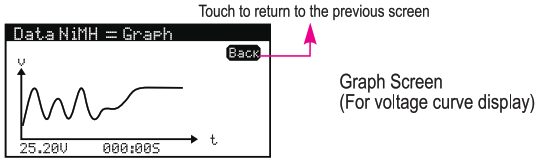
The Operation Screen shows you details of the battery and the current program that is running.
LiXX Operation Screen Info
| Operation | Name | Descriptions |
| Discharge, Charge, Balance | Capacity | Capacity that’s been charged into or discharged from the battery pack so far |
| Current | Charging / Discharging Current | |
| Voltage | Battery Voltage | |
| Stage | For LiXX batteries: CC (constant current) or CV (constant voltage) | |
| Input Volt | DC Input Voltage, either from the charger’s internal power supply or its DC Input port | |
| End Volt | Target battery voltage to achieve | |
| Int Temp. | Internal temperature of the charger | |
| Safety Timer | Safety Timer Duration (After which the charger will turn off automatically) | |
| CAPA Cut-off | Capacity Cut-off Threashold (Beyond which the charger will turn off automatically) | |
| Resistance | Internal resistance of the battery | |
| Peak Temp. | Highest temperature detected during the program (requires the optional temperature sensor accessory) | |
| Change, Balance, Storage | CHG Power | Charging voltage multiplied by Charging current) |
| Discharge,Discharge, Storage | DCHG Power | Discharging Power (= Battery voltage multiplied by discharging current) |
NiMH/NiCd Battery Program
Each NiXX program has the 3 operating modes. Selecting each mode will take you to its setting screen. 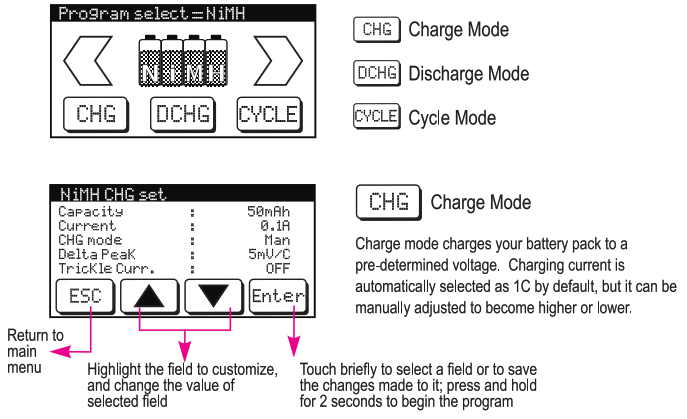
Available settings:
| Setting Name | Setting Descriptions | Option |
| Capacity | Input the Capacity of the battery to be charged | 50-50000mAh, in 50mAh increments |
| Current | Charging Current | 0.1 to 10A in 0.1A increments |
| CHG Mode | This setting changes the Delta Peak used (see below): Manual: select your own Delta Peak Auto: use default Delta Peak setting of 8mV/Cell for NiMH and 5mV/Cell for NiCd | Man (Manual) /Auto |
| Delta Peak | Select the voltage drop that is used to determine when a battery is fully charged. When unsure, choose Auto CHG Mode, or consult the specs of your battery. Setting the delta peak too high has a risk of over-charging your battery, while a low delta peak may cause the charging to terminate prematurely. | 5-25rnV/Cell |
| Trickle Cum. | If this is on, a small current will be used to continue charging the battery after it’s been fully charged, to offset self-discharging. | Off, 50-200rnA in 10mA increments |
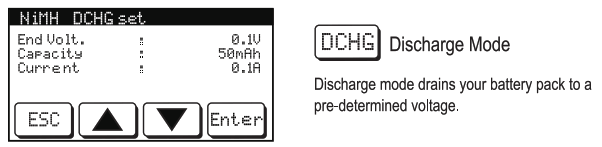
Available settings:
| Setting Name | Setting Descriptions | Option |
| End Volt. | Termination Voltage Note: NiCdINiMH batteries should not be discharged to less than 0.9V/Cell, except for old batteries that you are ready to dispose. | 0.10V to 24.00V in 0.1V increments |
| Capacity | Input the Capacity of the battery to be charged | 50-50000mAh, in 50mAh increments |
| Current | Discharging Current | 0.1 to 5A in 0.1A increments |
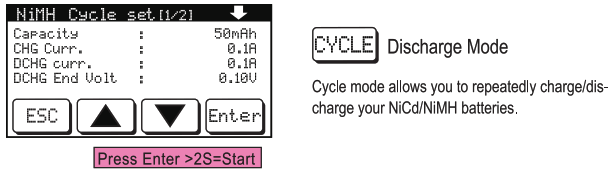 Available settings:
| Setting Name | Setting Descriptions | Setting Range |
| Capacity | Input the Capacity of the battery to be charged | 50-50000mAh, in 50mAh increments |
| CHG Curr. | Select the charge current | 0.1A to 10.0A in 0.1A increments |
| DCHG Cue. | Select the discharge current | 0.1A to 5.0A in 0.1A increments |
| DCHG End Volt. | Termination Voltage Note: NiCdINiMH batteries should not be discharged to less than 0.9V/Cell, except for old batteries that you are ready to dispose. | 0.10V to 24.00V in 0.1V increments |
| Cycle Mode | Select the cycle order: charging before discharging, or vice versa | CHG>DCHG, DCHG>CHG |
| No. of Cycle | Select how many cycles to run | 1T to5T |
| Delay Timer | Select the rest time between each charging and discharging cycle. This will allow the battery to cool down in the cycling process. We recommend using 10 mins for most situations. | 1 min to 60 mins |
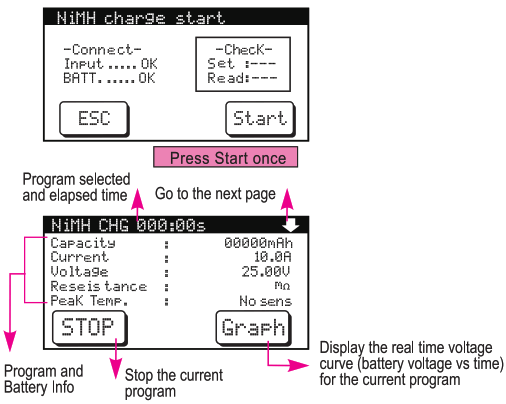
Confirmation Screen
A confirmation screen appears when you press and hold the START button in the previous screen. It tells you if the connection between the charger and your battery is valid. If an error is detected, an error screen will appear. If no problem i s detected, you can either press “START” again to begin the program, or touch “ESC” to cancel.
Operation Screen
The Operation Screen shows you details of the battery and the current program that is running.
NiMH Operation Screen Info
| Operation | Name | Descriptions |
|
Discharge, Charge, Cycle
| Capacity | frCoampatchiety bthaaffte’s:peaecnkcshoarfgaer d into or discharged |
| Current | Charging / Discharging Current | |
| Voltage | Battery Voltage | |
| Stage | CC (constant current) CV (constant voltage) Trickle (trickle charging) | |
| Input Volt | DC Input Voltage, either from the chargers internal power supply or its DC Input port | |
| Delta Peak | The voltage drop threshold used to determine when the battery is fully charged |
NiMH/NiCd Program – Continued
| Discharge, Charge, Cycle | Int Temp, | Internal temperature of the charger |
| Safety Timer | Safety Timer Duration (After which the charger will tum off automatically) | |
| CAPA Cutoff | Capacity Cut-off Threashold (Beyond which the will turn off automatically) | |
| Resistance | Internal resistance of the battery | |
| Peak Temp. | Highest temperature detected during the program (requires the optional temperature sensor accessory) | |
| Charge, Balance, Cycle | CHG Power | Charging Power (= Charging voltage multiplied by charging current) |
| Discharge, Cycle | DCHG Power | Discharging Power (= Battery voltage multiplied by discharging current) |
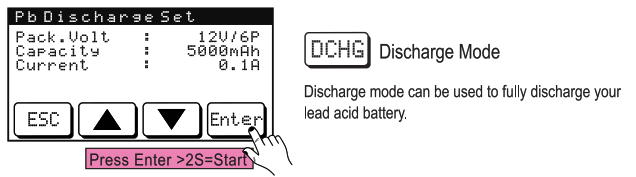
Lead Acid Battery Program
The Pb battery program is used to charge lead acid batteries.
It has the 2 operating modes: Charge and Discharge. Selecting each mode will take you to its setting screen. 
Available settings:
| Pack. Volt. | Rated voltage of the battery | 2V — 24V |
| Capacity | Rated capacity of the battery | 50-50000mAh, in 50mAh increments |
| Current | Charging Current. Pb/lead acid batteries are typically charged at low current, and the optimal charging current for is 0.1C (e.g. 0.1C fora 10Ah battery is 1A). When unsure, please follow the charging instructions from the battery manufacturer. | 0.1A to 10.0A |
Available settings:
| Setting Name | Setting Descriptions | Option |
| Pack Volt. | Rated voltage of the battery | 2V — 24V |
| Capacity | Rated capacity of the battery | 50-50000mAh, in 50mAh increments |
| Current | Discharging Current. | 0.1A to 5.0A, in 0.1A increments |
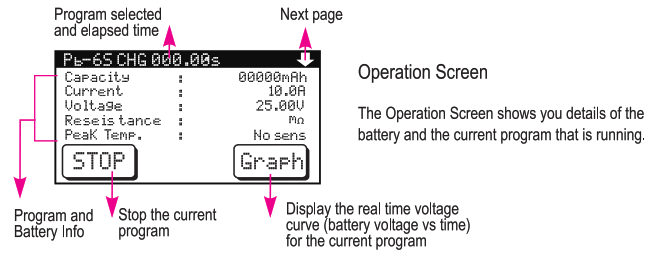
Pb Operation Screen Info
| Operation | Name | Descriptions |
| Discharge, Charge | Capacity | Capacity that’s been charged into or discharged from the battery pack so far |
| Current | Charging / Discharging Current | |
| Voltage | Battery Voltage |
| Discharge, Charge | Stage | CC (constant current) CV (constant voltage) Trickle (trickle charging) |
| Input Volt | DC Input Voltage, either from the charger’s internal power supply or its DC Input port | |
| End Volt | The target battery voltage to achieve. | |
| Int Temp. | Internal temperature of the charger | |
| Safety Timer | Safety Timer Duration (After which the charger will turn off automatically) | |
| CAPA Cut-off | CthaepcahciatyrgeCruwt joilfftuTrnhreoaffsahuotIodm(BaLayoinlyd) which | |
| Resistance | Internal resistance of the battery | |
| Discharge, Charge | Peak Temp. | Highest temperature detected during the program (requires the optional temperature sensor accessory) |
| Charge | CHG Power | Charging Power (= Charging voltage multiplied by charging current) |
| Discharge | DCHG Power | Discharging Power (= Battery voltage multiplied by discharging current)v |
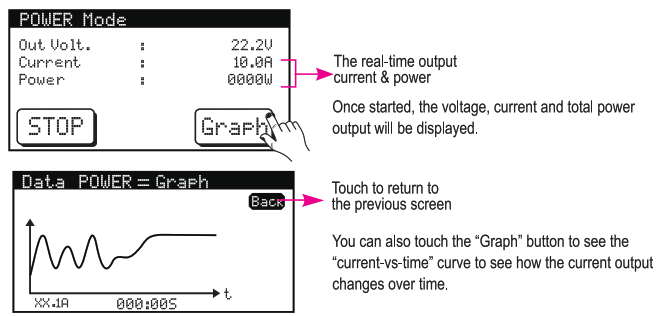
Digital Power Program
This operation mode tums the charger into a DC power supply. Simply connect the charger to your device through its red/black Main Charging Port, and configure the power output from the charger’s touch-screen control. 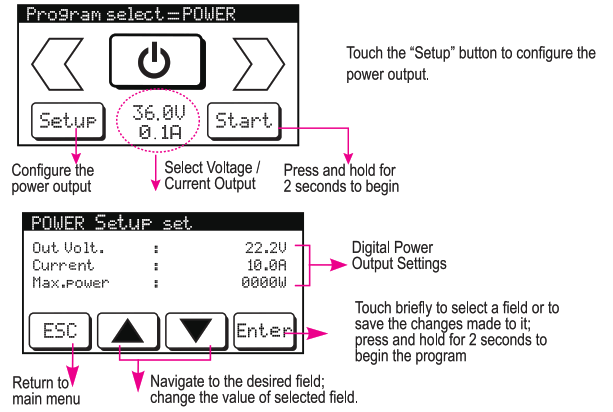
Available settings:
| Setting Name | Setting Descriptions | Option |
| Out Volt. | Output DC Voltage | 3.0V — 24.0V in 0.1V increments |
| Current | Output DC Current | 0.1V — 10.0V in 0.1V increments |
| Max. Power | Maximum Power Output | 1Watt — 90Watt in 1W increments |
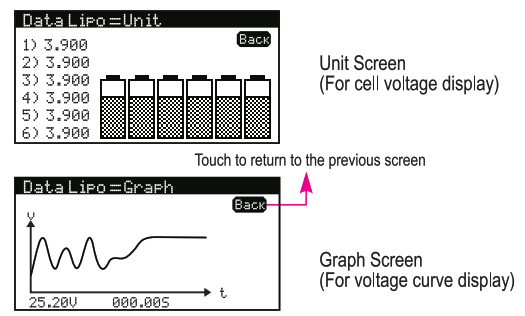
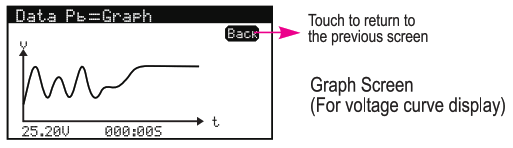
Data View
This program can be used to quickly check the battery and charger status (View), or to balance your LiXX batteries. 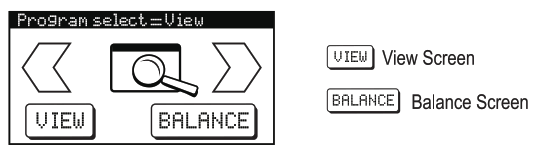
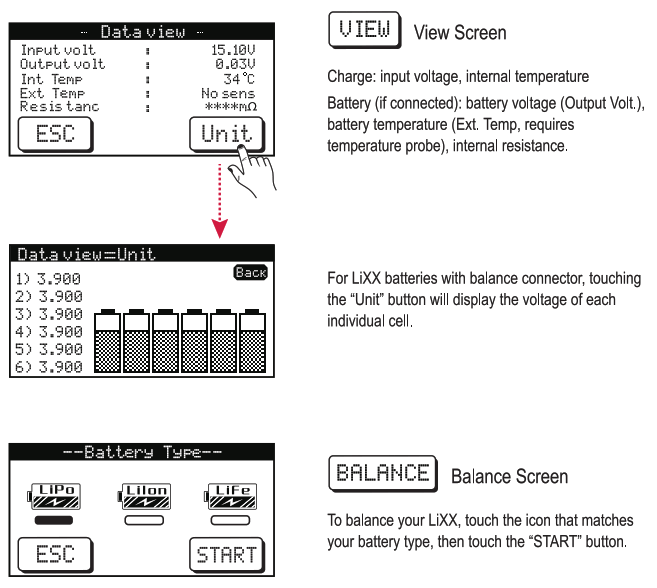
![]() Warning: Be sure to verify your battery’s chemistry type in order to select the correct setting. Failure to do so can damage your battery.
Warning: Be sure to verify your battery’s chemistry type in order to select the correct setting. Failure to do so can damage your battery.
Memory Program
The Memory Program allows you to save the settings of the charger’s last operation, so you can load them up quickly in the future.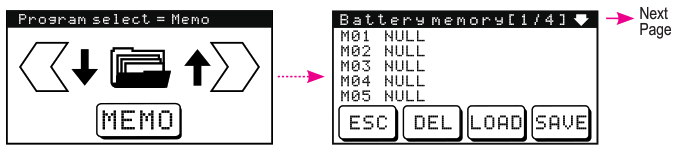
To Save:
- Touch one of the 20 available memory slots (M01 – M20). Empty slots are displayed as NULL
- Touch the “SAVE” button, and the last-used operation settings will be saved in that slot.
To Load:
- Touch one of the occupied memory slots.
- Touch the “LOAD” button, and the operation settings in that slot will be loaded to the Setup screen for that program. Adjustments can still be made before starting the program.
To Delete:
- Touch and hold one of the occupied memory slots for 1-2 seconds.
- The slot label will return t o NULL. Now it’s available for use again .
ATTENTION!!
WARNING:Failure to exercise caution while using this product and comply with the following warnings could result in product malfunction,electrical issues,excessive heat,FIRE,and ultimately injury and property damage.
- Never leave the power supply,charger and battery unattended during use.
- Never attempt to charge batteries that are dead, damaged, wet, non-rechargeable, or of chemistry types that is not specifically mentioned in this manual.
- Never attempt to charge a battery pack containing different types of batteries.
- Never allow children under 14 years of age to charge battery packs.
- Never charge a battery in extremely hot or cold places or place in direct sunlight.
- Never charge a battery if the cable has been pinched or shorted.
- Never connect the charger if the power cable has been pinched or shorted.
- Never connect the charger to an automobile 12V battery while the vehicle is running.
- Never attempt to dismantle the charger or use a damaged charger.
- Never connect the input jack(DC input ) to AC power.
- Always use only rechargeable batteries designed for use with this type of charger.
- Always inspect the battery before charging.
- Always keep the battery away from any material that could be affected by heat.
- Always monitor the charging area and have a fire extinguisher available at all times.
- Always end the charging process if the battery becomes too hot to touch, or starts to change form (e.g. swelling/puffing) during the charging process.
- Always connect the charge cable to the charger first,Then connect the battery to avoid short circuit between the charger leads.Reverse the sequence when disconnecting.
- Always connect the positive red leadsNand negative black leads(-)correctly.
- Always disconnect the battery after charging, and let the charger cool between charges.
- Always charge in a well-ventilated area. 20.Always terminate all processes and contact local dealer if the product malfunctions.
WARNING: Never leave charger unattended,exceed maximum charge rate,charge with non-approved batteries or charge batteries in the wrong mode.Failure to comply may result in excessive heat,fire and serious injury.
CAUTION: Always ensure the battery you are charging meets the specifications of this charger, and that the charger’s settings are supported by the battery. Not doing so can result in excessive heat and other related product malfunctions, causing user injury and/or property damage.
Warning & Error Messages
Tenergy’s T180 Touch Screen Charger is designed to offer protection against various situations due to operating errors and hardware/battery malfunctions. Detected faults/errors are displayed on the LCD screen, halting any active process in order to protect the charger and the battery. 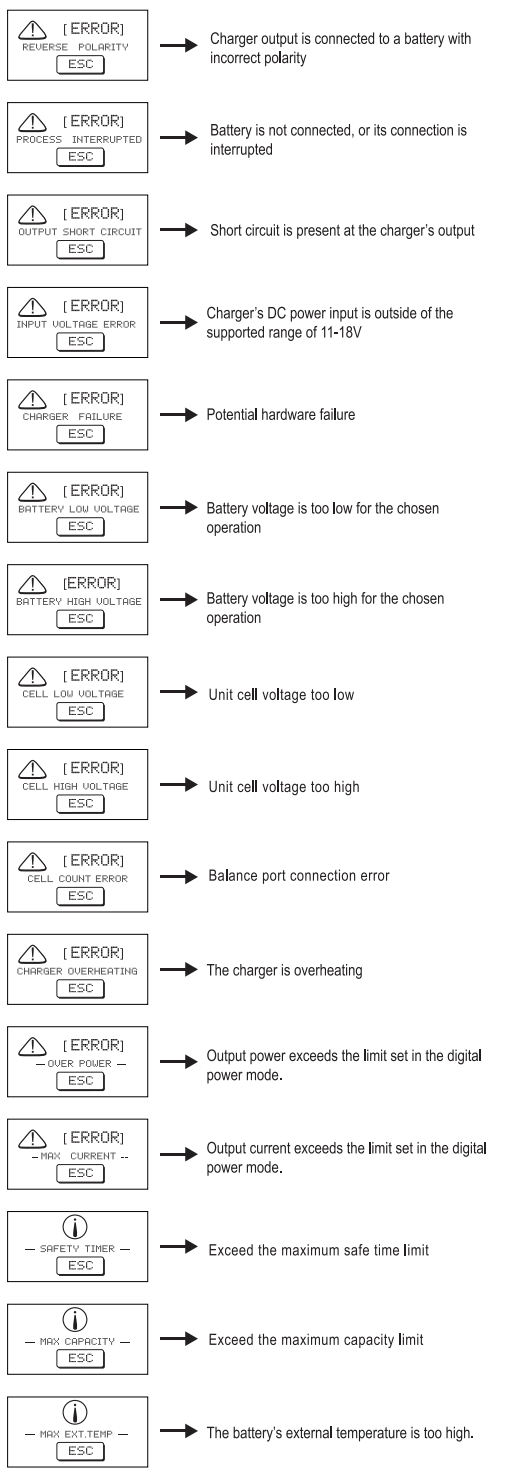 Regulatory Compliance
COMPLIANCE INFORMATION FOR THE EUROPEAN UNION
Declaration of Conformity
 Product Name: 1180 Touch Screen Balance Charger
Item Number: 03180 / TN180
The object of declaration described above is in conformity with the requirements of the specifications listed below, following the provisions of the European EMC Directive 2004/108/EC
EN 55014-1:2006
EN55014-2:1997+A1:2001
EN61000-3-2:2006
EN61000-3-3:2008
Instructions for disposal of WEEE by users in the European Union
![]() This product must not be disposed of with other waste Instead, it is the user’s responsibility to dispose of their waste equipment by handing it over to a designated collections point for the recycling of waste electrical and electronic equipment. The separate collection and recycling of your waste equipment at the time of disposal will help to conserve natural resources and ensure that it is recycled in a manner that protects human health and the environment.
This product must not be disposed of with other waste Instead, it is the user’s responsibility to dispose of their waste equipment by handing it over to a designated collections point for the recycling of waste electrical and electronic equipment. The separate collection and recycling of your waste equipment at the time of disposal will help to conserve natural resources and ensure that it is recycled in a manner that protects human health and the environment.
All rights reserved. Production by any method (e.g. photocopy, microfilming, or capturing in electronic data processing systems) require written approval from Tenergy. Reprinting in full form or in parts is also prohibited. These operating instructions represent the product’s technical status at the time of printing. We reserve the right to change/modify the product’s technology and/or design without prior notice.
![]() Power.Tenergy.com
Power.Tenergy.com
©2020 Tenergy Corporation


