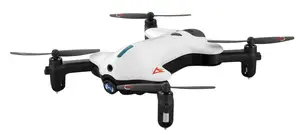
AMAX VA-1000 HD STREAMING VIDEO DRONE
INSTRUCTION BOOKLET
WARNING: Never leave product charging unattended for extended periods of time. Always disconnect the battery from charger immediately after the battery is fully charged. Please refer to enclosed safety instructions.
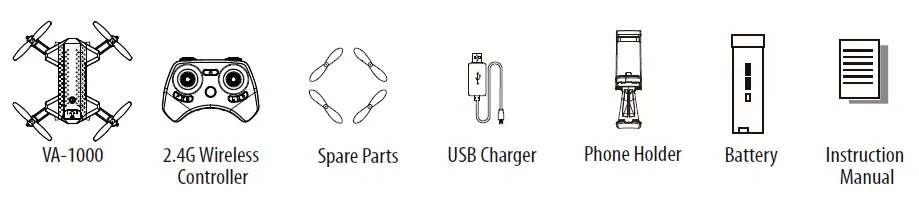
PACKAGE CONTAINS
Thank you for purchasing the VA-1000 HD Streaming Video Drone. Please read this instruction booklet as it contains valuable information on how to properly fly and care your VA-1000.
FEATURES
- Compact fold-in design allows for easy portability
- New obstacle avoidance training feature will cause the drone to automatically circumvent walls and other obstructions so new pilots can get the hang of flying
- Air pressure sensor locks flight altitude for stable video footage
- Takes video and still shots with on board HD Camera
6 axis gyro for extremely stable flight and maneuverability
REMOTE CONTROL BATTERY INSTALLATION
- Unscrew and remove the battery cover from the back of the controller.
- Install 3 fresh”AAA”alkaline batteries into the controller as shown in diagram A. Replace the battery cover and secure it.
- Turn over the controller and press the power button. f the power indicator turns on you have installed your batteries properly.


CHARGING THE VA-1000 LI-POLY BATTERY
- Connect the USB charger to the battery charging socket (see diagram B).
CAUTION: The USB plug fits the charging socket only in one way. Do not force it. Improper connection will damage the VA-1000’s battery. - Connect the USB end of the cable to your computer’s USB port or a USB wall charger (see diagram C).
- The indicator light on the USB charger will turn to solid red to indicate that the battery is charging. The red LED indicator will turn off when charging is completed.
- The average charging time is approximately 50-60 minutes ( via 5.0V 2A USB wall charger).
- A fully charged VA-1000 can fly for 5-6 minutes depending on the environment and user input.
IMPORTANT: ALWAYS REMEMBER TO UNPLUG YOUR CHARGING CORD WHEN NOT IN USE!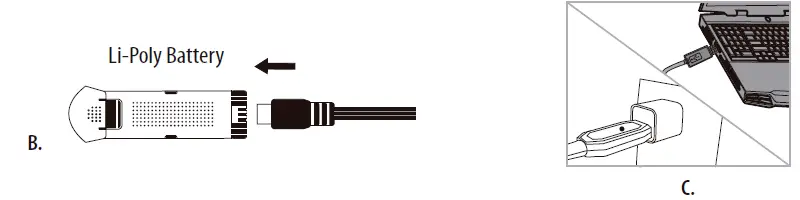
INSTALL THE VA-1000 BATTERY
Push the fully charged battery into the battery compartment then lock the end with the battery locks.(see diagram D) The battery only fits one way to the battery compartment, do not force it.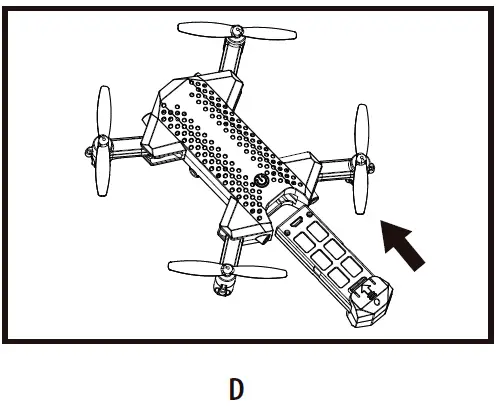
HOW TO EXPAND AND FOLD YOUR VA-1000
Before flying your VA-1000, you need to expand the foldable arms out. Turn your VA-1000 over, bottom side facing you, pull and expand the 4 arms as shown in the diagram below carefully. Make sure the arms are fully expanded to the position. After flying your VA-1000, it is recommended to fold all 4 arms back in. When expanding or folding your VA-1000, make sure to be gentle.(see diagram E)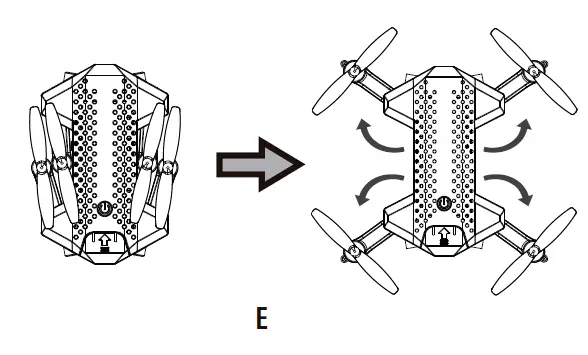
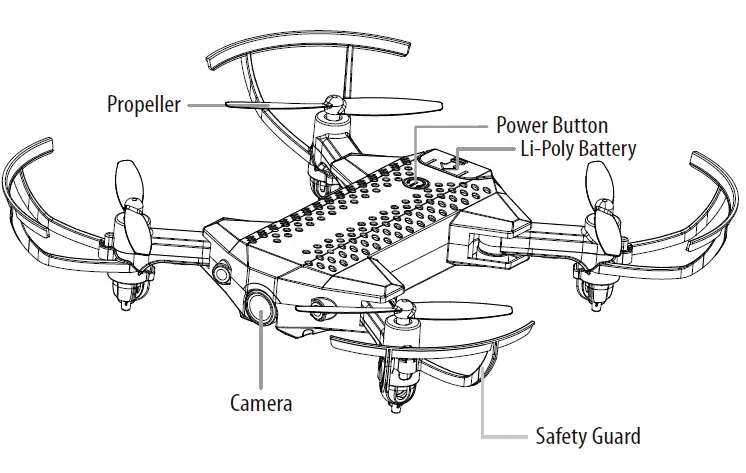
VA-1000 DIAGRAM
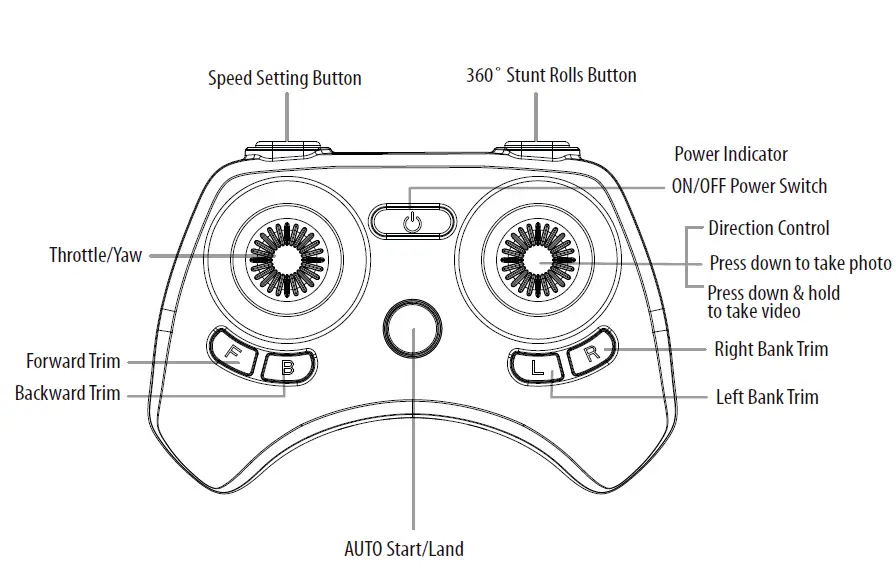
CONTROLLER DIAGRAM
WARNING
DO NOT FLY YOUR VA-1000 IN FOUL WEATHER!
FLIGHT PREPARATION
Verify that there are 3″AAA” batteries inside the remote control unit and the VA-1000 battery has been fully charged. Make sure to be in a large open space preferably a field or a park with an open radius of at least 200 feet. Make sure to start your drone on a clean flat level surface before take-oft.
IMPORTANT! Until you have experience in flying your VA-1000, it is not advised to use in any rate of wind. Pick a day with zero wind or extremely light wind condition when learning how to fly.
SYNCING YOUR VA-1000
Important! When syncing your VA-1000 with the controller always make sure that the drone is on a flat level surface and that your digital trim settings are in the center position.
- Before starting, make sure that the power on your controller is off and the battery is removed from the VA-1000. Make sure that there are no other 2.4G devices in the area.
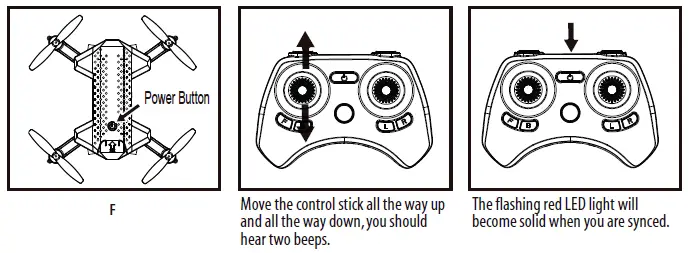
- Insert the battery into the VA-1000 and set it down on a flat level surface.Press down the power button and hold for a few seconds (see diagram F).The LED lights on the drone should begin to flash.
- Quickly turn ON the remote and you will notice that the top red LED light on the face of the controller.
- Push the throttle stick all the way up until it stops and then pull it back all the way down to the bottom(see diagram below).When pushing the stick up or pulling the stick down you should hear a high-pitched beep both ways. The indicating lights on the drone and controller will stop flashing and stay solid on. You have successfully synced your VA-1000 and are ready to fly. If this doesn’t happen, repeat steps 1-4 again.
- TIP 1:Try not to leave too much time between putting your battery into the drone and turning on the controller or your syncing window will time-out.
- TIP 2:Syncing your drone indoors or in the shade willmake it easier to see the LED light indicators on both the controller and the drone.

NOW YOU ARE READY TO FLY!
If you have successfully synced your VA-1000 to your controller as explained on page 4 you are now ready to fly. Before beginning to fly your drone you should familiarize yourself with how to start and stop the rotors, how to use your auto land feature and how the controls work so please carefully read and familiarize yourself with various control features explained in the next. Once again as a beginner pilot you should learn how to control your drone in a large open field or park on a day with zero or very light wind. Do not try to fly your VA-1000 too high until you become a more experience pilot.
RECOGNIZING THE FRONT & REAR OF THE VA-1000
Even though the VA-1000 has four rotors there is still a front or “forward” facing direction and “rear” or backwards facing direction.The front and forward-facing direction of the VA-1000 is the side with a camera (see diagram G). The rear and backward facing direction of the drone is the side with a red light (see diagram G).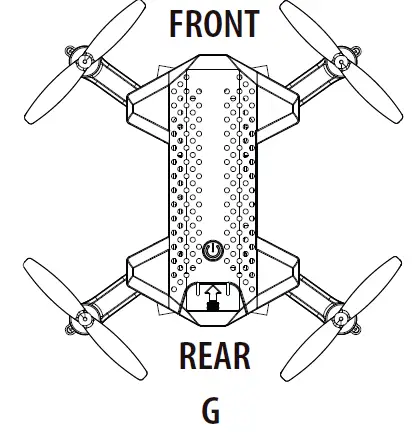
AUTOMATICALLY TAKE OFF /LAND
Make sure you have properly synced The VA-1000. simply press the Auto Start/Land button, your VA-1000 will automatically take off. To stop or land the VA-1000 just Press the Auto Start/Land button again and the VA-1000 will descend and land automatically (see diagram Hi).again and the VA-1000 will descend and land automatically (see diagram H1). 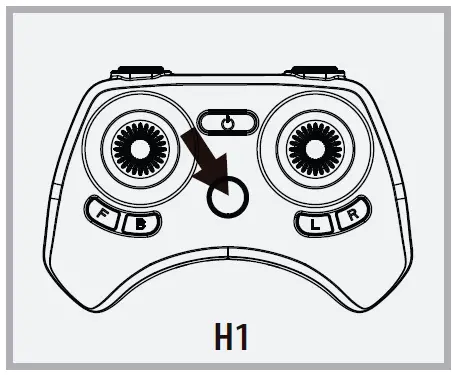
Tips:You also can move the two control sticks simutaneously down inside or outside corners, hold them till the blades start spinning. Release the control sticks and push the throttle stick slowly to take off manually (see diagram H2).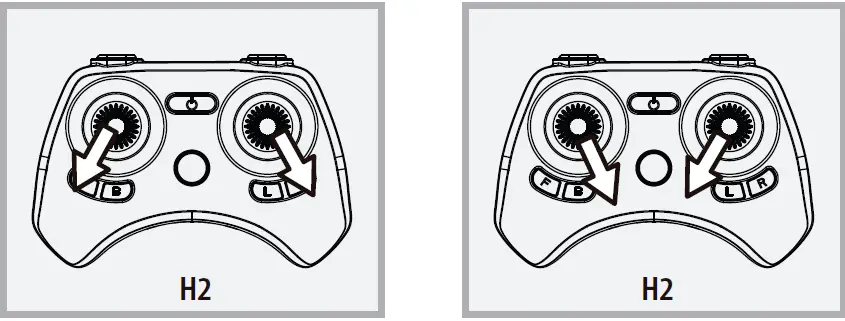
SPEED SELECT BUTTON
The VA-1000 has 4 speed settings;T(Training),1 (SLOW),2 (MEDIUM) and 3 (HIGH). The Default setting when you first turn on your VA-1000 is the 1 (SLOW) speed mode. To increase the speed simply trigger the speed setting button (see remote diagram on pg 3) you will hear beeping sounds of the controller will show you what speed setting you are on. Speed settings can be set before flight or during the flight.
FLIGHT CONTROL
Below is a list of basic flight functions for your long-range remote to control the VA-1000.While learning to fly your VA-1000 it is best to start in a large space with the drone facing away from you until you get used to the basic controls. As you master flying your VA-1000 you can move to more advanced maneuvering techniques. Practice makes perfect!
- Move the left Throttle stick up to increase the propeller speed and the VA-1000 will accelerate and ascend.
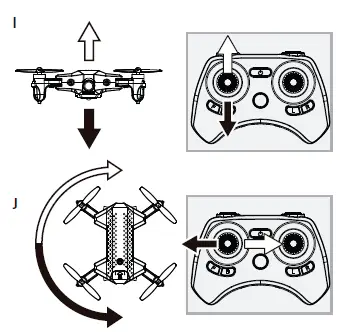
- Move the left Throttle stick down to decrease the propeller speed and the VA-1000 will decelerate and descend (see diagram I).
- While in the air, move the left Throttle stick left and the VA-1000 will rotate left. Move the left Throttle stick right and the VA-1000 will rotate right (see diagram J).

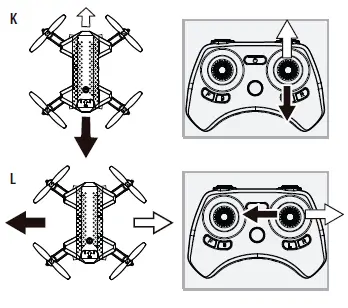
- While in the air, move the right Direction Stick up and the VA-1000 will move forward. Move the right Direction Control down and the VA-1000 will move backward (see diagram K).
- While in the air, move the right Direction Control left and the VA-1000 will bank to the left. Move the right Direction Control right and the VA-1000 will bank to the right (see diagram L).

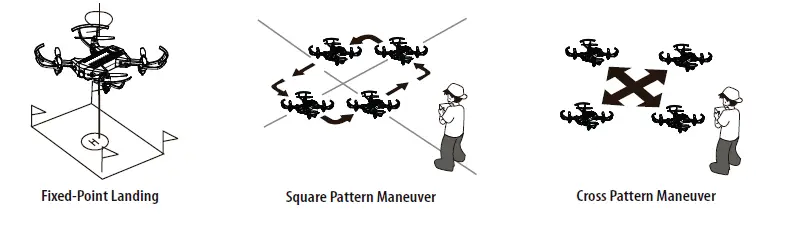
FLIGHT PRACTICE
To master flying your aircraft try practicing the exercises shown below, start with simple vertical takeoffs, landings, and left/right turning and rotating. Once those are mastered move on to square and cross maneuvers. Good luck and have fun!