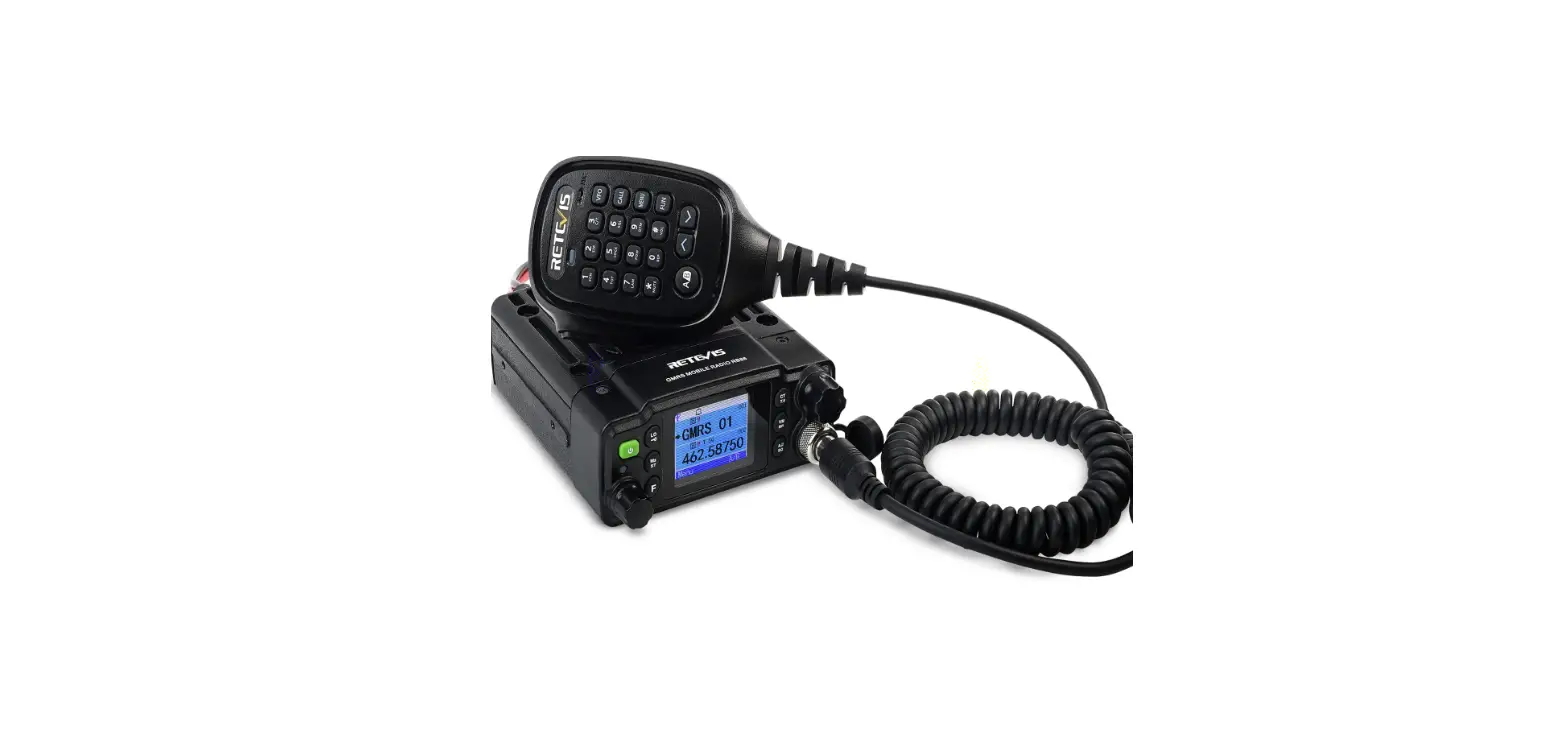
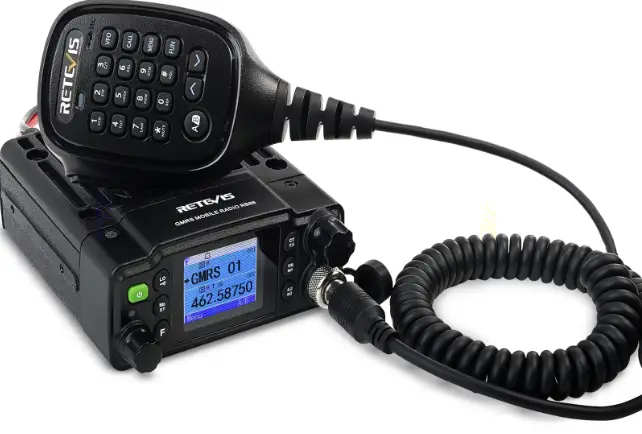
RETEVIS RA86 Mobile Radio
Users Safety Information
- Do not attempt to configure your transceiver while driving.
- This transceiver is designed for a 13.8V DC power supply. Do not use a 24V battery to power on the transceiver.
- Please keep it away from interferential devices (Such as TVs, generators, etc.)
- Don not expose the transceiver to long periods of direct sunlight or place it close to heating appliances.
- If an abnormal odour or smoke is detected coming from the transceiver, turn off the power immediately and contact your dealer.
- Do not transmit with high power for extended periods or the transceiver may overheat.
Notice Before Use
Congratulations on your purchase of a high quality Retevis product. RA86 is designed for General Mobile Radio Service (GMRS) operation. All Retevis GMRS radios can communicate with each other freely. The frequency of GMRS is a shared frequency, and the possibility of interference is relatively high. So the RA86 factory frequency setting is with CTCSS/DCS. If you don’t want CTCSS/DCS in the factory setting, You can cancel the default CTCSS/DCS setting by doing the following.
- Be sure the radio is turned off
- Press and hold the PTT and the Scan button simultaneously,
- With the buttons still held, turn on the radio.
All default CTCSS/DCS settings will be cleared. (i.e. no CTCSS/DCS on all channels)
Mani Features
- 15 GMRS Channels
- 8 Repeater Channels
- 7 Receive Only Channels
- 10 NOAA Weather Channels
- 260 Privacy Codes (50 CTCSS, 105 DCS-N and 105 DCS-I )
- Monitor Function
- Mic Gain
- VOX
- Squelch
- Keypad Lock
- LCD Brightness Settings
- Bandwidth Settings
- Power Hi/Lo Settings
- Automatic Power On Function
- External Speaker Jack
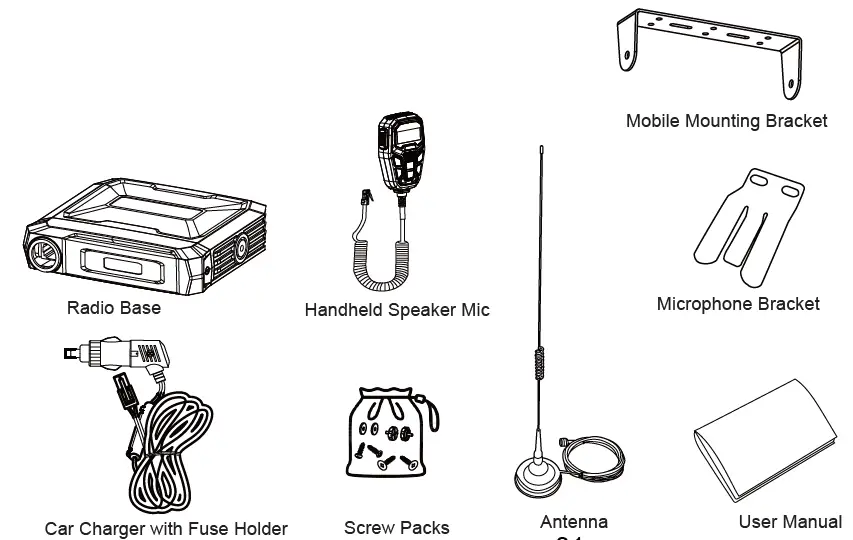
Package Includes
Installing Your Radio
To install the transceiver select a safe and convenient location inside your vehicle that minimizes danger to your passengers and yourself while the vehicle is in motion. Also take into consideration the routing and length of the lead wires and cables to the power source, antenna, and/or optional external speaker.
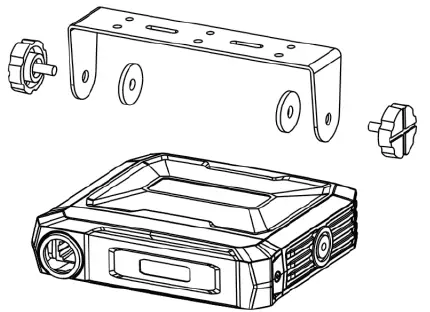
Installing the Mounting Bracket
- Using the mounting bracket as a template, mark the location of each screw hole. Use a nail or other sharp pointed object to mark the hole locations.
- Attach the bracket with the Phillips head sheet metal screws provided. Tighten the screws securely. DO NOT OVER-TIGHTEN.
- Slide the radio into the mounting bracket. BE SURE the mounting bracket retainers engage the slots in the sides of the radio to prevent movement while driving.
Installing the Antenna
The RA86 includes a ”magnetic mount” antenna, intended to be attached to the vehicle’s roof, trunk or similar location. Specific installation requirements vary between vehicles. The Antenna height is 0.54 feet (16.5cm) and the antenna cable is 16.4 feet (5 meters) long.

Electrical and Rear Panel Connections
The power cord supplied with the RA86 is equipped with a cigarette lighter adapter for easy installation. Simply plug the connector into the vehicle’s cigarette lighter.
Connecting the Microphone
Insert the RJ45 connector into the front of the RA86. The microphone mounting bracket can be attached to the vehicle dash or other convenient location in a manner similar to the radio’s mounting bracket.
Using an External Speaker
- The RA86 provides a rear-panel jack for connection of an optional external speaker (purchased separately).
- When selecting an external speaker, ensure the speaker has 8-ohm impedance and is rated for 4.0 watts.
NOTE: When an external speaker is connected, the radio’s internal speaker is automatically disabled.
Radio Introduction
Speaker Mic
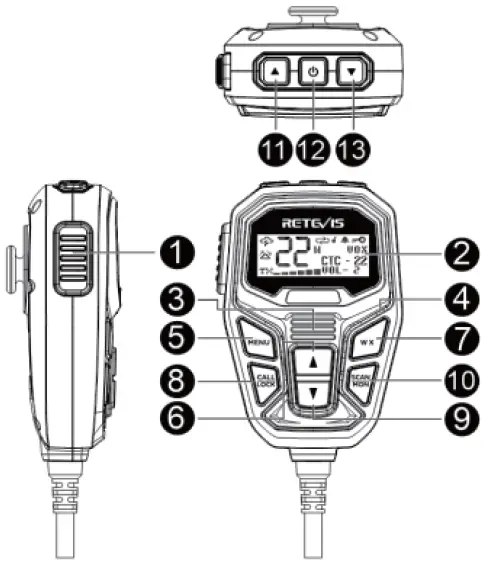
| No. | Name | Short Press Function | Long Press Function |
| 1 | PTT | ||
| 2 | LCD | ||
| 3 | Speaker | ||
| 4 | Speaker Microphone | ||
| 5 | Menu | Enter menu, confirm selection
and exit menu | |
| 6 | Volume+ | Raise volume during standby,
Function selection during menu | Raise volume during standby,
Function selection during menu |
| 7 | WX | Enter weather mode | |
| 8 | Call/Lock | Press to send a call signal | Keypad Lock |
| 9 | Volume- | Lower the volume during standby,
Function selection during menu | Lower the volume during standby,
Function selection during menu |
| 10 | Scan/Mon | Enter/exit scan | Enable/disable monitor |
| 11 | Channel+ | Increase the channel number | Rapidly increase the channel number |
| 12 | Power On/Off Button | Turn on/off the radio | |
| 13 | Channel- | Decrease the channel number | Rapidly decrease the channel number |
Rear panel
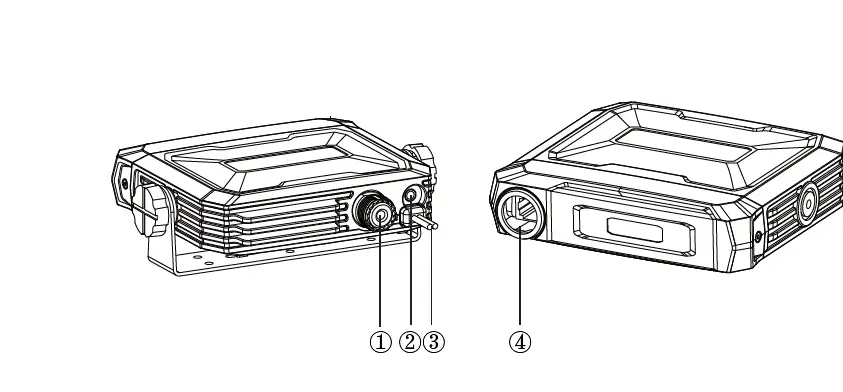
| NO. | Key | Functions |
| 1 | Antenna connector | Connect a 50 ohm antenna |
| 2 | Ex-Speaker Jack | Connect external speaker |
| 3 | Power cable | Connect a standard DC power cable |
| 4 | Microphone Jack | Connect Handheld Speaker Mic |
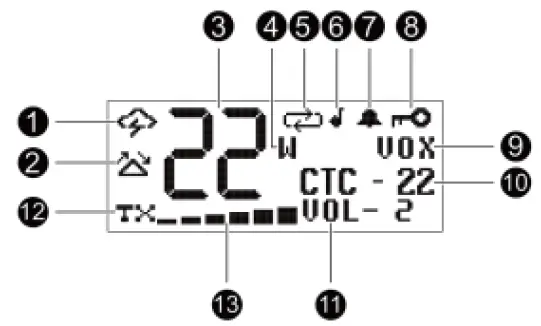
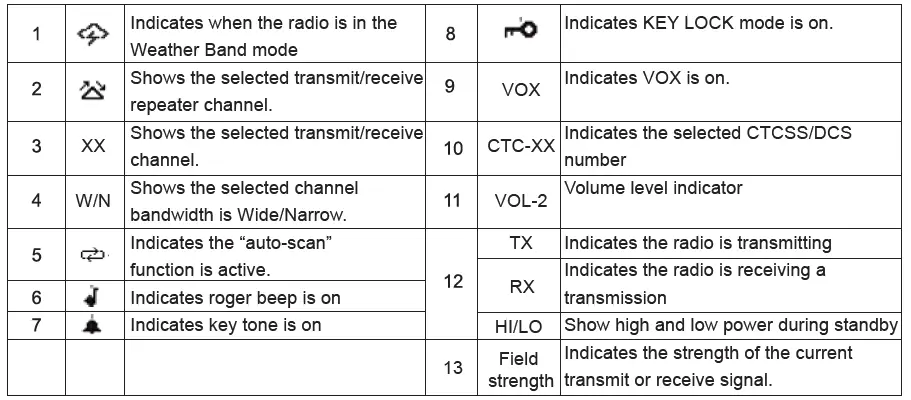
LCD Display
Keypad Function Introduction
- Power On/Off
With the radio off, press and hold the Power Button for three seconds. You will hear a tone when the radio is on.- The LCD display will show Retevis icons for one second and then display the most recently selected channel. With the radio on, press and hold the Power Button for three seconds.
- The LCD display will go blank when the radio turns off.
NOTE: In the case of an unnatural shutdown, the device can be turned on immediately after the next plug in.
- Channel+/-
IMPORTANT! To communicate between two radios, both radios must be set to the same channel and CTCSS/DCS Code selections.
To Select the Active channel:
Short press the Channel+ button on the microphone to scroll forward through the available channels. Short press the Channel- button on the microphone to scroll backward through the available channels.- Rapidly switch channel number by Long pressing the Channel+ or Channel-.
- The Channel icon on the LCD display will show the active channel.
- PTT key
To transmit a call, press and hold the PTT button on the microphone, and speak into the microphone in a normal voice. The TX icon and Signal Strength will show continuously on the LCD display while transmitting.
NOTE:- For maximum clarity, hold the microphone 2 to 3 inches from your mouth when speaking.
- The 08-14 channel of the radio is only allowed to receive, not to transmit. The radio will have a long tone when you press PTT.
- Keypad lock: Call/Lock
You can use the keypad “lock” function to prevent accidentally changing your radio’s settings. When the function is enabled, the current radio settings are “locked” in place.
NOTE: When the “lock” function is enabled, the PTT button, Volume Buttons and the Call Button on the microphone remain active.
To “lock” and “unlock” the keypad:
Press and hold the Lock button for three seconds.- The Keypad Lock icon will show on the LCD display when the keypad is “locked.” Press and hold the Lock button for three seconds again to “unlock” the keypad.
- The Keypad Lock icon will turn off when the keypad is “unlocked”.
- Call Alert Tone: Call/Lock
Retevis RA86 has 5 selectable Call Alert Tones. Selecting a Call Alert Tone:- Short press the Menu button to place the radio in “Menu” mode.
- Use the MENU button to scroll through the menu options until the LCD display shows CALL TONE.
- Use the Volume Up or Volume Down button to scroll forward or backward through the tone options (01 – 05). When scrolling through the 5 options the sound will be played for you.
- When the desired tone is found, press the MENU button to confirm your selection. Radio will shows the next setting. Or you can long press the MENU to save and exit the menu list directly.
- Monitor: Scan/Mon
Monitor mode lets you check for activity on the current active channel. You can also use Monitor mode to adjust the volume of your radio when not receiving a signal.
To enter and exit Monitor mode:- Long press the Scan/Mon button to enter Monitor mode. You will hear any activity on the current selected channel.
- In the monitor mode, you can adjust the volume by the volume key on the microphone.
- Long press the Scan/Mon button to exit Monitor mode.
- Scan: Scan/Mon
To enter and exit “auto-scan” mode: Short press the Scan button to enter “auto-scan” mode.- The Scanning icon will show on the LCD display when the radio is in “auto-scan” mode.
- Your radio will rapidly scan through the available channels and will pause on any active channel.
- “Auto-scan” will resume when there has been no activity on the current channel for four seconds.
To transmit during “auto scan,” press and hold the PTT button on the microphone while the radio is paused on the desired channel. - The radio will remain on the active channel for ten seconds after the PTT button is released. To exit the “auto-scan” mode, Short press the Scan button.
- The Scanning icon will turn off when the radio is no longer in “auto-scan” mode.
- NOAA Weather forecast:WX
Retevis RA86 has a NOAA Weather Radio function, to enable the user to receive weather reports from designated NOAA stations. Your radio also has a NOAA Weather Scan function, to enable the user to scan all 10 channels for the NOAA National Weather Service. - To enter and exit Weather Scan
Short press the Weather button to enter weather mode.- The radio will then scan all 10 weather channels and stops when the weather channel receives the signal.
- When is scan mode, press the Channel+ or Channel- key, you can switch the scan direction. When scan is stop, press the Channel+ or Channel- key, you can switch the weather channel.
- Press the PTT or WX key to exit Weather Mode.
- To Manually Set the Weather Channel:
With the Weather Scan activated, press the Scan button to exit scanning mode. The Weather icon and active channel will stop flashing and will continuously be displayed on the LCD. Using the Channel Up or the Channel Down buttons on the microphone, manually set the active weather channel. - To Enable Weather Alert:
- With Weather mode activated, press the Scan button to exit scanning mode.
- The weather icon and active channel will stop flashing and will continuously be displayed on the LCD.
- Use the Channel Up or Channel Down on the microphone to select the desired Weather Channel.
- Short press the MENU button to enter the weather forecast alarm switch setting, and use the volume button to select ON/ OFF, press and hold the MENU button again to complete the setting and return to the weather channel.
- After the alarm function is enabled, when the radio is in the weather channel scanning mode, any channel receiving an alarm modulation of 1050HZ will trigger a weather forecast alarm.
- When the radio is on the GMRS channel, it will also watch the weather channel (the watch weather channel is the channel where the user exits the weather forecast).
- Weather alarm work mode
When the radio receives the signal of the alarm channel you set, it will alarm in this mode, and the alarm will cycle once every 20 seconds, and enter the weather forecast mode after the alarm.
The user can set the function of the radio through the menu.
Note: In the process of menu setting, short PTT key or no operation within 5S will automatically exit the menu, the settings of the current menu will not be saved, and the menu that has been set will not be affected.
Channel Menu Quick Reference Chart

POWER LEVEL
Retevis RA86 provides two transmit power levels: HI and Lo. The Lo power level is generally suitable when operating under optimal conditions. The HI power level is recommended to ensure you get maximum range from your radio.
- Short press the MENU button in standby mode until the Power Level menu is displayed;
- Set high/low power by the volume keys on the mic(HI/LO);
- Short press the MENU button to save the settings and enter the next function menu, long press the MENU button to save the settings and exit the menu.
- In standby mode, short press the MENU button until the Band menu is displayed;
- Set wide/narrow band by the volume keys on the mic(Wide/Narrow);
- Short press the MENU button to save the settings and enter the next function menu, long press the MENU button to save the settings and exit the menu.
- In the standby state, short press the MENU button until the TX code menu is displayed;
- Use the volume keys on the microphone to set the transmit CTCSS/DCS (see CTCSS/DCS frequency Chart);
- Short press the MENU button to save the settings and enter the next function menu, long press the MENU button to save the settings and exit the menu.
- When in the transmitting state, the LCD will display the set transmitting CTCSS/DCS.
- In the CTCSS/DCS setting interface, you can switch the display CTCSS/DCS number or CTCSS/DCS frequency by short pressing the SCAN/MON key, and then short press the MENU key to confirm the display mode.
- In the standby state, short press the MENU button until the TX code menu is displayed;
- Use the volume keys on the microphone to set the transmit CTCSS/DCS (see CTCSS/DCS frequency Chart);
- Short press the MENU button to save the settings and enter the next function menu, long press the MENU button to save the settings and exit the menu.
- When the radio is in standby or receiving state, the LCD will display the set receiving CTCSS/DCS.
- In the CTCSS/DCS setting interface, you can switch the display CTCSS/DCS number or CTCSS/DCS frequency by short pressing the SCAN/MON key, and then short press the MENU key to confirm the display mode.
The RA86 has adjustable squelch sensitivity. The minimum squelch level of 01 is the most sensitive, which allows the squelch to open on very weak signals. Setting the squelch to the maximum setting of 09 requires very strong signals to open the squelch.
- In standby mode, short press the MENU button until the SQUELCH menu is displayed;
- Set the squelch level through the volume key on the hand microphone (OFF, 01-09);
- Short press the MENU button to save the settings and enter the next function menu, long press the MENU button to save the settings and exit the menu.
MIC GAIN
Different usage environment needs different microphone sensitivity. The RA86 has adjustable microphone sensitivity.
- Short press the MENU button in standby mode until the Mic Gain menu is displayed;
- Set the microphone gain level (01-03, of which level 03 has the highest microphone gain) by the volume keys on the hand microphone;
- Short press the MENU button to save the settings and enter the next function menu, long press the MENU button to save the settings and exit the menu.
REPEATER
Your RA86 has the ability to access repeater channels. The use of a repeater can significantly increase a radio’s range and coverage area.
Prior to using a repeater you must coordinate with the owner of the repeater to gain permission to use the repeater. Be sure to understand and follow the sharing and usage rules for each repeater system.
- Short press the MENU button in standby mode until the Repeater menu is displayed;
- Use the Volume Up or Volume Down button to select ON or OFF.
- Short press the MENU button to save the settings and enter the next function menu, long press the MENU button to save the settings and exit the menu.
- Short press the MENU button to save the settings and enter the next function menu, long press the MENU button to save the settings and exit the menu.
NOTE: When activated the repeater channels will be displayed as the channel number (Ex. 15,16,17,etc.) and the repeater icon.
CALL TONE
The RA86 has 5 selectable Call Alert Tones.
- Short press the MENU button in standby mode until the Call Tone menu is displayed;
- Use the Volume Up or Volume Down button to scroll forward or backward through the tone options (01 – 05). When scrolling through the 5 options the sound will be played for you;
- Short press the MENU button to save the settings and enter the next function menu, long press the MENU button to save the settings and exit the menu.
KEY TONE
The RA86 has a Silent Operation mode. In this mode, all “beeps” and “tones” are disabled.
- Short press the MENU button in standby mode until the Key Tone menu is displayed;
- Use the Volume Up or Volume Down button to select ON or OFF.;
- Short press the MENU button to save the settings and enter the next function menu, long press the MENU button to save the settings and exit the menu.
ROGER BEEP
When the PTT button on the mic is released, the radio will beep to confirm to other users that your transmission is complete.
- Short press the MENU button in standby mode until the Roger Beep menu is displayed;
- Use the Volume Up or Volume Down button to select ON or OFF.
- Short press the MENU button to save the settings and enter the next function menu, long press the MENU button to save the settings and exit the menu.
VOX
- Short press the MENU button in standby mode until the VOX Level menu is displayed;
- Use the Volume Up or Volume Down button to select the VOX level (OFF, 01-09, of which level 09 is the most sensitive);
- Short press the MENU button to save the settings and enter the next function menu, long press the MENU button to save the settings and exit the menu.
TOT
- Short press MENU in standby state until the TOT menu is displayed;
- Use the Volume Up or Volume Down button to select the TOT time (up to 180s) ;
- Short press the MENU button to save the settings and enter the next function menu, long press the MENU button to save the settings and exit the menu.
BACKLIGHT:
The RA86 has 4 different color options for the LCD Display background.
- Short press the MENU button in standby mode until the Backlight menu is displayed;
- Use the Volume Up or Volume Down button to select the LCD Display background color (00-04, 00 is to turn off the backlight);
- Short press the MENU button to save the settings and enter the next function menu, long press the MENU button to save the settings and exit the menu.
BRIGHTNESS
The RA86 has 3 different screen brightness.
- Short press the MENU key in standby mode until the Brightness menu is displayed;
- Use the Volume Up or Volume Down button to select the backlight brightness level (01-03).
- Short press the MENU button to save the settings and enter the next function menu, long press the MENU button to save the settings and exit the menu.
SLEEP TIME
- In standby mode, short press the MENU button until the Sleep Time menu is displayed;
- Use the Volume Up or Volume Down button to select the sleep time (OFF/5S/10S/20S/30S/60S) .
- Short press the MENU button to save the settings and enter the next function menu, long press the MENU button to save the settings and exit the menu.
When the sleep function takes effect, the LCD backlight and key backlight of the radio will be turned off, and will enter the power saving mode, but the LCD will still display normally.
SPEAKER SELECT
The RA86 has two speakers. You can choose which speaker you would like to use for your audio.
- Short press the MENU button in standby mode until the Speaker Sel menu is displayed;
- Use the Volume Up or Volume Down button to select the speaker status (Base/MIC/DUAL) .
- Short press the MENU button to save the settings and enter the next function menu, long press the MENU button to save the settings and exit the menu.
| Display Option | Description |
| BASE | Radio Base Speaker is Active. Handheld Speaker is Off. |
| MIC | Handheld Speaker is Active. Radio Base Speaker is Off. |
| DUAL | Both the Handheld and the Radio Base Speakers are active. |
RESTORING THE DEFAULT SETTINGS
You can restore the original (factory default) settings for your RA86 at any time.
- Be sure the radio is turned off
- Press and hold the PTT and the WX button simultaneously,
- With the buttons still held, turn on the radio.
- During the reset process, the LCD will display the current software version number;
- After the reset is completed, all the settings of the radio is restored to the factory state.
Factory frequency chart
| CH NO. | TX Frequency(MHz) | RX Frequency(MHz) | Code(Hz) | Power |
| 1 | 462.5625 | 462.5625 | 67.0 | Low |
| 2 | 462.5875 | 462.5875 | 118.8 | Low |
| 3 | 462.6125 | 462.6125 | 127.3 | Low |
| 4 | 462.6375 | 462.6375 | 131.8 | Low |
| 5 | 462.6625 | 462.6625 | 136.5 | Low |
| 6 | 462.6875 | 462.6875 | 141.3 | Low |
| 7 | 462.7125 | 462.7125 | 146.2 | Low |
| 8 | / | 467.5625 | D243N | Low |
| 9 | / | 467.5875 | D032N | Low |
| 10 | / | 467.6125 | D047N | Low |
| 11 | / | 467.6375 | D051N | Low |
| 12 | / | 467.6625 | D053N | Low |
| CH NO. | TX Frequency(MHz) | RX Frequency(MHz) | Code(Hz) | Power |
| 13 | / | 467.6875 | D065N | Low |
| 14 | / | 467.7125 | D116N | Low |
| 15 | 462.5500 | 462.5500 | 123.0 | High |
| 16 | 462.5750 | 462.5750 | D743I | High |
| 17 | 462.6000 | 462.6000 | D332I | High |
| 18 | 462.6250 | 462.6250 | 127.3 | High |
| 19 | 462.6500 | 462.6500 | D243I | High |
| 20 | 462.6750 | 462.6750 | D606N | High |
| 21 | 462.7000 | 462.7000 | D731I | High |
| 22 | 462.7250 | 462.7250 | 136.5 | High |
| 15RP | 467.5500 | 462.5500 | – | High |
| 16RP | 467.5750 | 462.5750 | – | High |
| 17RP | 467.6000 | 462.6000 | – | High |
| 18RP | 467.6250 | 462.6250 | – | High |
| 19RP | 467.6500 | 462.6500 | – | High |
| 20RP | 467.6750 | 462.6750 | – | High |
| 21RP | 467.7000 | 462.7000 | – | High |
| 22RP | 467.7250 | 462.7250 | – | High |
Weather forecast channel frequency table
| Channel | RX | Channel | RX |
| 1 | 162.5500 | 6 | 162.5000 |
| 2 | 162.4000 | 7 | 162.5250 |
| 3 | 162.4750 | 8 | 161.6500 |
| 4 | 162.4250 | 9 | 161.7750 |
| 5 | 162.4500 | 10 | 163.2750 |
CTCSS/DCS frequency table
CTCSS
| NO. | NO. | NO. | NO. | ||||
| CTC-01 | 67.0 | CTC-15 | 85.4 | CTC-29 | 165.5 | CTC-43 | 210.7 |
| CTC-02 | 69.3 | CTC-16 | 88.5 | CTC-30 | 167.9 | CTC-44 | 218.1 |
| CTC-03 | 71.9 | CTC-17 | 91.5 | CTC-31 | 171.3 | CTC-45 | 225.7 |
| CTC-04 | 74.4 | CTC-18 | 94.8 | CTC-32 | 173.8 | CTC-46 | 229.1 |
| CTC-05 | 77.0 | CTC-19 | 97.4 | CTC-33 | 177.3 | CTC-47 | 233.6 |
| CTC-06 | 79.7 | CTC-20 | 100.0 | CTC-34 | 179.9 | CTC-48 | 241.8 |
| CTC-07 | 82.5 | CTC-21 | 103.5 | CTC-35 | 183.5 | CTC-49 | 250.3 |
| CTC-08 | 85.4 | CTC-22 | 136.5 | CTC-36 | 186.2 | CTC-50 | 254.1 |
| CTC-09 | 88.5 | CTC-23 | 141.3 | CTC-37 | 189.9 | ||
| CTC-10 | 91.5 | CTC-24 | 146.2 | CTC-38 | 192.8 | ||
| CTC-11 | 94.8 | CTC-25 | 151.4 | CTC-39 | 196.6 | ||
| CTC-12 | 97.4 | CTC-26 | 156.7 | CTC-40 | 199.5 | ||
| CTC-13 | 100.0 | CTC-27 | 159.8 | CTC-41 | 203.5 | ||
| CTC-14 | 103.5 | CTC-28 | 162.2 | CTC-42 | 206.5 |
DCS
| NO. | Code | NO. | Code | NO. | Code | NO. | Code | NO. | Code |
| DCS-001 | D023N | DCS-043 | D251N | DCS-085 | D532N | DCS-127 | D131I | DCS-169 | D371I |
| DCS-002 | D025N | DCS-044 | D252N | DCS-086 | D546N | DCS-128 | D132I | DCS-170 | D411I |
| DCS-003 | D026N | DCS-045 | D255N | DCS-087 | D565N | DCS-129 | D134I | DCS-171 | D412I |
| DCS-004 | D031N | DCS-046 | D261N | DCS-088 | D606N | DCS-130 | D143I | DCS-172 | D413I |
| DCS-005 | D032N | DCS-047 | D263N | DCS-089 | D612N | DCS-131 | D145I | DCS-173 | D423I |
| DCS-006 | D036N | DCS-048 | D265N | DCS-090 | D624N | DCS-132 | D152I | DCS-174 | D431I |
| DCS-007 | D043N | DCS-049 | D266N | DCS-091 | D627N | DCS-133 | D155I | DCS-175 | D432I |
| DCS-008 | D047N | DCS-050 | D271N | DCS-092 | D631N | DCS-134 | D156I | DCS-176 | D445I |
| DCS-009 | D051N | DCS-051 | D274N | DCS-093 | D632N | DCS-135 | D162I | DCS-177 | D446I |
| DCS-010 | D053N | DCS-052 | D306N | DCS-094 | D645N | DCS-136 | D165I | DCS-178 | D452I |
| DCS-011 | D054N | DCS-053 | D311N | DCS-095 | D654N | DCS-137 | D172I | DCS-179 | D454I |
| DCS-012 | D065N | DCS-054 | D315N | DCS-096 | D662N | DCS-138 | D174I | DCS-180 | D455I |
| DCS-013 | D071N | DCS-055 | D325N | DCS-097 | D664N | DCS-139 | D205I | DCS-181 | D462I |
| DCS-014 | D072N | DCS-056 | D331N | DCS-098 | D703N | DCS-140 | D212I | DCS-182 | D464I |
| DCS-015 | D073N | DCS-057 | D332N | DCS-099 | D712N | DCS-141 | D223I | DCS-183 | D465I |
| DCS-016 | D074N | DCS-058 | D343N | DCS-100 | D723N | DCS-142 | D225I | DCS-184 | D466I |
| DCS-017 | D114N | DCS-059 | D346N | DCS-101 | D731N | DCS-143 | D226I | DCS-185 | D503I |
| DCS-018 | D115N | DCS-060 | D351N | DCS-102 | D732N | DCS-144 | D243I | DCS-186 | D506I |
| DCS-019 | D116N | DCS-061 | D356N | DCS-103 | D734N | DCS-145 | D244I | DCS-187 | D516I |
| DCS-020 | D122N | DCS-062 | D364N | DCS-104 | D743N | DCS-146 | D245I | DCS-188 | D523I |
| DCS-021 | D125N | DCS-063 | D365N | DCS-105 | D754N | DCS-147 | D246I | DCS-189 | D526I |
| DCS-022 | D131N | DCS-064 | D371N | DCS-106 | D023I | DCS-148 | D251I | DCS-190 | D532I |
| DCS-023 | D132N | DCS-065 | D411N | DCS-107 | D025I | DCS-149 | D252I | DCS-191 | D546I |
| DCS-024 | D134N | DCS-066 | D412N | DCS-108 | D026I | DCS-150 | D255I | DCS-192 | D565I |
| DCS-025 | D143N | DCS-067 | D413N | DCS-109 | D031I | DCS-151 | D261I | DCS-193 | D606I |
| DCS-026 | D145N | DCS-068 | D423N | DCS-110 | D032I | DCS-152 | D263I | DCS-194 | D612I |
| DCS-027 | D152N | DCS-069 | D431N | DCS-111 | D036I | DCS-153 | D265I | DCS-195 | D624I |
| DCS-028 | D155N | DCS-070 | D432N | DCS-112 | D043I | DCS-154 | D266I | DCS-196 | D627I |
| DCS-029 | D156N | DCS-071 | D445N | DCS-113 | D047I | DCS-155 | D271I | DCS-197 | D631I |
| DCS-030 | D162N | DCS-072 | D446N | DCS-114 | D051I | DCS-156 | D274I | DCS-198 | D632I |
| DCS-031 | D165N | DCS-073 | D452N | DCS-115 | D053I | DCS-157 | D306I | DCS-199 | D645I |
| DCS-032 | D172N | DCS-074 | D454N | DCS-116 | D054I | DCS-158 | D311I | DCS-200 | D654I |
| DCS-033 | D174N | DCS-075 | D455N | DCS-117 | D065I | DCS-159 | D315I | DCS-201 | D662I |
| DCS-034 | D205N | DCS-076 | D462N | DCS-118 | D071I | DCS-160 | D325I | DCS-202 | D664I |
| DCS-035 | D212N | DCS-077 | D464N | DCS-119 | D072I | DCS-161 | D331I | DCS-203 | D703I |
| DCS-036 | D223N | DCS-078 | D465N | DCS-120 | D073I | DCS-162 | D332I | DCS-204 | D712I |
| DCS-037 | D225N | DCS-079 | D466N | DCS-121 | D074I | DCS-163 | D343I | DCS-205 | D723I |
| DCS-038 | D226N | DCS-080 | D503N | DCS-122 | D114I | DCS-164 | D346I | DCS-206 | D731I |
| DCS-039 | D243N | DCS-081 | D506N | DCS-123 | D115I | DCS-165 | D351I | DCS-207 | D732I |
| DCS-040 | D244N | DCS-082 | D516N | DCS-124 | D116I | DCS-166 | D356I | DCS-208 | D734I |
| DCS-041 | D245N | DCS-083 | D523N | DCS-125 | D122I | DCS-167 | D364I | DCS-209 | D743I |
| DCS-042 | D246N | DCS-084 | D526N | DCS-126 | D125I | DCS-168 | D365I | DCS-210 | D754I |
Technical Specifications
| GENERAL | |
| Frequency Range | GMRS |
| Number of Channels | 23 channels |
| Channel Spacing | 25K (Wide Band) 12.5K (Narrow band) |
| Operating Voltage | DC 13.8V (Standard version) DC 12.6-14.4V (Optional version) |
| Frequency Stability | ±2.5ppm |
| Operating Temperature | -30℃-+55℃ |
| RECEIVER | |
| Adjacent Channel Selectivity | ≥60dB |
| Receiving sensitivity | ≤-122m@SINAD=12dB |
| Audio distortion | ≤8% |
| Audio power output | 3.2v-4.2v@8R SPK@AF=1KHz.FM Devation=1.5KHZ |
| TRANSMITTER | |
| Power Output | ≤20W |
| Modulation | FM |
Before using this radio, read this guide which contains important operating instructions for safe usage and rf energy awareness and control for compliance with applicable standards and regulations.
- User instructions should accompany the device when transferred to other users.
- Do not use this device if the operational requirements described herein are not met.
This two-way radio uses electromagnetic energy in the radio frequency (RF) spectrum to provide communica-tions between two or more users over a distance. RF energy, which when used improperly, can cause biological damage. All Retevis two-way radios are designed, manufactured, and tested to ensure they meet government-established RF exposure levels. In addition, manufacturers also recommend specific operating instructions to users of two-way radios. These instructions are important because they inform users of RF energy exposure and provide simple procedures on how to control it. Please refer to the following websites for more information on what RF energy exposure is and how to control your exposure to assure compliance with established RF exposure limits: http://www.who.int/en/ When two-way radios are used as a consequence of employment, the Local Government Regulations requires users to be fully aware of and able to control their exposure to meet occupational requirements. Exposure awareness can be facilitated by the use of a product label directing users to specific user awareness information. Your Retevis two-way radio has a RF Exposure Product Label. Also, your Retevis user manual, or separate safety booklet includes information and operating instructions required to control your RF exposure and to satisfy compliance requirements.
Radio License(only applicable to licensed radio)
Governments keep the radios in classification, business two-way radios operate on radio frequencies that are regulated by the local radio management departments (FCC, ISED, OFCOM, ANFR, BFTK, Bundesnetzagen- tur…).To transmit on these frequencies, you are required to have a license issued by them. The detailed classification and the use of your two radios, please contact the local government radio management departments. Use of this radio outside the country where it was intended to be distributed is subject to government regulations and may be prohibited.
Unauthorized modification and adjustment
Changes or modifications not expressly approved by the party responsible for compliance may void the user’s authority granted by the local government radio management departments to operate this radio and should not be made. To comply with the corresponding requirements, transmitter adjustments should be made only by or under the supervision of a person certified as technically qualified to perform transmitter maintenance and repairs in the private land mobile and fixed services as certified by an organization representative of the user of those services. Replacement of any transmitter component (crystal, semiconductor, etc.) not authorized by the local government radio management departments equipment authorization for this radio could violate the rules.
FCC
FCC Requirements:
This device complies with part 15 of the FCC Rules. Operation is subject to the following two conditions: (1) This device may not cause harmful interference,and (2) this device must accept any interference received, including interference that may cause undesired operation.
(Only Applicable to GMRS radio station):
A valid individual license is required to operate a GMRS station. To obtain an individual license, an applicant must be eligible and follow the applicable rules and procedures established by FCC. The applicant must pay the required application and regulatory fees. Each individual license in the GMRS will normally have a term of ten years from the date of grant or renewal, and may be renewed pursuant to the procedures of FCC. To obtain a GMRS operator license, you need FCC Form 605 & 159, we suggest visiting the FCC website at https://www.fcc.gov/wireless/support/fcc-form-605, which includes necessary instructions. More questions about the license application, please contact the FCC at 1-888-225-5322 or go to the FCC’s website: http://www.fcc.gov.
According to FCC rules, any individual who holds an individual license may allow his or her immediate family members to operate his or her GMRS station or stations. Immediate family members are the licensee’s spouse, children, grandchildren, stepchildren, parents, grandparents, stepparents, brothers, sisters, aunts, uncles, nieces, nephews, and in-laws.
This equipment has been tested and found to comply with the limits for a Class B digital device, pursuant to part 15 of the FCC Rules. These limits are designed to provide reasonable protection against harmful interference in a residential installation. This equipment generates, uses and can radiate radio frequency energy and, if not installed and used in accordance with the instructions, may cause harmful interference to radio communications. However, there is no guarantee that interference will not occur in a particular installation. If this equipment does cause harmful interference to radio or television reception, which can be determined by turning the equipment off and on, the user is encouraged to try to correct the interference by one or more of the following measures:
- Reorient or relocate the receiving antenna.
- Increase the separation between the equipment and receiver.
- Connect the equipment into an outlet on a circuit different from that to which the receiver is connected.
- Consult the dealer or an experienced radio/TV technician for help.
Disposal
Disposal
The crossed-out wheeled-bin symbol on your product, literature, or packaging reminds you that in the European Union, all electrical and electronic products, batteries, and accumulators (rechargeable batteries) must be taken to designated collection locations at the end of their working life. Do not dispose of these products as unsorted municipal waste. Dispose of them according to the laws in your area.
RF Exposure Compliance and Control Guidelines and Operating Instructions
- General population/uncontrolled Radio, this radio is designed for and classified as “General population/uncon-trolled Use”.
- To control your exposure and ensure compliance with the occupational/controlled environment exposure limits, always adhere to the following procedures. When operating in front of the face, worn on the body, always place the radio in a Retevis approved clip, holder, holster, case, or body harness for this product. Using approved body-worn accessories is important because the use of Non-Retevis approved accessories may result in exposure levels, which exceed the IEEE/ICNIRP RF exposure limits.
- Transmit no more than the rated duty factor of 50% of the time. To Transmit (Talk), push the Push to Talk (PTT) button. To receive calls (listen), release the PTT button.
- Transmitting necessary information or less, is important because the radio generates measurable RF energy exposure only when transmitting in terms of measuring for standards compliance.
- DO NOT operate the radio without a proper antenna attached, as this may damage the radio and may also cause you to exceed RF exposure limits. A proper antenna is the antenna supplied with this radio by the manufacturer or an antenna specifically authorized by the manufacturer for use with this radio, and the antenna gain shall not exceed the specified gain by the manufacturer declared.
- DO NOT transmit for more than 50% of total radio use time, more than 50% of the time can cause RF exposure compliance requirements to be exceeded.
- During transmissions, your radio generates RF energy that can possibly cause interference with other devices or systems. To avoid such interference, turn off the radio in areas where signs are posted to do so.
- DO NOT operate the transmitter in areas that are sensitive to electromagnetic radiation such as hospitals, aircraft, and blasting sites.
- Mobile Device, during operation, the separation distance between user and the antenna subjects to actual regulations, this separation distance will ensure that there is sufficient distance from a properly installed externally-mounted antenna to satisfy the RF exposure requirements. Transmit only when people outside the vehicle are at least the recommended minimum lateral distance 44away from a properly installed according to installation instructions, externally mounted antenna.
This equipment should be installed and operated with a minimum distance of 45.2cm between the radiator and you body.
Electromagnetic Interference/Compatibility
NOTE: Nearly every electronic device is susceptible to electromagnetic interference (EMI) if inadequately shielded, designed, or otherwise configured for electromagnetic compatibility.
Avoid Choking Hazard
Turn off your radio power in the following conditions:
- Turn off your radio before removing (installing) a battery or accessory or when charging battery.
- Turn off your radio when you are in a potentially hazardous environments: Near electrical blasting caps, in a blasting area, in explosive atmospheres (inflammable gas, dust particles, metallic powders, grain powders, etc.).
- Turn off your radio while taking on fuel or while parked at gasoline service stations.
To avoid electromagnetic interference and/or compatibility conflicts - Turn off your radio in any facility where posted notices instruct you to do so, hospitals or health care facilities (Pacemakers, Hearing Aids and Other Medical Devices) may be using equipment that is sensitive to external RF energy.
- Turn off your radio when on board an aircraft. Any use of a radio must be in accordance with applicable regulations per airline crew instructions.
Protect your hearing:
- Use the lowest volume necessary to do your job.
- Turn up the volume only if you are in noisy surroundings.
- Turn down the volume before adding headset or earpiece.
- Limit the amount of time you use headsets or earpieces at high volume.
- When using the radio without a headset or earpiece, do not place the radio’s speaker directly against your ear
- Use careful with the earphone maybe possible excessive sound pressure from earphones and headphones can cause hearing loss
Note: Exposure to loud noises from any source for extended periods of time may temporarily or permanently affect your hearing. The louder the radio’s volume, the less time is required before your hearing could be affected. Hearing damage from loud noise is sometimes undetectable at first and can have a cumulative effect.
Avoid Burns
Antennas
- Do not use any radio that has a damaged antenna. If a damaged antenna comes into contact with the skin when the radio is in use, a minor burn can result.
Long transmission - When the transceiver is used for long transmissions, the radiator and chassis will become hot.
Safety Operation
Forbid
- Do not use charger outdoors or in moist environments, use only in dry locations/conditions.
- Do not disassemble the charger, that may result in risk of electrical shock or fire.
- Do not operate the charger if it has been broken or damaged in any way.
- Do not place a portable radio in the area over an air bag or in the air bag deployment area. The radio may be propelled with great force and cause serious injury to occupants of the vehicle when the air bag inflates.
To reduce risk
- Pull by the plug rather than the cord when disconnecting the charger.
- Unplug the charger from the AC outlet before attempting any maintenance or cleaning.
- Contact Retevis for assistance regarding repairs and service.
- The adapter shall be installed near the equipment and shall be easily accessible
Approved Accessories
- This radio meets the RF exposure guidelines when used with the Retevis accessories supplied or designated for the product. Use of other accessories may not ensure compliance with the RF exposure guidelines and may violate regulations.
- For a list of Retevis-approved accessories for your radio model, visit the following website: http://www.Retevis.com
Guarantee
- Model Number:
- Serial Number:
- Purchasing Date:
- Dealer:
- User’s Name:
- Country:
- Post Code:
- Telephone:
- Telephone:
- Address:
- Email:
Remarks:
- This guarantee card should be kept by the user, no replacement if lost.
- Most new products carry a two-year manufacturer’s warranty from the date of purchase. Further details, pls read http://www.retevis.com/after-sale/
- The user can get warranty and after-sales service as below:
- Contact the seller where you buy.
- Products Repaired by Our Local Repair Center
- For warranty service, you will need to provide a receipt proof of purchase from the actual seller for verification
Exclusions from Warranty Coverage:
- To any product damaged by accident.
- In the event of misuse or abuse of the product or as a result of unauthorized alterations or repairs.
- If the serial number has been altered, defaced, or removed
7/F, 13-C, Zhonghaixin Science&Technology Park, No.12 Ganli
E-mail: [email protected]
Facebook: facebook.com/retevis