![]()
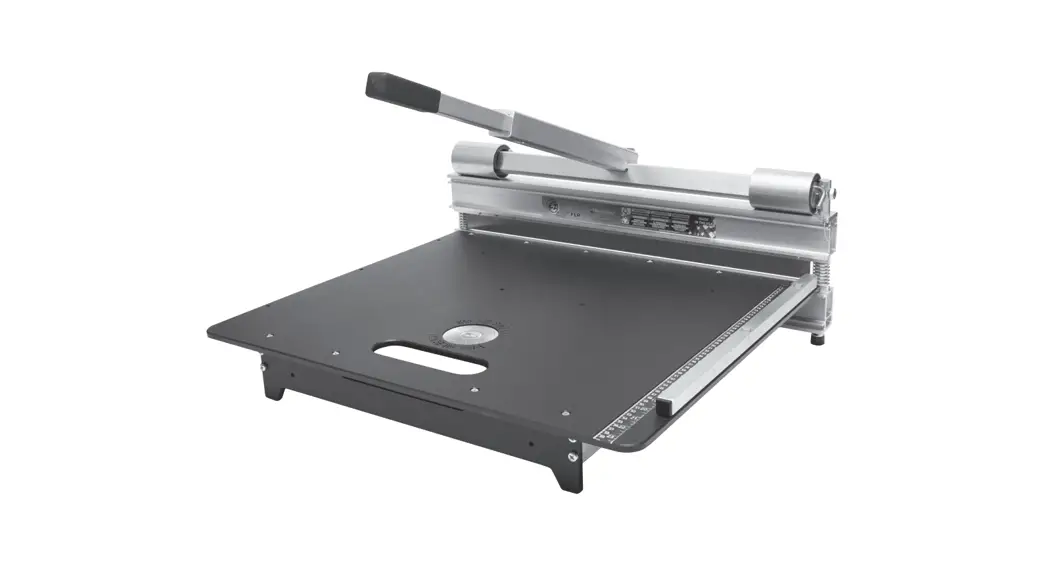
26″ EZ SHEAR FLOORING SHEAR
Part# ES90-0126 | EDI# 29982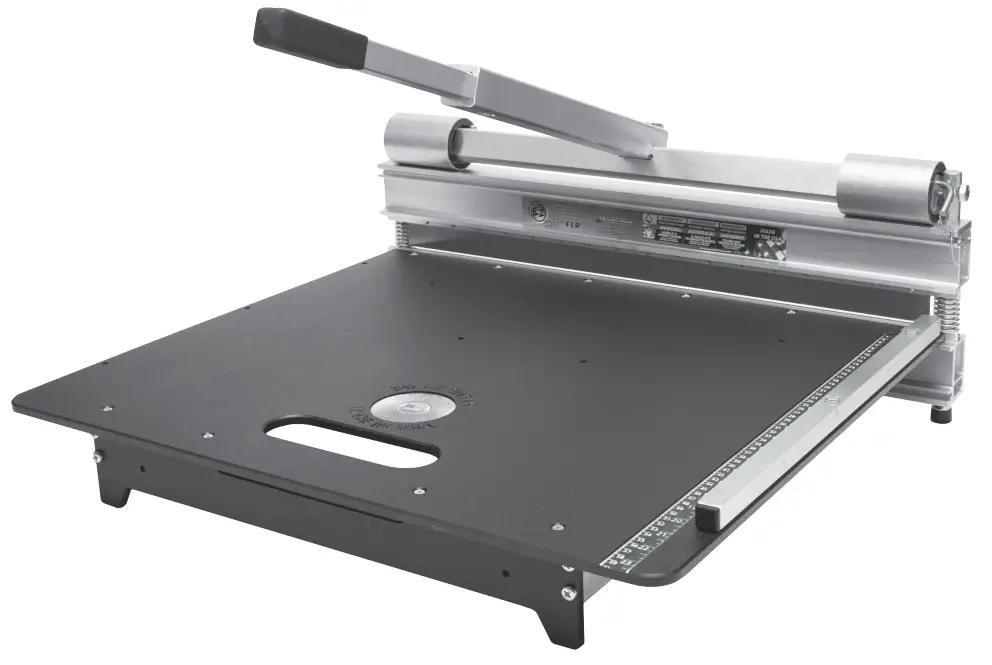
104 S. 8th Ave.
Marshalltown, IA Phone 800-888-0127 / 641-753-0127
Fax 800-477-6341 / 641-753-6341
www.MARSHALLTOWN.com
WS2648revA
INTRODUCTION
Thank you for your purchase of the Bullet by MARSHALLTOWN EZ Shear Flooring Shear. This versatile, light-duty flooring shear is proudly Made in the USA, manufactured with the highest-grade materials, and designed with the flooring professional in mind.
Your new EZ Shear Flooring Shear includes features such as:
- Easy and quiet one-cut action
- Ability to cut inside without dust, noise, or electrical cords
- Built-in ruler for accurate cuts
- A strong, lightweight aircraft-grade aluminum construction
- Handhold for easy transportation
- Metal jacketed bearings for long tool life
- Moveable fence for 45 and 90-degree cuts
And can cut materials up to 5/8″ (15mm) thick, 26″ (660mm) wide, including:
- LVP/LVT/WPC/MLF/SPC
- Engineered Hardwood Flooring (up to 1/2″ / 12mm thick and 1250 Janka–ONLY cut by flipping material over with the back facing up)
- Laminate flooring
- LVP/LVT/VCT
- PVC & Rubber Tile
- Cove Base
- WPC/MLF/SPC
- Carpet Tile · Rigid Core
This owner’s manual provides the information needed to operate and maintain this EZ Shear, Flooring Shear. Carefully read and follow all safety and operating instructions in this manual. Ensure every operator of this flooring shear reads this manual before operating the unit. The replacement of any part on this flooring shear by other than the manufacturer’s authorized replacement part may adversely affect the performance, durability, or safety of the product.
Be sure safety precautions are observed. Read and follow all safety and operating instructions in this operator’s manual.
The manufacturer reserves the right to make changes on or add improvements to its product at any time without prior notice or obligation. The manufacturer reserves the right to decide, upon its sole discretion and at any time, to discontinue this product.
This manual covers the EZ Shear, Flooring Shear. For technical questions or repair parts, please call MARSHALLTOWN customer service at 1-800-888-0127 or visit www.MARSHALLTOWN.com.
SAFETY PRECAUTIONS
 DANGER or WARNING safety signs are located near specific hazards.
- General precautions are listed on CAUTION safety signs.
- This notation appears before warnings in the text. It means that the step that follows must be carried out to avoid the possibility of personal injury or death. These warnings are intended to help the technician avoid any potential hazards encountered in the normal service procedures. We strongly recommend that the reader takes advantage of the information provided to prevent personal injury or injury to others.
THE FOLLOWING PRECAUTIONS ARE SUGGESTED TO HELP PREVENT ACCIDENTS. A CAREFUL OPERATOR IS THE BEST OPERATOR. MOST ACCIDENTS CAN BE AVOIDED BY OBSERVING CERTAIN PRECAUTIONS. READ AND TAKE THE FOLLOWING PRECAUTIONS BEFORE OPERATING THIS EQUIPMENT TO HELP PREVENT ACCIDENTS. EQUIPMENT SHOULD BE OPERATED ONLY BY THOSE WHO ARE RESPONSIBLE AND
INSTRUCTED TO DO SO.
![]() WARNING
WARNING
CALIFORNIA PROPOSITION 65 WARNING: This product can expose you to chemicals known to the State of California to cause cancer, birth defects, or other reproductive harm.
- Read all operating and maintenance instructions before operating or servicing the flooring shear.
- A flooring shear is only as safe as its operator. Give complete and undivided attention to the operation of the flooring shear.
- Know how to stop the flooring shear instantly. WARNING!NEVER operate the flooring shear if any shear components have been removed.
- Keep inexperienced and unauthorized people away from the flooring shear at all times.
- Keep the flooring shear in good operational condition. Loose or damaged parts are dangerous.
- Avoid loose clothing that could get caught in moving parts. WARNING! Keep hands and feet away from moving parts.
- Keep all warning, caution, and safety instruction labels in good condition. Replace missing, damaged or illegible labels.
- Clear the work area around the shear to prevent tripping or falling onto the shear.
- Operate on level ground to prevent the flooring shear from flipping over.
- DO NOT OPERATE this flooring shear under the influence of alcohol or while taking medication that impairs your reactions.
- Use only factory-authorized parts for replacement.
- Wear safety glasses when operating the flooring shear.
- Always use caution when replacing the shear blade.
- Only operate the shear with the approved materials. If extreme force is required to cut a material, it may result in personal injury and/or damage to the flooring shear.
- Wear proper protective clothing while operating flooring shear, including eye, ear, and clothing.
- Handle all solvents and cleaning agents with care and follow the manufacturer’s instructions on safety and disposal.
SAFETY DECALS
If your safety decals are damaged, they can be replaced by contacting Customer Service. Blade Warning Label
Handle Warning Label![]()
WARRANTY
This product is warranted to the original purchaser only, to be free of defects in material and workmanship under normal use, for one year from the purchase date. MARSHALLTOWN shall without charge for parts and labor, repair or replace such parts which are found to be defective. All transportation charges for replacement parts must be borne by the purchaser.
For warranty service, the product must be delivered, with proof of purchase date, to MARSHALLTOWN. Contact MARSHALLTOWN Customer Service to determine the best method of delivering the product that is under warranty. The delivery of the product must be made no later than 30 days after the expiration of the warranty period.
All implied warranties, including those of merchantability and fitness for a particular purpose, are limited to one year from the date of purchase by the original retail customer and to the extent permitted by law any and all implied warranties are excluded and disclaimed after the expiration of such period.
Some states do not allow limitations on how long an implied warranty lasts or the exclusion or limitations of incidental or consequential damages, so the above limitations or exclusions may not apply to you. This warranty gives you specific legal rights, and you may also have other rights, which vary from state to state.
Exclusion from this warranty:
- All consequential damages, including pickup and delivery of the unit, communication, mileage charges and/ or rental of a replacement unit during repairs are not covered under this warranty or are any loss of income and/or other loss resulting from the failure of the product to function due to a warranty defect.
- This warranty will not apply when the product becomes inoperative due to misuse, normal wear, neglect, improper maintenance, accident or freight damage; has not been operated and maintained in accordance with the instructions furnished in the Operator’s Manual; or has been altered or modified without approval from the factory Service Department.
- No parts or products are to be returned to the factory without prior written approval from the factory.
ASSEMBLY
1. Lay out all of the parts.
Tools for Assembly:
- Electric drill or impact driver with #3 Phillips bit
- #3 Phillips Screwdriver
- #2 Phillips Screwdriver
- 1/2″ or 13mm wrench
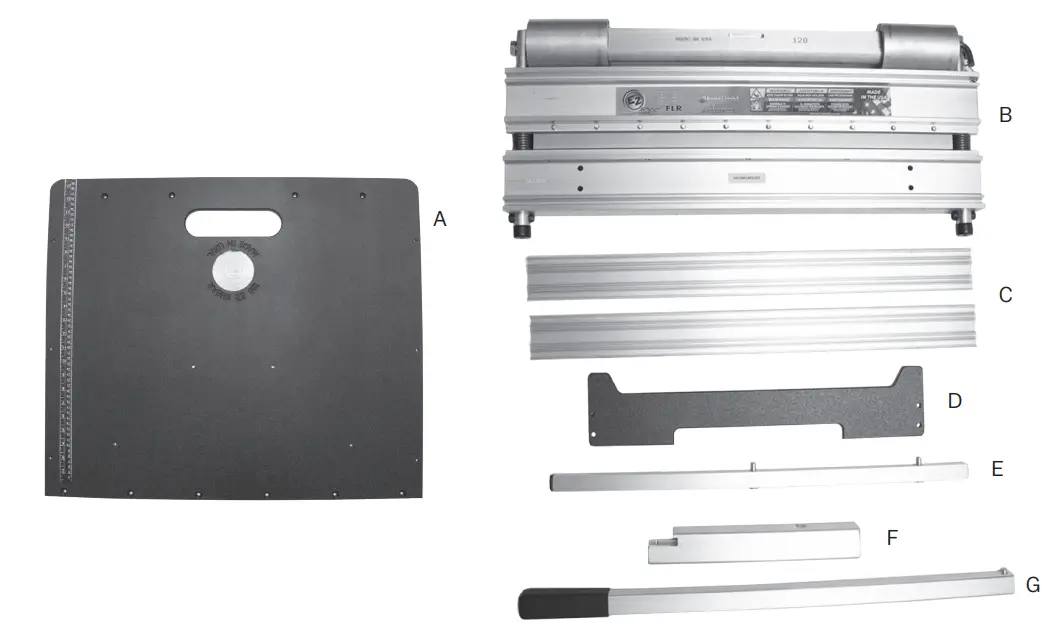
- A. Bed
B. Shear Assembly
C. Bed Brace
D. Leg
E. Bed Fence
F. Handle Assembly
G. Handle
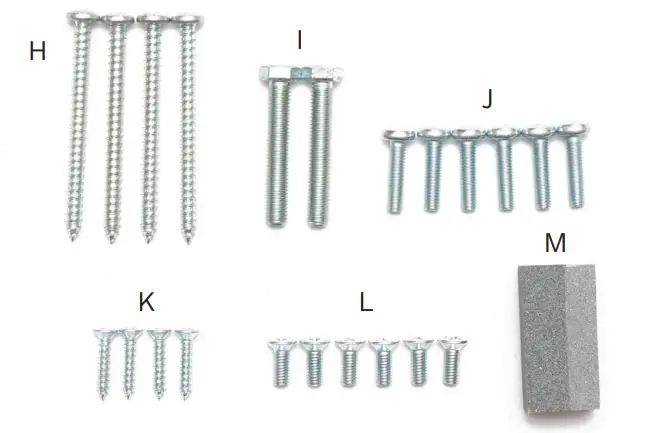
- Layout all hardware.
H. 1/4-14 x 21/2 PHP SMS
I. M8-11/4 x 50 Hex Bolt
J. M6-1 x 16 PHPMS
K. #10 x 3/4 FHPSMS
L. M6-1 x 12 FHPMS
M. Honing Stone (1x)
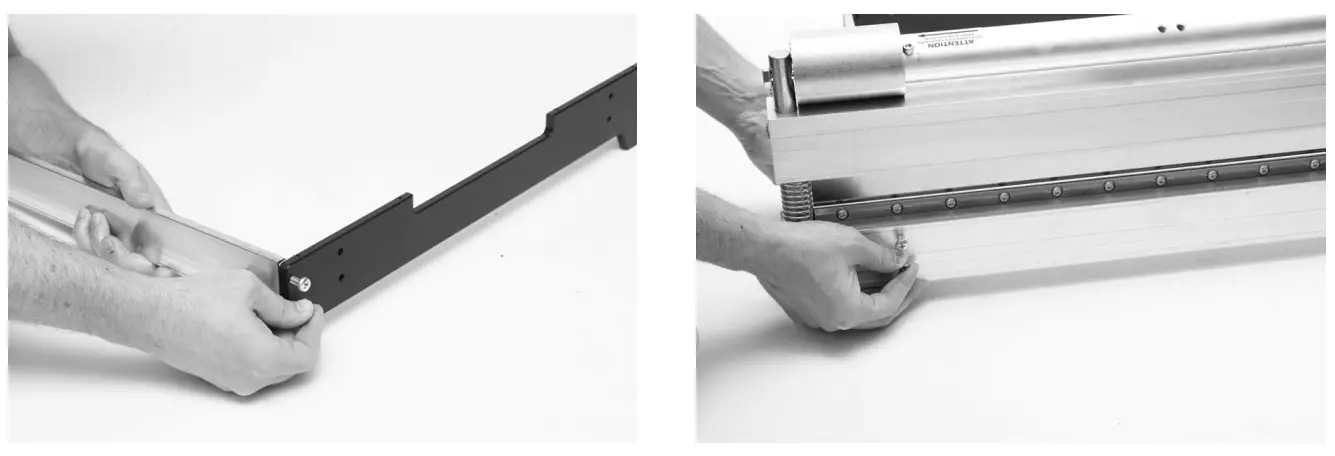
- Attach the Bed Brace (C) Leg (D) using Hardware Set (J).
- Attach the Shear Assembly (B) to the Bed Brace (C) using Hardware Set (H).

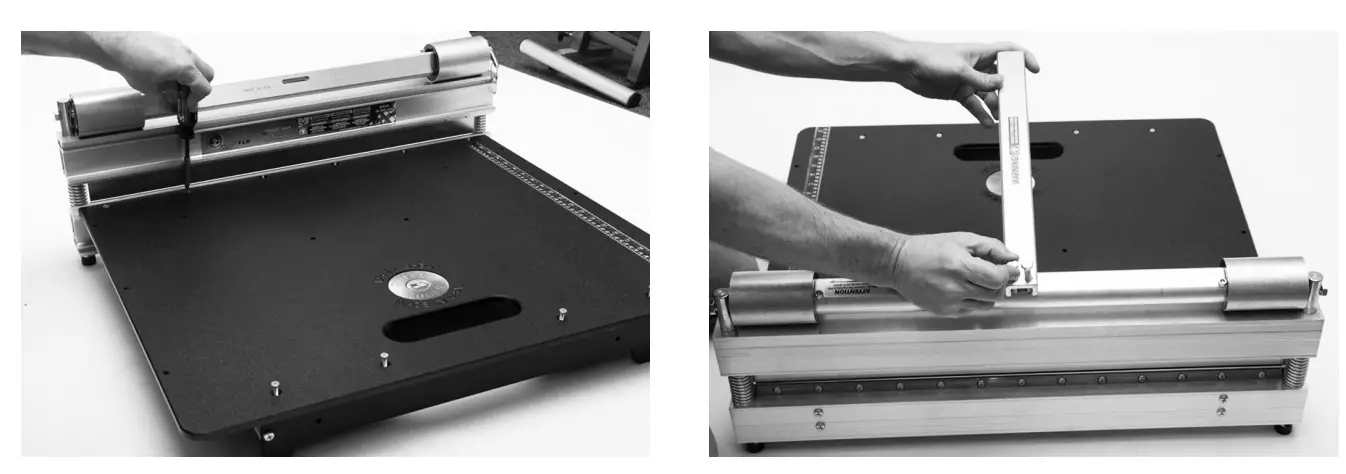
- Attach the Bed (A) to the Shear Assembly (B) using Hardware Set (K) for the back and Hardware Set (L) for the front.
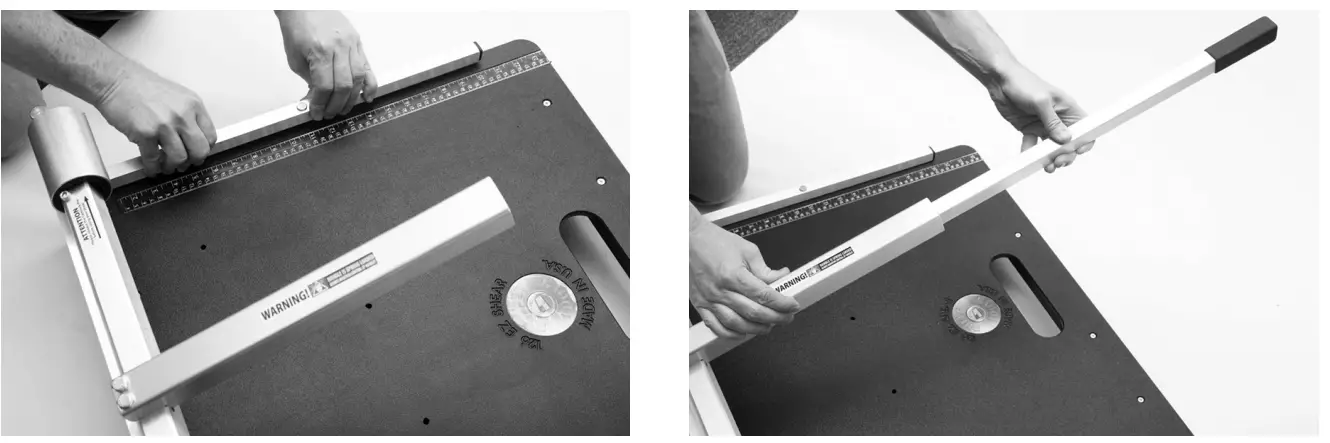
- Attach the Handle Assembly (F) to the Shear Assembly (B) using Hardware Set (I).

- Attach the Bed Fence (E) to the Bed(A).
- Attach the Handle (G) to the Handle Assembly (F).
PRODUCT OPERATION
When most materials are cut, the `drop’ piece will have a beveled edge, while the `keep’ piece (the piece left on the table) will have a mostly square edge.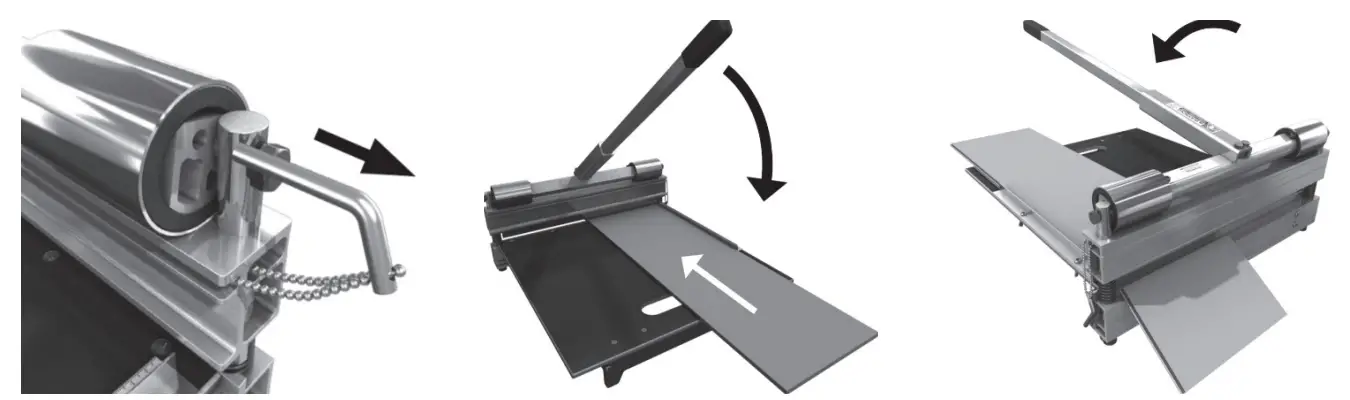
- While gently pushing the handle down, pull the Safety Lock pinout, then lift the handle.
- Place product on the table. It is recommended that you HOLD YOUR MATERIAL IN PLACE until the cut is complete. Bring handle down until blade touches the material.
- Push handle down to cut. Some effort may be required depending of the hardness of the material.
SAFETY LOCK
When not in use, slide the Safety Lock pin into the Power Assembly to lock your tool. To remove, gently push the handle down, pull out the Safety Lock pin, then lift the handle.
TRANSPORT
Always re-engage the Safety Lock pin and secure the extended handle in the down position while storing, carrying, or transporting your shear.
CUTTING GUIDE
The EZ Shear Flooring Shear is designed to cut a variety of materials. Materials include Engineered Hardwood Flooring (up to 1/2″ / 12mm thick and 1250 Janka–ONLY cut by flipping material over with the back facing up), Laminate Flooring, LVT, LVP, VCT, PVC & Rubber Tile, Cove Base, WPC, SPC, MLF, and Rigid Core.
Note: DO NOT attempt to cut any solid wood or high-pressure laminate. Additionally, do not cut engineered hardwood with a Janka Hardness Rating higher than 1250, and do not cut engineered hardwood with a Janka Hardness Rating lower than 1250 without first flipping over the material and cutting with the back facing up.
Note: Even the approved materials may vary greatly in density and hardness. If extreme force is required to cut a material stop immediately, as it could lead to damage to your shear or injury. Attempting to cut unapproved materials will void the warranty.
45 DEGREE CUTS
Firmly lift the friction-fit fence to remove it from the table and press back down in the appropriate 45-degree position.
NOTE: This image is for the Marksman. Your shear may look slightly different.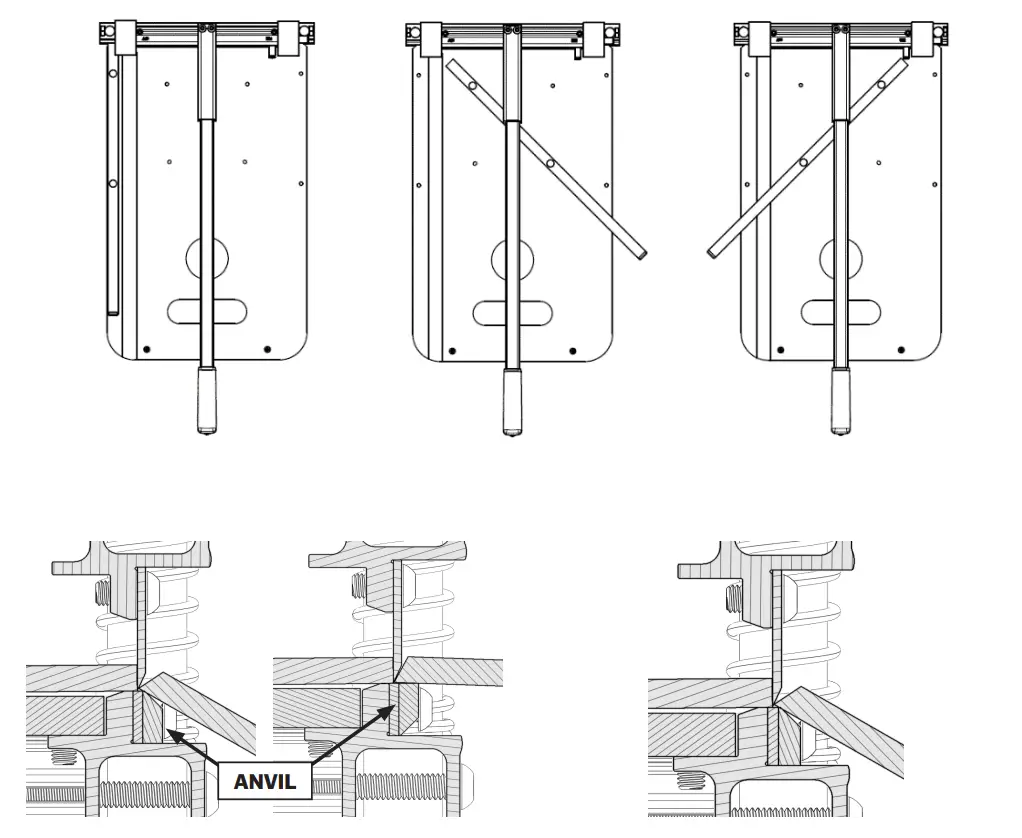
FLOPPY MATERIALS
When cutting floppy materials, flip the anvil: Remove anvil and blade-stop using a 4mm or 5/32″ hex key. Reinstall with flat side up instead of bevel. This makes fibrous and floppy materials (examples: cove base, thin vinyl plank) cut more easily.
For Kevlar® fiber-reinforced materials (example: rubber belting), put flat side of anvil up above, but also remove plastic blade-stop.
DOUBLE CUTTING
Most materials shear very well with just one cut. However, some brands of fiber cement siding and other products may require cutting twice to produce a better cut. Simply make your first cut 1/8″ to 1/4″ (3 to 6mm) longer than your mark, then go back and make your second cut on your mark. This is very useful to create a cleaner cut when a trim molding or transition cannot be used to cover your cut end.
MAINTENANCE
Honing the Blade
Push the handle down until the blade is 1/8″ (3mm) above the tabletop. Place the provided Hone Stone against the flat side of the blade. Slide the honing stone from one end of the blade to the other 3-4 times. This will remove any burrs from your blade.
When you first get your shear, you should hone after your 5th cut, then hone your blade every 10th cut for the first 100 cuts until your blade is broken in. From there, you only need to hone once per job. Use caution when honing the blade. The blade is sharp and can easily cause injury. Cut-resistant gloves are recommended when honing the blade. For more information on honing your blade, scan the QR code or visit www.marshalltown.com/honing-your-blade
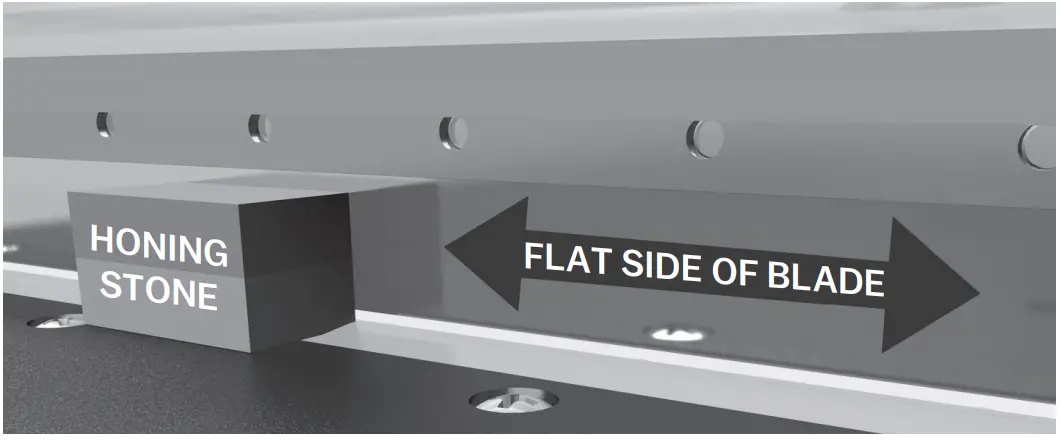
Sharpening the Blade
The blade can be sharpened to restore a one-sided, 21° 22° knife edge. It is important to note that the blade must be sharpened only on the beveled side, leaving the flat side flat. We recommend that powder grinding only be done professionally, as the blade must be fluid cooled during this process.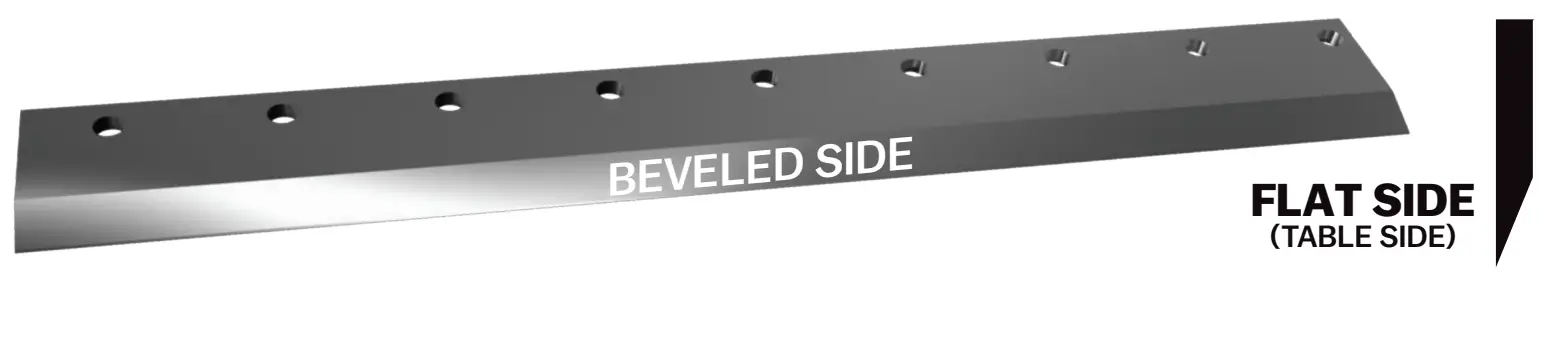
Replacing the Blade
WARNING: Blade is extremely sharp! Use cut-resistant gloves when replacing the blade.
- TURN SHEAR UPSIDE DOWN Tip: put the shear on the edge of a sturdy table.
- LOOSEN BLADE Using a Phillips screwdriver, remove the screws.
- REMOVE BLADE Hold blade by each end and carefully lift out of pocket.
- INSTALL BLADE Hold the blade by each end and carefully place it into the blade pocket in the head, with the flat side of the blade facing the table. Be sure that it is firmly seated, and the pocket is clear of debris.
- TIGHTEN THE BLADE Using a Phillips screwdriver, replace & tighten the screws, starting with the center screw.
NOTE: This image is for the SharpShooter 2.0. Your shear may look slightly different.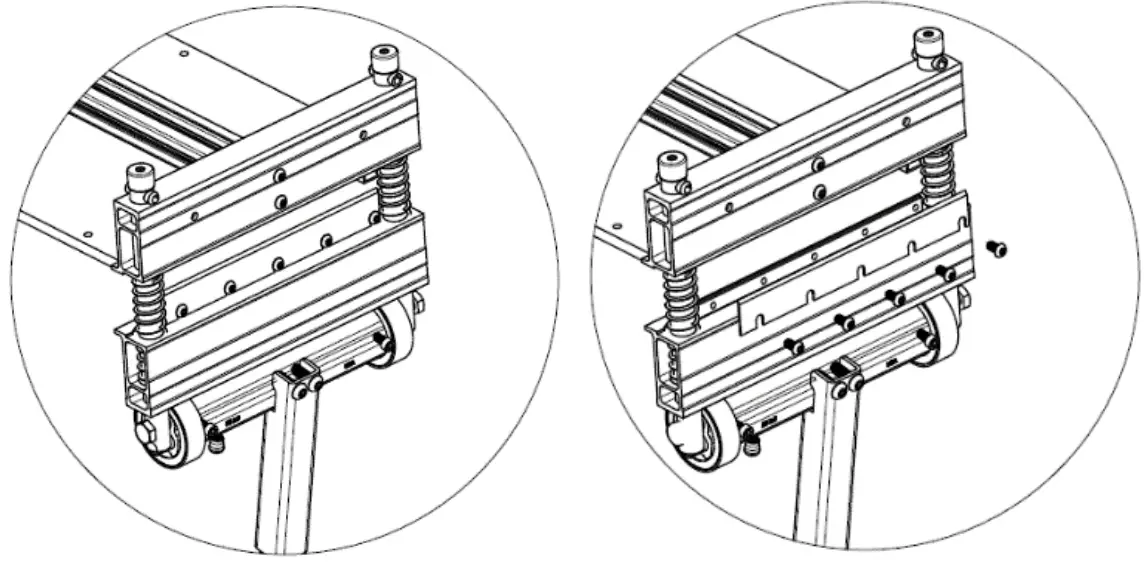
Lubrication
After every 100 cuts, it is recommended that the shear be lubricated. Use a light oil and grease (wheel bearing grease) and apply according to the image below. Lubricating the shear will extend the life of the shear and result in easier cutting.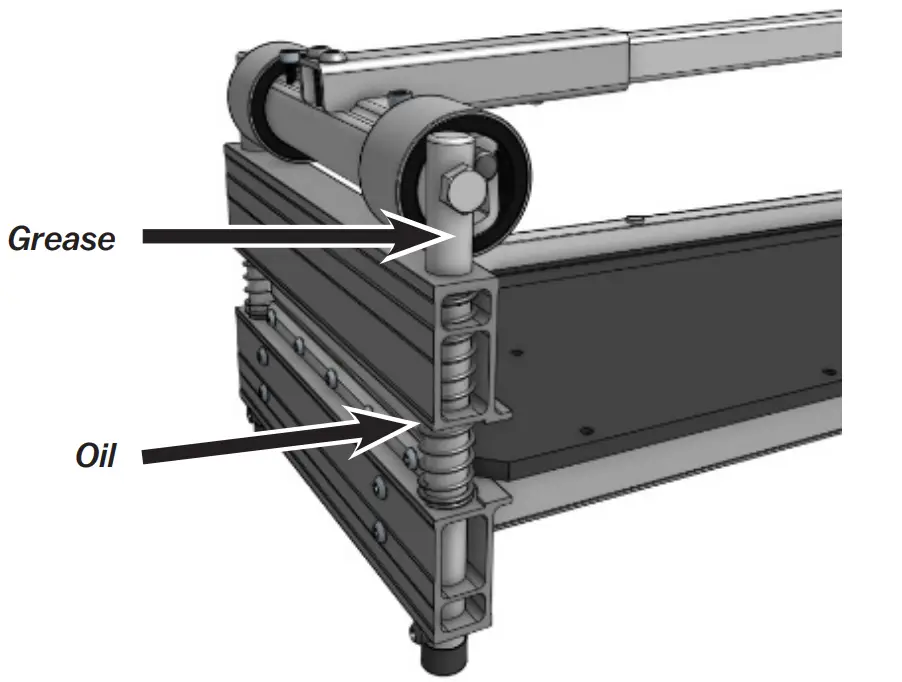
PARTS BREAKDOWN

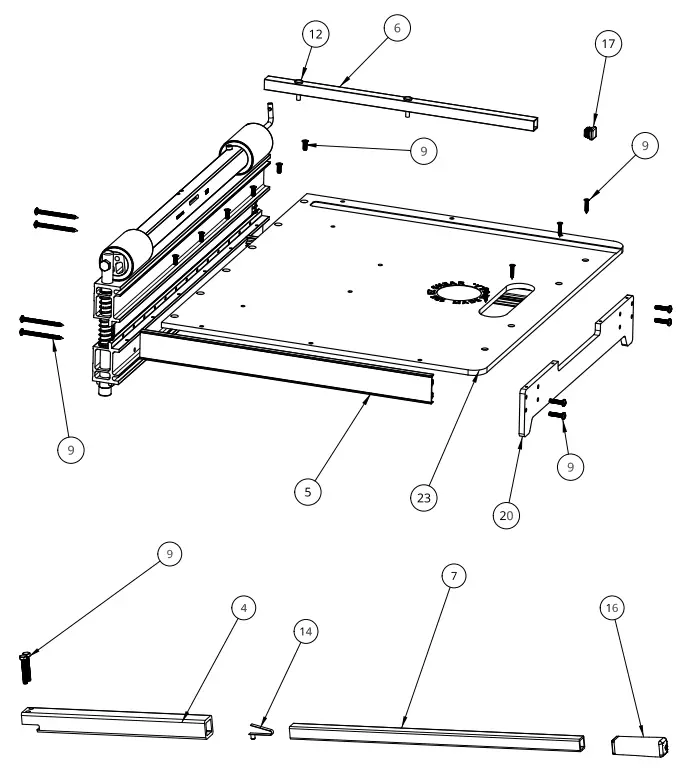

PARTS BREAKDOWN
| REF # | DESCRIPTION | EDI | PART# | QTY |
| 1 | 26″ RCT/FLR HEAD | R7210 | CON-HED-0026 | 1 |
| 2 | EZ 126 CAM | R7124 | CON-CAM-0126 | 1 |
| 3 | 126 FLR BASE | R7084 | CON-BSE-0126 | 1 |
| 4 | 11/2″ SQUARE x 14.8″ LOWER HANDLE | R7200 | CON-HAN-L213 | 1 |
| 5 | EZ SHEAR RAIL 213/8″ | WC1129 | WC1129 | 2 |
| 6 | RIVETED SHEAR FENCE 19.751N | R7178 | CON-FNC-1000 | 1 |
| 7 | EZ UPPER HANDLE | R7205 | CON-HAN-U113 | 1 |
| 8 | EZ SHEAR BENT CAMLOCK PIN | R7153 | CON-CML-0100 | 1 |
| 9 | HARDWARE KIT 120/126/220 | WR1517 | FAS-KIT-0113 | 1 |
| 10 | BOLT, M10 x 80 HEX, 10.9, ZINC PLT | WR1510 | FAS-BLT-EZ80 | 2 |
| 11 | PIN, TENSION, M10 x 30 | WR1508 | FAS-PIN-EZ02 | 2 |
| 12 | 1/4 x 11/4″ FLAT HEAD AL RIVET | WR1553 | FAS-RVT-2513 | 2 |
| 13 | M6-1 x 16, SHCS, ZINC PLT | WR1581 | FAS-SCW-5021 | 2 |
| 14 | BUTTON SPRING, HAIRPIN, 5/16 | WR1630 | GEN-SPR-0847 | 1 |
| 15 | SPRING, COMPRESSION, 0.989 x 4″, x 0.105, 14 COIL | WL1635 | GEN-SPR-4075 | 2 |
| 16 | GRIP, 1″ x 4″, SQ TEXTURED RUBBER | WK230 | GEN-HAN-0100 | 1 |
PARTS BREAKDOWN CONTINUED
| REF # | DESCRIPTION | EDI | PART# | QTY |
| 17 | EZ END CAP, BLACK, FITS 5C) TUBE ID OF 0.584 – 0.68″ | WL790 | GEN-CAP-1075 | 1 |
| 18 | FOOT CAP, 3/4″ BLACK VINYL, FCR-12 | WL793 | GEN-CAP-5039 | 2 |
| 19 | M6 x 12 BHSCS ZP | WR1585 | FAS-SCW-5612 | 30 |
| 20 | EZ-26 TAIL | R7302 | CON-TAL-0226 | 1 |
| 21 | BEARING ASSY, 120 / 126 | R7528 | SUB-BNG-0120 | 2 |
| 22 | 226 BLADE | WX2594 | RAW-BDE-2263 | 1 |
| 23 | 126 TABLE | R7324 | CON-TBL-0126 | 1 |
| 24 | EZ/RCT-26 ANVIL | R7014 | CON-ANV-0526 | 1 |
| 25 | EZ/RCT-26 BLADE STOP | R7112 | CON-BST-0526 | 1 |
| 26 | SET SCREW, M6 x 8 CUP POINT | WR1739 | FAS-SCW-EZ88 | 2 |
| 27 | 3/4″ OD x 5/8 STROKE PIN FOR 1.64 BLADE ZINC PLT | WU943 | COT-PIN-0202 | 2 |
REPLACEMENT PARTS
| REF # | DESCRIPTION | EDI | PART # |
| 22 | REPLACEMENT BLADE, 126FLR | 29798 | 126-B |
| 14 | REPLACEMENT HANDLE SPRING PIN, 5/16″ 1 SIDED | 29860 | 847-RP |
| 4,7,14,16 | REPLACEMENT HANDLE ASSEMBLY | 29877 | 858-RP-EZFLR |
| 4 | REPLACEMENT HANDLE LOWER ONLY | 29880 | 858-RP-L200 |
| 7,14,16 | REPLACEMENT HANDLE UPPER ONLY | 29881 | 858-RP-U009 |
| 16 | REPLACEMENT HANDLE GRIP ONLY | 29906 | 868-RP-EZ |
| 6,12,17 | REPLACEMENT FENCE ASSEMBLY, EZ | 29870 | 856-RP-100F |
| 21 | REPLACEMENT BEARING SET, 120/126 | 29900 | 865-120F-RP |
| 18 | REPLACEMENT FOOT CAPS (3/4″ ID) | 29855 | 838-RP-EZ |
| 5 | REPLACEMENT RAIL SET FOR F-BEAM SHEARS 213/8 | 29858 | 845-RP-W021 |
| 8 | REPLACEMENT CAMLOCK PIN & CHAIN | 29885 | 860-RP-CML |
| 11,18,27 | REPLACEMENT PINS (2EA), 100 SERIES EZ SHEAR | 29892 | 862-RP-100 |
| 9 (PARTIAL) | REPLACEMENT HANDLE ATTACH BOLTS, F BEAM EZ SHEAR | 29897 | 863-RP-EZ50 |
| 10 | REPLACEMENT 10MM X 80MM AXLE BOLT | 29898 | 863-RP-EZ80 |
| 22,24,25,18 | 126 SHEAR MAINTENANCE KIT (FITS MODEL ES90-0126) | 29797 | 126-SMK |
| 24 | ANVIL REPLACEMENT 526/126 | 29869 | 854-RP-526 |
| 25 | BLADE STOP REPLACEMENT 526/126 | 29909 | 869-RP-526 |
| 5 | EXTRUSION-W-RAIL, EZ RAIL, (AL-52865), 21.375″ LONG | WC1129 | WC1129 |
| 19 | M6-1.0 X 12MM ALLEN 10.9 ZINC BUTTON SOCKET CAP SCREW | WR1585 | FAS-SCW-5612 |
TROUBLESHOOTING
Before troubleshooting double-checks the manual:
- Is your shear properly assembled?
- Is it being operated correctly?
- Is it properly lubricated?
- Has the blade been honed as recommended?
Visually inspect shear, watching for objects that might obstruct the blade or powerhead travel:
- Foreign material presence between the blade and anvil, in the pin springs or under the cam.
- Check your blade for chips, cracks, or burrs.
- Make sure bearings are intact and lubricated. They should not be spinning/moving on the cam during use.
NOTE: This troubleshooting is for all Bullet shears. If you are uncertain if it pertains to your shear, please contact
Marshalltown customer service.
| PROBLEM | CHECK FIRST | CHECK SECOND | CHECK THIRD | CHECK FOURTH |
| Difficulty cutting | Ensure cam lock is OFF. If equipped, engage power lobes (Model 226) | Make sure the handle is FULLY extended | Check blade sharpness/ condition | Inspect and lubricate bearings/pins |
| Not cutting completely through the material | Inspect pins for oblong/wallowed orifice | Adjust front stroke stop (MAGNUM shears) | Check bearings for wear/play | Ensure the blade is proper nominal height |
| Blade sticking after completing cuts | Check/remove & replace blade stops if damaged | Ensure blade screws are tight | Remove anvil, turn it over, reinstall | Check for marks on the anvil (overbite) |
| Rough or crushed cuts | Check veneer thickness (max= 1/16″) | Check blade condition (chips, burrs, breaks) | Ensure blade is honed and sharp | Review approved materials list |
| Cuts aren’t square | Loosen fence screws, align fence, tighten | Check pins for uneven wear | Inspect blade and anvil/blade-stop for contact | |
| Handle not returning to open position | Ensure pins are lubricated | Apply grease to the contact area of bearing | Lubricate axle bolts | Check springs for breakage |
| The material won’t fit into cut area | Check the max thickness of material for your shear | Reverse backstroke stop | Ensure the blade is proper nominal height | If you have two bearings, switch which bearing is engaged |
| Cam lock pin bent/stuck | Do not lift or carry shear by the handle | Return handle slowly to open position – do not “let it fly” | Disengage cam lock pin BEFORE cutting | |
| Blade chipping | Hone as directed in the manual (~25 cuts, then daily) | Do not cut stranded bamboo | Do not cut high-pressure laminate | Check veneer thickness (max=1/16″) |
| Pin openings wallowed out / oblong where cam axle passes through | Do not lift or carry shear by the handle | Return handle slowly to open position – do not “let it fly” | Check veneer thickness (max= 1/16″) | Review approved materials list |
| Not cutting to edge of the material | Check fence alignment – adjust if needed | Do not “angle” material beyond the blade edge | Ensure angle fence(s) are installed with WIDE edge inward (620 models) |
104 S. 8th Ave., Marshalltown, IA
Phone 800-888-0127 / 641-753-0127
Fax 800-477-6341 / 64 1-753-6341
www.MARSHALLTOWN.com
WS2648revA


