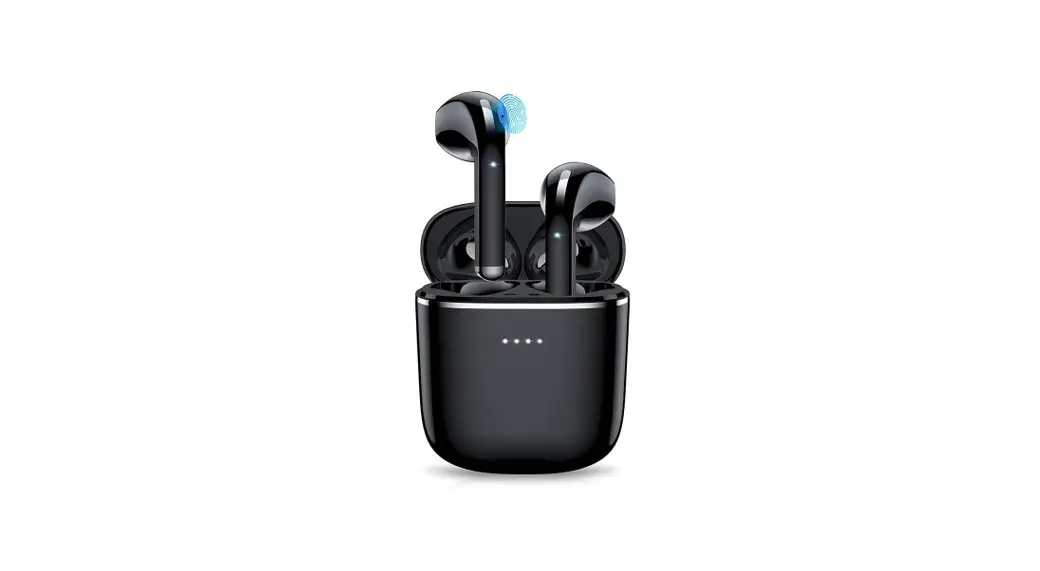
![]() JX05 Wireless Earphone
JX05 Wireless Earphone
User Manual
Voice switching
The left and right earphones team up successfully (the phone is not connected), and tap any earphone 5 times to switch the prompt tone. After the successful switching, there will be a prompt tone.
What is in the box
- TWS earphone x 2pcs
- Charging base x 1pcs
- Charging cable x 1pcs
- Eearphone cap x 2pairs
- User manual x 1pcs
Specification
- Model No.:JX05
- BT version:V5.3
- I/O port:Type-C
- Charging time: 3
- Earphone weight: 3.55gx2
- Total weight: 40.5g
- Battery capacity (earphone): 40mAH
- Battery capacity (Charging base): 300mAH
- Music playing time: About 5.5H
- Horn/driver diameter: 10mm
- Transmission distance: 10m
- Impedance: 32Ώ
- Sensitivity: -42dB ± 3dB
- Frequency response range: 20HZ-20KHZ
- Charging base input : DC 5V-1A
Product Overview
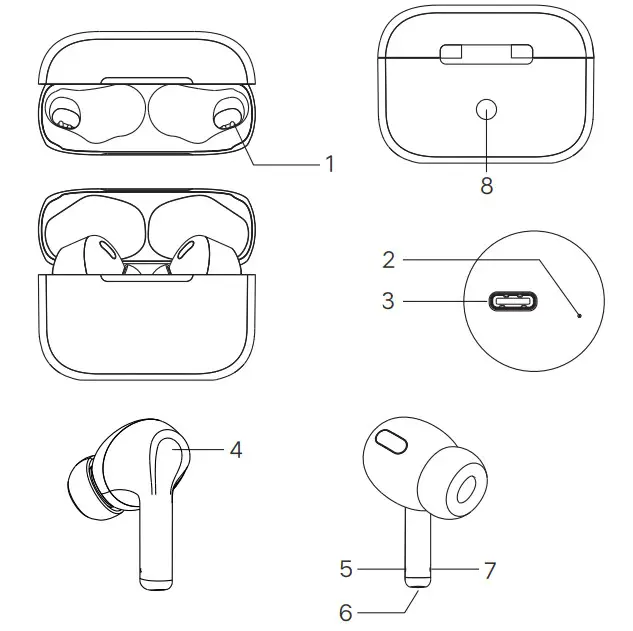
| 1. Charging pins on the case | 5. Earphone LED light |
| 2. Charging base LED light | 6. Charging pins on the earphone |
| 3. Power input Type-C port | 7. Microphone |
| 4. Multi-function touch area |
Use function
| Charging docking pin | The charging docking pin is docked with the charging contacts of the headset to charge the built-in battery of the headset |
| Charging Base LED light status indicator | Charge the headset: the white light is on Charge the charging compartment: red light flashes Low battery in charging compartment: white light flashes Double click, second click and hold for 5s to shut down |
| Earphone LED light | Earphone function indication |
| Power on/off | Take out the headset and turn it off When the headset is off, press and hold the touch button for 5 seconds to turn on When the headset is on, press and hold the touch button for 5 seconds to shut down |
| Answer/hang up | Touch the earphone 1 time on the earphone ‘multi-function touch area |
| Refuse answer the call | Earphone long press for 3 seconds to reject |
| Music play/pause | Music status Double tap the touch key to play/pause music |
| next music | Triple click the next song on the right ear |
| previous music | Triple click left ear previous song |
| Siri | Quick touch the earphone ‘multi-function touch area’three times to wake up SIRI Quickly touch three times again to exit SIRI |
| charging interface port | TYPE-C USB cable charging to charge the charging base(DC5V/1A) |
Power on/off
Power on:
The earphones automatically power on when they are taken out from the charging base. The blue light on the earphone is on for 1 second.
Power off
If you don’t want to use the TWS earphone anymore, placed back the TWS earphones to the charging base and they will shut down automatically with the earphone LED red light on for 1 second.
Bluetooth pairing
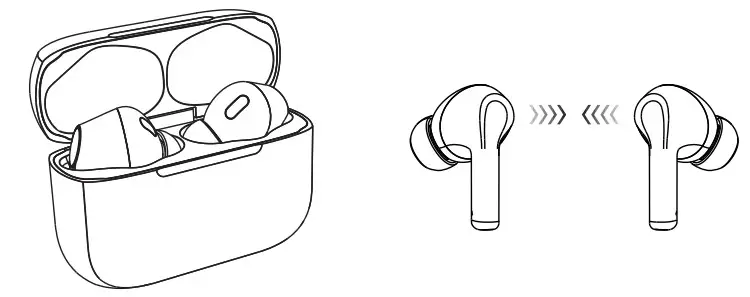
- After power on, close the left and right earphones (less than 3cm), when the left earphone and right earphone is connected to each other successfully it will be a beep sound “Dong”, and then: host earphone LED light is the red and blue lights flash alternately, and the slave earphone LED light flashes blue slowly, which means that the earphones are ready for the pairing mode.
- Now turn on the smartphone Bluetooth function, find the pairing name: JX05, and click to connect the smartphone with the JX05 TWS earphone. After they are paired and connected successfully, the host earphone LED blue light will flash slowly, now you can enjoy the music cableless!
Note: Please be noted that the earphones will automatically powered off if they are not paired to any BT device in about 5 minutes.
Use Single Earphone only
Take any one earphone out the R and L earphones from the charging base, they will connect with each other automatically. Now turn on the smartphone Bluetooth function, find the pairing name: JX05 and click to connect the smartphone with the JX05 TWS earphone .After that ,put any one earphone back to the charging base, the other earphone will automatically connect with your smartphone. Now you can only use one earphone!
How to restore to the factory default setting
The phone is not connected to the six-click headset to restore factory settings
Charging
With Hall switch function, put the earphone into the charging compartment, close the cover, earphoneTo start charging.
Wearing method
Wear the earphones left and right. Place the earphones with earplugs into the ear canal and turn them gently until they fit comfortably without falling. The wrong way of wearing will affect the signal of the headset and the call of the microphone.
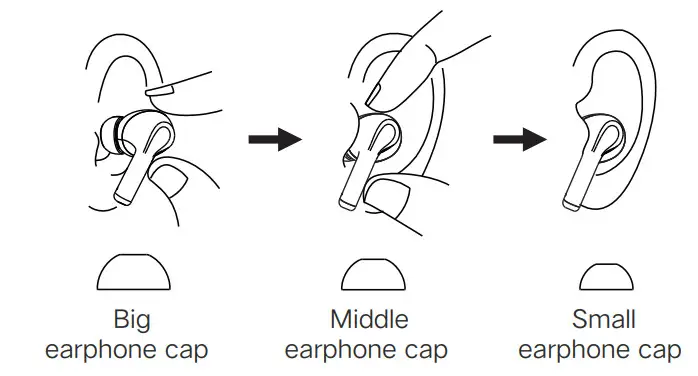
Tip: There are different size earphone caps for you choose. For the best sound, choose an earphone cap that completely seals your ear canal.
Attention:
- Please read this user manual carefully before using the product and keep it properly;
- Do not disassemble or modify this product by yourself;
- Do not place the product near heat sources;
- Do not allow water or other liquids to flow into the product and cause damage to the product;
- Please store and use this product in normal temperature environment;
- Do not throw, to avoid product damage caused by falling;
- Do not use chemical solvents to wipe this product;
- Please use a USB charger with an output voltage of DC 5V 1A for charging;
- The earphones are with built-in rechargeable lithium-ion battery, the earphone battery must be fully charged before you use it for the first time.
NOTE: This equipment has been tested and found to comply with the limits for a Class B digital device, pursuant to part 15 of the FCC Rules. These limits are designed to provide reasonable protection against harmful interference in a residential installation. This equipment generates uses and can radiate radio frequency energy and, if not installed and used in accordance with the instructions, may cause harmful interference to radio communications.
However, there is no guarantee that interference will not occur in a particular installation. If this equipment does cause harmful interference to radio or television reception, which can be determined by turning the equipment off and on, the user is encouraged to try to correct the interference by one or more of the following measures:
- Reorient or relocate the receiving antenna.
- Increase the separation between the equipment and receiver.
- Connect the equipment into an outlet on a circuit different from that to which the receiver is connected.
- Consult the dealer or an experienced radio/TV technician for help.
Changes or modifications not expressly approved by the party responsible for compliance could void the user’s authority to operate the equipment.


