![]() CL030066-FD-NA Slim Jumbo Atomic Digital Wall
CL030066-FD-NA Slim Jumbo Atomic Digital Wall
Clock with Indoor and Outdoor Temperature
 User Manual
What’s in the box
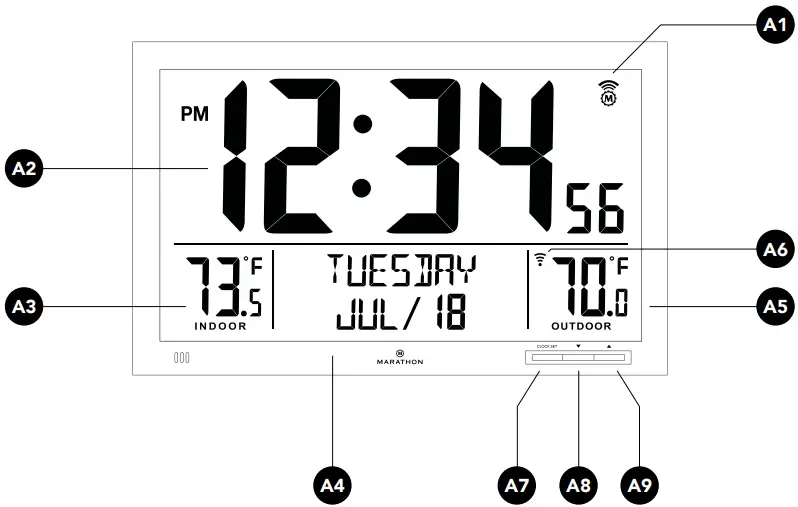
Front
A1:![]() radio-control icon
radio-control icon
A2: Time display
A3: Indoor temperature
A4: Date and weekday
A5: Outdoor temperature
A6: ![]() Radio frequency icon
Radio frequency icon
A7: CLOCK SET button
A8: ![]() button
button
A9: ![]() button
button
Back
B1:![]() button
button
B2: OUTDOOR TEMP SYNC button
B3: ![]() °C/°F button
°C/°F button
B4: ![]() WAVE button
WAVE button
B5: DST ON/OFF switch
B6: TIME ZONE switch
B7: RCC ON/OFF switch
C1: Wall mount hole
C2: Battery compartment
C3: Stand
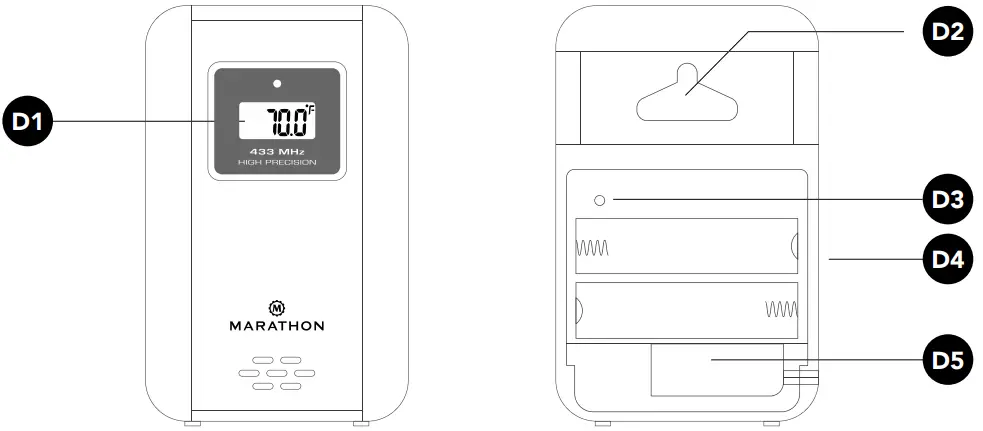
Outdoor Remote Sensor
D1: Temperature display
D2: Wall mount hole
D3: RESET button
D4: Battery compartment
D5: Temperature probe connection
Battery installation
Open the battery cover on the unit and insert 4x new AA batteries, observing the correct “+” and “-“ polarity.
The unit can be placed onto any flat surface by using the built-in stand, or placed onto any wall using the wall mount at the back of the unit. It is recommended you place the clock near a window or in a location with good reception as the automatic time setting requires a strong radio-wave signal.
Low Battery Indication
The low battery icon will appear on the display when the batteries are low, to indicate the batteries should be replaced.
Clock set up
Automatic Clock Set up: RCC WWVB Reception
NOTE: Ensure the RCC switch is set to ON, to enable automatic clock set up.
When the RC function is set to ON
| Indicating excellent signal connection | |
| Indicating acceptable signal connection | |
| Indicating weak signal connection | |
| Indicating no signal connection |
After powering up, if the RCC switch is set to ON the clock will automatically start to synchronize with the WWVB radio wave signal. The Radio Control Icon will![]() flash on the LCD.
flash on the LCD.
The clock can be set to scan the time signal manually by holding the![]() button for 3 seconds.
button for 3 seconds.
Reminder:
- Reception can take up to 10 minutes.
- If the signal is weak, it can take up to 24 hours to get a valid signal.
- The clock automatically synchronizes with the radio wave signal at 3:00am every day to ensure accurate timing. If reception fails, the icon will disappear from the
 LCD.
LCD. - You can stop the clock from automatically synchronizing by holding the button for 2 seconds.
Daylight Savings Mode
- Slide the DST switch to AUTO, when the RCC function is ON, and the clock is in an area where the RC-WWVB signal can be received.
NOTE: the DST icon will appear on the LCD during daylight saving time. - Slide the DST switch to OFF to turn off Daylight savings mode
- Slide the DST switch to ON, and the time will change to daylight saving time automatically, whether the RCC function is ON or OFF.
Time Zone
Slide TIME ZONE switch to select the time zone, there are 8 time zone for selectable:
| Hawaii = HST | Central = CST |
| Alaskan = AKST | Eastern = EST |
| Pacific = PST | Atlantic = AST |
| Mountain = MST | Newfoundland = NST |
Manual Clock Set Up: RCC function is set to OFF
Steps
Press the CLOCK SET button to toggle the display between year & time.
To enter Clock Set Up
Hold the CLOCK SET button for 3 seconds, or until you hear a beep.
NOTE: Press and hold![]() or
or![]() to speed up the digits cycling.
to speed up the digits cycling.
Default = 12/24 HOUR FORMAT
Press![]() or
or![]() to select 12 or 24 hour display.
to select 12 or 24 hour display.
Press 1x = SET HOUR
Press![]() or
or![]() to set hours.
to set hours.
Press 2x = SET MINUTE
Press![]() or
or![]() to set minutes.
to set minutes.
Press 3x = SET SECONDS
Press![]() or
or![]() to reset seconds to zero.
to reset seconds to zero.
Press 4x = SET YEAR
Press![]() or
or![]() to set a year.
to set a year.
Press 5x = SET MONTH
Press![]() or
or![]() to select desired a month.
to select desired a month.
Press 6x = SET DAY
Press![]() or
or![]() to set a date.
to set a date.
Press 7x = SET LANGUAGE OF WEEKDAY DISPLAY
Press![]() or
or![]() to select desired language:
to select desired language:
ENGLISH (default) / FRENCH / SPANISH
Press 8x = SET ICE ALARM FUNCTION
Press![]() or
or![]() to toggle between ON or OFF.
to toggle between ON or OFF.
NOTE: If ice alert function is ON and outdoor temperature display is between -2°C ~ +3 °C, icon is shown on display.
Press 9x = EXIT CLOCK SETUP MODE
NOTE: If you do not press a button for 15 seconds the clock will automatically exit setup mode.
Outdoor remote sensor
Temperature
Once powered up, the outdoor remote sensor will immediately send the temperature RF signal to the main unit. The main unit will attempt to search for the RF temperature signal for five minutes after powering up (or after pressing the RESET button). If the RF temperature signal is not received within the first five minutes, press and hold the OUTDOOR TEMP SYNC button on the main unit to search for the remote temperature. The clock will search for another six minutes.
Losing Synchronization of the Outdoor Remote Sensor
If the main unit has received the remote temperature successfully, but now 0displays a blank value (—.-), the synchronization between the outdoor remote sensor and the main unit may have been lost. If this occurs, press and hold the OUTDOOR TEMP SYNC button on the main unit. The main unit will attempt to receive the outdoor temperature for six minutes and re-initiate synchronization with the remote unit. If the remote temperature cannot be received, check:
- If the distance between the main unit and the outdoor remote sensor is at least 0.9 m to 1.2 m (3 to 4 feet) and away from any interfering sources, such as computer monitors or television sets.
- If the main unit is in the immediate proximity of metal window frames.
Refrigerator Thermometer Probe
The refrigerator thermometer probe that is included may be used optionally and may be connected to the outdoor remote sensor. This probe allows for measurement of more drastic temperatures that are outside of the measurement range provided by the outdoor remote sensor – either below -20C (-4F) or above 50C (122F). For example, the sensor may be used indoors and the attached probe outdoors, or the probe may be used when you want to measure temperature within a refrigerator or wine cellar. Please note that when the refrigerator thermometer probe is connected to the outdoor remote sensor, the main unit will display the reading from the probe only.
Installing the Refrigerator Thermometer Probe
Insert the temperature probe connection into the jack on the right-hand side of the outdoor remote sensor.
Place the end of the probe in your desired location and place the outdoor remote sensor in a location compatible with its temperature limitations.
Alarm set up
Steps
To enter Alarm Set Up
Hold the![]() for 3 seconds, or until you hear a beep.
for 3 seconds, or until you hear a beep.
NOTE: Press and hold![]() or
or![]() to speed up the digits cycling and press ALARM button to confirm each setting.
to speed up the digits cycling and press ALARM button to confirm each setting.
Default = SET HOUR
Press![]() or
or![]() to set hours.
to set hours.
Press 1x = SET MINUTE
Press![]() or
or![]() to set minutes.
to set minutes.
Press 2x = EXIT ALARM SETUP MODE
NOTE: If you do not press a button for 15 seconds the clock will automatically exit setup mode.
Alarm Activation and Deactivation
Press![]() button to activate or deactivate the alarm. When the alarm is activated, the alarm icon will appear on the display and the alarm time displays for 3 seconds.
button to activate or deactivate the alarm. When the alarm is activated, the alarm icon will appear on the display and the alarm time displays for 3 seconds.
To stop the alarm, press any button, otherwise, the alarm will sounds for approximately 2 minutes before stopping.
Thermometer
- Press the °C/°F button to set temperature in Celsius or Fahrenheit.
- If the temperature is out of the measurable range, LL.L (beyond the minimum temperature) or HH.H (beyond the maximum temperature) will be shown on the LCD.
NOTE: The clock might not work properly if the temperature is higher than 50°C.
Specifications
Temperature Measurable range
| Indoor Temperature: | -9.9°C to 60°C / 14.2°F to 140°F |
| Outdoor Temperature: | -20°C to 50°C / -4°F to 122°F |
| Thermometer Probe: | -50°C to 70°C/-58°F to 158°F |
Temperature Checking Interval
| Main Unit: | Every 60 seconds |
| Outdoor Remote Sensor: | Approx. every 60 seconds |
Outdoor Remote Sensor RF Transmission
| Frequency: | 433MHz |
| Range: | Up to 100meters (open area) |
| Transmission: | Approx. every 60 seconds |
Power Source
| Main Unit: | 4 x AA batteries, 1.5V batteries |
| Outdoor Remote Sensor: | 2 x AA batteries, 1.5V batteries |
Precautions
- The clock loses its time information when the battery is removed.
- Do not subject the clock to excessive force or shock.
- Do not expose it to extreme temperatures, direct sunlight, dust, or moisture.
- Avoid contact with corrosive materials. Do not clean the device using abrasive or corrosive materials or products. Abrasive cleaning agents may scratch the plastic parts and corrode the electronic circuits.
- Do not tamper with any of the internal components of this clock. This may cause damage to the components.
FCC Statement
This equipment has been tested and found to comply with the limits for a Class B digital device, pursuant to Part 15 of the FCC Rules. These limits are designed to provide reasonable protection against harmful interference in a residential installation. This equipment generates uses and can radiate radio frequency energy and, if not installed and used in accordance with the instructions, may cause harmful interference to radio communications. However, there is no guarantee that interference will not occur in a particular installation. If this equipment does cause harmful interference to radio or television reception, which can be determined by turning the equipment off and on, the user is encouraged to try to correct the interference by one or more of the following measures:
- Reorient or relocate the receiving antenna.
- Increase the separation between the equipment and receiver.
- Connect the equipment into an outlet on a circuit different from that to which the receiver is connected.
- Consult the dealer or an experienced radio/TV technician for help.
Changes or modifications not expressly approved by the party responsible for compliance could void the user’s authority to operate the equipment.
IC Statement
This device contains license-exempt transmitter(s)/receiver(s) that comply with Innovation, Science and Economic Development Canada’s licenceexempt RSS(s). Operation is subject to the following two conditions:
(1) This device may not cause interference.
(2) This device must accept any interference, including interference that may cause undesired operation of the device.
Marathon Watch Company Ltd.
Customer Service:
www.MarathonWatch.com
2 year warranty
Made in China


