
![]()
R7
INSTRUCTION MANUAL
REMOTE CONTROL
Bioreader![]()
Biohandle ![]()
Modul ![]()
Biopass ![]()
The remote control can be used in combination with a fingerprint reader (for analogue control) or on its own to open the door only.
A) REMOTE CONTOL FOR DOOR OPENING
(without a fingerprint reader)
REMOTE CONTROL PAIRING
1 PERFORM THE FACTORY RESET ON THE CONTROL UNIT.
You now have 30 seconds to pair one or more remote controls.
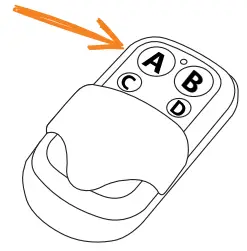
2 IN THE NEXT 30 SECONDS, PRESS BUTTON A ON THE REMOTE CONTROL.
The remote control is paired.
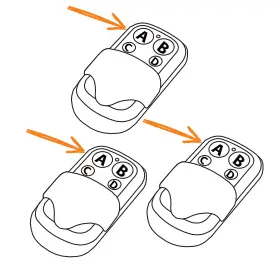
IF YOU WANT TO PAIR ADDITIONAL REMOTE CONTROLS, PRESS BUTTON A ON ALL OF THEM WITHIN 30 SECONDS.
B) ANALOGUE READER CONTROL WITH A REMOTE CONTROL
1 Perform a factory reset and pair the remote control.
2 Start by adding administrator fingerprints by pressing Button A on the remote control.
REMOTE CONTROL
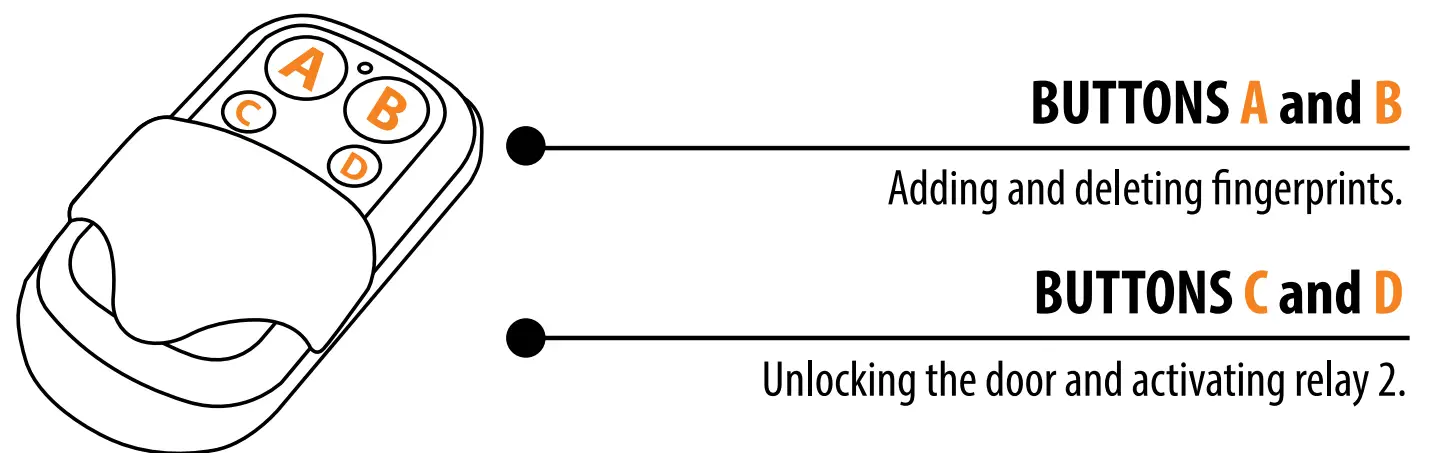
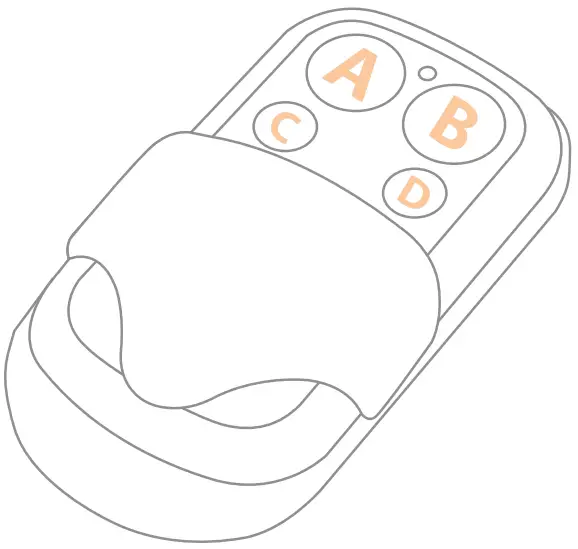
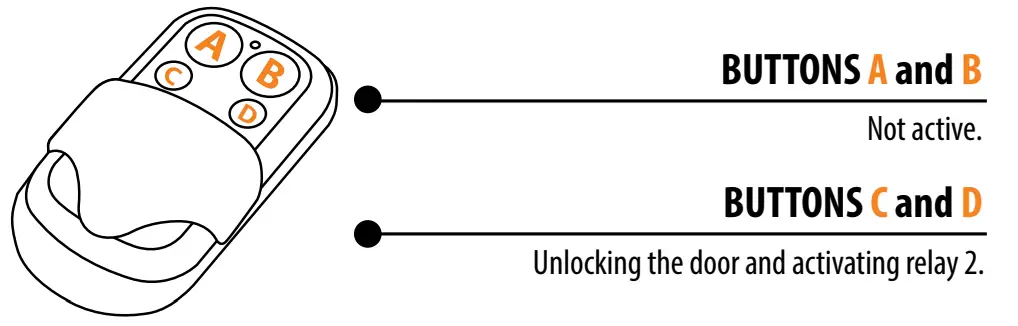
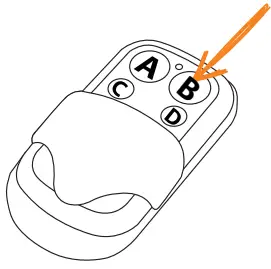
The door can also be unlocked by using the remote control (if included in the set). Press button D to unlock the front door (relay 1) and button C to activate relay 2.
REMOTE CONTROL PAIRING
1 PERFORM THE FACTORY RESET. THE PURPLE LED BLINKS 5 TIMES ACCOMPANIED BY FIVE BEEPS. You now have 30 seconds to pair one or more remote controls.
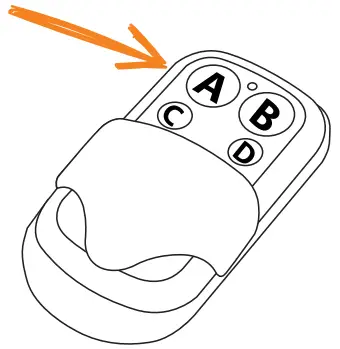
2 IN THE NEXT 30 SECONDS, PRESS BUTTON A ON THE REMOTE CONTROL.
The remote control is paired.

IF YOU WANT TO PAIR ADDITIONAL REMOTE CONTROLS, PRESS BUTTON A ON ALL OF THEM WITHIN 30 SECONDS.
ADMINISTRATOR FINGERPRINTS
The first three saved fingerprints have a special role and are called administrator fingerprints. These fingerprints are entered by the administrator, i.e. the device owner. From the third memory spot onwards, only user fingerprints can be entered. Entering fingerprints without the presence of an administrator is no longer possible beyond the three memory spots.
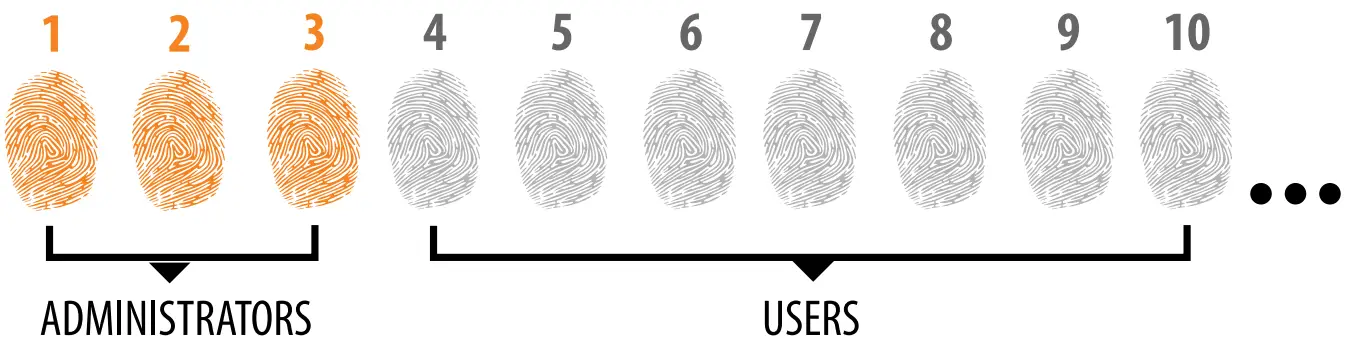
- THE ADMINISTRATOR FINGERPRINTS ARE ONLY THE FIRST THREE FINGERPRINTS STORED IN THE MEMORY No further administrator fingerprints can be added after the first three. Administrator fingerprints can be three different fingers of the same person or fingerprints of different persons.
- WHEN THE FIRST THREE MEMORY SPOTS ARE FILLED, ONLY USERS CAN BE ENTERED.
- ADMINISTRATOR FINGERPRINTS SHOULD BE CAREFULLY CHOSEN, AND THE FINGERPRINTS SHOULD BE CLEAR.
You need to be especially careful when entering administrator fingerprints, as these fingerprints cannot be entered later, and can only be deleted by RESETTING TO FACTORY SETTINGS..
When entering the administrator fingerprint, select an uninjured finger with the clearest fingerprint. While entering the fingerprints, keep your fingers clean and sufficiently moist, and for good readings follow the instructions in the section PLACING YOUR FINGER ON THE SENSOR PROPERLY. - ADMINISTRATOR FINGERPRINTS ALSO OPEN DOORS AND ACTIVATE RELAY 2 The only difference between the administrator and user fingerprint role is that administrator can perform input and deletion operations.
- WHEN THE READER MEMORY IS EMPTY, FINGERPRINTS CAN BE ENTERED BY ANYONE, SO ADMINISTRATOR FINGERPRINTS SHOULD BE ENTERED AS SOON AS THE DEVICE IS INSTALLED TO PROTECT IT AGAINST UNAUTHORIZED ACCESS.
ADMINISTRATOR FINGERPRINTS ENTRY PROCEDURE

1 TO START THE ADMINISTRATOR FINGERPRINTS ENTRY PROCEDURE, PRESS BUTTON A ON THE REMOTE CONTROL.

The blue LED starts flashing.
OPTIONAL STEP FOR RELAY 2 ACTIVATION![]() IF YOU DON’T WANT TO ACTIVATE RELAY 2, SKIP THIS STEP
IF YOU DON’T WANT TO ACTIVATE RELAY 2, SKIP THIS STEP
2a PRESS BUTTON A IF YOU WANT THE ADMINISTRATOR FINGERPRINT TO ACTIVATE RELAY 2. The orange LED will flash once and you will hear a beep. The entered fingerprint will only activate relay 2.
2b IF YOU WANT THE ADMINISTRATOR FINGERPRINT TO SIMULTANEOUSLY OPEN THE DOOR AND ACTIVATE RELAY 2, PRESS BUTTON B.
The orange LED will flash twice and you will hear two beeps. The entered fingerprint will open the door and activate relay 2 at the same time.
3 PLACE THE FIRST ADMINISTRATOR FINGERPRINT ON THE SENSOR 3 TIMES IN A ROW. EACH SUCCESSFUL ENTRY IS CONFIRMED WITH A SHORT BEEP. AFTER THREE ENTRIES, THE FINGERPRINT IS SAVED – A LONG BEEP IS HEARD AND THE GREEN LED LIGHTS UP.

4 REPEAT THE PROCEDURE WITH THE SECOND AND THIRD ADMINISTRATOR FINGERS.

![]() IF THE FINGERPRINT YOU ARE TRYING TO ENTER IS TOO DAMAGED AND DOES NOT HAVE A CLEAR ENOUGH STRUCTURE, THE RED LED WILL LIGHT UP, THE DEVICE WILL BEEP 5 TIMES AND THE OPERATION WILL BE STOPPED. CHOOSE A HIGH QUALITY FINGERPRINT, MAKE SURE THE FINGER IS CLEAN AND MOIST ENOUGH AND REPEAT THE PROCESS. FOR EACH FINGERPRINT YOU WANT TO SAVE, PLACE THE FINGER 3 TIMES ON THE SENSOR TO ENSURE GOOD FINGERPRINT RECOGNITION.
IF THE FINGERPRINT YOU ARE TRYING TO ENTER IS TOO DAMAGED AND DOES NOT HAVE A CLEAR ENOUGH STRUCTURE, THE RED LED WILL LIGHT UP, THE DEVICE WILL BEEP 5 TIMES AND THE OPERATION WILL BE STOPPED. CHOOSE A HIGH QUALITY FINGERPRINT, MAKE SURE THE FINGER IS CLEAN AND MOIST ENOUGH AND REPEAT THE PROCESS. FOR EACH FINGERPRINT YOU WANT TO SAVE, PLACE THE FINGER 3 TIMES ON THE SENSOR TO ENSURE GOOD FINGERPRINT RECOGNITION.
USER FINGERPRINTS ENTRY PROCEDURE
1 TO START THE USER FINGERPRINTS ENTRY PROCEDURE, PRESS BUTTON A ON THE REMOTE CONTROL. The blue LED starts flashing.
2 FIRST, THE ADMINISTRATOR PLACES A FINGER ON THE SENSOR. For security reasons, the administrator must always confirm the start of the user deletion procedure.
After successful administrator recognition, the green LED will light up and a beep will be heard. If a non-administrative finger is placed on the sensor, the device will not react and the blue LED will keep flashing.
OPTIONAL STEP FOR RELAY 2 ACTIVATION
![]() IF YOU DON’T WANT TO ACTIVATE RELAY 2, SKIP THIS STEP
IF YOU DON’T WANT TO ACTIVATE RELAY 2, SKIP THIS STEP![]() Follow the instructions on the previous page.
Follow the instructions on the previous page.

3 THE BLUE AND GREEN LEDS FLASH ALTERNATELY.
PLACE THE USER FINGERPRINT ON THE SENSOR 3 TIMES IN A ROW. EACH SUCCESSFUL ENTRY WILL BE CONFIRMED WITH A SHORT BEEP. AFTER THREE ENTRIES, THE FINGERPRINT IS SAVED – A LONG BEEP IS HEARD AND THE GREEN LED LIGHTS UP.

![]() IF THE FINGERPRINT YOU ARE TRYING TO ENTER IS TOO DAMAGED AND DOES NOT HAVE A CLEAR ENOUGH STRUCTURE, THE RED LED WILL LIGHT UP, THE DEVICE WILL BEEP 5 TIMES AND THE OPERATION WILL BE STOPPED. CHOOSE A HIGH QUALITY FINGERPRINT, MAKE SURE THE FINGER IS CLEAN AND MOIST ENOUGH AND REPEAT THE PROCESS. FOR EACH FINGERPRINT YOU WANT TO SAVE, PLACE THE FINGER 3 TIMES ON THE SENSOR TO ENSURE GOOD FINGERPRINT RECOGNITION.
IF THE FINGERPRINT YOU ARE TRYING TO ENTER IS TOO DAMAGED AND DOES NOT HAVE A CLEAR ENOUGH STRUCTURE, THE RED LED WILL LIGHT UP, THE DEVICE WILL BEEP 5 TIMES AND THE OPERATION WILL BE STOPPED. CHOOSE A HIGH QUALITY FINGERPRINT, MAKE SURE THE FINGER IS CLEAN AND MOIST ENOUGH AND REPEAT THE PROCESS. FOR EACH FINGERPRINT YOU WANT TO SAVE, PLACE THE FINGER 3 TIMES ON THE SENSOR TO ENSURE GOOD FINGERPRINT RECOGNITION.
USER FINGERPRINTS DELETION PROCEDURE
 1 TO START THE USER FINGERPRINTS DELETION PROCEDURE, PRESS BUTTON B ON THE REMOTE CONTROL.
 The blue LED starts flashing.
2 FIRST, THE ADMINISTRATOR PLACES A FINGER ON THE SENSOR.
For security reasons, the administrator must always confirm the start of the user deletion procedure.
After successful administrator recognition, the green LED will light up and a beep will be heard.
If a non-administrative finger is placed on the sensor, the device will not react and the blue LED will keep flashing.
3 GREEN AND RED LEDS WILL FLASH ALTERNATIVELY.
PLACE THE USER FINGER YOU WANT TO DELETE ON THE SENSOR ONCE.

When the finger is successfully deleted, the LED will light up 3 times and three beeps will be heard.
If a finger that is not saved in the memory is placed on the sensor, the device will not react. The green and red LEDS will continue flashing.

![]() IF MORE THAN 1 FINGERPRINT OF THE SAME USER IS SAVED, DELETE THE FINGERPRINTS OF ALL FINGERS!
IF MORE THAN 1 FINGERPRINT OF THE SAME USER IS SAVED, DELETE THE FINGERPRINTS OF ALL FINGERS!
FACTORY RESET
* Applies only when the remote control is already paired.
PRESS AND HOLD BUTTONS A AND D FOR 10 SECONDS AT THE SAME TIME.
THE PURPLE LED BLINKS 5 TIMES ACCOMPANIED BY 5 BEEPS.
All fingerprints, including the administrator’s, are erased from the memory and the device is restored to factory settings. The remote control needs to be re-paired.
c) APP CONTROL
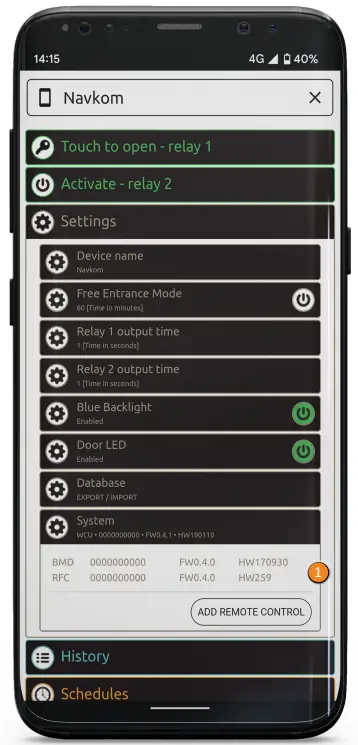
ADDING A REMOTE CONTROL IN THE APP
If you have a remote control, you can add (pair) it in the app.
Pressing the “System” tab opens a list of all paired devices. You can add new remote controls by pressing the ADD REMOTE CONTROL button. The reader beeps for 30 seconds. During this time, press the A button on one or more remote controls to pair them.
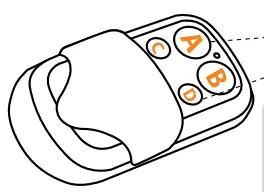
BUTTON FUNCTIONS ON THE REMOTE CONTROL
If you have a remote control but you wish to operate the reader using the app, buttons A and B will serve as shortcuts to turn on/off the free passage mode and blue lighting.
BUTTON C opens the door, BUTTON D activates relay 2.
ON/OFF FREE ENTRANCE MODE

1 TO ACTIVATE, PRESS BUTTON A.

The blue LED starts flashing.
2 THE ADMINISTRATOR CONFIRMS THE OPERATION WITH THEIR FINGERPRINT.
For security reasons, the administrator must always confirm the operation.
AS LONG AS THE FREE ENTRANCE MODE IS ON, THE GREEN LED REMAINS ON.
3 TO DEACTIVATE, PRESS BUTTON A.
Hold button A until the green LED is replaced by the blue one.
BLUE LIGHTING ON/OFF
HOLD BUTTON B UNTIL THE BLUE LED IS TURNED ON/OFF.
 FACTORY RESET
PRESS AND HOLD BUTTONS A AND D FOR 10 SECONDS AT THE SAME TIME.
THE PURPLE LED BLINKS 5 TIMES ACCOMPANIED BY 5 BEEPS.
All fingerprints, including the administrator’s, are erased from the memory and the device is restored to factory settings. The remote control needs to be re-paired.
![]()


