
![]() Stand Blender
Stand Blender
5KSB13**A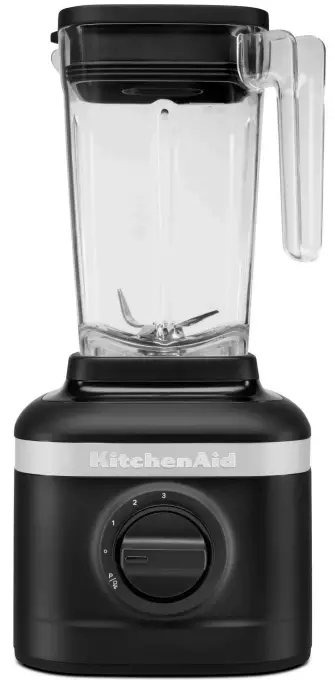
PARTS AND FEATURES
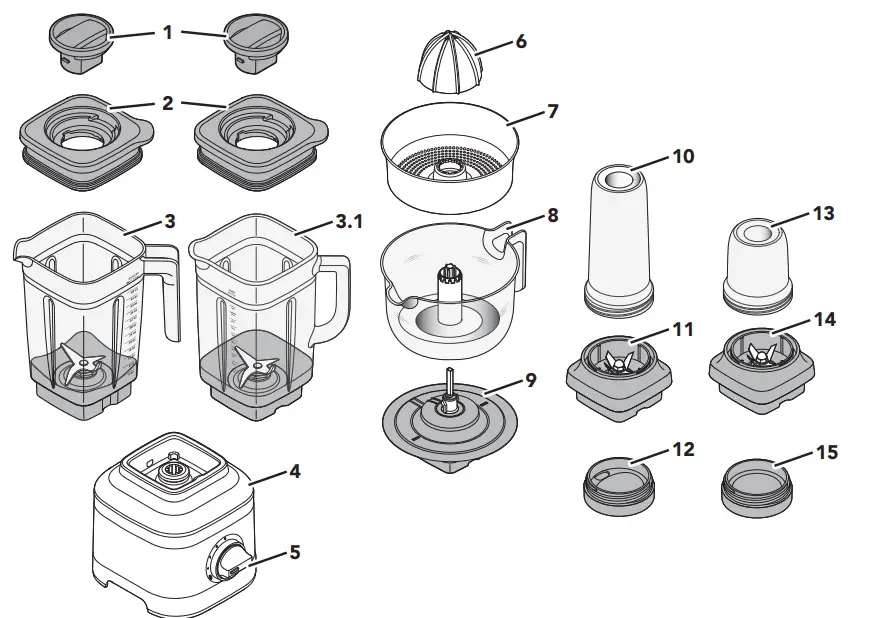
| 1 | Lid Centre Cap | 8 | Juice Container* (1 Litre capacity) |
| 2 | Lid with Vent Well | 9 | Gear Assembly* |
| 3 | Jar (1.4 Litre capacity) | 10 | Personal Jar** (0.4 Litre capacity) |
| 3.1 | Glass Jar**** (1.4 Litre capacity) | 11 | Blade Assembly of Personal Jar** |
| 4 | Base | 12 | Personal Jar Easy-Drink Lid** |
| 5 | Control Dial | 13 | Small Batch Jar***(0.2 Litre capacity) |
| 6 | Reamer* | 1 | Blade Assembly of Small BatchJar** |
| 7 | Pulp Strainer/Basket* | 4 | Small Batch Jar Lid*** |
* Accessories only included with Citrus Press model.
** Accessories only included with Personal Jar model.
*** Accessories only included with Small Batch Jar model.
**** Accessories only included with Glass Jar Blender model.
The Glass Blender Jar (1.4 Litre capacity) is clear, easy-to-clean (Dishwasher safe), with a comfortable firm grip for better handling.
PRODUCT SAFETY
Your safety and the safety of others are very important.
We have provided many important safety messages in this manual and on your appliance. Always read and obey all safety messages.![]() This is the safety alert symbol.
This is the safety alert symbol.
This symbol alerts you to potential hazards that can kill or hurt you and others.![]() DANGER
DANGER
All safety messages will follow the safety alert symbol and either the word ” or “.” These words mean:![]() WARNING You can be killed or seriously injured if you don’t immediately follow instructions. You can be killed or seriously injured If you don’t follow Instructions. All safety messages will tell you what the potential hazard is, tell you how to reduce the chance of injury, and tell you what can happen if the instructions are not followed.
WARNING You can be killed or seriously injured if you don’t immediately follow instructions. You can be killed or seriously injured If you don’t follow Instructions. All safety messages will tell you what the potential hazard is, tell you how to reduce the chance of injury, and tell you what can happen if the instructions are not followed.
IMPORTANT SAFEGUARDS
When using electrical appliances, basic safety precautions should always be followed, including the following:
- Read all instructions. Misuse of appliances may result in personal injury.
- To protect against the risk of electrical shock do not put the Stand Blender Base in water or other liquid.
- This appliance is not intended for use by persons (including children) with reduced physical, sensory or mental capabilities, or lack of experience and knowledge unless they have been given supervision or instruction concerning the use of the appliance by a person responsible for their safety.
- Children should be supervised to ensure that they do not play with the appliance.
- Turn the appliance OFF, then unplug it from the outlet when not in use, before assembling or disassembling parts and before cleaning. To unplug, grasp the plug and pull from the outlet. Never pull from the power cord.
- Avoid contacting moving parts.
- Do not operate any appliance with a damaged cord or plug or after the appliance malfunctions, or is dropped or damaged in any manner. Contact the manufacturer at their customer service telephone number for information on examination, repair or adjustment.
- Do not use outdoors.
- Do not let the cord hang over the edge of the table or counter.
- Keep hands and utensils out of the container while blending to reduce the risk of severe injury to persons or damage to the Blender. A scraper may be used but must be used only when the Blender is not running.
- Blades are sharp. Care should be taken when handling the sharp cutting blades, emptying the jar and cleaning.
- Be careful if hot liquid is poured into the blender as it can be ejected out of the appliance due to sudden steaming.
PRODUCT SAFETY
- If the supply cord is damaged, it must be replaced by the manufacturer, its service agent or similarly qualified persons in order to avoid a hazard.
- Refer to the “Care and Cleaning” section for instructions on cleaning the surfaces in contact with food.
- Always operate the Blender with cover in place.
- When blending hot liquids or ingredients, Lid Centre Cap should remain in place over the lid opening. Always start on the lowest speed and slowly ramp to desired speed when blending hot liquids or ingredients.
- Do not blend hot liquids and ingredients in the Personal Jar or Small Batch Jar.
- To reduce the risk of injury, never place blade assembly on the base without Personal Jar or Small Batch Jar properly attached.
- The use of attachments, including canning jars, not recommended or sold by the manufacturer may cause a risk of injury to persons.
- This appliance is intended to be used in households and similar applications such as:
– staff kitchen areas in shops, offices, or other working environments;
– farmhouses;
– by clients in hotels, motels and other residential-type environments;
– bed and breakfast type environments.
SAVE THESE INSTRUCTIONS
ELECTRICAL REQUIREMENTS
Voltage: 220-240 VAC
Frequency: 50-60 Hz
Wattage: 650 Watts
NOTE: If the plug does not fit in the outlet, contact a qualified electrician. Do not modify the plug in any way. Do not use an adapter.
Do not use an extension cord. If the power supply cord is too short, have a qualified electrician or service technician install an outlet near the appliance. The cord should be arranged so that it will not drape over the countertop or tabletop where it can be pulled on by children or tripped over unintentionally.
GETTING STARTED
The Blender features 3 speeds and an Ice Crush/Pulse function, allowing you to customise your blend. Recipes can differ significantly and might work best on speeds that is not obvious. We encourage you to find the best speed match for your favourite recipes.
| ACCESSORIES | CAPACITY | SPEED | SUGGESTED ITEMS TO BLEND |
| Blender Jar | 1.4 Litre | Speed 1, 2, 3, and Pulse/Ice crush | Smoothies, Icy drinks, Shakes / Malts, Dips, Spreads and more. |
| Glass Blender Jar | 1.4 Litre | ||
| Personal Jar | 0.4 Litre | Individual Smoothie, Icy drinks, Shakes / Malts and lower volume recipes. | |
| Small Batch Jar | 0.2 Litre | Small-volume recipes – Purees, Sauces, Baby food, Dressings, Marinades, Pesto and more. | |
| Citrus Press | 1 Litre | Speed 1 | Citrus juice, Grapefruit juice and more. |
BLENDER USAGE
Before first use, clean all parts and accessories (see the Care and Cleaning section).
Be sure the countertop beneath the Blender and surrounding areas are dry and clean.
IMPORTANT: When moving your Blender, always support/lift from the Blender base. The base will become disengaged from Jar if, carried by Blender Jar or Blender Jar handle only
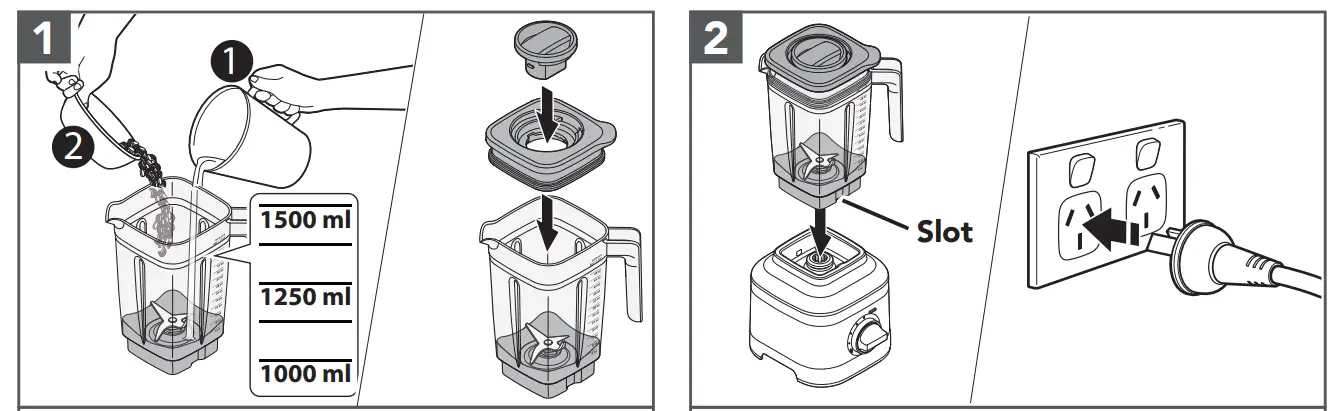 | |
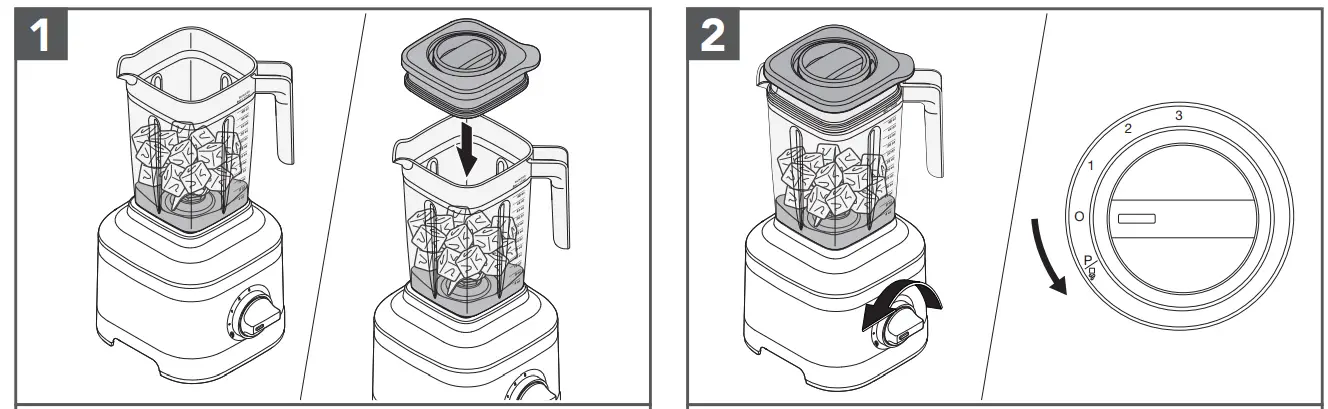
| Add ingredients into Blender Jar OR Glass Blender Jar (max. 1.4 Litre). Secure the Lid and Lid, Centre Cap. | Place the Blender Jar on the base by aligning it with the Slot to fit inside the jar pad, so that the handle of the Jar will be towards the Control Dial.Plug the Blender into an earthed outlet. |
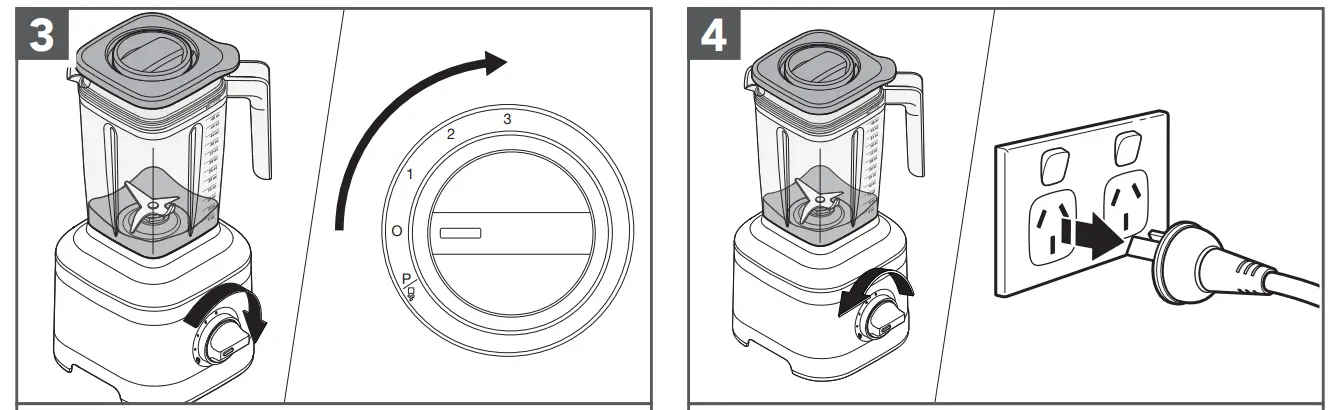 | |
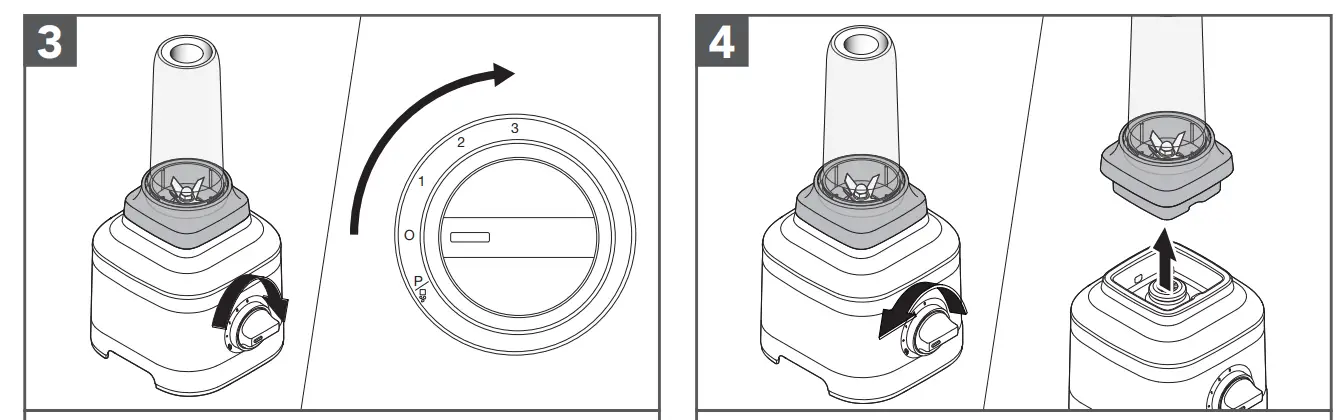
| Turn the Control Dial from (O) to desired speed for constant operation. | When finished, turn the Blender off by returning the Control Dial to (O). Unplug the Blender before removing the Blender Jar. |
IMPORTANT: Allow the Blender to fully stop before removing the Lid, Jar, or pouring out your blended ingredients.
PULSE /ICE CRUSH FUNCTION USAGE
Your Blender offers a “Pulse/Ice Crush (![]() )” function with a soft start to avoid ingredient splatter. In this function, the Blender will operate at optimal speed to crush ice. This function will continue until you release the Control Dial, returning to (O).
)” function with a soft start to avoid ingredient splatter. In this function, the Blender will operate at optimal speed to crush ice. This function will continue until you release the Control Dial, returning to (O).
 | |
| Place ingredients or Ice cubes into the Blender Jar. Firmly secure the Lid with Lid Centre Cap on Blender Jar. | Turn and hold the Control Dial from ( When finished, release the Control Dial to stop the Blender. |
TIP: Use half of the standard ice cube tray or 7-8 standard ice cubes at a time for blending.
The Pulse/Ice Crush ( ![]() ) function has been optimised to crush and chop ice without adding any liquid ingredients.
) function has been optimised to crush and chop ice without adding any liquid ingredients.
USING THE PERSONAL JAR
IMPORTANT: Do not blend hot liquids and ingredients in the Personal Jar.
The Personal Jar is perfect in size for single servings or smaller recipes and handy to carry with you on the go. Before first use, clean all parts and accessories (see “Care and Cleaning” section).
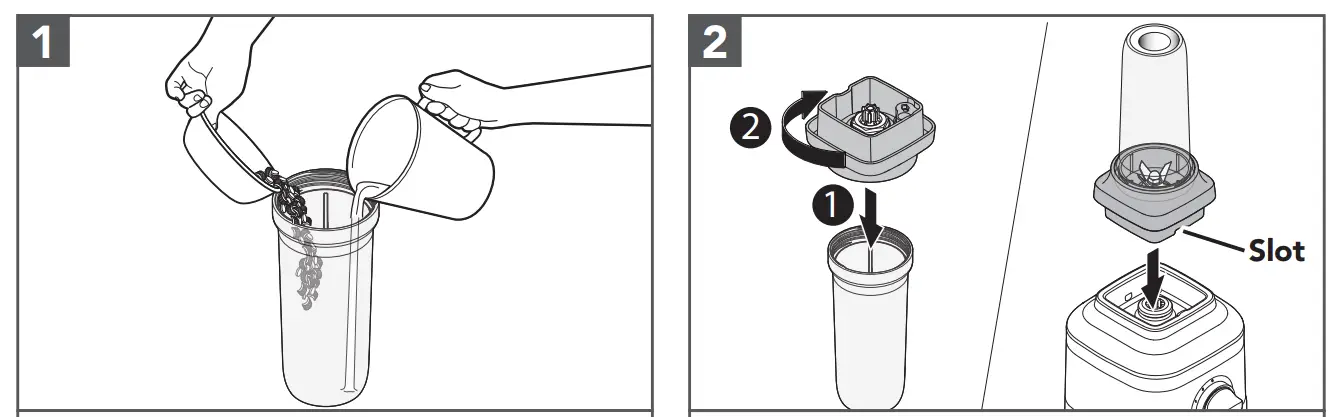 | |
| Add ingredients (max. 0.4 Litre). Add ice or frozen items, then leafy greens, then soft foods and liquids at last. | Secure the Blade Assembly on the Personal Jar and rotate it clockwise until it is tight. Place it on the Blender Base. |
 | |
| Turn the Control Dial from (O) to desired speed for constant operation. | When finished, turn the Blender off by returning Control Dial to (O). Always remove the Personal Jar with the Blade Assembly from the Base. |
USING THE SMALL BATCH JAR
The Small Batch Jars are perfect for smaller recipes like sauces, dressings, marinades and more. Before first use, clean all parts and accessories (see “Care and Cleaning” section).
IMPORTANT: Do not blend hot liquids and ingredients in the Small Batch Jar.
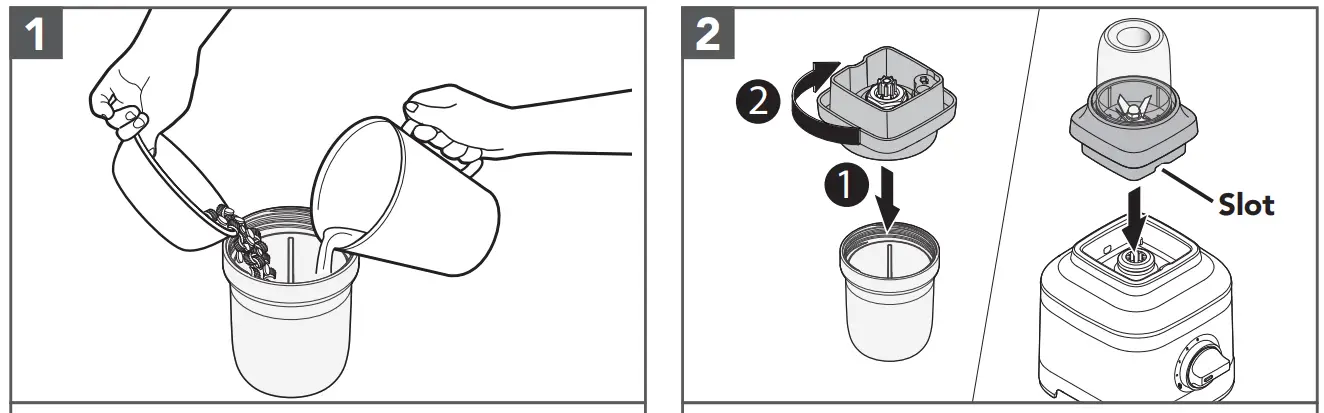 | |
| Add ingredients into the Small Batch Jar (max. 0.2 Litre). | Secure the Blade Assembly on Small Batch Jar and rotate it clockwise until it is tight. Place it on the Blender base. |
 | |
| Turn the Control Dial from (O) to desired speed for constant operation. | When finished, turn the Blender off by returning Control Dial to (O). Always remove the Small Batch Jar with Blade Assembly from the Base. |
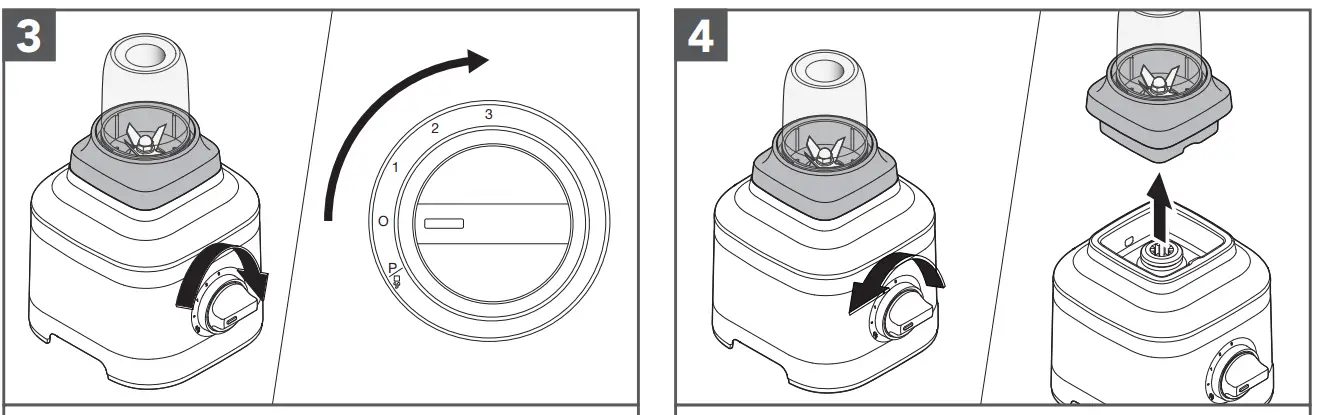
USING THE CITRUS PRESS
Before first use, clean all parts and accessories (see “Care and Cleaning” section).
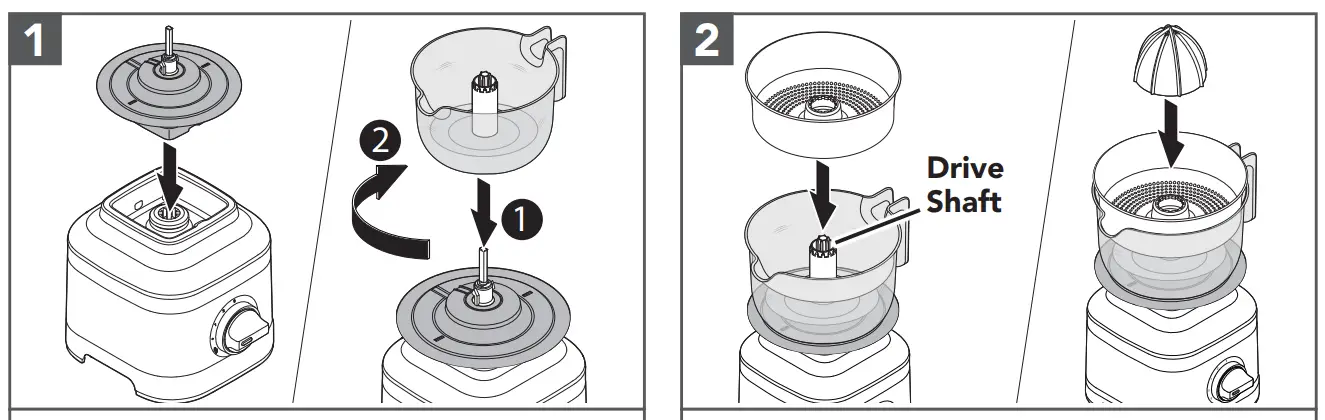 | |
| Place the Gear Assembly on the base. Then, place the Juice Container on the Gear Assembly and twist clockwise to lock in place. | Place the Pulp Basket and then the Reamer into the Juice Container by aligning them with the Drive Shaft. |
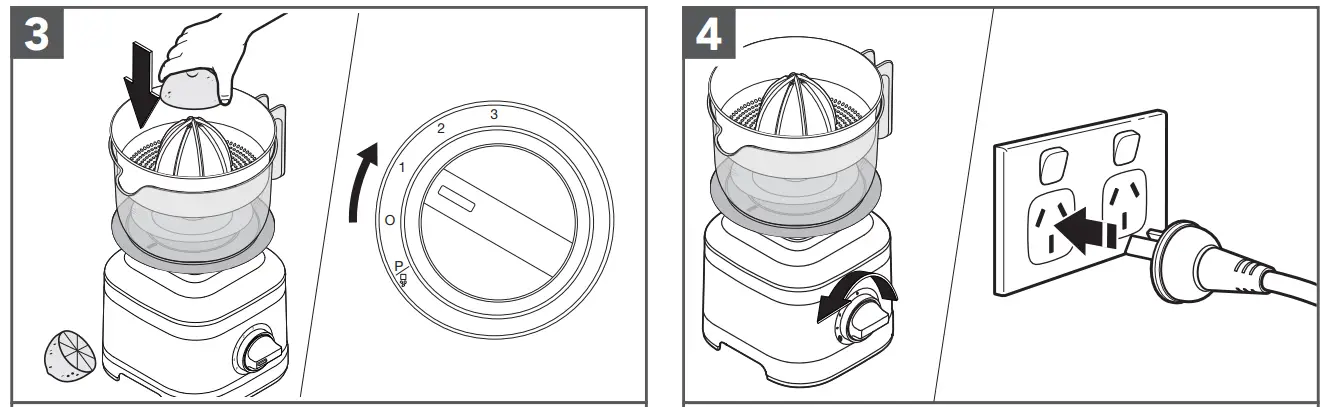 | |
| Hold down the halved citrus fruit on the Reamer. Turn the Control Dial from (O) to speed (1) to start juicing. | When finished juicing, turn the Blender off by returning Control Dial to (O).Unplug the Blender. |
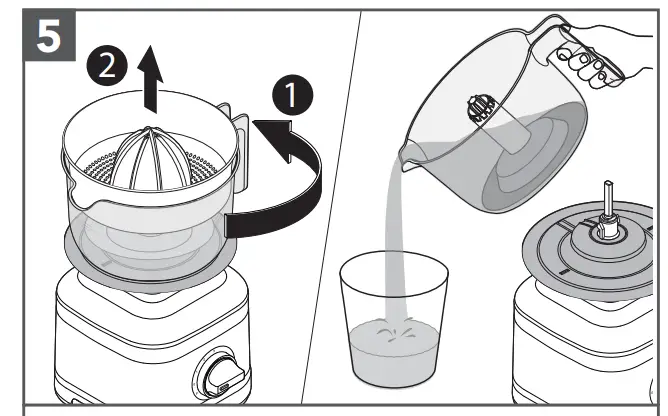
Twist the Juice Container counterclockwise and lift it by using the handle. Pour and enjoy!
CARE AND CLEANING
USING THE CLEAN FUNCTION
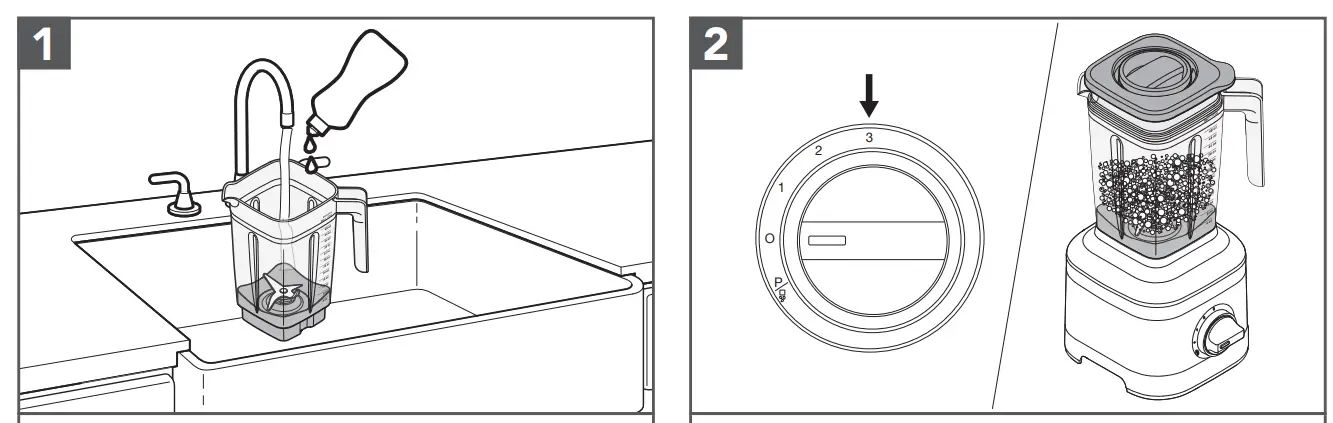 | |
| Empty the Blender Jar. Fill half of the Jar with warm water and add 1 or 2 drops of dish-washing liquid. Place the Blender Jar on the base. Secure the Lid and Lid, Centre Cap. | Turn the Control Dial to speed (3) and run the Blender for 15-20 seconds. Remove the Blender Jar, empty contents and rinse with warm water and dry thoroughly. |
NOTE: To avoid damaging the Blender, do not immerse the Blender base or cord in water. Do not use abrasive cleaners or scouring pads to avoid scratching the Blender.
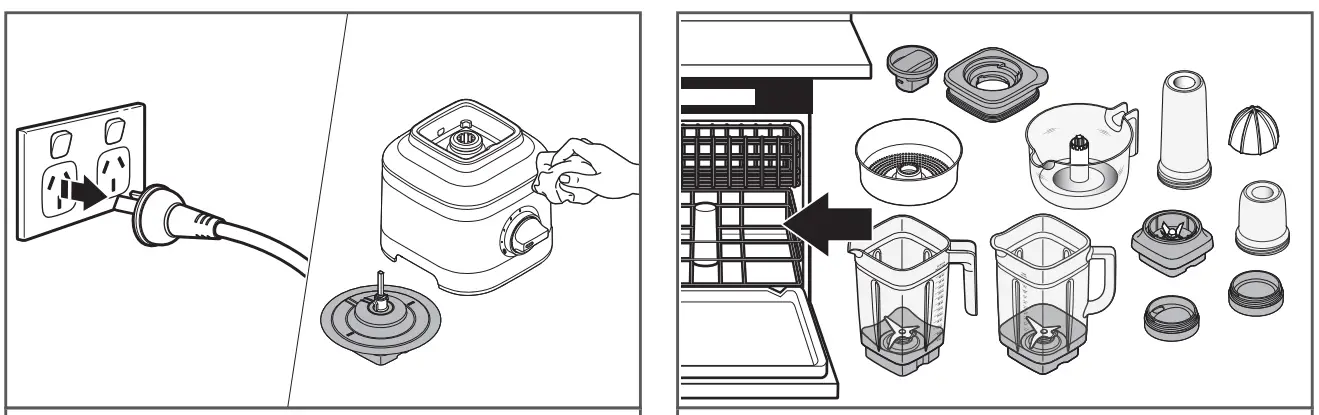 | |
| Unplug the Blender before cleaning. Wipe clean the Base, Power Cord and the Gear Assembly of the Citrus Press with a warm, damp cloth and dry with a soft cloth. | Dishwasher-safe, top rack only: Personal Jar, Small Batch Jar, Lids, Blade Assembly, Reamer, Juice Container, Pulp Basket and Lid Centre Cap. Blender Jar can also be washed in the bottom rack. |
TROUBLESHOOTING GUIDE
| PROBLEM | SOLUTION |
| If Blender fails to start: | Check to see if the Blender is securely plugged into an earthed electrical outlet. |
| If you have a circuit breaker box, make sure the circuit is closed. Try unplugging the Blender, then plug it back into an earthed electrical outlet. | |
| If Blender stops while blending: | The Blender becomes overloaded or jammed. It will automatically shut off to prevent damage to the motor. Unplug the power cord. Remove the Blender Jar from the base and use a spatula to rearrange the ingredients in the Blender Jar. |
| The Blender is overloaded, divide contents into smaller batches. For certain recipes, adding liquid to the Blender Jar may also reduce the load on the Blender. | |
| If Blender stops while blending with Personal Jar or Small Batch Jar: | Unplug the power cord. Remove the Personal Jar or Small Batch Jar from the base with the Blade Assembly. Shake it a little bit. Place it back on the base, and then plug and turn the Blender back on to continue regular use. |
| If the problem cannot be corrected: | See the “Product Warranty and Customer Service” sections. Contact an Authorised Service Centre for assistance. Do not return the Blender to the retailer — retailers do not provide service. |
CUSTOMER SERVICE
In Australia:
For any questions, or to find the nearest Authorised KitchenAid Service Centre,
please find our contact details below.
NOTE: All service should be handled locally by an Authorised KitchenAid Service
Centre.
Toll-free number: 1-800-990-990
Phone number: 02 49026500
Address Australia:
KitchenAid Australia Pty Ltd
6-8 Billbrooke Close
Cameron Park NSW 2285, Australia
Phone: 1-800-990-990
Mobile: 0249026500
Email: [email protected]
In New Zealand:
Website: www.KitchenAid.co.nz
Email: [email protected]
Phone: 0800 881 200
In other countries:
For all product-related questions and after-sales matters, please contact your dealer to obtain the name of the nearest Authorised KitchenAid Service/Customer Centre.
For more information, visit our website at:
www.KitchenAid.com.au


