![]() BT01 Bluetooth Microphone
BT01 Bluetooth Microphone
User Guide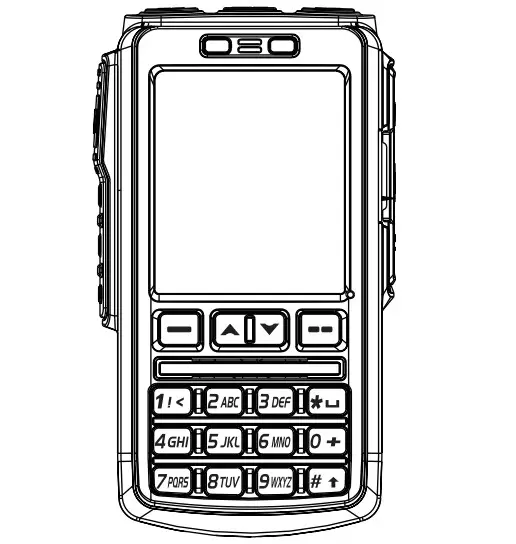 User Guide
Bluetooth Microphone
Thank you for purchasing Anytone BT01 Bluetooth Microphone. This product uses a dedicated master-slave Bluetooth module to realize wireless talk and wireless operation settings for all functions of the ATD578UV DMR mobile radio with built-in Bluetooth module. Combined with the noise reduction function, it can effectively reduce background noise and ambient noise to achieve high-definition intercom.
Precautions
Please read the following regulations carefully before using this product.
The following regulations will help you understand and fulfill your obligations in the warranty terms.
- Without permission, please do not try to disassemble or modify the BT01 Bluetooth Microphone. The handling of the Bluetooth Microphone by non-professionals may cause damage.
- Please don’t put the Bluetooth Microphone in a dusty or damp place.
- Please abide by the walkie-talkie usage rate of 1 minute for transmission and 4 minutes for reception. Long-term transmission or continuous use in high-power mode will cause the AT-D578UV mobile radio to heat up.
- Please charge the BT01 Bluetooth Microphone before using it.
- After the BT01 Bluetooth Microphone is turned on, it will automatically enter the pairing state. Before use, please turn on the Bluetooth function of the AT-D578UV mobile radio, and pair it with the BT01 Bluetooth microphone.
Accessories
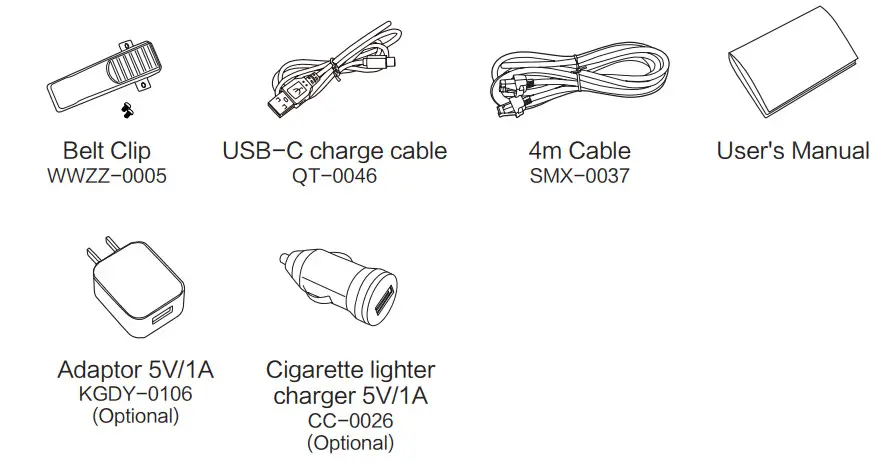
Charge The Battery
Charging Instructions
- Insert the USB plug of the charging cable into the power adapter.
- Plug the power adapter into the AC power outlet.
- Insert the other end of the charging cable into the charging/upgrade interface of the radio.
- The red charging indicator of the BT01 Bluetooth Microphone is on.
- When the red charging indicator of the BT01 Bluetooth microphone goes out, the charging is complete.
 USB Adaptor and Cigarette light charger must be 5V voltage and ≥1A current output.
Getting Started
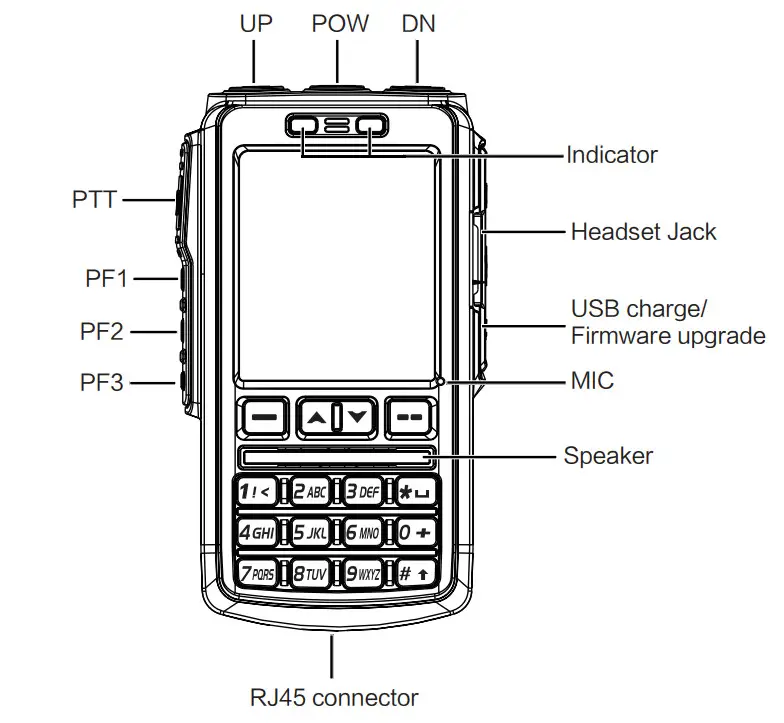
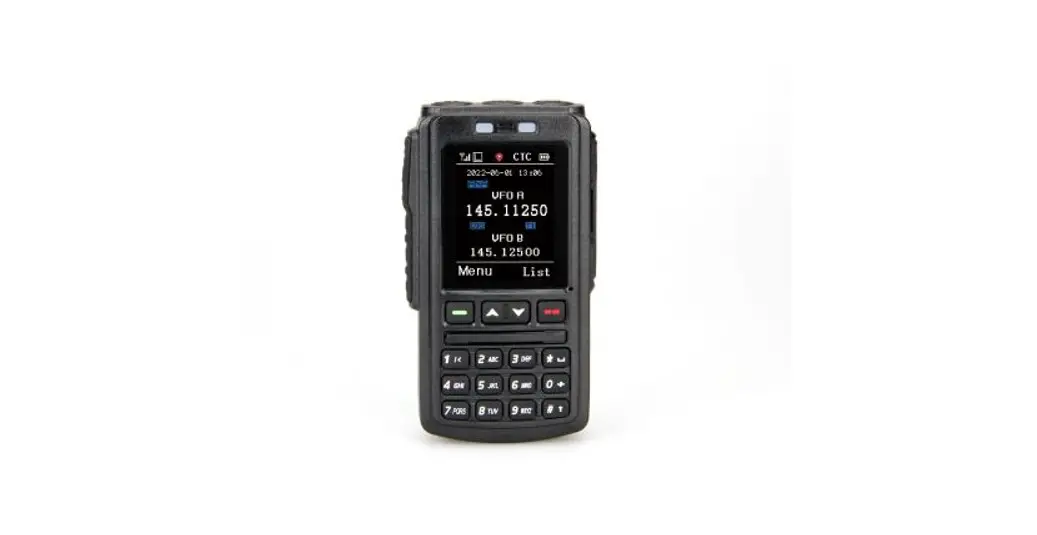
Indicator Instructions
| Indicator Color | Status |
| Left light red | Transmit |
| Right light red | Charge the battery |
| Right light green | Receive |
| Right light red blinking | Battery voltage is low |
Basic Operation
Power ON
Press the top [POW] button on microphone, the right green indicator light on, later the screen displays “Select Port”, press ![]() or
or![]() to choose the connect mode:
to choose the connect mode:
BT MODE: Connect the BT01 microphone to AT-D578UV mobile radio through Bluetooth.
CABLE MODE: Connect the BT01 microphone to AT-D578UV mobile radio through 4m cable.
Click on “confirm” to select the connect mode.
BT MODE connect to AT-D578UV
After select “BT MODE” on microphone, it will display BT NAME and “NO DEVICE CONNECTED” when no radio is connected. In this state, the BT pairing shall be done on AT-D578UV.
a)Enter into AT-D578UV radio Menu![]() Bluetooth
Bluetooth![]() BT On/Off, set it ON.
BT On/Off, set it ON.
b)Switch to AT-D578UV radio Menu![]() Bluetooth
Bluetooth![]() BT Pairing, select “Seek BT”.
BT Pairing, select “Seek BT”.
c)AT-D578UV radio displays “Seeking BT”, it will take some time to do the pairing.
d)AT-D578UV radio displays “ALL DATA CHECKING”, the display content of the AT-D578UV radio will be mapped to the Bluetooth microphone.
e)AT-D578UV radio displays “EXTERNAL BT MODE” on the screen, the pairing is done.
BT01 microphone is able to access the radio menu and do communications now.![]() Once the BT pairing is done, the BT microphone will automatically connect to AT-D578UV radio after reboot.
Once the BT pairing is done, the BT microphone will automatically connect to AT-D578UV radio after reboot.
CABLE MODE connect to AT-D578UV
After select “CABLE MODE” on microphone, it will display “NO DEVICE CONNECTED” when no radio is connected.
Use the 4m cable to connect the microphone to radio, AT-D578UV displays “ALL DATA CHECKING”, the display content of the AT-D578UV radio will be mapped to the Bluetooth microphone.
AT-D578UV radio displays “EXTERNAL CABLE MODE” on the screen, BT01 microphone is able to access the radio menu and do communications now.
Power Off
Press and hold the top [POW] button on microphone to turn off the microphone. AT-D578UV radio will be powered off automatically when BT microphone is off.
Adjust The Volume
In standby state, press the top [POW] button to switch the [CH-]/[CH+] button for volume adjust use.
When screen shows “UpDn Key: Vol Set” , press [CH-] to reduce the volume, press [CH+] to increase the volume.
 If the volume is adjusted to the maximum and you still consider it is not loud enough.
- In BT MODE, you can enter into Menu ->Bluetooth->RfBT SPK Gain to adjust the Bluetooth gain level and increase the volume.
- In POWER CABLE MODE, the volume adjustment is realized by the volume switch on AT-D578UV radio.
Set Up VFO Frequency
In Menu->Setting->Radio Set->Key Func, assign a key function to [VFO/MR].
Press the assigned [VFO/MR] key to switch the radio into VFO frequency mode, and then press the or key to change the frequency.
And it allows input the frequency by keypad on microphone to change the frequency rapidly, for example, input 4,5,0,1,2,5,0,0 or 4,5,0,1,2,5,# to obtain 450.125MHz.
- Normally you shall input 8 digits to change the frequency, in case the end of the frequency is 0, you can press # key to confirm the valid frequency instead of input several 0.
Select a Channel
Press the assigned [VFO/MR] key to switch the radio into channel mode, and then press the top [POW] button to switch the [CH-]/[CH+] button for channel adjust use.
And it allows input the channel number by keypad on microphone to access the channel rapidly, for example, input 0,0,9,9 a total of 4digits will switch to channel 99. In case the input channel number is not in the current zone, the microphone will emit “du” beep and stay at the current channel.
Select a Zone
Press the assigned [VFO/MR] key to switch the radio into channel mode first.
Operation 1: Press the ![]() or
or![]() key to change the zone.
key to change the zone.
Operation 2: Go to Menu![]() Zone, select a zone from the zone list.
Zone, select a zone from the zone list.
Operation 3: In Menu![]() Setting Radio Set
Setting Radio Set
Key Func, assign a key function to [Zone Select]. Press the assigned [Zone Select] key, and input the zone number and confirm.
Make a Call
Press and hold the [PTT] button to start a call at the current channel, the left red indicator lights on and the radio is transmitting. Release the [PTT] button to stop the transmitting.
Receive a Call
When the radio receives a call, the right green indicator lights on and the radio is receiving.
Noise Reduction function
Enable the noise reduction function can reduce background noise and ambient noise effectively, and make calls between users clearer. Go to Menu ![]() Settings
Settings ![]() Radio Set
Radio Set ![]() Voice Func
Voice Func ![]() Noise Reduce(RX), set the noise reduce level for receiving use, recommend setting is level 3. Go to
Noise Reduce(RX), set the noise reduce level for receiving use, recommend setting is level 3. Go to ![]() Menu Settings
Menu Settings ![]() Radio Set
Radio Set ![]() Voice Func
Voice Func ![]() Noise Reduce(TX), set the noise reduce level for transmit use, recommend setting is level 3.
Noise Reduce(TX), set the noise reduce level for transmit use, recommend setting is level 3.
Menu operation
The menu operation on BT microphone is mapped from AT-D578UV radio, the functions are fully same as AT-D578UV radio. Please refer to AT-D578UV for operation.
Programmed Key
It is possible to set different functions for [P1], [P2], [P3] side keys on microphone.
Method 1: In radio Menu ![]() Settings
Settings ![]() Radio Set
Radio Set ![]() Key Func
Key Func
Method 2: In PC software ![]() Public Optional Setting
Public Optional Setting ![]() BT
BT ![]() Bluetooth handset.
Bluetooth handset.
| OFF | No Function |
| Volt | Check the current battery capacity voltage |
| Tx Power | Switch the power between super high, high, middle and low power. |
| TalkAround | Switch between Talk Around and Repeater mode |
| Reverse | Turn on/off the frequency reverse function. |
| Digi Encrypt | Choose the digital encryption group for digital channel |
| Call | In Analog mode, send the DTMF/5TONE/2TONE encode. This function is only valid for analog channel. |
| VFO / MR | Switch between VFO mode and memory channel mode. |
| Scan | Scan on/off |
| AM air/FM | Turn on/off AM air band receive or FM radio receive |
| Alarm | Long press the key to start alarm, short press again to exit the alarm. |
| Record Switch | Enable/disable the recording function |
| Record | Start/stop recording. When stop recording, the radio will remind repeat or send the record. |
| SMS | In digital mode, press to enter into SMS messages |
| Dial | Start the manually dial |
| GPS Info | Check the GPS position information |
| Monitor | Monitor the weak signal or the signal with unmatched ID. |
| Main CH Switch | Choose channel A or channel B as the main channel |
| Hot Key 1-6 | Selects Hot Keys 1-6 Note: Hot key setup details on next page |
| Work Alone | Turn on/off the work alone function. |
| Nuisance Delete | During scanning, press the key to skip the unwanted channel |
| Digi Monitor | In DMR mode, press the key to turn on/off digital monitor |
| Sub CH On/Off | Turn on/ off the sub channel |
| Priority Zone | Switch to Priority Zone |
| Program Scan | “Press the key to start the scan In VFO channel scan start and end frequency must be programmed in CPS.” |
| Enhanced Sound | In digital channel, switch the microphone tone to normal or enhanced mode. |
| LastCall Reply | In digital channel, press the key to access the last call and press PTT to call back. |
| Switch ChType | Switch the channel type(Anabg, Digital, Ana+Dgi, Dgi+Ana) |
| Ranging | When the radio receives a call and the suspension time is on, press the key programmed as” Ranging” to obtain the callers position and distance. (Both party need GPS positioned, or will receive only GPS information) |
| Roaming | In standby, press the key programmed as ‘Roaming” to search and lock on the repeater with strongest signal. (Note: After lock on a repeater, the radio will return to last frequency only after channel or frequency is changed. The repeater frequency list must pre- programmed in CPS.) |
| CH Ranging | In standby, if the call contact type for a channel is ‘Single call” , press the key programmed as ” Channel Ranging” to turn on this function. The radio will automatically start ranging function when turn to this channel. |
| Max VOL Set | In standby, press the key programmed as” Max Volume”, will enable users to set the maximum RX volume. |
| Slot Set | Choose Slot for current channel, this function is only valid in repeater mode. |
| Aprs Type | Choose analog or digital Aprs Type for current channel. |
| Zone Select | In standby, press the programmed “Zone Select’ key, it will allow you input the zone number and then press confirm key will switch to the zone. |
| A CH Mute | Mute the main channel |
| B CH Mute | Mute the sub channel |
| Roaming Set | Enter into Roaming menu quickly |
| APRS Set | Enter into APRS menu quickly |
| Zone Up | Switch the zone upwardly |
| Zone Dn | Switch the zone downwardly |
| Exit | Exit the menu (only for A-D short press) |
| Menu | Enter into the menu (only for A-D short press) |
| Repeater | Enable / disable the repeater function |
| Speaker Mode | Set the voice come out from speaker on microphone or radio. |
| Ch.Name | Switch between channel name display and frequency display for the current channel |
| BHT On/Off | Enable / disable the bluetooth. |
| GPS On/Off | Enable / disable the GPS. |
| CDT Scan | Enable / disable the CTCSS/DCS scanning for the analog channel.When the radio finds matched CTCSS/DCS for current channel, it will open the speaker and start receiving. Only the analog channels with CTCSS/DCS signalling is able to start the CDT scanning. |
| TBST Send | Send the TBST Tone |
| Aprs Send | Manually transmit the APRS at the current channel. |
Technical Specifications
| GENERAL | |
| BT version | BT version V4.2 +EDR |
| Protocol | HFP; HSP; A2DP; AVRCP; SPP |
| Transmit Distance | 10 Meters |
| Maximum Transmission Power | Class2, 4dbm |
| Sensitivity | -80dBm |
| Audio performance | SBC Decoding |
| Speaker | 1W/8R |
| LED | Blue/Green/Red |
| LCD screen | 2.2inch |
| Charge | 5V Type C USB |
| Battery capacityNotage | 1800mAh 3.7V |
| Interface | 3.5mm |
| Dimension (WWT) | 109*62*28mm |
| Weight | 147g |
| Working Temperature | -20°C — 55°C |
![]() Qixiang Electron Science & Technology Co., Ltd.
Qixiang Electron Science & Technology Co., Ltd.
www.anytone.net


