
IMPORTANT SAFETY INSTRUCTIONS
WARNING: To reduce the risk of injury, fire, electric shock, and property damage resulting from improper use of the appliance, carefully observe the following instructions. This unit contains electrical connections and moving parts that potentially present a risk to the user.
- This appliance can be used by persons with reduced physical, sensory or mental capabilities or lack of experience and knowledge if they have been given supervision or instruction concerning the use of the appliance in a safe way and understand the hazards involved. Children shall not play with the appliance.
- Keep the appliance out of reach of children when it is energized or cooling down.
- When in use, NEVER turn the Steam Mop over on its side or direct steam toward people, pets or plants. Liquid or steam must not be directed towards equipment containing electrical components, such as the interior of ovens.
- The filling aperture shall not be opened during use.
- Use the system ONLY for its intended purpose.
- DO NOT use to heat a room.
- DO NOT use outdoors.
- DO NOT leave the Steam Mop unattended when plugged in. ALWAYS unplug the power cord from the electrical socket when not in use and before servicing.
- DO NOT allow the Steam Mop to be used by children. Close attention is necessary when used near children, pets or plants.
- Use ONLY as described in this instruction manual.
- Use ONLY the manufacturer’s recommended accessories.
- DO NOT use with a damaged cord or plug. If the Steam Mop is not working as it should or has been dropped, damaged, left outdoors or immersed in water, return it to SharkNinja Operating LLC for examination and repair. Incorrect reassembly or repair can cause a risk of electrical shock or injury when the Steam Mop is used.
- To protect against a risk of electric shock, DO NOT immerse the Steam Mop in water or any other liquid.
- DO NOT handle the plug or Steam Mop with wet hands or operate it without wearing shoes.
- DO NOT pull or carry by cord, use cord as a handle, close a door on cord or pull cord around sharp edges or corners. DO NOT run Steam Mop over cord. Keep cord away from heated surfaces.
- DO NOT unplug by pulling on power cord. To unplug, grasp the plug, not the power cord.
- DO NOT use extension cords or sockets with inadequate current carrying capacity.
- DO NOT put any objects into the steam nozzle openings. Discontinue use if the steam nozzle is blocked.
- DO NOT put hands or feet under the Steam Mop. It gets very hot.
- Use ONLY on flat, horizontal surfaces. DO NOT use on walls, counters or windows.
- DO NOT use on leather, wax polished furniture, synthetic fabrics, velvet or other delicate, steam-sensitive materials.
- DO NOT add cleaning solutions, vinegar, scented perfumes, oils or any other chemicals to the water used in the Steam Mop as this may damage it or make it unsafe for use. If you live in a hard-water area, we recommend using distilled water in your Steam Mop.
- NEVER store or leave Steam Mop in one spot with Dirt Grip™ pad attached, as this may damage surfaces.
- Before removing the Dirt Grip pad, unplug the Steam Mop and allow it to cool.
- Unplug the Steam Mop before cleaning. Use a dry or damp cloth to clean the exterior. DO NOT pour water on Steam Mop or use alcohol, benzene or paint thinner to clean.
- Extreme caution should be exercised when using the Steam Mop to clean stairs.
- NEVER use Steam Mop without the Dirt Grip pad attached.
- Keep your work area well-lit.
- Store Steam Mop indoors in a cool, dry place.
- To avoid circuit overload, DO NOT operate another appliance on the same socket (circuit) as the Steam Mop.
- To avoid scalding injuries, ALWAYS unplug the Steam Mop and allow it to cool before removing or changing mop heads, accessories or Dirt Grip pads.
- Your Steam Mop is designed to clean hard floor surfaces that will withstand high heat. DO NOT use on unsealed wood or unglazed ceramic floors.
- On surfaces that have been treated with wax and on some no-wax floors, the sheen may be removed by heat and steam action. We recommend testing an isolated area of the surface to be cleaned before proceeding. We also recommend that you check the use and care instructions from the floor manufacturer.
GETTING TO KNOW YOUR STEAM MOP
WELCOME
Congratulations on your purchase. Use this instruction manual to learn about your new Steam Mop’s great features. From assembly to use to maintenance, you will find it all in here.
NOTE: When assembling your Steam Mop there may be a little water in or around the water tank. This is because we thoroughly test all of our Steam Mops before you buy them, so you get a quality Steam Mop.
MAIN UNIT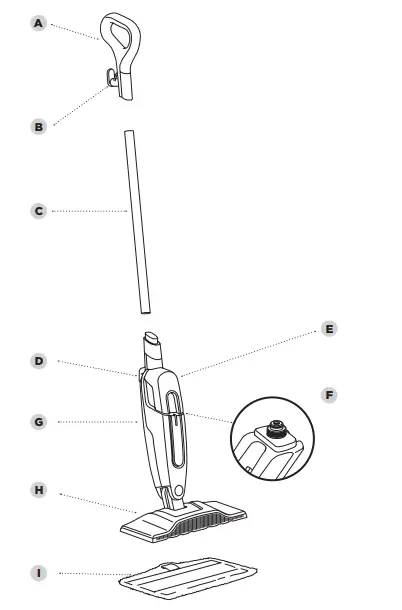
- A Steam Mop Handle
- B Upper Cord Wrap
- C Pole
- D Lower Cord Wrap
- E Removable Water Tank
- F Water Tank Cap
- G Steam Mop Body
- H Mop Head
- I Dirt Grip™ Pad
ASSEMBLING YOUR STEAM MOP
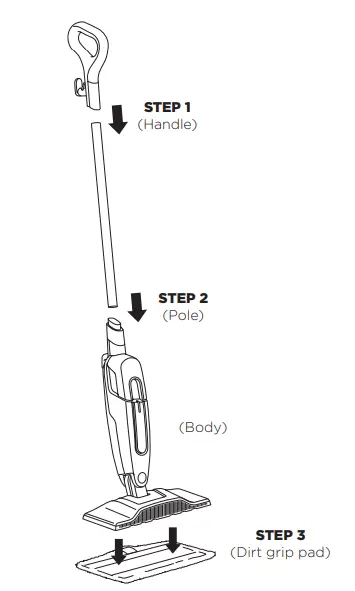
- Align the mop handle and mop pole so the arrow symbols inside them face forward. Insert either end of the pole into the handle until it clicks securely into place.
- Align the assembled steam mop pole and the steam mop body, so their arrow symbols both face forward. Insert the pole into the top of the mop body, sliding it in until it clicks into place.
- Place the Dirt Grip™ cleaning pad on the floor with the quick fastener strips facing up. Align the mop head directly over the pad, then press the mop head down onto the pad. The quick fastener strips will secure the pad to the mop head.
USING YOUR STEAM MOP
- IMPORTANT: DO NOT scrub any one area for an extended period of time.
- Before you fill-up the tank, make sure your Steam Mop is unplugged from the electrical socket.
- Make sure you DO NOT use the Steam Mop without first attaching a Dirt Grip™ pad and filling the tank with water.
- NOTE: To prolong the life of your Steam Mop, we recommend using distilled water.
- Sweep or vacuum your floors prior to cleaning with your Steam Mop.
- Please wait for 2 to 3 minutes for the Steam Mop to cool off before removing the Dirt Grip pad. NEVER leave the Steam Mop with a damp or wet Dirt Grip pad on any floor for an extended period of time.
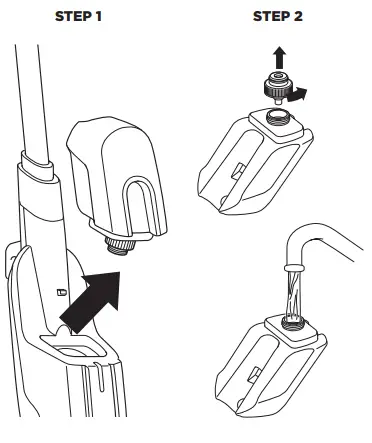
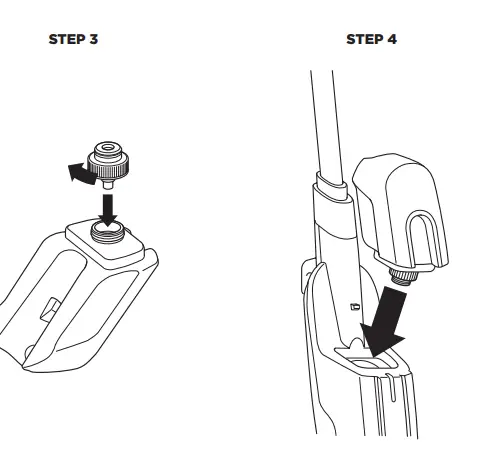
- To remove the tank, lift it up and away from the Steam Mop body. Make sure to unplug the Steam Mop before removing the water tank.
- To remove the water tank cap, twist counterclockwise. Fill tank completely with distilled water or tap water.

- Replace cap on water tank and turn cap clockwise to seal.
- To replace the water tank, align it so the cap faces down. Place the cap into the hole in the Steam Mop body and slide tank down until it clicks securely into place.
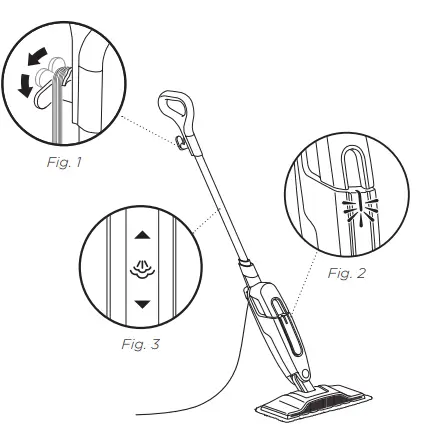
- Pull and twist the quick release cord holder to unwrap the power cord completely (Fig. 1). When Steam Mop is plugged into an electrical socket, the power light will illuminate (Fig. 2). It takes approximately 30 seconds for the mop to heat up and the steam to be ready.
- Pump the handle a few times in a downward motion (Fig. 3) This pumping action will release steam as you mop and allows you to customise the amount of steam you want. Begin mopping with a forward and backward motion. The natural motion of mopping will produce steam.
- When the water tank is empty, the Steam Mop will stop producing steam. Make sure to unplug the Steam Mop before refilling the water tank. Follow the water tank refilling instructions on pages 7-8.
TO SANITISE* WITH YOUR STEAM MOP
- Start with a clean pad.
- Pump the handle a few times in a downward motion (Fig. 1).
- Start mopping on an appropriately sealed hard-floor surface with a forward and backward motion. After three minutes, your unit is ready to be used to sanitize.
- Using a forward and backward motion, move the unit over the area you seek to sanitize. Repeat at least 15 times.
ACCESSORIES
Refer to the packaging which shows the select accessories that are included with your model. To purchase additional accessories, visit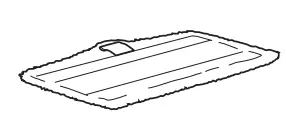
DIRT GRIP™ WASHABLE PAD
These easy-to-attach, reusable pads feature a superabsorbent microfibre for locking in moisture and dirt and scrubbing material for breaking up tough, stuck-on stains.
PAD CARE INSTRUCTIONS
Machine-wash the Dirt Grip pads separately with warm water using liquid detergent. NEVER USE BLEACH, POWDERED DETERGENT, or FABRIC SOFTENERS as they may damage or leave a coating on the Dirt Grip pads that will reduce their cleaning performance and absorbency. Dirt Grip pads should be line-dried or tumble-dried on a low setting, as this will extend the life of the microfibre fabric. Loose fibers can indicate the wearing of the microfibre fabric. DO NOT pull the loose fibers, as this can cause the weave to come undone. Simply trim the loose fibers with scissors. For best cleaning results, we recommend replacing your Dirt Grip pads every 3 to 4 months following normal use. As with any fabric, dirt particles, grease, friction, and repeated washing can cause the fibers to break down and you may notice an increase in the effort needed to push or pull the mop.
MAINTAINING YOUR STEAM MOP
WARNING: To reduce the risk of shock and unintended operation, unplug unit before servicing.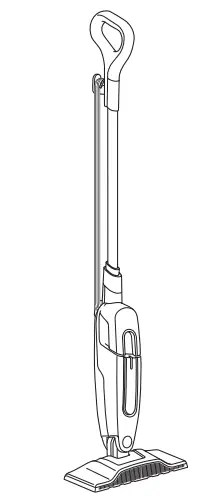
AFTER USE AND STORAGE
- Unplug the cord from the wall socket and wrap the cord around the cord hooks. Lock the Steam Mop in an upright standing position by raising the handle until the pole is standing straight up, perpendicular to the ground.
- After cleaning, wait 2 to 3 minutes to let the Dirt Grip™ pad cool before touching it. When cool, remove pad from mop head to avoid damage to your floors. Remove the pad by stepping on the tab and lifting off the mop head or by carefully pulling the pad off the mop head.
- With the unit locked in the upright standing position, store it in a cupboard or the corner of a room.
TROUBLESHOOTING GUIDE
WARNING: To reduce the risk of shock and unintended operation, turn off power and unplug unit before servicing.
The Steam Mop will not turn on.
- Your Steam Mop should be securely plugged into an electrical socket.
- Check your fuse or circuit-breaker.
- If your unit still doesn’t work, give us a call at: 0800 862 0453.
Steam Mop will not make steam.
- Make sure there is water in the tank. To add water, follow the instructions on pages 7 and 8.
- If your water tank is full, prime the mop by pumping the handle in a downward motion a few times to release steam.
Steam Mop leaves water on the floor.
- DO NOT leave the Steam Mop on the floor with a damp or wet cleaning pad.
- If you are using tap water, we recommend switching to distilled water.
- Make sure that the cap is securely placed on the water tank.
Steam Mop left white spot on the floor.
- DO NOT leave the Steam Mop on the floor with a damp or wet cleaning pad.
- Do you have hard water? If you do, you might want to switch to distilled water.
Floors are cloudy, streaky or spotty after steaming.
- The Dirt Grip™ pad might be dirty. Change to a new pad.
- If you washed the pad with powder detergent then the pad might have residual detergent left on it. Wash it again with liquid detergent.
- If you are cleaning in a kitchen area where there might be a buildup of grease, then use a degreasing agent such as an all-purpose cleaner or dish soap and paper towels to clean the area first.
- You might have left the mop in the same spot for too long.
- Do you have hard water? If you do, you might want to switch to distilled water.
- This might be left over from past cleaners used on the floor surface. Clean with the Steam Mop a few more times and see if the leftover cloudiness is removed.
Steam Mop is hard to push.
- Make sure the Dirt Grip pad is properly attached.
WARRANTY TERMS AND CONDITIONS
When a consumer buys a product in the UK, they get the benefit of legal rights relating to the quality of the product (your “statutory rights”). You can enforce these rights against your retailer. However, at Shark we are so confident about the quality of our products that we give the original product owner an additional manufacturer’s warranty of up to two years. (1 year as standard plus 1 year when you register) These terms and conditions relate to our manufacturer’s warranty only – your statutory rights are unaffected. Please note that the 2 year guarantee is available in all EU countries and in the UK if it stops being an EU country during the guarantee term. The conditions below describe the prerequisites and scope of our warranty. They do not affect your statutory rights or the obligations of your retailer and your contract with them.
Shark® Guarantees
A household appliance like a steam mop constitutes a sizeable investment. Your new machine needs to work properly for as long as possible. The guarantee it comes with is an important consideration – and reflects how much confidence the manufacturer has in its product and manufacturing quality. Every Shark machine comes with free parts and labor guarantee. Our customer service helpline (0800 862 0453) is open from 9.00 am to 6.00 pm Monday – Friday. It’s free to call, and you’ll be put straight through to a Shark representative. You’ll also find online support at www.sharkclean.eu/uk.
How do I register my extended Shark® guarantee?
You can register your guarantee online within 28 days of purchase. To save time, you’ll need the following information about your machine:
- The date you purchased the machine (receipt or delivery note)
- To register online, please visit www.sharkclean.eu/uk/register-guarantee
IMPORTANT
- Both the 12 months and the extended 1 year guarantee will only cover your product from the date of purchase.
- Please keep your receipt at all times. Should you need to use your extended guarantee we will need your receipt to verify the information you have supplied to us is correct. The inability to produce a valid receipt may invalidate your guarantee.
What are the benefits of registering my free Shark® guarantee?
When you register your guarantee we’ll have your details to hand if we ever need to get in touch. If you further agree to receive communications from us, you can also receive tips and advice on how to get the best out of your Shark steam mop and hear the latest news about new Shark technology and launches. If you register your guarantee online, you’ll get instant confirmation that we’ve received your details.
How long are new Shark® machines guaranteed for?
Our confidence in our design and quality control means that your new Shark steam mop is guaranteed for a total of up to two years for the original owner (12 months plus an extended warranty of 1 year).
What is covered by the free Shark guarantee?
Repair or replacement of your Shark machine (at Shark’s discretion), including all parts and labour. A Shark guarantee is in addition to your legal rights as a consumer
What is not covered by the free Shark guarantee?
- Blockages – For details of how to unblock your steam mop, please refer to the Operating Manual.
- Normal wear and tear.
- Accidental damage, faults caused by negligent use or care, misuse, neglect, careless operation or handling of the steam mop which is not in accordance with the Shark® Operating Manual supplied with your machine.
- Use of the steam mop for anything other than normal domestic household purposes.
- Use of parts not assembled or installed in accordance with the operating instructions.
- Use of parts and accessories which are not Shark® Genuine Components.
- Faulty installation (except where installed by Shark®).
- Repairs or alterations carried out by parties other than Shark or its agents
What happens when my guarantee runs out?
Shark does not design products to last for a limited time. We do appreciate that there may be a desire for our customers to want to repair their steam mop cleaners after the warranty has elapsed or the product has been sold to a new owner. In this case please contact our freephone customer service helpline and ask about our out warranty program, on 0800 862 0453.
Where can I buy genuine Shark spares and accessories?
Shark spares and accessories are developed by the same engineers who developed your Shark steam mop. You’ll find a full range of Shark spares, replacement parts and accessories for all Shark machines at www.sharkclean.eu. Please remember that using non-Shark spares invalidates your guarantee.
NOTE: Save these instructions. Keep it for future reference.
Euro-Pro Europe Limited
- Unit 15 Mariner Court
- Calder Business Park
- Wakefield, West Yorkshire, WF4 3FL, UK
- Freephone 0800 862 0453
- www.sharkclean.eu


