![]()
Original Instructions – Cordless drywall screwdriver

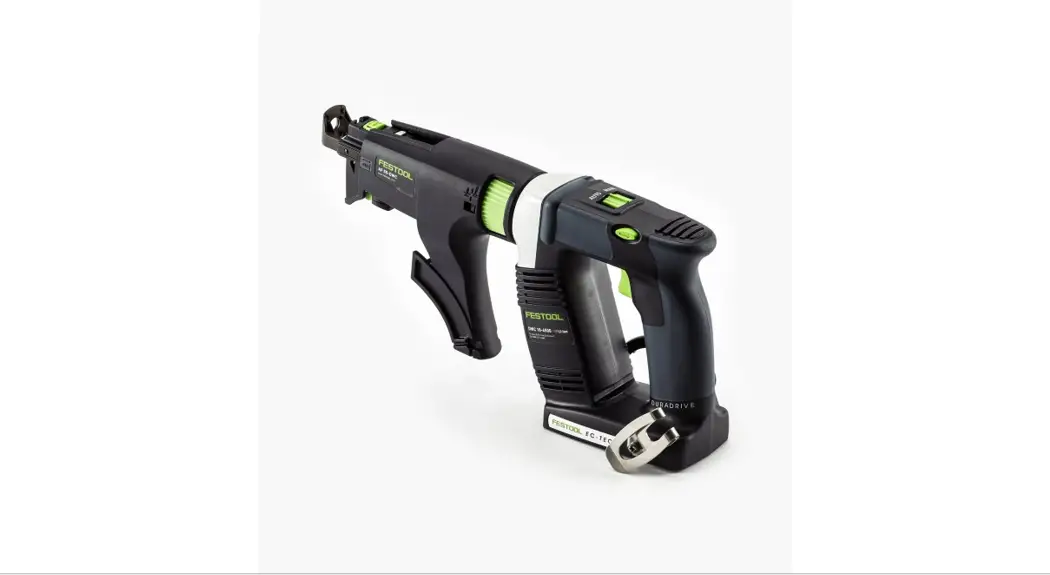
DWC 18-2500
DWC 18-4500
Festool GmbH
Wertstraße 20
D-73240 Wendlingen
+49 (0)7024/804-0
www.festool.com

720910_B / 2020-12-11
 | |
 | |
 | |
 | |
 |  |
 | |
 | |
 | |
 |  |
 |  |
 |  |
 |  |
Cordless drywall screwdriver Serial no. *
| DWC 18-2500 | 205054 |
| DWC 18-4500 | 205055 |
EC-Declaration of Conformity. We declare under our sole responsibility that this product is in conformity with all relevant provisions of the following directives including their amendments and complies with the following standards:
62841-1: 2015 + AC:2015
62841-2-2:2014 + AC:2015
55014-1: 2017,
55014-2: 2015
50581: 2012
![]() Festool GmbH
Festool GmbH
Wertstr. 20, D-73240 Wendlingen GERMANY
Wendlingen, 2019-04-30

Markus Stark
Head of Product Development

Ralf Brandt
Head of Product Conformity
in the specified serial number range (S-Nr.) from 40000000 – 49999999
Symbols
 | Warning of general danger |
 | Warning of electric shock |
 | Read the operating manual and safety instructions. |
 | Wear ear protection. |
 | Wear protective goggles. |
 | Do not dispose of it with domestic waste. |
| CE marking: Confirms the conformity of the power tool with the European Community directives. | |
 | Tip or advice |
| Handling instruction | |
 | Inserting the battery pack |
 | Removing the battery pack |
Safety warnings
2.1 General power tool safety warnings
WARNING! Read all safety warnings, in instructions, illustrations, and specifica tions provided with this power tool. Failure to follow all instructions listed below may result in electric shock, fire, and/or serious injury.
Save all warnings and instructions for future reference.
The term “power tool” in the warnings refers to your mains-operated (corded) power tool or battery-operated (cordless) power tool.
Follow the operating manual for the charger and the battery pack.
2.2 Machine-specific safety notices
– Hold the power tool by insulated gripping surfaces, when performing an operation where the fastener may contact hidden wiring. Fasteners contacting a “live” wire may make exposed metal parts of the pow er tool “live” and could give the operator an electric shock.
– Use appropriate detection devices to look for any hidden supply lines or consult your local utility company. If the insertion tool makes contact with live cables, it can result in fire and electric shock. Damage to a gas pipe can lead to an explosion. Penetration of a water pipe can result in damage to property.
–
Wear suitable personal protective equip ment: Ear protection and safety goggles.
CAUTION! The power tool can jam and cause sudden kickback! Switch off immediately!
– Hold the power tool firmly in your hand. Make sure the speed is adjusted correctly when screw driving. Be prepared for a high reaction torque, which may cause the pow er tool to turn and possibly lead to injury.
– Do not use the power tool in the rain or in damp surroundings. Moisture in the power tool may cause a short circuit and fire.
– Do not lock the on/off switch in place per manently.
– Connecting the magazine attachment and drywall screwdriver results in a tool for which the safety warnings and instructions of the drywall screwdriver apply.
– Do not use power supply units or third-party battery packs to operate cordless power tools. Do not use third-party charg ers to charge the battery packs. The use of accessories not expressly authorized by the manufacturer can result in electric shocks and/or serious accidents.
2.3 Emission levels
The levels determined in accordance with 62841 are typical:
| DWC 18-2500 | |
| Sound pressure level | LPA = 67 dB(A) |
| Sound power level | LWA = 78 dB(A) |
| Uncertainty | K = 3 dB |
| DWC 18-4500 | |
| Sound pressure level | LPA = 72 dB(A) |
| Sound power level | LWA = 83 dB(A) |
| Uncertainty | K = 3 dB |
|
Noise generated when working Risk of damage to hearing
|
Vibration emission level ah (vector sum for three directions) and uncertainty K measured in accordance with EN 62841:
| DWC 18-2500 | ah ≤ 2.5 m/s² K = 2 m/s² |
| DWC 18-4500 | ah ≤ 2.5 m/s² K = 2 m/s² |
The specified emission levels (vibration, noise)
– are used to compare machines.
– They are also used for making preliminary estimates regarding vibration and noise load during operation.
– They represent the primary applications of the power tool.
|
| The emission values may deviate from the specified values. This is dependent on how the tool is used and the type of workpiece being machined. ► The actual load during the entire operating cycle must be evaluated. ► Depending on the actual load, suitable pro tective measures must be defined in order to protect the operator. |
Intended use
Drywall screwdriver suitable for the following screwdriving tasks:
DWC 18-2500
– Screwdriving gypsum fibreboard to metal or wooden constructions using drywall screws with milling ribs
– Screwdriving chipboard/OSB to wooden constructions with wood screws and chip board screws up to a diameter of 5 mm
DWC 18-4500
– Screwdriving plasterboards onto metal profile bars (≤ 0.88 mm) using drywall screws with a fine thread
– Screwdriving plasterboards onto metal profile bars (≤ 2.25 mm) using drywall screws with a drill point
– Screwdriving plasterboards to wooden constructions using drywall screws with a coarse thread
This power tool is suitable for use with BP Festool battery packs of the same voltage class.
The user is liable for damage and acci dents caused by improper and non-inten ded use; this also includes damage and wear caused by the continuous industrial operation.
Technical data
| Cordless drywall screwdrivers | DWC 18-2500 | DWC 18-4500 |
| Motor voltage | 18 V | 18 V |
| No-load speed* | 0–2500 rpm | 0–4500 rpm |
| Torque soft/hard | 7/18 Nm | 5/14 Nm |
| Tool holder | 1/4″ DIN 3126/ | 1/4″ DIN 3126/ |
| Cordless drywall screwdrivers | DWC 18-2500 | DWC 18-4500 |
| Max. workable screw length | 55 mm | 55 mm |
| Weight (incl. battery pack and magazine attachment) as per EPTA procedure 01:2014 | 2 kg | |
| Weight excl. battery pack | 1.2 kg | |
| Weight excl. battery pack, incl. depth stop | 1.3 kg | |
| Weight excl. battery pack, incl. magazine attachment | 1.6 kg | |
* Speed values based on the fully charged battery pack.
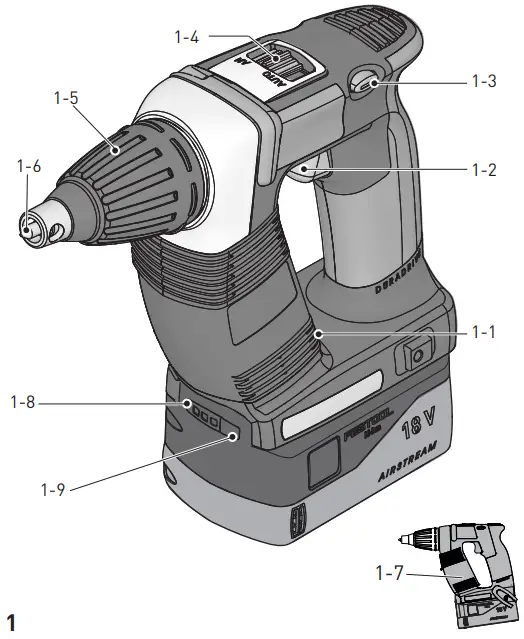
Parts of the machine
[1-1] Bit store
[1-2] On/off switch
[1-3] Rotational direction switch
[1-4] AUTO/MAN selector switch
[1-5] Depth stop
[1-6] Bits
[1-7] Insulated gripping surfaces (grey sha ded area)
[1-8] Capacity display button on the battery pack
[1-9] Capacity display
Accessories shown or described are not always included in the scope of delivery.
The specified illustrations appear at the begin ning of the Operating Instructions.
Commissioning
6.1 Changing the battery pack
Inserting the battery pack [2 A]
Removing the battery pack [2 B]
The battery pack is ready to use straight out of the box and can be charged at any time.
6.2 Changing the battery pack
Inserting the battery pack [2 A]
Removing the battery pack [2 B]
The battery pack is ready to use straight out of the box and can be charged at any time.
Further information about the battery pack and charger can be found in the corresponding operating manual.
Settings
|
| Risk of injury ► Only adjust the settings when the power tool is switched off. |
7.1 Changing direction of rotation [1-3]
– Switch to the left = clockwise rotation
– Switch to the right = counterclockwise rota on
Tool holder, attachments
|
| Risk of injury, electric shock ► Always disconnect the battery pack before any type of work on the machine! |
8.1 Bit holder
The bit holder enables the operator to change drill bits quickly.
|
| Risk of injury from a hot and sharp tool ► Do not use any blunt or faulty tools. |

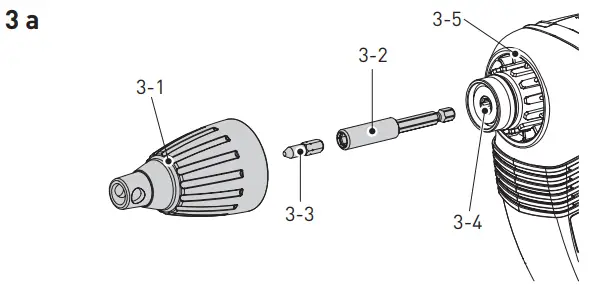
Attaching the bit holder
- Move the switch [1-4] to the MAN position.
- Push the bit holder [3-2] into the tool hold er [3-4] until it clicks into place.
- Place the bit [3-3] in the holder.
- Then affix the depth stop to the transmis sion housing, as described in section.
Removing the bit holder
- Take out the depth stop as described in sec on.
- Remove the bit holder from the tool holder by pulling firmly.
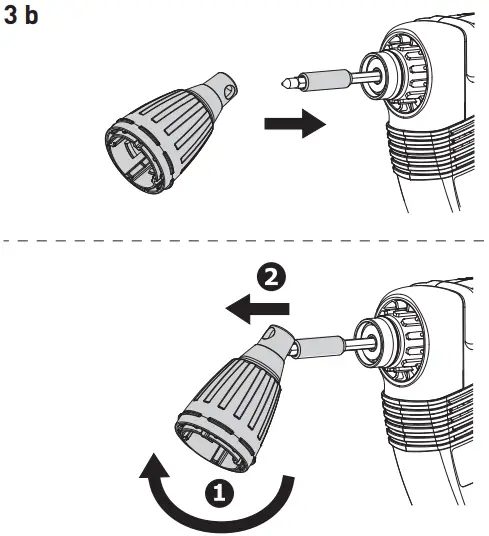
8.2 Changing the bit
To change the bit [1-6], you can use the depth stop [1-5].
- To do this, place the depth stop on the bit as shown in figure [3b].
- The bit can be taken out by tilting the depth stop with the bit while pulling at the same time.
- Then place the new bit in the bit holder.
Working with the machine
9.1 Switching on/off [1-2]
The tool is not started by pressing the switch [1-2] alone – not a tool fault!
Once the screw is driven to the de sired depth, the tool switches off au automatically.
There are numerous ways to switch the tool on:
a)
- Set the tool’s rotational direction to clock wise using the right/left switch [1-3].
- Move the selector switch [1-4] to the MAN position.
- To switch the tool on, actuate the switch [1-2] and at the same time, press onthe screws with the drill bit.
By pressing on the switch [1-2], the speed can be infinitely adjusted.
b)
- Set the tool’s rotational direction to clock wise using the right/left switch [1-3].
- Move the selector switch [1-4] to the AUTO position.
- To activate the tool, press on the screw with the drill bit.
It is not necessary to press the switch [1-2].
The top speed is set automatically.
- Set the tool’s rotational direction to anti clockwise using the right/left switch [1-3].
- Switch the tool on using the switch [1-2].
The MAN/AUTO selector switch [1-4] is in either position.
By pressing on the switch [1-2], the speed can be infinitely adjusted.
The drywall screwdriver rotates anti clockwise by pressing on the switch [1-2] only, without also having to press on the bit.
To unscrew screws fully, the depth stop does therefore not need to be re moved.
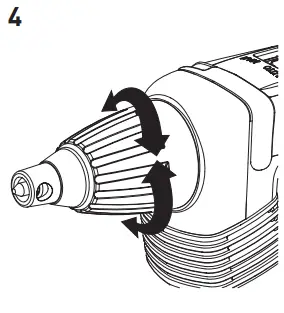
9.2 Depth stop
Turning on the depth stop [1-5] sets the screw ing depth, as shown in figure [4]. The setting is accurate to approx. ± 0.1 mm.
| Anticlockwise rota on | The screw is countersunk further out. |
| Clockwise rotation | The screw is countersunk further in. |
Once the depth setting is made, drive in a test screw then, if necessary, correct the depth.
Attaching the depth stop
- Place the depth stop [3-1] on the transmis sion housing [3-5].
- Then, apply pressure until the depth stop audibly clicks into place.
Removing the depth stop
- Take the depth stop out of the transmission housing by pulling firmly.
9.3 Frame hook and belt clip
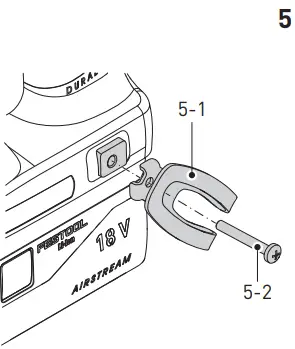
The belt clip [5-1] can be used to attach the tool to working clothes temporarily – it can be af fixed to the left or right-hand side of the tool using a screw [5-2], making it suitable for right-handed and left-handed operators – see figure [5].
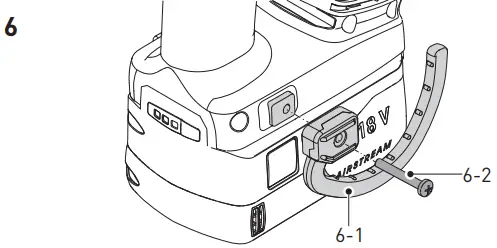
The tool also has a hook [6-1], by which the tool can be hung, as required. It can be affixed to the left or right-hand side of the housing using the screw [6-2] – see figure [6].
9.4 Magazine attachment
The magazine attachment enables the operator
to work continuously without unnecessary pau ses.
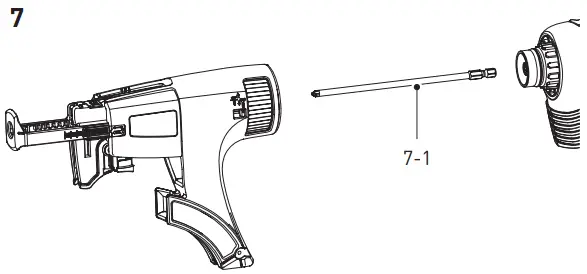
Fitting the magazine attachment
- Remove the depth stop [3-1] on the bit holder [3-2] using the bit, as described in section 8.
- Move the selector switch [1-4] to the MAN position.
- Push the long bit [7-1] into the tool hold er [3-4] until it clicks into place.
- Then affix the magazine attachment to the transmission housing. The magazine at tachment must audibly click into place.
- The magazine attachment can be positioned at 30° increments.
Removing the magazine attachment
- Take the magazine attachment out of the transmission housing by pulling firmly.
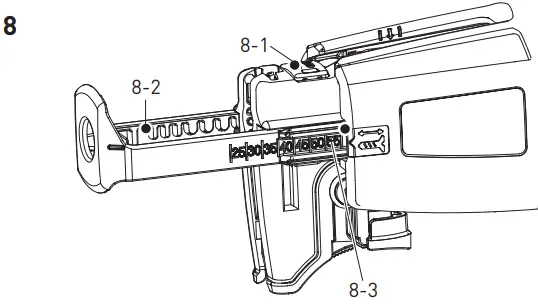
Adjusting the screw length
- Pressing on the button [8-1] slides the depth stop [8-2] in or out so that it can be adjusted to the required screw length. The screw length setting is visible on the sides of the depth stop [8-3].
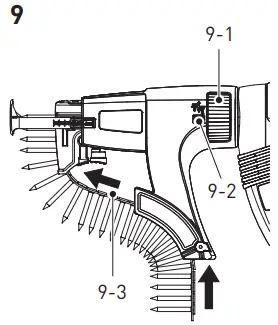
Inserting collated screws
- Firstly, draw the belt of collated screws [9-3] through the lower magazine guide and then thread them into the car riage guide until a screw clicks into the working position.
Make sure that the screws are correctly positioned and secure by pulling gently on the belt of collated screws.
Check that the first screw is lined up in the screwing axis – see figure [9]. - Use the adjusting wheel [9-1] to set the re quired insertion depth.
- Clockwise rotation will countersink the screws further in, while anticlockwise rota tion will countersink the screws further out. The current setting can be read off the pre
setting display [9-2]
Once the setting is made, drive in a test screw, then, if necessary, correct the depth setting us ing the adjusting wheel [9-1]. Each setting ad adjustment shifts the stop by ± 0.1 mm.
We recommend screwdriving in the automatic mode – see section 9.1 b).
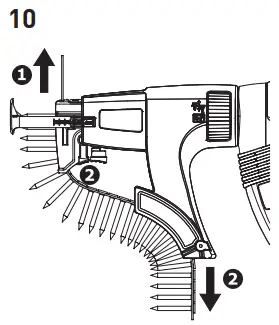
Removing collated screws
- Remove the collated screws by pulling up wards once (figure [10] ¹) or by engaging the transport lever at the same time as pulling the collated screws downwards (fig ure [10]²).
Working instructions
– The magazine attachment must not be held in the area of the depth stop.
– Each screwdriving process must be com pleted in full. Interrupting a screwdriving process or applying pressure when screw driving can cause the tool to malfunction.
– The collated screws must only be changed when the tool is at a standstill.
– The magazine attachment must under no circumstances be used in any way other than that described in this operating man gal.
– Use only original screwdriver bits.
– Use only original collated screws.
– The collated screws must always be kept in their original packing.
– Always work at right angles to the board that is being affixed.
10.1 Magazine attachment maintenance
The magazine attachment is essential mainte nance-free. After an extensive period of use, however, it is recommended to clean it with compressed air.
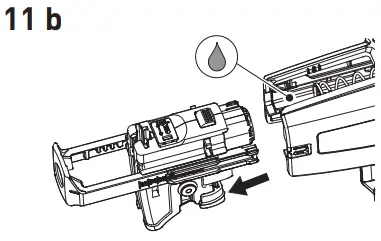
The magazine attachment can be lubricated around the area of the carriage guide – see fig ure [11b].
For the purposes of cleaning, the magazine at tachment can be dismantled as described be low.
Prior to cleaning, remove the collated screws from the magazine as described in section “Re moving collated screws”.
Take the magazine attachment out of the dry wall screwdriver.
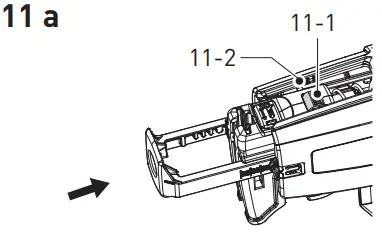
Removing the carriage
- Push the depth stop [8-2] into the housing as far as it will go, until the locking but ton [11-1] is level with the marking for car riage removal [11-2] – see figure [11a].
- Press the locking button [11-1] and at the same time pull the carriage out of the mag azine – see figure [11b].
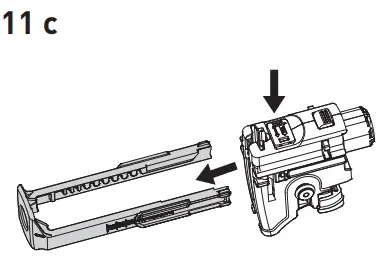
- Push the button [8-1] and at the same time unscrew the depth stop – see figure [11c].
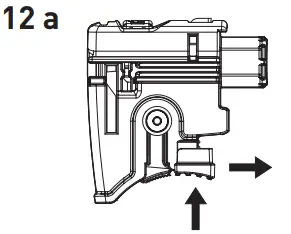
Removing the transport lever
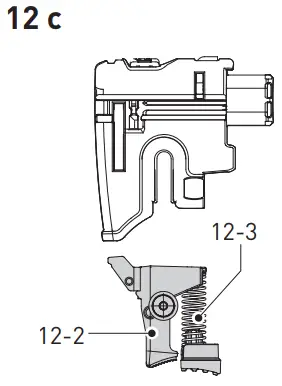
- Push the button [12-1] and at the same time slide in the direction of the arrow – see figure [12a].
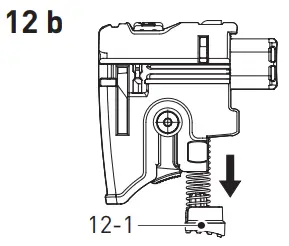
- Remove the released button [12-1] (fig ure [12b]) together with the transport lev er [12-2] and the spring [12-3] from the carriage (figure [12c]).
- Clean the individual parts, replace faulty or worn parts and then reassemble in reverse order.
When reassembling the transport lever in the carriage, ensure the spring [12-3] is posi mentioned correctly within the transport lever. In correct assembly can prevent the collated screws from being transported properly.
10.2 Acoustic warning signals
Acoustic warning signals sound and the ma chine switches off in the following operating states:
 | Battery flat or machine over loaded. – Change the battery. |
 | The machine is overheating. – You must allow the ma chine to cool before using it again. |
 | The lion battery pack is faulty or has overheated. – Once the battery pack has cooled, perform a func tional check using the charger. |
Service and maintenance
|
Risk of injury, electric shock
|
Customer service and repairs
must only be carried out by the manufacturer or service work shops. Find the nearest address at: www.festool.co.uk/service

Always use original Festool spare parts. Order no. at: www.festool.co.uk/service
To ensure constant air circulation, always keep the cooling air openings in the motor housing clean and free of blockages.
Keep the contacts on the power tool, charger, and battery pack clean.
Environment
Do not dispose of the device in the household waste! Recycle devices, ac accessories, and packaging. Observe appli cable national regulations.
EU only: In accordance with the European Di directive on waste electrical and electronic equipment and implementation in national law, used power tools must be collected separately and handed in for environmentally friendly re cycling.
Information on REACH: www.festool.com/reach
General information
Imported into the UK by
Festool UK Ltd
1 Anglo Saxon Way Bury
St Edmunds
IP30 9XH
Great Britain
13.1 Bluetooth®
The Bluetooth ® word mark and the logos are registered trademarks of Bluetooth SIG, Inc.;
they are used by TTS Tooltechnic Systems AG & Co. KG, and therefore by Festool, under license.
References
 Festool customer service | Service for you and for your tool
-
Festool Worldwide - Tools for the toughest demands
-
Festool Worldwide - Tools for the toughest demands
-
Responsibility for the environment at Festool
-
Zákaznický servis Festool | Servis pro vás a vaÅ¡e náÅ™adí
-
Festool Kundenservice | Service für Sie und Ihr Werkzeug
-
Festool kundeservice | Service til dig og dit værktøj
-
Festool España | Fabricando Herramientas Profesionales desde 1925
-
Nuestros Servicios Personalizados | Rendimiento sin concesiones ? Festool
-
Festool-asiakaspalvelu | Sinun ja työkalusi palveluksessa
-
Festool France
-
Festool Netherlands
-
Odpowiedzialność za środowisko w Festool
-
Os nossos grupos de produtos | Ferramentas da Festool ?


