![]() SM-R860 Galaxy Watch4
SM-R860 Galaxy Watch4
User Manual
SM-R860 Galaxy Watch4
| SM-R860 | SM-R865F |
| SM-R870 | SM-R875F |
| SM-R880 | SM-R885F |
| SM-R890 | SM-R895F |
Getting Started
About the Galaxy Watch4 Classic / Galaxy Watch4
The Galaxy Watch4 Classic / Galaxy Watch4 (hereafter, Watch) is a smartwatch that can analyze your exercise pattern, manage your health and allow you to use a variety of convenient apps for making phone calls and playing music. You can easily browse the various features by using the bezel, launch a feature by simply tapping the screen, or change the watch face to match your taste. You can use your Watch after connecting it to your smartphone.
Read me first
- Please read this manual before using this device to ensure safe and proper use.
- Descriptions are based on the device’s default settings.
- Some content may differ from your device depending on the region, service provider, model specifications, or device’s software.
- The device may require a connection to a Wi-Fi or mobile network when using some apps or features.
- Content (high quality content) that requires high CPU and RAM usage will affect the overall performance of the device. Apps related to the content may not work properly depending on the device’s specifications and the environment that it is used in.
- Samsung is not liable for performance issues caused by apps supplied by providers other than Samsung.
- Samsung is not liable for performance issues or incompatibilities caused by edited registry settings or modified operating system software. Attempting to customize the operating system may cause the device or apps to work improperly.
- Software, sound sources, wallpapers, images, and other media provided with this device are licensed for limited use. Extracting and using these materials for commercial or other purposes is an infringement of copyright laws. Users are entirely responsible for illegal
use of media. - You may incur additional charges for data services, such as messaging, uploading and downloading, auto-syncing, or using location services depending on your data plan. For large data transfers, it is recommended to use the Wi-Fi feature.
- Default apps that come with the device are subject to updates and may no longer be supported without prior notice. If you have questions about an app provided with the device, contact a Samsung Service Centre. For user-installed apps, contact service providers.
- This device’s operating system is different from the previous Galaxy Watch series, and you cannot use previously purchased content due to compatibility issues.
- The model specifications and supported services may differ depending on the region.
- Modifying the device’s operating system or installing software from unofficial sources may result in device malfunctions and data corruption or loss. These actions are violations of your Samsung licence agreement and will void your warranty.
- Some functions may not work as described in this manual depending on the maker and model of the smartphone you connect to your Watch.
- Depending on the region or service provider, a screen protector may be attached for protection during production and distribution. Damage to the attached screen protector is not covered by the warranty.
- You can see the touchscreen clearly even in strong outdoor sunlight by automatically adjusting the contrast range based on the surrounding environment. Due to the nature of the product, displaying fixed graphics for extended periods may result in afterimages (screen burn-in) or ghosting.
– It is not recommended to use fixed graphics on part or all of the touchscreen for extended periods. Turn off the touchscreen when not using the device.
– You can set the touchscreen to turn off automatically when you are not using it. On the Watch’s Apps screen, tap (Settings) → Display → Screen timeout and select
the length of time you want the device to wait before turning off the touchscreen.
– To set the touchscreen to automatically adjust its brightness based on the surrounding environment, on the Watch’s Apps screen, tap(Settings) → Display and tap the Auto brightness switch to activate it. - The use of smartphones on airplanes or ships may be subject to federal and local guidelines and restrictions. Check with the appropriate authorities and always follow crew instructions regarding when and how you may use your device.
- Depending on the region, you can view the regulatory information on the device. To view the information, on the Watch’s Apps screen, tap (Settings) → About watch → Regulatory info.
- Your device contains magnets. Keep a safe distance between your device and objects that may be affected by magnets such as credit cards and implantable medical devices. If you have an implantable medical device, consult your physician before use.
Maintaining water and dust resistance
Your device supports water- and dust-resistance. Follow these tips carefully to maintain the water- and dust-resistance of the device. Failure to follow the tips below may exult in damage to your device and will not guarantee its performance, including its water-resistance.
- Do not expose your device to liquids other than fresh water, or chemical products such as sunscreen, hand sanitizer, cosmetics, soapy water, detergent, oil, perfume, coffee, or beverages
- Do not stay underwater, dive, or play water sports, such as water-skiing, surfing, jumping into water, and do not swim or use the device in fast-moving water, such as a river
- Do not expose the device directly to water moving with force, such as water from a faucet. Do not suddenly apply excessive water pressure to the device, such as when diving.
- It is recommended to only swim in a swimming pool where its water level is not deep (approximately within 1.5 m).
- 5ATM water-resistance classification certification: The device has been tested by submerging it in 50 m of fresh water for 10 minutes, leaving it still, without any movement to meet the requirements of ISO 22810:2010. The water-resistance is not guaranteed when using the device under conditions that deviate from the standard.
- IP68 water-resistance classification certification: The device has been tested by submerging it in 1.5 m of fresh water for 30 minutes, leaving it still, without any movement to meet the requirements of IEC 60529. The water-resistance is not guaranteed when using the device under conditions that deviate from the standard.
- If the device is hit or damaged, its water-resistance may be compromised.
- If using the device when it or your hands are wet, the device’s performance and its appearance may be damaged. Dry them thoroughly with a dry cloth before handling the device.
- If the device is exposed to fresh water, dry it thoroughly with a clean, soft cloth.
- If the device is exposed to liquids other than fresh water, such as salt water, coffee, beverages, swimming pool water, soapy water, oil, perfume, sunscreen, hand sanitizer, or chemical products, such as cosmetics, take immediate action as follows. Rinse the device with fresh water that does not flow and dry it thoroughly with a clean, soft cloth. If you do not follow these instructions, the device’s performance, including its water-resistance and appearance may be affected.
- Do not disassemble your device. The water- and dust-resistant features of the device can be damaged.
- Do not expose your device to a dramatic change in air temperature or water temperature.
- Do not dry your device with a heating machine like a hair drier.
- The water-resistant feature of the device can be damaged in a sauna.
- If the device has been immersed in water or the microphone or speaker is wet, sound may not be heard clearly during a call. After wiping the device with a dry cloth, dry it thoroughly before using it.
- The touchscreen and other features may not work properly if the device is used in water.
- Your device has been tested in a controlled environment and certified to be water- and dust-resistant in specific situations and conditions. (Meets the requirements of the water-resistance in a 50 m deep water as described by the international standard ISO 22810:2010 and your device can be used in shallow water. Meets the requirements of the dust-resistance as described by classification IEC 60529 IP6X.).
Precautions for overheating
If you feel discomfort due to overheating while using the device, stop using it immediately and remove it from your wrist.
To avoid problems, such as device malfunction, skin discomfort or damage, and battery draining, a warning will appear on the device if it reaches a specific temperature. When the initial warning appears, device functions will be disabled until the device cools down to a specific temperature. However, the emergency call feature will be available on the LTE model.
If the device temperature continues to increase, a second warning will appear. At this time, the device will shut down. Do not use the device until it cools down to a specific temperature. However, when using the LTE model, the emergency call feature that has been previously connected will remain active until you are finished, even though the second warning will appear.
Cleaning and managing the Watch
Follow the points below to ensure your Watch functions correctly and maintains its appearance. Failure to do so may damage the Watch and cause the skin irritation.
- Turn off the Watch and remove the band before cleaning it.
- Prevent the device from being exposed to dust, sweat, ink, oil, and chemical products such as cosmetics, antibacterial spray, hand cleaner, detergent, and insecticides. The Watch’s exterior and interior parts may be damaged or it could result in poor performance. If your Watch is exposed to any of the previously mentioned substances, use a lint-free, soft cloth to clean it.
- Do not use soap, cleaning agents, abrasive materials and compressed air when cleaning your Watch and do not clean it with ultrasonic waves or external heat sources. Doing so may damage the Watch. Skin irritation may be caused by soap, detergents, hand sanitizers, or cleaning agents left on the Watch. • When you remove sun block, lotion, or oil, use a soap-free detergent, then rinse and dry your Watch thoroughly.
- The hybrid band is not water-resistant. Do not swim or take a shower while using the hybrid band.
- The hybrid band may make squeaking sound where it connects with the Watch due to the characteristics of the leather material. This is normal and you can address this issue by applying leather care products to the band at the connection point.
- Avoid exposing the Watch’s hybrid band to direct sunlight, hot or humid environments, or water. The leather material’s colour and form may change if you do so. If it gets wet, wipe it with a soft, lint-free cloth immediately and dry it in a well-ventilated and shaded place.
- When your hybrid band get stained, wipe it with a soft, lint-free cloth. If necessary, slightly dampen a cloth with fresh water.
![]() The supplied band may vary depending on the region or model. Be sure to properly clean and maintain your band accordingly.
The supplied band may vary depending on the region or model. Be sure to properly clean and maintain your band accordingly.
Use caution if you are allergic to any materials on the Watch
- Samsung has tested the noxious materials found on the Watch through internal and external certificate authorities, including tests for all materials that contact with skin, skin toxicity test, and the Watch-wearing test.
- The Watch includes nickel. Take the necessary precautions if your skin is hypersensitive or you have an allergy to any materials found on the Watch.
– Nickel: The Watch contains a small amount of nickel, which is below its reference point limited by the Europe REACH regulation. You will not be exposed to the nickel inside the Watch and the Watch has passed the international certificated test. However, if you are sensitive to nickel, be careful when using the Watch. - Only materials that meet the standards of the U.S Consumer Product Safety Commission (CPSC), the regulations of the European countries, and other international standards are used to make a Watch.
Instructional icons
![]() Warning: situations that could cause injury to yourself or others
Warning: situations that could cause injury to yourself or others![]() Caution: situations that could cause damage to your device or other equipment
Caution: situations that could cause damage to your device or other equipment![]() Notice: notes, usage tips, or additional information
Notice: notes, usage tips, or additional information
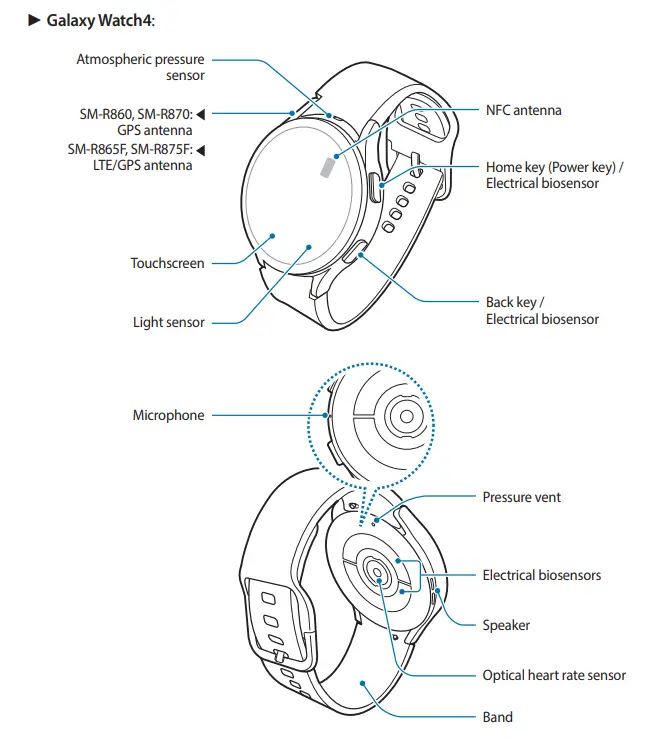
Device layout
Package contents
 The items supplied with the Watch and any available accessories may vary depending on the region or service provider.
- The supplied items are designed only for this Watch and may not be compatible with other devices.
- Appearances and specifications are subject to change without prior notice.
- You can purchase additional accessories from your local Samsung retailer. Make sure they are compatible with the Watch before purchase.
- Except for the Watch, some supplied items and accessories may not have the same water- and dust-resistance certification.
- Only use Samsung-approved accessories. Using unapproved accessories may cause performance problems and malfunctions that are not covered by the warranty.
- Availability of all accessories is subject to change depending entirely on manufacturing companies. For more information about available accessories, refer to the Samsung website.
Watch
 |  |
![]() The device and some accessories (sold separately) contain magnets. The American Heart Association (US) and the Medicines and Healthcare Products Regulatory Agency (UK) both warn that magnets can affect the operation of implanted pacemakers, cardioverters, defibrillators, insulin pumps or other electro medical devices (collectively, “Medical Device”) within the range of 15 cm (6 inches). If you are a user of any of these Medical Devices, DO NOT USE THIS DEVICE AND SOME ACCESSORIES (SOLD SEPARATELY) UNLESS YOU HAVE CONSULTED WITH YOUR PHYSICIAN.
The device and some accessories (sold separately) contain magnets. The American Heart Association (US) and the Medicines and Healthcare Products Regulatory Agency (UK) both warn that magnets can affect the operation of implanted pacemakers, cardioverters, defibrillators, insulin pumps or other electro medical devices (collectively, “Medical Device”) within the range of 15 cm (6 inches). If you are a user of any of these Medical Devices, DO NOT USE THIS DEVICE AND SOME ACCESSORIES (SOLD SEPARATELY) UNLESS YOU HAVE CONSULTED WITH YOUR PHYSICIAN.
 Do not store your device and some accessories (sold separately) near magnetic fields. Magnetic stripe cards, including credit cards, phone cards, passbooks, and boarding passes, may be damaged by magnetic fields.
- When using the speaker, such as when playing media files, do not place the Watch close to your ears.
- Ensure that the band is kept clean. Contact with contaminants, such as dust and dye, can cause stains on the band that cannot be fully removed.
- Do not insert sharp objects into the atmospheric pressure sensor, the pressure vent, speaker, or the microphone. Inner components of the Watch may be damaged along with the water-resistance feature.
- If you use the Watch with its acrylic body broken, there is a risk of injury. Use the Watch only after it has been repaired at a Samsung Service Centre.
- Connectivity problems and battery drain may occur in the following situations:
– If you use a metallic band
– If you attach metallic stickers on the antenna area of the Watch
– If you cover the Watch’s antenna area with your hands or other objects while using certain features, such as calling or the mobile data connection (LTE models) - Do not cover the light sensor area with screen accessories, such as a screen protector or stickers. Doing so may cause the sensor to malfunction.
- Make sure the Watch’s microphone is not obstructed when you are speaking into it.
- The pressure vent ensures that the Watch’s inner parts and sensors work correctly when you use the Watch in an environment where the atmospheric pressure changes.
- The leather on the hybrid band is made of natural leather with minimised processing. The band’s irregular patterns, leather grains, pores, scars, as well as the natural colour change, including metachromatic stains, which may occur during use, are a natural phenomenon of the leather and not product defects.
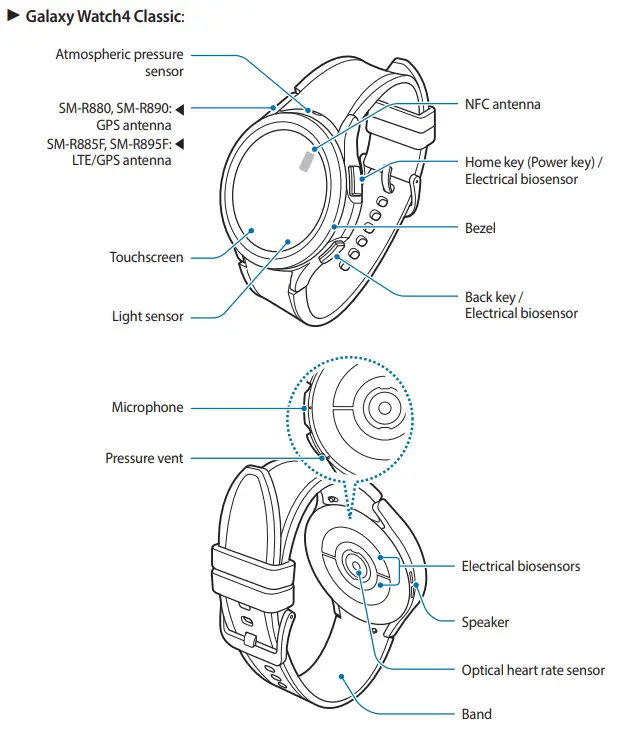
- The images in this manual are of a Galaxy Watch4 Classic.
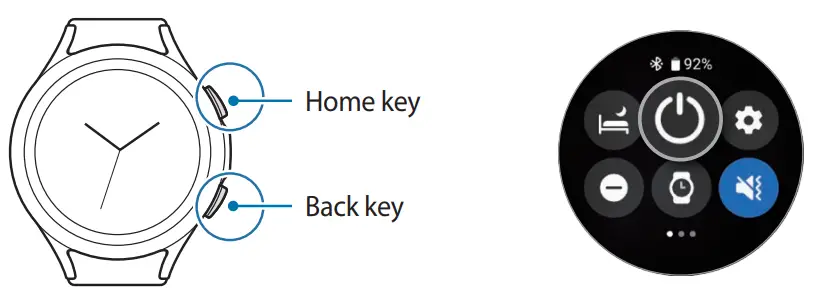
Keys
| Key | Function |
| Home key | • When the Watch is off, press and hold to turn it on. • When the screen is off, press to turn on the screen. • Press and hold to start a conversation with Bixby. Refer to Using Bixby for more information. • Press twice or press and hold to launch the app or feature you set.( • Press to open the Watch screen when you are on any other screen. |
| Back key | • When the screen is off, press to turn on the screen. • Press to launch the feature you set. ( |
| Home key + Back key | • Press simultaneously to capture a screenshot. • Press and hold simultaneously to turn off the Watch. |
Wireless charger
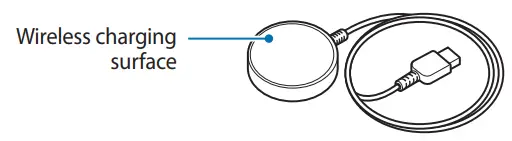
![]() Do not expose the wireless charger to water. The wireless charger does not have the same water- resistance certification as your Watch.
Do not expose the wireless charger to water. The wireless charger does not have the same water- resistance certification as your Watch.
Charging the battery
Charge the battery before using it for the first time or when it has been unused for an extended period.
![]() Only use a Samsung-approved charger and cable specifically designed for your Watch. An incompatible charger or cable can cause serious injuries or damage to your device.
Only use a Samsung-approved charger and cable specifically designed for your Watch. An incompatible charger or cable can cause serious injuries or damage to your device.
- Only use the wireless charger supplied with the device. The Watch cannot be charged properly with a third-party wireless charger.
- Connecting the charger improperly may cause serious damage to the device. Any damage caused by misuse is not covered by the warranty.
- To save energy, unplug the charger when not in use. The charger does not have a power switch, so you must unplug the charger from the electric socket when not in use to avoid wasting power. The charger should remain close to the electric socket and easily accessible while charging.
- The Watch has a built-in wireless charging coil. You can charge the battery by using a wireless charging pad. The wireless charging pad is sold separately. For more
information about available wireless charging pads, refer to the Samsung website.
Wireless charging
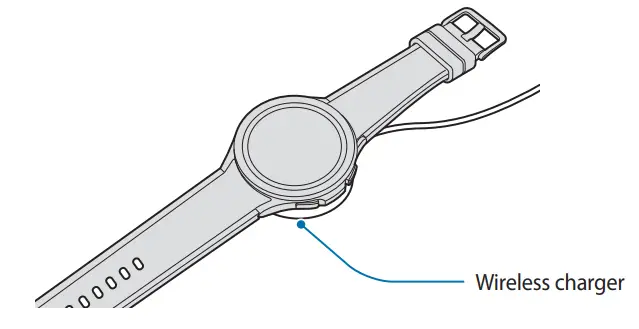
- Connect the wireless charger to the USB power adapter.
- Place the Watch on the wireless charger, aligning the centre of your Watch’s back side with the centre of the wireless charger.

- After fully charging, disconnect the Watch from the wireless charger.
Checking the charging status
You can check the charging status on the screen during wireless charging. If the charging status does not appear on the screen, on the Apps screen, tap ![]() (Settings) → Display and tap the Show charging info switch to activate it.
(Settings) → Display and tap the Show charging info switch to activate it.
If you charge the Watch when it is turned off, press any key to check the charging status on the screen.
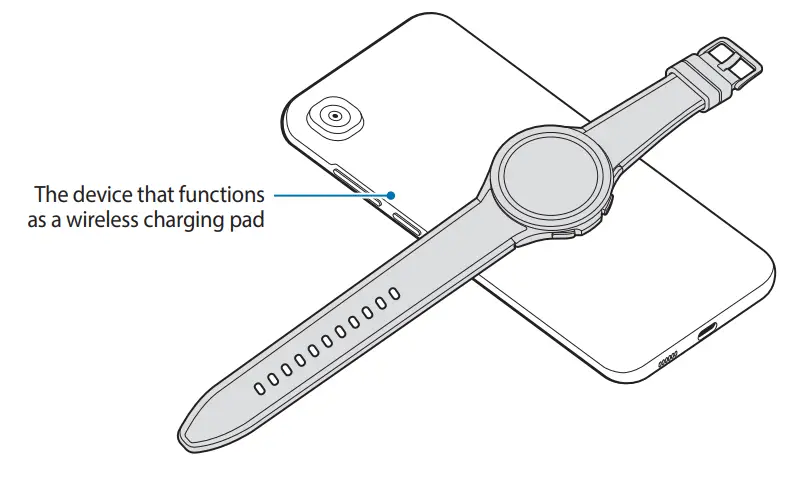
Charging the battery using Wireless power sharing
You can charge your Watch with the battery of a device that functions as a wireless charging pad. You can still charge your Watch even while charging the device that functions as a wireless charging pad. Depending on the type of cover being used, the Wireless power sharing feature may not work properly. It is recommended to remove any cover being used from the device that functions as a wireless charging pad before using this feature.
- Turn on the Wireless power sharing feature on the device that functions as a wireless charging pad and place the centre of the Watch’s back on the device.

- After fully charging, remove the Watch from the device that functions as a wireless charging pad.Do not use earphones or a Bluetooth headset while sharing power. Doing so may affect nearby devices.• The location of the wireless charging coil may vary by device model. Adjust the device or Watch to connect with each other properly.
• Some features that work while wearing the Watch are not available while sharing power.
• To charge properly, do not move or use the device that functions as a wireless charging pad or the Watch while charging.
• The power charged to your Watch may be less than the amount shared to it by the device that functions as a wireless charging pad.
• If you charge the Watch while charging the device that functions as a wireless charging pad, the charging speed may decrease or the Watch may not charge properly, depending on the charger type.
• The charging speed or efficiency may vary depending on the condition of the device that functions as a wireless charging pad or the surrounding environment.
• If the remaining battery power of the device that functions as a wireless chargingpad drops below a certain level, power sharing will stop.
• For more information about available devices that function as wireless charging pads, refer to the Samsung website.
Battery charging tips and precautions
- If there are obstructions between the Watch and the wireless charger, it may not charge properly. Check if there is any sweat, liquid, or dust on them before charging.
- If the battery is completely discharged, the Watch cannot be turned on immediately when the wireless charger is connected. Allow a depleted battery to charge for a few minutes before turning the Watch on.
- If you use multiple apps at once, network apps, or apps that need a connection to another device, the battery will drain quickly. To avoid losing power during a data transfer, always use these apps after fully charging the battery.
- When connecting the wireless charger to another power source, such as a computer or multi-charging hub, the Watch may not charge properly or it may charge more slowly due to a lower electric current.
- The Watch can be used while it is charging, but it may take longer to fully charge the battery.
- If the watch’s power supply is unstable while being used and charged at the same time, the touchscreen may not function. If this happens, disconnect the Watch from the wireless charger.
- While charging, the Watch may heat up. This is normal and should not affect the Watch’s lifespan or performance. Before wearing the Watch, allow it to cool down for a while before using it. If the battery gets hotter than usual, the charger may stop charging.
- If you charge the Watch while the wireless charger is wet, the Watch may be damaged. Thoroughly dry the wireless charger before charging the Watch.
- If the Watch is not charging properly, visit a Samsung Service Centre.
- Avoid using a bent or damaged wireless charger cable. If the wireless charger cable is damaged, stop using it.
Wearing the Watch
Putting on the Watch
Open the buckle and place your Watch around your wrist. Fit the band to your wrist, insert the pin into an adjustment hole, and then secure the buckle to close it. If the band is too loose or too tight on your wrist, select a different hole.![]() Do not bend the band excessively. Doing so may damage the Watch.
Do not bend the band excessively. Doing so may damage the Watch.
- To measure your physical condition accurately, wear the Watch firmly around your lower arm above the wrist. Refer to How to wear the Watch for accurate measurements for more information.
- When certain materials come into contact with the back of the Watch, your Watch may recognize that you are wearing it on your wrist.
- If the sensors on the back of your Watch do not come into contact with your wrist for more than 10 minutes, your Watch may recognize that you are not wearing it on your wrist.
Band tips and precautions
- For accurate measurement, you have to wear the Watch so that it fits your wrist. After measuring, loosen the band to allow air to reach your skin. It is recommended to wear the Watch so that it is not too loose or tight, and that it feels comfortable in normal circumstances.
- When you wear the Watch for a long time or do a high-intensity exercise while wearing it, skin irritation may occur due to certain factors, such as friction, pressure, or moisture. If you have been wearing your Watch for a long time, remove it from your wrist for a while to keep your skin healthy and allow your wrist to rest.
- Skin irritation may occur due to an allergy, environment factors, other factors, or when your skin is exposed to soap or sweat for long periods. In this case, stop using your Watch immediately and wait 2 or 3 days for the symptoms to ease. If the symptoms persist or worsen, call your doctor.
- Make sure your skin is dry before wearing your Watch. If you wear a wet Watch for a long time, your skin may be affected.
- If you use your Watch in the water, remove foreign materials from your skin and Watch and dry them thoroughly to prevent the skin irritation.
- Do not use any accessories in water, only the Watch.
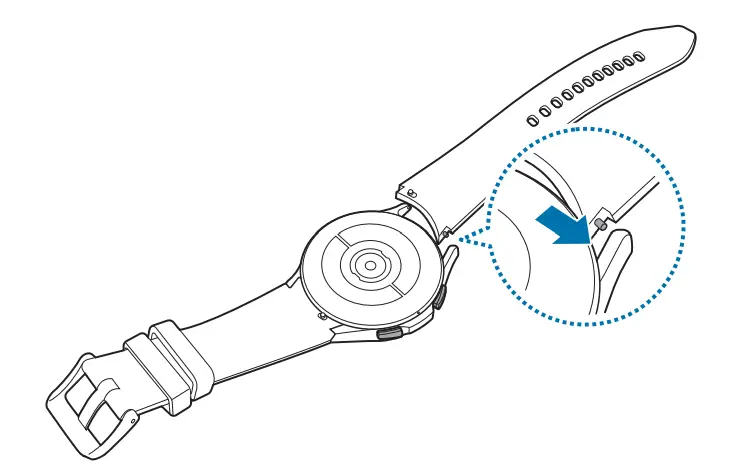
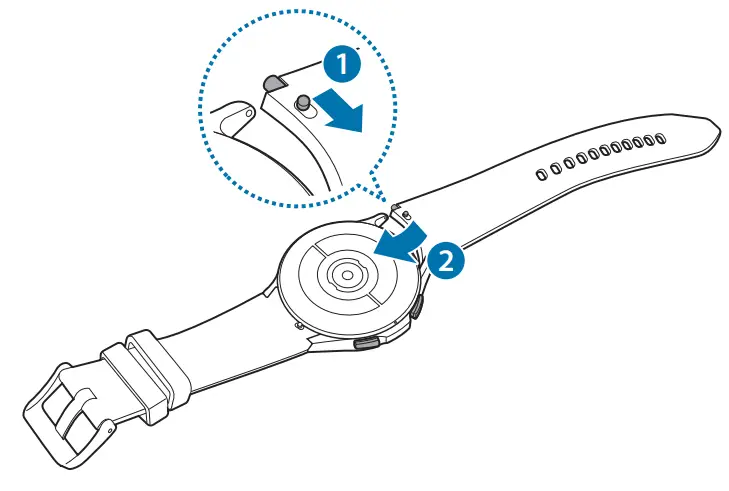
Connecting the band
Connect the band before using your Watch. You can detach the band from the Watch and replace it with a new one. Remove the band in the reverse order of how you connected it.![]() Be careful not to damage your fingernail when sliding the spring bar while connecting or replacing bands.
Be careful not to damage your fingernail when sliding the spring bar while connecting or replacing bands.
- The supplied band may vary depending on the region or model.
- The supplied band’s size may vary depending on the model. Use the proper band that fits your model’s size.
- Insert one end of the band’s spring bar into the Watch’s lug.

- Slide the spring bar inwards and connect the band.

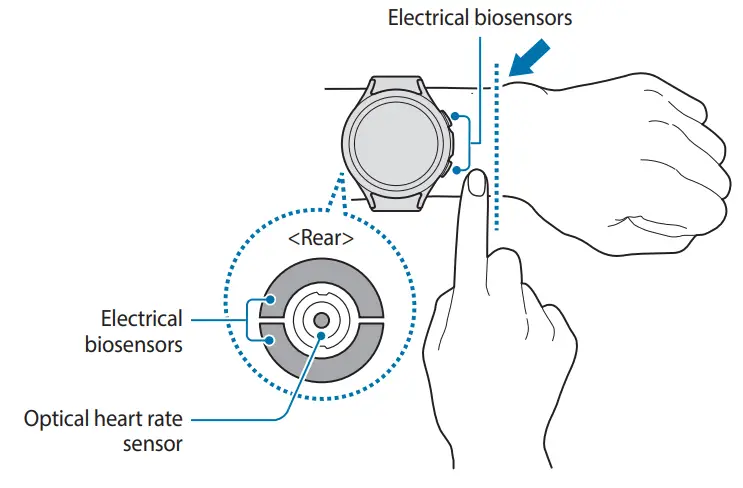
How to wear the Watch for accurate measurements
For accurate measurements, wear the Watch firmly around your lower arm above the wrist while leaving a finger’s worth of space as shown in the figure below.
- If you fasten the Watch too tightly, skin irritation may occur and if you fasten it too loosely, friction may occur.
- Do not look directly at the optical heart rate sensor’s lights. Make sure children do not look directly at the lights. Doing so may impair your vision.
- If the Watch becomes hot to the touch, remove it until it cools. Exposing your skin to a hot surface of the Watch for a long time may cause low-temperature burns.
- Remove all water from your Watch and the band before measuring your body composition and ECG.
- Use the HR feature only for measuring your heart rate. The accuracy of the optical heart rate sensor may be diminished depending on measurement conditions and surroundings.
- Cold ambient temperatures may affect your measurement; during winter or cold weather, keep yourself warm when checking your heart rate.
- Smoking or consuming alcohol before taking measurements may cause your heart rate to be different from your normal heart rate.
- Do not move, talk, yawn, or breathe deeply while taking heart rate measurements. Doing so may cause your heart rate to be recorded inaccurately.
- If your heart rate is extremely high or low, measurements may be inaccurate.
- If measuring children’s heart rates, the measurement may not accurate.
- Users with thin wrists may receive inaccurate heart rate measurements when the device is loose, causing the light to be reflected unevenly. In this case, wear the Watch around your lower arm above the wrist.
- If heart rate measurement is not working properly, adjust the position of the device’s optical heart rate sensor to the right, left, up, or down on your wrist, or wear the device on your inner arm so that the sensor is in contact with your skin.
- If the optical heart rate sensor and the electrical biosensors are dirty, wipe the sensor and try again. If foreign materials prevent the light from reflecting evenly, the measurement may not accurate.
- The optical heart rate sensor may be affected by tattoos, marks, and hair on the wrist you wear your Watch on. These may cause your Watch not to recognise that you are wearing it, and the Watch’s features may not work properly. Therefore, wear your Watch on a wrist that does not interfere with the Watch’s features.
- The measurement features may not work properly due to certain factors, such as the light from the optical heart rate sensor being blocked, depending on your skin brightness, blood flow under your skin, and the cleanliness of the sensor area.
- For accurate measurements, use the Ridge sport band. The Ridge sport band may be sold separately depending on the model.
Turning the Watch on and off
![]() Follow all posted warnings and directions from authorized personnel in areas where the use of wireless devices is restricted, such as airplanes and hospitals.
Follow all posted warnings and directions from authorized personnel in areas where the use of wireless devices is restricted, such as airplanes and hospitals.
Turning the Watch on
Press and hold the Home key for a few seconds to turn on the Watch.
When you turn on the Watch for the first time or reset it, on-screen instructions will appear to instruct you to launch the Galaxy Wearable app on your smartphone. Refer to Connecting the Watch to a smartphone for more information.
Turning the Watch off
- Press and hold the Home key and the Back key simultaneously. Alternatively, open the quick panel by dragging downwards from the top edge of the screen and tap


- Tap Power off. You can set the Watch to turn off when you press and hold the Home key. On the App screen, tap (Settings) → Advanced features → Customize keys, tap Press and hold under Home key, and then select Power off menu.
Forcing restart
If your Watch is frozen and unresponsive, press and hold the Home key and the Back key simultaneously for more than 7 seconds to restart it.
Connecting the Watch to a smartphone
Installing the Galaxy Wearable app
To connect your Watch to a smartphone, install the Galaxy Wearable app on the smart phone Depending on your smartphone, you can download the Galaxy Wearable app from the following places:
- Samsung Android smartphones: Galaxy Store, Play Store
- Other Android smartphones: Play Store• It is compatible with Android smartphones that support Google mobile services.
• You cannot install the Galaxy Wearable app on the smartphones that do not supporWatch syncing. Ensure that your smartphone is compatible with a Watch.
• The Watch cannot be connected to a tablet.
Connecting the Watch to a smartphone via Bluetooth
- Turn on the Watch and swipe upwards from the bottom of the screen. On-screen instructions for launching the Galaxy Wearable app will appear.
- Tap Language to select a language to use and follow the on-screen instructions.
- Launch the Galaxy Wearable app on your smartphone. If necessary, update the Galaxy Wearable app to the latest version.
- Tap Start.
- Select your Watch on the screen. If you cannot find your device, tap Mine’s not here.
- Follow the on-screen instructions to complete the connection. When completing the connection, tap Start and follow the on-screen instructions to learn about the Watch’s basic controls.
- The initial setup screen may differ depending on your region.
- Connection methods may vary depending on your smartphone and software version.
- The Watch is smaller than normal smartphones so the network quality may be lower, especially in areas with weak signals or poor reception. When a Bluetooth connection is unavailable, your cellular network or Internet connection may be poor or become disconnected.
- When you connect your Watch to a smartphone for the first time after resetting it, the Watch’s battery may drain more quickly while syncing data, such as contacts.
- Supported smartphones and features may vary depending on your region, service provider, or device manufacturer.
- When you cannot establish a Bluetooth connection between your Watch and the smartphone, the
 indicator icon will appear on the top of the Watch screen.
Connecting the Watch to a new smartphone
When you connect the Watch to a new smartphone, the Watch will reset all personal information. When the prompt appears before connecting your Watch to a new smartphone, tap Back up data to securely back up the stored data.
- On the Apps screen, tap (Settings) → General → Connect to new phone → Continue. After a reset, it will automatically enter Bluetooth pairing mode.
- On your new smartphone, launch the Galaxy Wearable app to connect to your Watch. If the smartphone you want to connect to is already connected to another device, launch the Galaxy Wearable app on your smartphone and tap
 → Add new device to connect with a new device.
Remote connection
Your Watch and smartphone are connected via Bluetooth. You can sync your smartphone to your Watch when both devices are remotely connected to each other, even though a
Bluetooth connection is not available. The Remote connection uses your mobile network or Wi-Fi.
If this feature is not turned on, launch the Galaxy Wearable app on your smartphone, tap Watch settings → Advanced features → Remote connection, and then tap the witch to activate it.
When your Watch and smartphone are remotely connected, the ![]() indicator icon will appear on the top of the Watch screen.
indicator icon will appear on the top of the Watch screen.
Controlling the screen
Bezel
Your Watch has a rotatable bezel or a touch bezel. Rotate or swipe the bezel clockwise or counter-clockwise to easily control various Watch functions.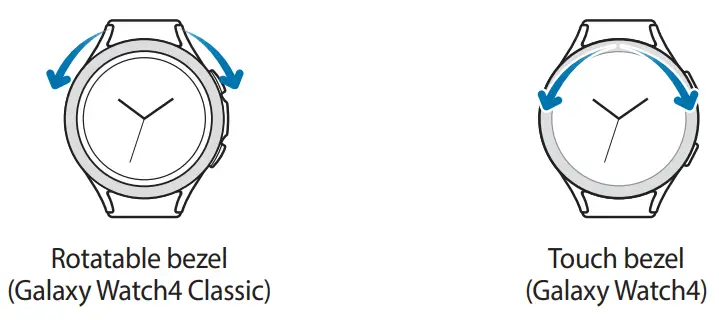
- Scrolling through screens: Rotate or swipe the bezel to view other screens.
- Selecting an item: Rotate or swipe the bezel to move from item to item.
- Adjusting the input value: Rotate or swipe the bezel to adjust the volume or brightness.
When adjusting the brightness, rotate or swipe the bezel clockwise to make the screen brighter. - Using the phone or alarm feature: Rotate or swipe the bezel clockwise to receive an incoming call or to dismiss an alarm. Rotate or swipe the bezel counter-clockwise to reject an incoming call or to activate the snooze feature for an alarm.
![]() • Make sure the rotatable bezel is free from the foreign materials like dust or sand.
• Make sure the rotatable bezel is free from the foreign materials like dust or sand.
• Do not use the rotatable bezel near magnetic substances, such as magnets or magnetic bracelets. The rotatable bezel may not work properly due to magnetic interference.![]() If the bezel does not work, take the Watch to a Samsung Service Centre without disassembling it.
If the bezel does not work, take the Watch to a Samsung Service Centre without disassembling it.
Touchscreen
Tapping
To open an app, to select a menu item, or to press an on-screen button, tap it with your finger.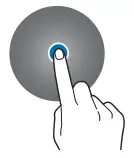
Dragging
Tap and hold an item and drag it to the target position.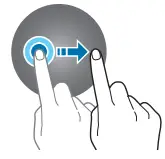
Spreading and pinching
Spread two fingers apart or pinch on an image to zoom in or out.
Tapping and holding
Tap and hold the screen for two or more seconds to access the edit mode or to view available options.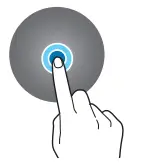
Double-tapping
Double-tap quickly on an image to zoom in or out.
Swiping
Swipe to the left or right to view other panels.
 Do not allow the touchscreen to come into contact with other electrical devices. Electrostatic discharges can cause the touchscreen to malfunction.
- To avoid damaging the touchscreen, do not tap it with anything sharp or apply excessive pressure to it with your fingertips.
- It is not recommended to use fixed graphics on part or all of the touchscreen for extended periods. Doing so may result in afterimages (screen burn-in) or ghosting.
- The Watch may not recognize touch inputs close to the edges of the screen, which are outside of the touch input area.
- The touchscreen may not be available when water lock mode is activated.
Screen composition
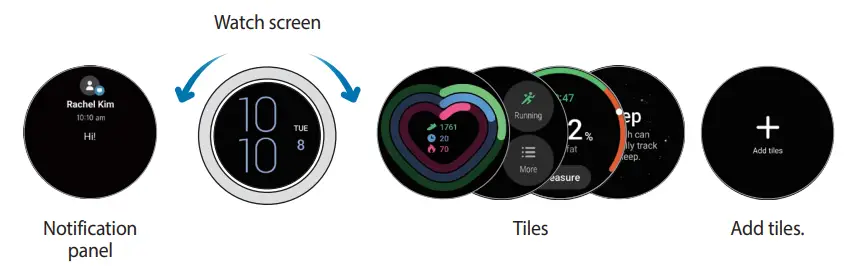
The Watch screen is the starting point for the Home screen, which is composed of several pages.
You can view tiles or open the notification panel by swiping the screen to the left or right or by using the bezel.
![]() The available panels, tiles, and their arrangement may vary depending on the software version.
The available panels, tiles, and their arrangement may vary depending on the software version.
Using tiles
To add a tile, swipe left on the screen, tap Add tiles, and then select a tile.
When tapping and holding a tile, you can access the edit mode to change the tile’s arrangement or remove the tiles.
- Moving the tile: Tap and hold a tile and drag it to the desired location.
- Removing the tile: Tap and hold a tile you want to delete and tap
 .
.
Turning the screen on and off
Turning the screen on
Use the following methods to turn the screen on.
- Turn the screen on with the keys: Press the Home key or Back key.
- Turn the screen on with the bezel: Rotate the bezel. If the screen does not turn on after you rotate the bezel, tap(Settings) on the Apps screen, tap Display, and then tap the Turn bezel to wake switch under Screen wake-up to activate it (Galaxy Watch4 Classic).
- Turn the screen on by tapping the screen: Tap the screen. If the screen does not turn on after you tap the screen, tap (Settings) on the Apps screen, tap Display, and then tap the Touch screen to wake switch under Screen wake-up to activate it.
- Turn the screen on by raising your wrist: Raise the wrist where you are wearing the Watch. If the screen does not turn on after you raise your wrist, tap (Settings) on the
Apps screen, tap Display, and then tap the Raise wrist to wake switch under Screen wake-up to activate it.
Turning the screen off
To turn off the screen, cover it with your palm. Also, the screen will automatically turn off if the Watch is not used for a specified period.
Switching the screen
Switching between the Watch and Apps screen
On the Watch screen, swipe upwards to open the Apps screen.
To return to the Watch screen, swipe downwards from the top of the Apps screen.
Alternatively, press the Home key.

Apps screen
The Apps screen displays icons for all apps installed on the Watch.![]() The available apps may vary depending on the software version.
The available apps may vary depending on the software version.
Opening apps
On the Apps screen, tap an app icon to launch the app.
To launch an app from the list of recent apps, on the Apps screen, tap ![]() (Recent apps).
(Recent apps).
Closing apps
- On the Apps screen, tap (Recent apps).
- Use the bezel or swipe left or right on the screen to move to the app to close.
- Swipe upwards on the app to close it.
To close all running apps, tap Close all.
Returning to the previous screen
To return to the previous screen, swipe right on the screen or press the Back key.
Lock screen
Use the screen lock feature to protect your data, such as your personal information saved on your Watch. After activating this feature, the Watch will require you to unlock it whenever you use it. However, if you unlock it once while wearing the Watch, it will remain unlocked.
Setting the screen lock
On the Apps screen, tap![]() (Settings) → Security → Lock → Type and select the lock method.
(Settings) → Security → Lock → Type and select the lock method.
- Pattern: Draw a pattern with four or more dots to unlock the screen.
- PIN: Enter a PIN (personal information number) to unlock the screen.
Watch
Watch screen
You can check the current time or view other information. When you are not on the Watch screen, press the Home key to return to the Watch screen.
Changing the watch face
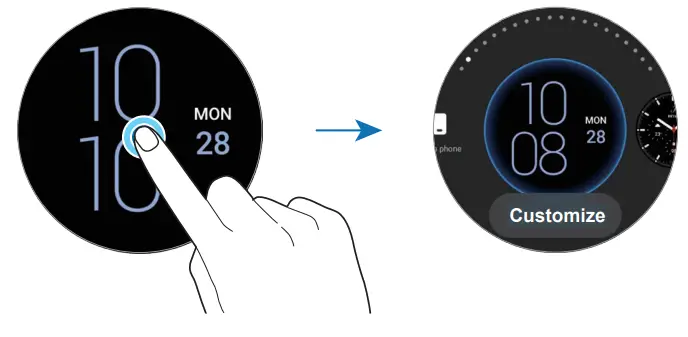
Tap and hold the Watch screen and use the bezel or swipe on the screen to the left or right, and then select a watch face.
To customize the watch face, tap Customize, swipe the screen to the left or right to move to the option you want, and then select the desired colour and other options using the bezel or by swiping upwards or downwards on the screen. To set the complications, tap each area you want and then set them.
You can download more watch faces from the Play Store app.
You can also change the watch face and customize it from your smartphone. Launch the Galaxy Wearable app on your smartphone and tap Watch faces.
Customize a watch face with a picture
Apply a picture as your watch face after importing a picture from your smartphone. Refer to Getting Started for more information about importing pictures from a smartphone.
- Tap and hold the Watch screen and tap Customize on the My Photo+ watch face using the bezel or by swiping left or right on the screen.
- Tap the screen and tap Add photo.
- Select a picture to apply as a watch face and tap OK.
To zoom in or out on the picture, double-tap the image quickly, or spread two fingers
apart or pinch the picture. When the picture is zoomed in, swipe the screen to make a part
of the picture appear on the screen.
• To select several pictures at the same time, tap and hold a picture, select pictures by using the bezel or swiping left or right on the screen, and then tap.
• To add extra pictures after selecting pictures, rotate or swipe the bezel clockwise.
Alternatively, swipe left on the screen and tap Add photo.
• Up to twenty pictures can be added as the watch face. The pictures you add will appear when you tap the screen.
 - Swipe the screen to change the background and other options and tap OK.
Activating the Always On Display feature
Set the Watch screen and some apps’ screens to always stay on while wearing your Watch.
However, the battery will drain more quickly than normal while using this feature.
Open the quick panel by dragging downwards from the top edge of the screen and tap . Alternatively, on the Apps screen, tap
  (Settings) → Display and tap the Always On Display switch to activate it.
Activating watch only mode
In watch only mode, only the time will display and no other functions can be used.
On the Apps screen, tap (Settings) → Battery → Watch only and tap Turn on.
To deactivate watch only mode, press and hold the Home key for more than three seconds.
Notifications
Notification panel
Check a notification such as a new message or a missed call on the notification panel. On the Watch screen, rotate or swipe the bezel counter-clockwise. Alternatively, swipe right on the screen to open the notification panel.
When there are unchecked notifications, an orange notification indicator will be visible on the Watch screen. If the notification indicator does not appear, on the Apps screen, tap (Settings) → Notifications and tap the Notification indicator switch to activate it.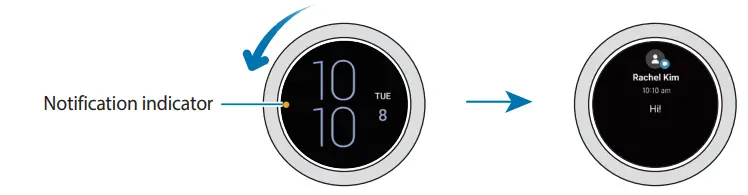
Viewing incoming notifications
When you receive a notification, information about the notification, such as its type or the time you received it, will appear on the screen. If more than two notifications are received, use the bezel or swipe left or right on the screen to view more notifications.
Tap the notification to view the details.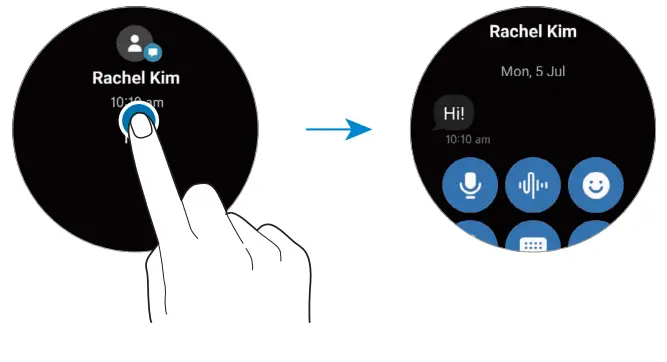
Deleting notifications
Swipe upwards on the screen while viewing a notification.
Selecting apps for receiving notifications
Select an app from your smartphone to receive notifications on your Watch.
- Launch the Galaxy Wearable app on your smartphone and tap Watch settings → Notifications.
- Tap More →▼→ All and tap the switch next to apps to receive notifications from the apps list.
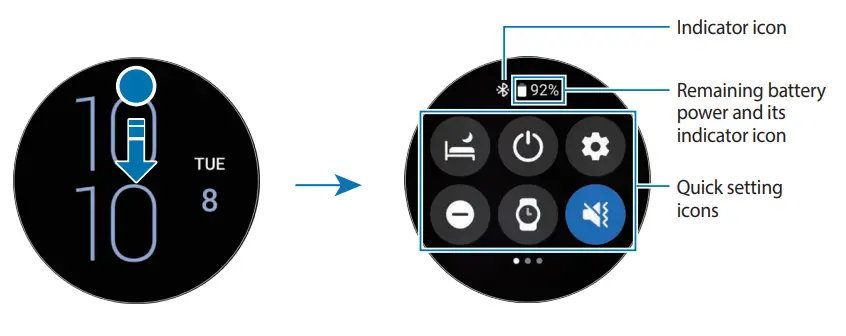
Quick panel
This panel allows you to view the Watch’s current status and configure settings.
To open the quick panel, drag downwards from the top edge of the screen. To close the quick panel, swipe upwards on the screen.
Use the bezel or swipe left or right on the screen to move to the next or previous quick panel.
Checking the indicator icons
Indicator icons appear at the top of the quick panel and let you know the Watch’s current status. The icons listed in the table below are most common.
| Icon | Meaning |
| Bluetooth connected | |
| Signal strength | |
| 3G network connected | |
LTE | LTE network connected |
| Wi-Fi connected | |
| Battery power level |
![]() The indicator icons may appear differently depending on the region, service provider, or model.
The indicator icons may appear differently depending on the region, service provider, or model.
Checking quick setting icons
Quick setting icons appear on the quick panel. Tap the icon to change the basic settings or launch the function conveniently.
Refer to Adding or removing a quick setting icon for more information about adding the new icons on the quick panel.
| Icon | Meaning |
| Activate bedtime mode | |
| Access the power options | |
| Launch the Settings app |
 | Activate do not disturb mode |
| Activate the Always On Display feature |
 | Activate sound, vibrate, or silent mode |
 | Activate the flashlight feature |
 | Adjust the brightness |
 | Activate power saving mode |
 | Activate theatre mode |
 | Connect the Wi-Fi network |
 | Activate water lock mode |
 | Activate flight mode |
 | Connect the Bluetooth headset |
 | Launch the Find My Phone app |
 | Activate the location information feature |
| Connect the mobile network (LTE models) | |
 | Activate the NFC feature |
 | Activate the touch sensitivity feature |
 | Open the volume menu |
Adding or removing a quick setting icon
To add a quick setting icon, rotate or swipe the bezel clockwise. Alternatively, swipe left on the screen, tap![]() , and then select a feature to add. To remove a quick setting icon, tap and hold any icon and tap
, and then select a feature to add. To remove a quick setting icon, tap and hold any icon and tap![]() on the feature you want to delete.
on the feature you want to delete.
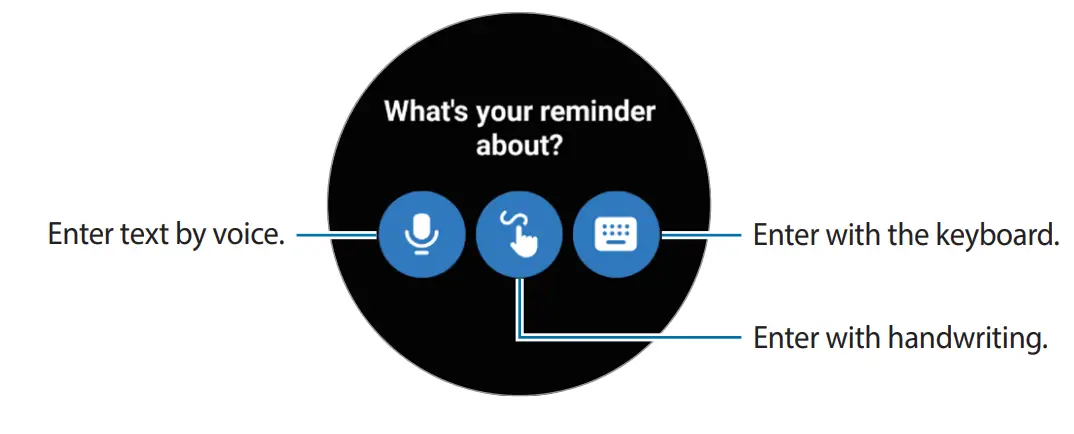
Entering text
Introduction
A text input screen will appear when you are able to enter text.
![]() The text input screen may be different depending on the app you launch.
The text input screen may be different depending on the app you launch.
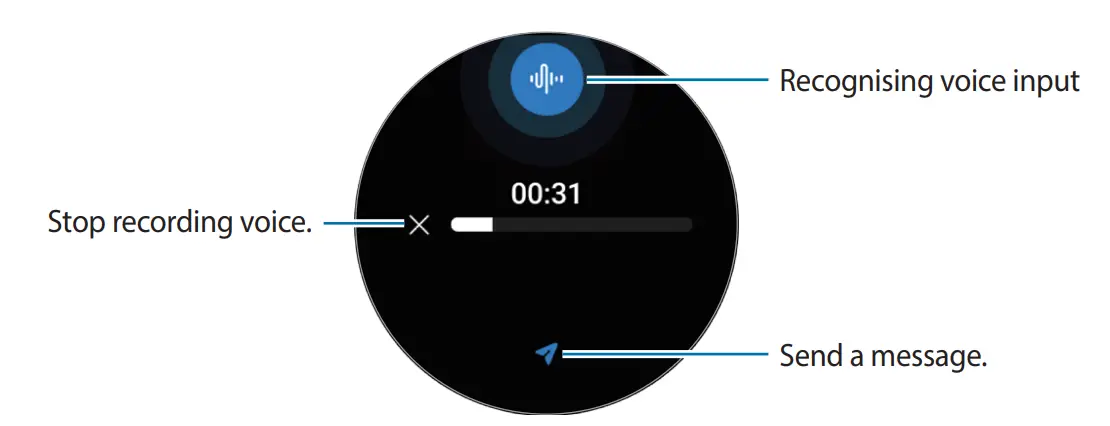
Entering text by voice
Tap ![]() and speak to enter your message.
and speak to enter your message.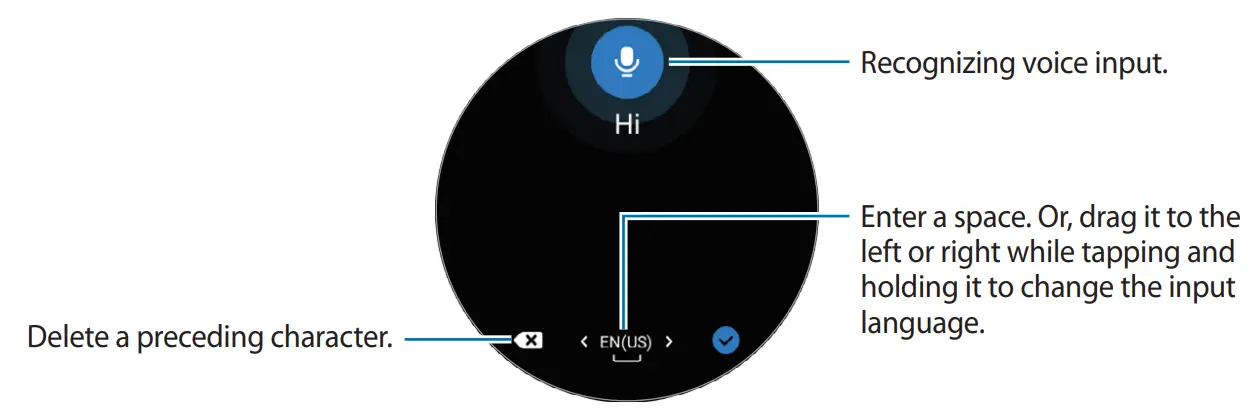
- This feature is not supported in some languages.
- Tips for better voice recognition
– Speak clearly.
– Speak in quiet places.
– Do not use offensive or slang words.
– Avoid speaking in dialectal accents.
The Watch may not recognize your spoken message depending on your surroundings or how you speak.
Entering with handwriting
Tap to open handwriting mode and write on the screen.

![]() This feature may not be available depending on the language.
This feature may not be available depending on the language.
Entering with the keyboard
Tap and tap the input area to open the keyboard.
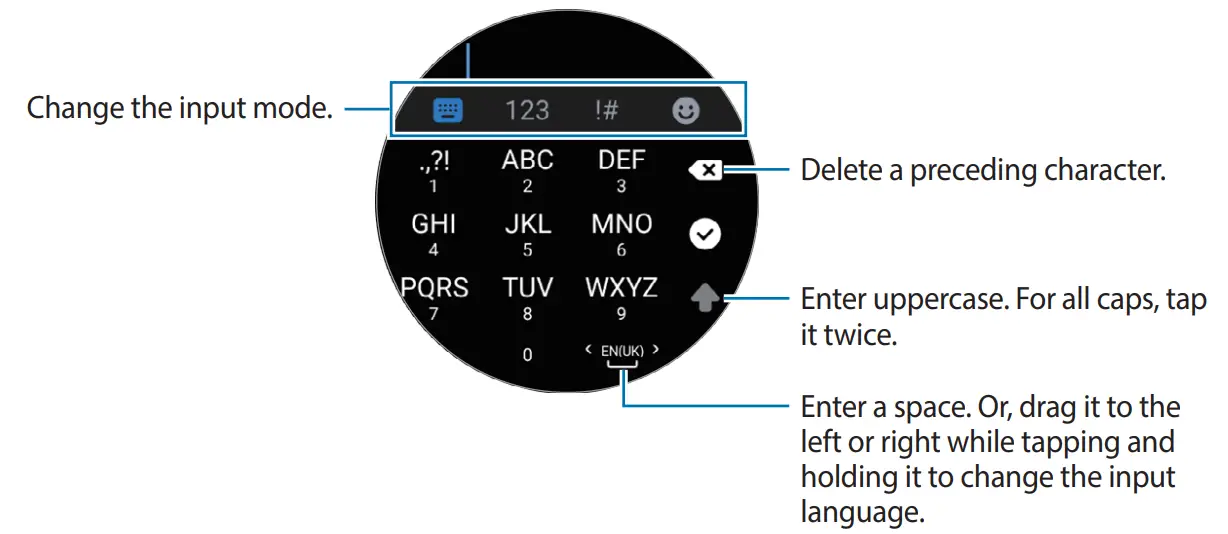
- Text entry is not supported in some languages. To enter text, you must change the input language to one of the supported languages.
- The keyboard layout may differ depending on the region.
Setting the input language
Switch to number mode, punctuation mode, or emoji mode. Then, tap → Input
languages → Manage languages and set a language. You can add up to two languages.
You can also set the input languages by tapping
(Settings) on the Apps screen and
tapping General → Input → Samsung Keyboard → Input languages → Manage
languages.
39
![]()
![]()
![]()
![]()
![]()
![]()
![]()
![]()
![]()
![]()
![]()
![]()


![]()
![]()
![]()
![]()
![]()
![]()
![]()
![]()
![]()
![]()
![]()
![]()
![]()
![]()
![]()
![]()
![]()


![]()