![]() D200 neo AC DC Multi Function Smart Charger
D200 neo AC DC Multi Function Smart Charger
Instruction Manual
 SK-100196
V1.0
Introduction
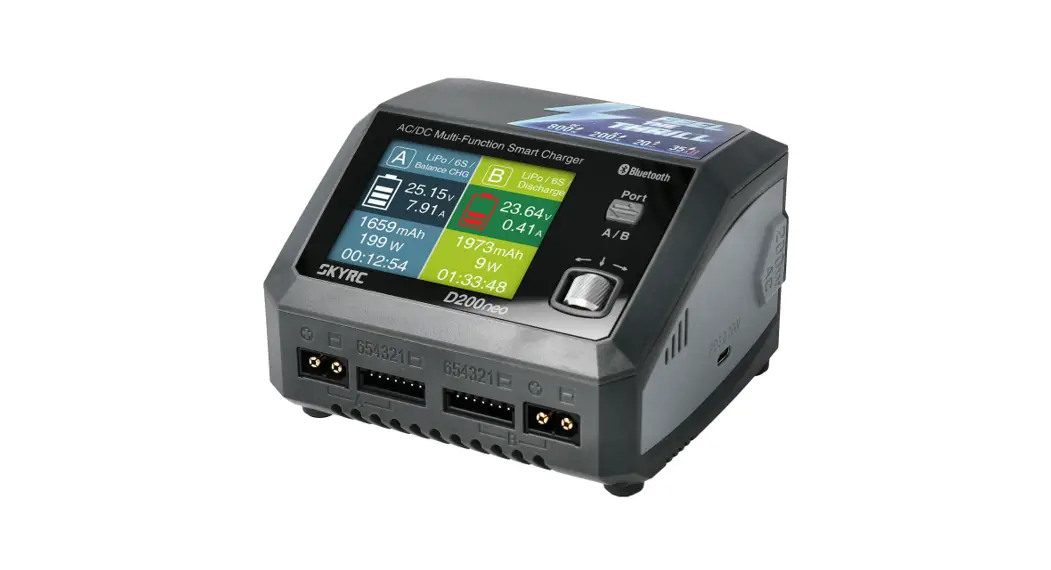
Congratulations on your choice of Scry D200 neo AC/DC Multi-Function Smart Charger. As an update version of D200, this charger will take you on an exciting and delightful journey in the world of model aircraft.
D200 neo has independent dual ports and supports most batteries in the RC industry. As a dual input charger, it can be used for various charging scenarios. We do not only inherit the meticulously designed interface and powerful functions of T1000 but also add the SkyCharger App control, Chager Master control enabled by Windows/Mac OS and also PD/QC3.0 fast charge. So it can meet the charging requirments of different users for different scenarios in a great extent. The new appearance design and the newly upgraded scroll button control make the charging operation more convenient and simple.
For first-time use, please read the instructions, warnings, and safety tips carefully. Incorrectly charging a battery or using the charger in the wrong way can cause a fire or explosion. Wishing you a pleasant experience with this charger.
Package
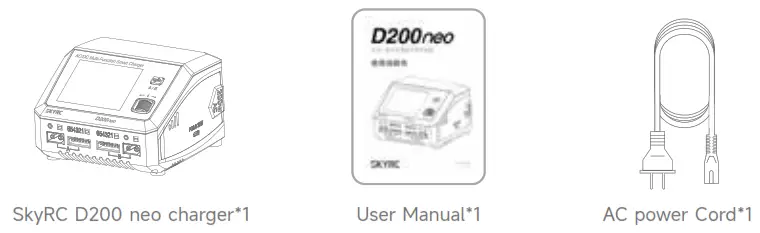
Chart
Specification
| Item | Option | Specification |
| Model | D200 neo | |
| Input Voltage | AC | 100-240V (50/60Hz) |
| DC | 10-30V | |
| Input Current | 30.0-35.0A |
| Item | Option | Specification |
| Charge Power | AC | 200W MAX |
| DC | 400W*2 MAX | |
| Discharge Power | Main port | 10W*2 |
| Balance port | 37W MAX | |
| External discharge | 350W MAX | |
| Charge Current | LiPo/LiFe/LiIon/LiHV/ NiMH/NiCd/Pb | 0.1-20.0A |
| Parallel | 20-35.0A | |
| Discharge Current | LiPo/LiFe/LiIon/LiHV/ NiMH/NiCd/Pb | 0.1-2.0A |
| External Discharge | 0.1-40.0A | |
| Balance Current | LiPo/LiFe/LiIon/LiHV | 1.5A MAX |
| Battery Types | LiPo/LiFe/LiIon/LiHV | 1-6S |
| NiMH/NiCd | 4-15S | |
| Pb | 3S/6S/12S | |
| Working Modes | LiPo/LiFe/LiIon/LiHV | Balance CHG, Charge, Discharge, Storage, Parallel |
| NiMH/NiCd | Charge, Re-Peak, CYCLE_C_D, CYCLE_D_C, Discharge | |
| Pb | Normal, AGM Charge, Cold Charge, Discharge | |
| DC Power Supply | Voltage | 5-27V |
| Current | 1.0-15.0A | |
| USB Type-C Output | QC3.0 | 5V 3A, 9V 2A, 12V 1.5A 18W |
| PD | 5V 3A, 9V 2.2A, 12V 1.67A 20W | |
| Size | Length*Width*Height | 116*110*79mm |
| Weight | Net weight | 602g |
Warning
D200 neo is not intended for use by persons with reduced physical, sensory or mental capabilities, or lack of experience and knowledge, unless they have been given supervision or instruction concerning the use of the charger by a person responsible for their safety.
Failure to exercise caution while using this product and comply with the following warnings could result in a product malfunction, electrical issues, excessive heat, FIRE, and
ultimately injury and property damage.![]() Never leave charging batteries unattended during use.
Never leave charging batteries unattended during use.![]() Never charge batteries overnight.
Never charge batteries overnight.![]() Never attempt to charge dead, damaged, or wet battery packs.
Never attempt to charge dead, damaged, or wet battery packs.![]() Never attempt to charge a battery pack containing different types of batteries.
Never attempt to charge a battery pack containing different types of batteries.![]() Never charge batteries in extremely hot or cold places or place in direct sunlight.
Never charge batteries in extremely hot or cold places or place in direct sunlight.![]() Never charge a battery if the cable has been pinched or shorted.
Never charge a battery if the cable has been pinched or shorted.![]() Never connect the charger if the power cord has been pinched or shorted.
Never connect the charger if the power cord has been pinched or shorted.![]() Never attempt to dismantle the charger or use a damaged charger.
Never attempt to dismantle the charger or use a damaged charger.![]() Never attach your charger to both an AC and a DC power source at the same time.
Never attach your charger to both an AC and a DC power source at the same time.![]() Always use the charger with the correct charging and discharging program.
Always use the charger with the correct charging and discharging program.![]() Always use only rechargeable batteries designed for use with this type of charger.
Always use only rechargeable batteries designed for use with this type of charger.![]() Never use the charger on car seats, carpets, or similar surfaces.
Never use the charger on car seats, carpets, or similar surfaces.![]() Always operate the charger away from flammable and explosive materials.
Always operate the charger away from flammable and explosive materials.
Standard Battery Parameters
| LiPo | Lilon | LiFe | LiHV | NiMH | NiCd | Pb | |
| Nominal voltage | 3.7V/cell | 3.6V/cell | 3.3V/cell | 3.8V/cell | 1.2V/cell | 1.2V/cell | 2.0V/cell |
| Max. charge voltage | 4.2V/cell | 4.1V/cell | 3.6V/cell | 4.35V/cell | 1.5V/cell | 1.5V/cell | 2.4V/cell |
| Storage voltage | 3.8V/cell | 3.7V/cell | 3.3V/cell | 3.85V/cell | N/A | N/A | N/A |
| Allowable fast charge current | ≦ 1C | ≦ 1C | ≦ 4C | ≦ 1C | 1C-2C | 1C-2C | ≦ 0.4C |
| Min. discharge voltage | 3.0-3.3V/ cell | 2.9-3.2V/ cell | 2.6-2.9V/ cell | 3.1-3.4V/ cell | 0.1-1.1V/cell | 0.1-1.1V/cell | 1.8-2.0V/ cell |
Select the correct operating procedure in accordance with the battery parameters. Incorrect settings may cause the battery to burn or even explode.
Program Flow Chart
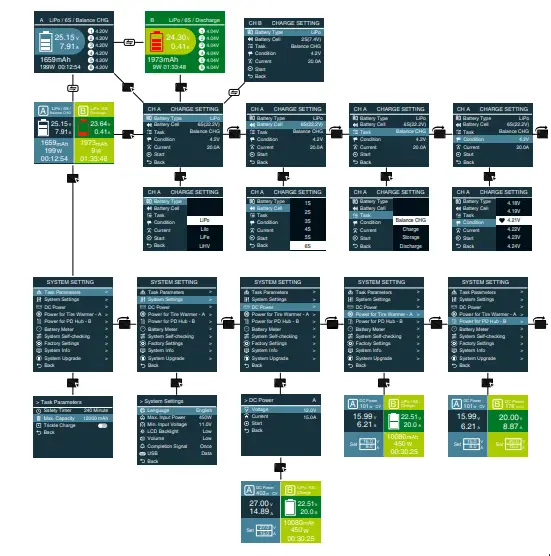
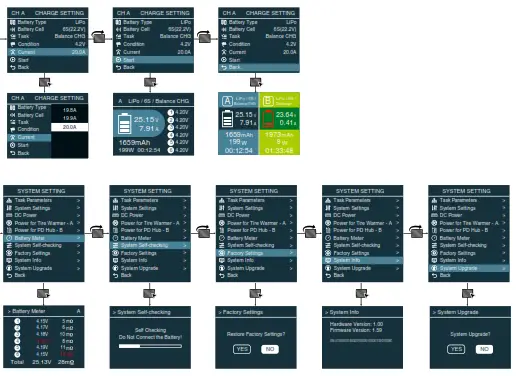
Note: The flow chart is taking one port for example as the flow chart for the two ports (Port A & B) are identical.
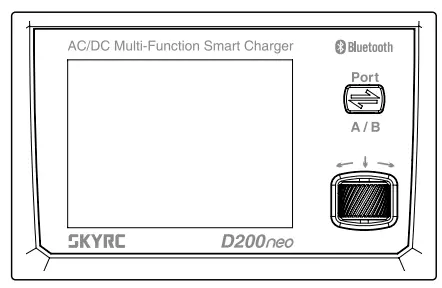
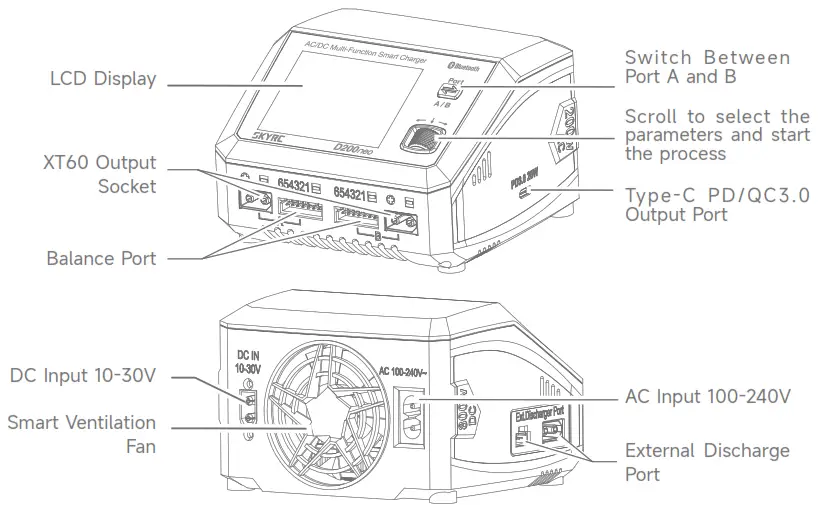
![]() Port Stich Button
Port Stich Button
Switch Between Port A and B
Short-press to exit the system setting interface![]() Scroll Button
Scroll Button
Short-press to enter the menu or confirm the setting Scroll to select the menu or parameters
Press and hold for three seconds under main interface to enter into the system setting menu
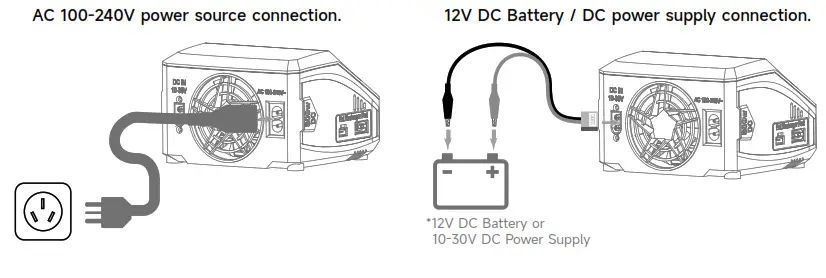
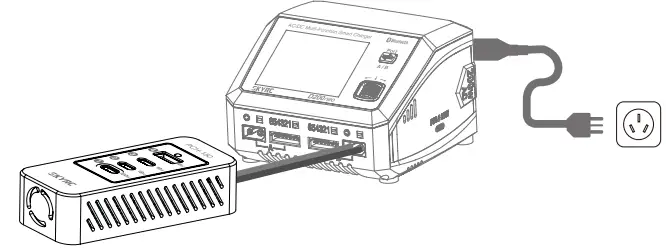
Power and Battery Connection
- Connecting to power source
There are two options of inputs for SKYRC D200 neo, DC 10-30V and AC 100-240V.
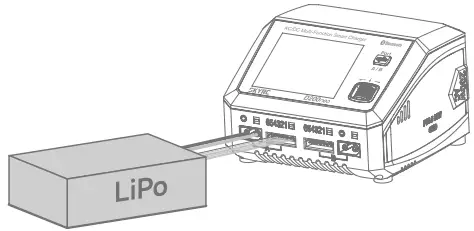
- Connecting the battery
TO AVOID SHORT CIRCUITS, ALWAYS CONNECT THE CHARGE LEADS TO THE CHARGER FIRST, AND THEN TO THE BATTERY. REVERSE THE
SEQUENCE WHEN DISCONNECTING THE PACK
- LiPo Battery Connection with Balance Adapter
For safety reasons, it is highly recommended to charge Lithium batteries (LiPo, Lilon, LiFe and LiHV) using Balance CHG mode, unless the battery comes without a balance wire.
The balance wire attached to the battery must be connected to the charger with the black wire aligned with the negative marking. Ensure correct polarity!
- NiMH/NiCd or Pb Battery Connection
Charger Operation
Depending on battery type, different operations will be available. This chart shows which operations are available for the different types of batteries the D200 neo is capable of working with.
| Battery Type | Working Mode | Description |
| LiPo Lilo LiFe LiHV | Balance CHG | This mode is to balance charge the lithium battery based on the charging rate the user set. It can balance each cells of the battery. |
| Charge | This mode is to charge the lithium battery based on the charging rate selected. | |
| Storage | This mode is to store the battery via charging or discharging its votlage to a specific storage value. | |
| Discharge | This mode is to discharge the lithium battery based on the discharging rate selected. | |
| Parallel | This mode is to parallel charge the battery with a higher charge rate of up to 35.0A. |
| Battery Type | Working Mode | Description |
| NiMH NiCad | Charge | This mode is to charge the NiMH/NiCd battery based on the charging rate selected. |
| Re-Peak | In re-peak charge mode, the charger can peak charge the battery twice in a row automatically. This is good for confirming the battery is fully charged. | |
| Cycle CD | 1 to 5 cyclic and continuous process of charge>discharge is operable for refreshing and restoring the performance of NiMH/NiCd batteries. | |
| Cycle DC | 1 to 5 cyclic and continuous process of discharge>charge is operable for refreshing and restoring the performance of NiMH/NiCd batteries. | |
| Discharge | This mode is to discharge the NiMH/NiCd battery based on the discharging rate selected. | |
| Pb | Normal | This mode is to charge the Pb battery based on the charging rate selected. |
| AGM Charge | This mode is to charge the AGM battery based on the charging rate selected. | |
| Cold Charge | This mode is to charge the Pb battery under a low temperature based on the charging rate selected. | |
| Discharge | This mode is to discharge the Pb battery based on the discharging rate selected. |
Lithium Battery Program(LiPo/LiFe/Lilon/LiHV)
The following flowchart is a reference to set the program manually.
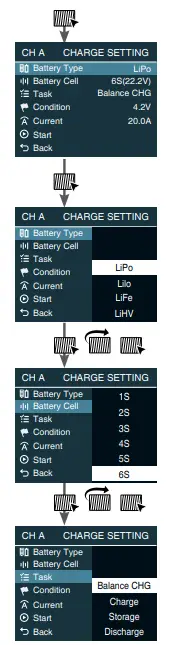 | ENTER Charge Setting On the main interface, press the scroll button to enter CHARGE SETTING. | 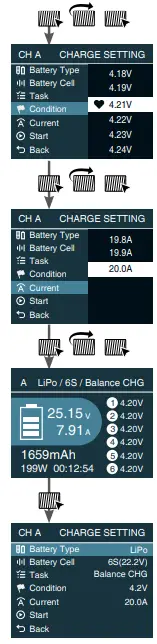 | Condition Select Scroll to Condition, call out the menu and set the delta voltage. |
| Battery Type Select Press scroll button to call out the Battery Type menu, and scroll to select LiPo. | Charge/Discharge Current Select Scroll to Charge/Discharge Current, call out the menu and scroll to select the working current. | ||
| Battery Cell Select Scroll to Battery Cell, call out the menu and scroll to select the correct battery cells. | Start Press scroll button to confirm and initiate the program. | ||
| Task Select Scroll to Task, call out the menu and scroll to select the working mode. | Stop Press scroll button to stop the program. |
Parallel Charge(LiPo/LiFe/Lilon/LiHV)
- The Parallel mode is available only for lithium batteries, which cannot be used for other types of batteries.
- To avoid short circuits, always connect the charge leads to the charger first, and then to the battery. Reverse the Sequence when disconnecting the pack.
- Select the correct battery type (LiPo/LiFe/LiIon/LiHV);
- Select the option of Parallel charge;
- Select the charging current (20.0-35.0A);
- Start the program after setting up;

Notice:
- Ensure that AC and DC power is not connected simultaneously;
- With the single port, charging power is 200W; with the dual ports, charging power is intelligently distributed;
- Do not connect the battery before the charger powered on.
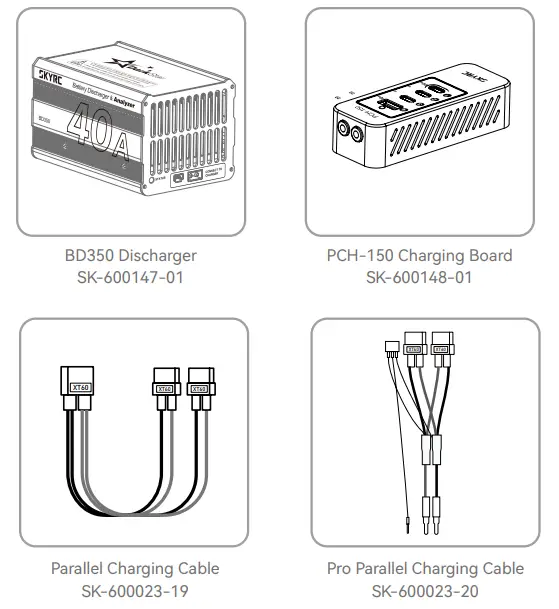
- The parallel charge cable is sold separately.
NiMH/NiCd Battery Program
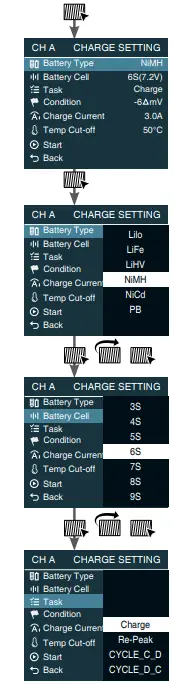 | ENTER Charge Setting On the main interface, press the scroll button to enter CHARGE SETTING. | 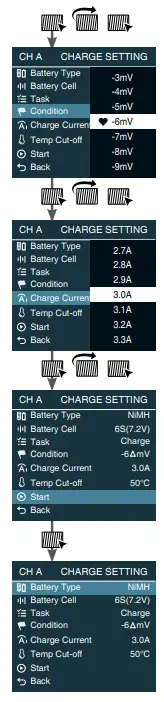 | Condition Select Scroll to Condition, call out the menu and set the delta voltage |
| Battery Type Select Press scroll button to call out the Battery Type menu, and scroll to select NiMH. | Charge/Discharge Current Select Scroll to Charge/Discharge Current, call out the menu and scroll to select the working current. | ||
| Battery Cell Select Scroll to Battery Cell, call out the menu and scroll to select the correct battery cells. | Start Press scroll button to confirm and initiate the program. | ||
| Task Select Scroll to Task, call out the menu and scroll to select the working mode. | Stop Press scroll button to stop the program. |
Pb Lead-Acid Battery Program
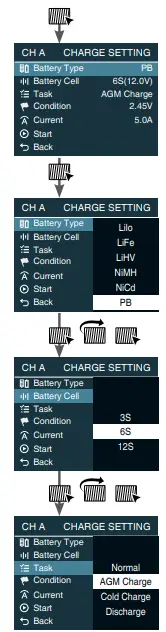 | ENTER Charge Setting On the main interface, press the scroll button to enter CHARGE SETTING. | 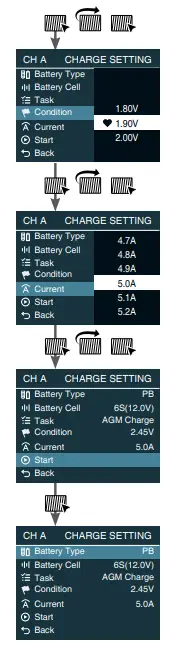 | Condition Select Scroll to Condition, call out the menu and set the delta voltage |
| Battery Type Select Press scroll button to call out the Battery Type menu, and scroll to select PB. | Charge/Discharge Current Select Scroll to Charge/Discharge Current, call out the menu and scroll to select the working current. | ||
| Battery Cell Select Scroll to Battery Cell, call out the menu and scroll to select the correct battery cells. | Start Press scroll button to confirm and initiate the program. | ||
| Task Select Scroll to Task, call out the menu and scroll to select the working mode. | Stop Press scroll button to stop the program. |
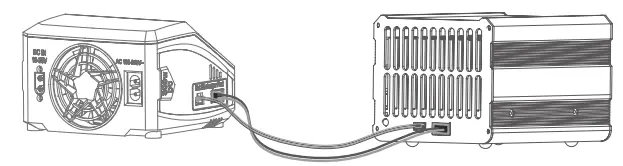
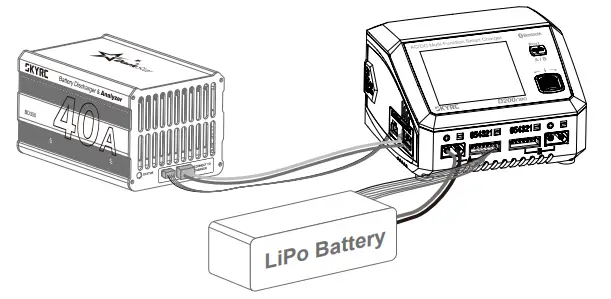
External Discharge
D200 neo is capable of external discharge. A discharge current of 40.0A can be reached with BD350 discharger connected.
- Upon connecting the power supply, D200 neo automatically powers up and enters the main interface;
- Connect BD350 discharger to D200 neo;

- Connect the battery to D200 neo on Port A;

- Select the battery type, battery cells, discharge program, cut-off voltage, and discharge current;
- Start the program after setting up.
Notice:
- BD350 discharger is not included and must be purchased separately.
- External discharge is available only on Port A;
Charger Master
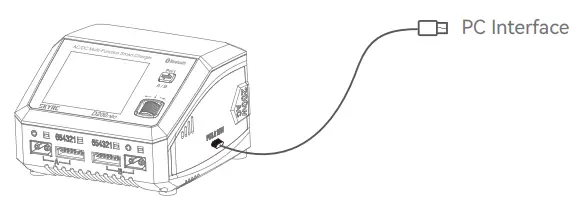
D200 neo is capable of charging and discharging through the computer with both Windows/ Mac OS. Various parameters, including charge time and capacity, can be displayed visually, as well as charge current and voltage in a curve.
- Download the latest Charger Master onto your desktop. Unzip and open it after downloading;
- Power on your D200 neo;
- Connect D200 neo to your computer via a USB type-C cable (It’s recommended to select Data function under the USB menu in the system setting before connecting to PC. )

- On the top left of the Charger Master, choose the option of Charge; Set the parameters on the corresponding ports. Click to start the program after setting up.
Battery Analyzer
D200 neo is capable of analyzing the battery performance with BD350 discharger connected, helping players choose a more suitable battery for competitions and gain better achievements.
- Launch the Charger Master and select Battery Analyzer on the top left;

- Specify the battery type, discharge current, cut-off voltage, and other parameters;
- Click New Test to start the testing after setting up;
- When the first test completes, click Append Test to start the second test. The third and further tests follow suit.
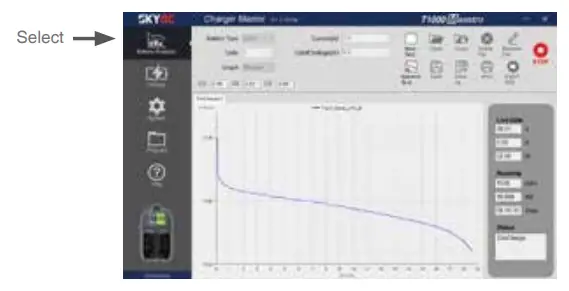
Up to ten groups of test data are visualized as curves, which are clear at a glance for players.
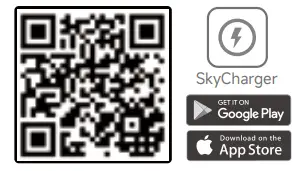
Sky Charger app Control
The charger has a built-in Bluetooth 5.0 module, allowing users to easily control the D200 neo charger and analyze the battery through the Sky Charger app. Even when you are racing outside, you can test and check the battery performance curve anytime and anywhere.
Scan the QR code below to download the Sky Charger app.
 http://www.skyrc.com/qrcode/?key=skyrc_q200
DC Power
- On the main interface, hold the Scroll button for three seconds to enter the system setting.
- Select the option of DC Power, then adjust the output voltage and current.
- Press Scroll to activate the power function after setting up.
- Connect your desired DC equipment.
Notice:
- On the DC Power interface, press the Port button to switch A/B ports;
- On the main interface, press the Ssroll button to exit the DC Power function;
PCH-150 Power & Charging Hub
The PD Charging Board can power several mobile devices simultaneously with the output power up to 100 watts when connecting with the charger.
Press and hold the Scroll button for three seconds to enter the system setting, select the Power for PD Hub-B menu and short press the Scroll button to activate it.
Connect the mobile devices to Port B after activated.
Notice:
- Short press the Scroll button to exit the power function.
- PCH-150 Power & Charging Hub is not included and must be purchased separately.
- Power for PD-Hub is only available on port B.
USB Type-C PD/QC3.0 Output
The charger can not only charge the R/C battery but also charge the mobile devices through the USB Type-C PD/QC3.0 output with a charging power of up to 20W.

Charging Settings
On the main interface, press the Scroll button to enter charging settings, in which you can switch A/B ports by pressing the Port button.
| Menu | Definition |
| Select your desired battery type. (LiPO, LiIon, LiFe, LiHV, Pb, NiMH, NiCd) | |
| Select the number of battery cells corresponding to the battery type. (Li-xx: 1-6S, Ni-xx: 1-15S, Pb: 3S/6S/12S) | |
| Select the program to be performed. (Balance CHG, Charge, Storage, Discharge, Parallel, etc.) | |
| Set the cut-off voltage as per the task. | |
| Set the charge or discharge current. | |
| Start the current program. | |
| Back to the main interface. |
System Setting
On the main interface, hold the Start button for seconds to enter the system setting.
| Menu | Option | Definition |
| Customize a period for program protection. | ||
| Customize the protection of capacity. | ||
| Enable/disable trickle charge. | ||
| Back to the previous interface. | ||
| Select your desired system language. | ||
| The maximum charge power. AC Input: 200W DC Input: 800W | ||
| In DC Input, set the minimum voltage for input protection. | ||
| Adjust the brightness of the screen. | ||
| Adjust the volume of the key and beep. | ||
| Choose the way you’d like to be reminded when the program completes. | ||
| Select the function of the USB Type-C port Auto: the charger detect the input of the USB port automatically Data: connect to PC Charge: charge the mobile devices | ||
| Back to the previous interface. |
| Menu | Option | Definition |
| Set the output voltage. (5.0-27.0V) | ||
| Set the output current. (1.0-15.0V) | ||
| Enable DC power output and return to the main interface. | ||
| Back to the previous interface. | ||
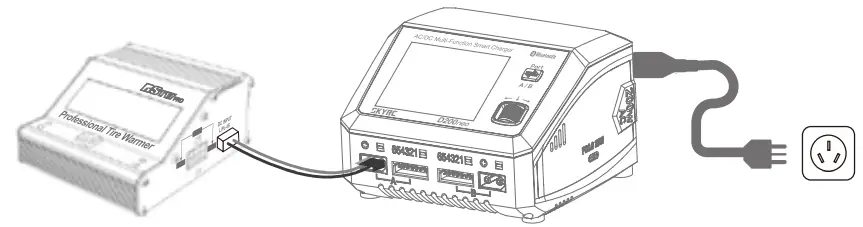
| N/A | Activate to power Scry Tire Warmer on port A | |
| N/A | Activate to power Scry PD Hub on Port B | |
| N/A | Measure the battery voltage and internal resistance. (Switch A/B ports by pressing the Port button. ) | |
| N/A | N/A | |
| N/A | Restore to the factory settings. | |
| | N/A | Check the current system status. |
| N/A | Upgrade the system. | |
| N/A | Back to the previous interface. |
Errors and Warnings
In the event of a fault, the charger will display an error message and sound an alarm.
| Error Message | Explanation |
| Error: DC Input Low! | DC input voltage is lower than preset! |
| Error: DC Input High! | DC input voltage is higher than preset! |
| Error: Battery Break! | The battery may be broken! |
| Cell Error | The cells do not match. |
| Battery Type Error! | The battery type is wrong! |
| Error: Overcharge! | The battery is overcharged! |
| Error: Over Time! | The program is timed out! |
| Error: Internal Temp. Too High! | The internal temperature is high! |
| Error: Battery Temp. Too High! | The battery temperature is high! |
| Error: Over Load! | The charger is overloaded! |
| Error: Reversed Polarity | The battery connection is reversed. |
| Error: Fully Charged | The battery is fully charged already! |
| Error: Outlet Overload | The output is overloaded. |
| Error: Balance Connection Break | The balance connection disconnects. |
| Error: Cell Volt Diff. | The voltage difference between each cell is high. |
| Error: AC to DC Too Low! | The input voltage is too low. |
| Error: Power Setting Error | The DC power setting is incorrect. |
Firmware Upgrade Notice
To recover from a firmware upgrade failure, please follow these steps:
- Press and hold the Scroll button, then connect the power cord; D200 neo will power on with a blue screen notice.
- Connect D200 neo to your computer via a Type-C USB cable;
- Launch the Charger Master on your computer;
- When the status shows CONNECTED, click to check for new firmware;
- Click to upgrade after detecting a new firmware;
- Wait for the progress bar to finish and reach 100%; The process takes about 5 minutes.
Optional Parts
Conformity Declaration
Warranty and Service
Liability Exclusion
This charger is designed and approved exclusively for use with the types of battery stated in this Instruction Manual. SkyRC accepts no liability of any kind if the charger is used for any purpose other than that stated. We are unable to ensure that you follow the instructions supplied with the charger, and we have no control over the methods you employ for using, operating, and maintaining the device. For this reason, we are obliged to deny all liability for loss, damage, or costs that are incurred due to the incompetent or incorrect use and operation of our products, or which are connected with such operation in any way. Unless otherwise prescribed by law, our obligation to pay compensation, regardless of the legal argument employed, is limited to the invoice value of those SkyRC products which were immediately and directly involved in the event in which the damage occurred.
Warranty and Service
We guarantee this product to be free of manufacturing and assembly defects for a period of one year from the time of purchase. The warranty only applies to material or operational defects, which are present at the time of purchase. During that period, we will repair or replace free of service charge for products deemed defective due to those causes.
This warranty is not valid for any damage or subsequent damage arising as a result of misuse, modification, or as a result of failure to observe the procedures outlined in this manual.
Note:
The warranty service is valid in China only.
If you need warranty service overseas, please contact your dealer in the first instance, who is responsible for processing guarantee claims overseas. Due to high shipping costs, and complicated custom clearance procedures to send back to China, please understand that SkyRC can’t provide warranty service to overseas end users directly.
If you have any questions which are not mentioned in the manual, please feel free to send an email to [email protected]
![]() SKYRC D200 neo 30.
SKYRC D200 neo 30.
The manual is subject to change without notice;
please refer to our website for the latest version!
Manufactured by
SKYRC TECHNOLOGY CO., LTD.
www.skyrc.com
©2022 Scry Technology Co., Ltd. All Rights Reserved


 Instruction Manual")