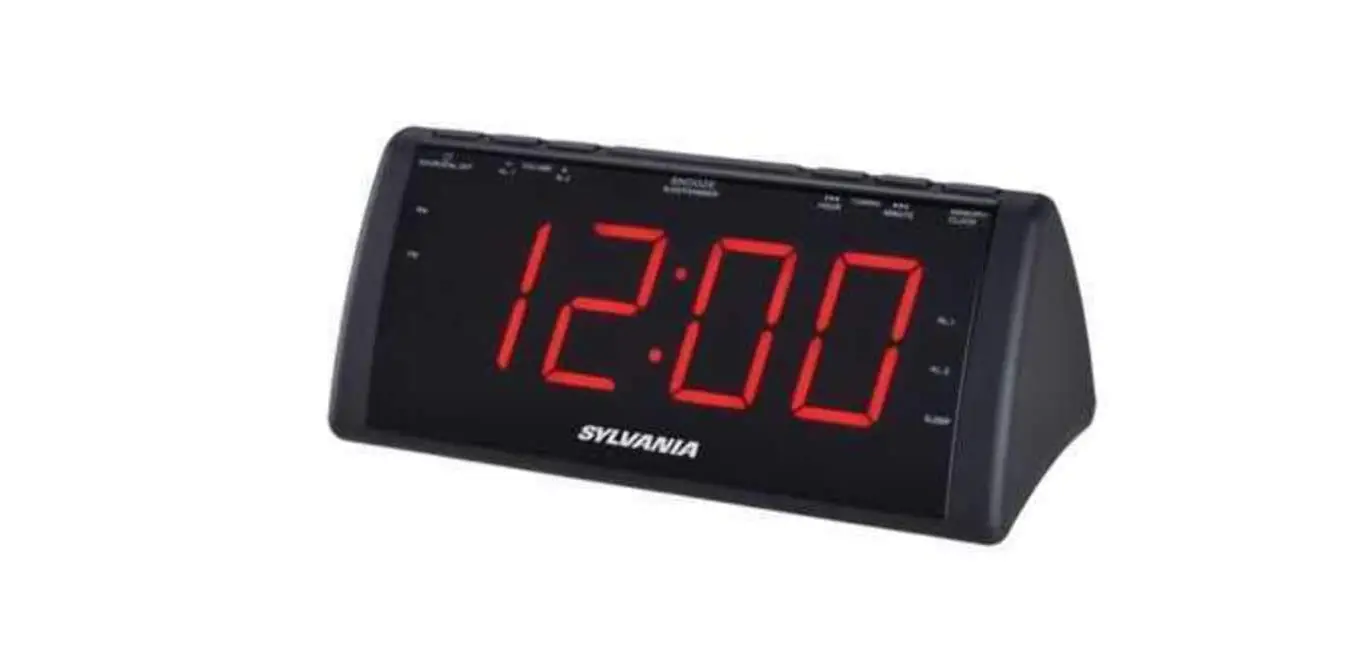
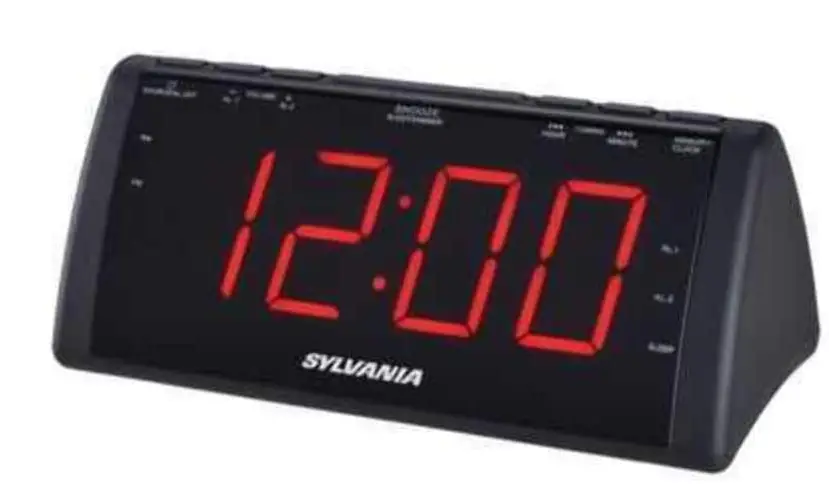
SYLVANIA SCR1808 1.8-Inch Screen USB Clock Radio
Specifications
- BRAND: SYLVANIA
- SHAPE: Rectangular
- POWER SOURCE: Corded Electric
- DISPLAY TYPE: Digital
- ITEM DIMENSIONS LXWXH: 10.7 x 4.2 x 3.9 inches
- USB CHARGING PORTS: 8
- ITEM WEIGHT: 14 ounces
- SCREEN: 1.8-Inch
Introduction
The two alarms on this Sylvania 1.8 In. Screen USB Clock Radio allow you to set distinct wake-up times, and the numerals are large and simple to read. It is perfect for keeping on a nightstand or bedside table because it has control buttons on the panel, a snooze feature, and radio tuning. Get the rest you need thanks to the alarms on the Sylvania 1.8 in. screen USB clock radio.
LOCATION OF CONTROLS
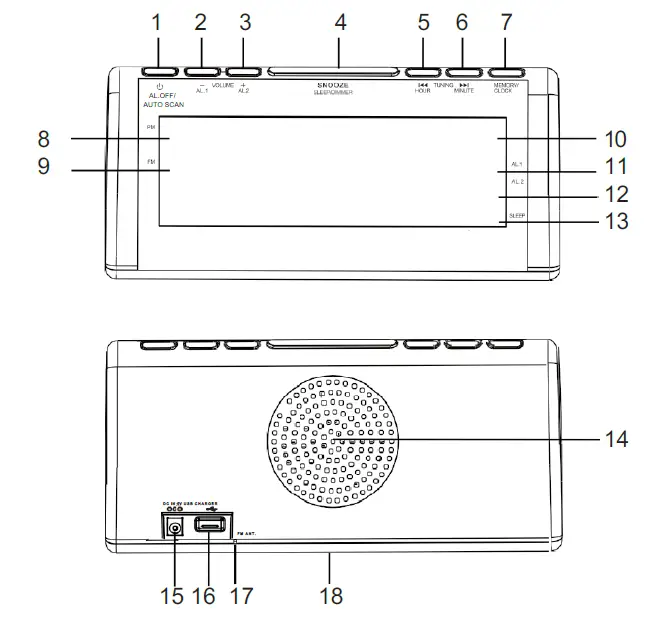
- POWER, AL OFF & AUTO SCAN BUTTON
- VOLUME DOWN & ALARM ONE BUTTON
- VOLUME UP & ALARM TWO BUTTON
- SNOOZE, SLEEP & DIMMER BUTTON
- TUNING DOWN & HOUR BUTTON
- TUNING UP & MINUTE BUTTON
- MEMORY & CLOCK SET BUTTON
- PM INDICATOR
- FM INDICATOR
- LED CLOCK & RADIO FREQUENCY DISPLAY
- ALARM ONE INDICATOR
- ALARM TWO INDICATOR
- SLEEP INDICATOR
- SPEAKER
- POWER JACK (DC 5V/1A)
- USB Charging Port (For 1A Charging)
- FM ANTENNA
- BACKUP BATTERY COMPARTMENT (2 X 1.5V “AA” BATTERIES) (Not Included)
POWER SOURCE
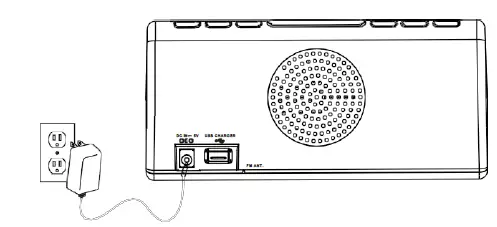
Plug the included AC/DC adapter (Input:100-240V~ 50/60Hz, Output:5V 1000mA) into the POWER JACK on the Clock Radio, and into an AC power outlet to power the unit.
BATTERY BACKUP
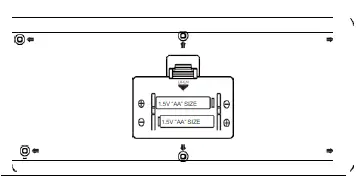
The battery backup is intended for short power outages only. The clock radio’s primary functions cannot run off of the battery backup.
Requires 2 AA batteries (not included).
SETTING CLOCK
- In standby mode, press and hold the MEMORY & CLOCK SET BUTTON.
- The hours will blink. Press TUNING DOWN & HOUR BUTTON to set the current hour.
- Press the TUNING UP & MINUTE BUTTON to set the current minute.
- Press MEMORY & CLOCK SET BUTTON once and the current time is set.
NOTE: The PM indicator will light when the hour is set in the PM.
SETTING SLEEP TIMER
When listening to the radio, press SNOOZE, SLEEP & DIMMER BUTTON to enter sleep mode. You can just adjust the sleep timer from 10 to 90 minutes by pressing the SNOOZE, SLEEP & DIMMER BUTTON.
The unit will automatically turn off after the selected time expires.
PLAYING AM/FM RADIO
AUTO TUNING THE FM RADIO
- Press the POWER/AL.OFF/AUTO SCAN BUTTON to turn the unit on.
- Press and hold POWER/AL.OFF/AUTO SCAN BUTTON.
- The unit will scan all local FM radio stations and store in preset memory (Maximum of 20 presets).
MANUAL TUNING THE FM RADIO
- Press the POWER/AL.OFF/AUTO SCAN BUTTON to turn the unit on.
- Press TUNE BUTTON to tune the radio manually.
- Hold down the TUNE button to scan for available stations.
MANUAL SAVING AND PLAYING A STATION AS A PRESET
- Tune to the desired station.
- Press and hold the MEMORY / CLOCK BUTTON. Preset number “P01” will appear on the displays.
- Press the TUNE BUTTON to adjust to the desired preset number. “P01” to” P20” (20 preset memories).
- Press the MEMORY / CLOCK BUTTON to save the current radio station to the selected preset number.
- Press the MEMORY / CLOCK BUTTON and then press the TUNE BUTTON to cycle through the preset radio stations.
ALARM
SETTING ALARM 1
- Tune to the radio station you want to hear when the alarm is activated, and then turn off the radio.
- Press and hold the ALARM 1 button (also the VOLUME – button). When the display starts to flash on & off, press the HOUR button (also the TUNING UP button) to adjust the hour, and press the MINUTE button (also the TUNING DOWN button) to adjust the minute. You have now set the alarm time. Wait until the display stops flashing prior to the next step.
- Press the ALARM 1 button repeatedly to select one of four options: the last AM station you listened to, the last FM station you listened to, BUZZER (bb will be displayed), and OFF. Stop scrolling when your choice is displayed.
- You have now set Alarm 1. Once the desired alarm time is reached, the alarm will activate.
SETTING ALARM 2
- Tune to the radio station you want to hear when the alarm is activated, and then turn off the radio.
- Press and hold the ALARM 2 button (also the VOLUME + button). When the display starts to flash on & off, press the HOUR button (also the TUNING UP button) to adjust the hour, and press the MINUTE button (also the TUNING DOWN button) to adjust the minute. You have now set the alarm time. Wait until the display stops flashing prior to the next step.
- Press the ALARM 2 button repeatedly to select one of four options: the last AM station you listened to, the last FM station you listened to, BUZZER (bb will be displayed), and OFF. Stop scrolling when your choice is displayed.
- You have now set alarm 2. Once the desired alarm time is reached, the alarm will activate.
NOTE: Once the alarm is set you can check the alarm time by pressing and holding the ALARM button (for both, Alarm 1 & 2) until the alarm time flashes.
SNOOZE
Press the SNOOZE button to delay for an additional 9 minutes.
CANCELLING THE ALARM
Press and release the appropriate ALARM button (AL 1 or AL 2) until “OFF” is shown in the display.
USB CHARGE
- Ensure that the unit is plugged into a wall outlet.
- Using the appropriate USB charging cable (not included), connect one end to the device and the other to the USB Charging receptacle on the unit.
Refer to the user’s manual for your specific device for manufacturers required charging amperage as well as determining the appropriate cable for your device before charging.
NOTE: This device uses a USB charging port with a 1000mA maximum charging capacity, making it unsuitable for charging iPads.
- The device will now charge.
CARE AND MAINTENANCE
- Clean the unit with a soft, damp (never wet) cloth. Solvent or detergent should never be used.
- Avoid operating your unit under direct sunlight or in hot, humid or dusty conditions to reduce the risk of fire or electric shock.
- Keep your unit away from heating appliances and sources of electrical noise, such as fluorescent lamps or motors.
- For better clock display clarity, avoid operating the unit under direct sunlight or in strong room illumination.
- Unplug the AC adapter from the unit and the electrical power outlet immediately in case of malfunction.
TROUBLESHOOTING GUIDE
| Symptom | Possible Cause | Solution |
| Noise or sound distorted on radio | Station not tuned properly
FM: Antenna is not fully extended. | Fine tune the FM broadcast station.
FM: Fully extend the FM antenna.
FM: Reposition the unit until the best reception is obtained. |
| FM no sound | Volume at minimum | Increase Volume |
Frequently Asked Questions
Press and hold the MEMORY/CLOCK BUTTON while the power is off to set the clock. SKIP/TUNE BUTTON should be pressed to change the hour. In order to confirm that the hour and minutes on the display will start flashing, press the MEMORY/CLOCK BUTTON one more. To change the minute count, press the SKIP/TUNE BUTTON.
Attempt to turn the clock. The inbuilt antenna of the majority of radio-controlled clocks is designed to pick up the signal best whether it is pointed directly at or away from Anthorn. The signal strength indicator on some clocks aids in locating the greatest reception. Move your clock to a new place if you can.
To see if it synchronizes, try turning off the clock (unplug it or take the batteries out) and then turning it back on. Check the batteries in the clock and replace them if necessary. Try rotating the desk-top radio-controlled clock 90 degrees if it is one.
Press the ALARM SET A or ALARM SET B button on the AM/FM clock radio to turn off the alarm. ALARM A or ALARM SET B will no longer be active when the ALARM A or ALARM SET B indicator vanishes from the display’s upper left corner.
DST is indicated on the screen, and the clock display changes to reflect this (summer time). Press and hold DST for more than 3 seconds once more to turn off the daylight-saving time (summer time) adjustment. making radio noise.
• Pressing the Play/Pause button briefly on an FM radio causes it to automatically search and save.
• To choose the preferred radio station, quickly push the Volume Up and Volume Down buttons.
The majority of radio-controlled clocks synchronize with a time broadcast signal once each day, at night, while other clocks do it more frequently. They often have accuracy of better than plus or minus a half second per day as a result.
Though some RCCs check themselves every few hours, the majority synchronize with a time broadcast signal once per day, at night. They often achieve accuracy of better than plus or minus 0.5 seconds per day as a result.
Tap the Apps icon (in the QuickTap bar) on the Home screen, then select the Apps tab (if necessary), followed by Clock.


