PHA7630205 Rev.00
Caloundra Range Sweep Fan
Installation Instructions
C4HS1300-WE
C4HS1300-AN
C4HS1300L-WE
For your safety

 DANGER
HAZARD OF ELECTRIC SHOCK, EXPLOSION OR ARC FLASH
- This product must only be installed by appropriately qualified and/or licensed electrical personnel.
- Isolate the electrical supply before doing any work on this product.
- Ensure that the product has been correctly installed and tested for safe operation before reconnecting the electrical supply.
Failure to follow these instructions will result in death or serious injury.
CAUTION
IMPORTANT INSTALLATION SAFEGUARDS
- The mounting bracket must be fixed to a solid structure, such as a ceiling joist, and this must be capable of supporting a weight of 30kg.
- The fan should be mounted so that the blades are at least 2.1m above the floor, and 300mm from the tip of the blade to the nearest object or walls. (Figure 1).
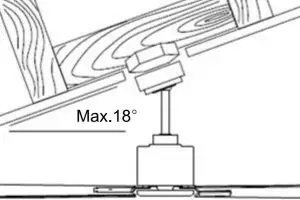
- The fan hanging system supports a maximum 18-degree angled ceiling installation (Figure 2).
Failure to follow these instructions can result in injury, equipment damage or unnecessary vibration and noise.
CAUTION
IMPORTANT CLEANING SAFEGUARDS
- Isolate the electrical supply before doing any cleaning of this product.
- Periodic cleaning of your ceiling fan is the only maintenance required.
- Use a soft brush or lint free cloth to avoid scratching the paint finish.
- Do not use water when cleaning your ceiling fan as it could damage the motor or blades and create the possibility of an electric shock.
- The motor has a permanently lubricated ball bearing so there is no need to oil.
Failure to follow these instructions can result in injury or equipment damage.
FIGURE 1.
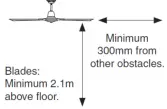
FIGURE 2.
Installation Procedure
STEP 1: PRE-INSTALL CHECK
Prior to installation, carefully identify the parts (Figure 3).
- Mounting bracket x1
- Pre-assembled fan motor, downrod, canopy and bottom cover x1
- Blades x4
- C2000 Wall Switch x 1
- Balancing Kit x1
- Blade Screws x9
- Wooden Screws for mounting bracket x2
FIGURE 3.

STEP 2: WIRING TO THE BRACKET TERMINALS
- See following page for Electrical Wiring Diagram (Figure 8.)
STEP 3: INSTALLING THE MOUNTING BRACKET
- Secure the mounting bracket to the ceiling joist or structure with the two long screws provided (Figure 4).
- Ensure at least 30mm of the screws is threaded into the support.
- The bracket screws provided are for use with wooden structures only. For structures other than wood the appropriate screw type must be used.
FIGURE 4.

STEP 4: INSTALLING THE BLADES
- Insert the blade into the square slot of the motor (Figure 5.).
- Secure the blade on the bracket by using the two motor screws, ensuring they are tightened simultaneously.
- Once completed, repeat the process on the remaining blades.
FIGURE 5.
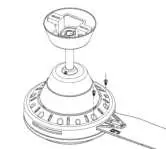
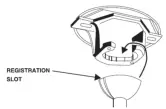
STEP 5: HANGING THE FAN
- Lift the fan assembly onto the mounting bracket.
- Ensure the registration slot of the hanger ball is positioned on the stopper of the mounting bracket to prevent the fan from rotating when in operation (Figure 6.)
FIGURE 6.
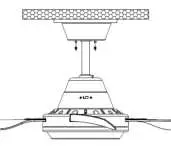
STEP 6: FINISHING THE INSTALLATION
- As the electrical connection was completed in Step 2, connect the ceiling fan to the terminal by connecting the quick-connector plug.
- Cover the mounting bracket with the canopy. Ensure all electrical wiring is tucked inside the canopy and that the wires are not damaged during this step.
- Secure the canopy to the mounting bracket using the screws provided (Figure 7.)
FIGURE 7.
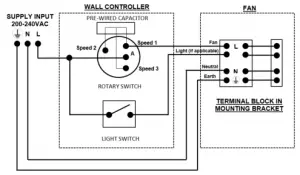
Electrical Wiring Diagram
FIGURE 8.
Technical Specifications
| Model | C4HS1300-WE | C4HS1300-AN | C4HS1300L-WE |
| Material | UV-Stabilised ABS | UV-Stabilised ABS | UV-Stabilised ABS |
| Blade Number | 4 | 4 | 4 |
| Blade Size | 1300mm (52 inch) | 1300mm (52 inch) | 1300mm (52 inch) |
| Colour | White Electric (WE) | Anthracite (AN) | White Electric (WE) |
| Light Colour | – | – | 4000K LED |
| Light Output | – | – | 1500Im |
| Motor | AC 75W | AC 75W | AC 75W |
| Control | Clipsal C2000 | Clipsal C2000 | Clipsal C2000 |
| Reverse/Winter Setting | Yes | Yes | Yes |
| RPM | 102/150/210 | 102/150/210 | 102/150/210 |
| Airflow | 13,000 m3/hr | 13,000 m3/hr | 13,000 m3/hr |
| Mounting Type | Hangsure | Hangsure | Hangsure |
| Coastal Rated | Yes | Yes | Yes |
Customer Care
Warranty information (Australia)
We warrant this product for 3 years—visit https://www.schneider-electric.com.au/en/about-us/legal/terms-and-conditions.jsp for details.
Our goods also come with guarantees that cannot be excluded under the Australian Consumer Law. You are entitled to a replacement or refund for a major failure and compensation for any other reasonably foreseeable loss or damage. You are also entitled to have the goods repaired or replaced if the goods fail to be of acceptable quality and the failure does not amount to a major failure.
Schneider Electric (Australia) Pty Ltd
Customer Care: 1300 369 233
Email: [email protected]
www.schneider-electric.com.au
Schneider Electric reserves the right to change specifications, modify designs and discontinue items without incurring obligation and whilst every effort is made to ensure that descriptions, specifications and other information in this catalogue are correct, no warranty is given in respect thereof and the company shall not be liable for any error therein.
© Schneider Electric 2018
This material is copyright under Australian, New Zealand and international laws. Except as permitted under the relevant law, no part of this work may be reproduced by any process without prior written permission of and acknowledgement to Schneider Electric.


