
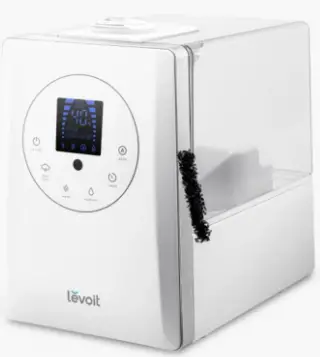
Levoit LV600HH Hybrid Ultrasonic Humidifier
Package Contents
- x Hybrid Ultrasonic Humidifier
- x Remote Control
- x 3V CR2025 Battery (Pre-Installed)
- x Aroma Pads (1 Pre-Installed)
- x Absorption Pads (1 Pre-Installed)
- x Cleaning Brush
- x User Manual
Specifications
| Power Supply | AC 120V, 60Hz |
| Rated Power | 280W |
| Effective Range | 430–753 ft² / 40–70 m² |
| Water Tank Capacity | 1.5 gal / 6 L |
| Max Cool Mist Output | 300 mL/h |
| Max Warm Mist Output | 500 mL/h |
| Dimensions | 11.3 x 7.0 x 10.5 in / 28.7 x 17.8 x 26.7 cm |
| Weight | 6.5 lb / 2.95 kg |
General Safety
- Only use the humidifier as described in this manual.
- Place the humidifier and cord so that the humidifier will not be knocked over.
- When not in use, turn the humidifier off and disconnect from power source by removing the plug from the outlet.
- Do not overfill the water tank, as this may cause electric shock.
- Do not use the humidifier in wet environments.
- Keep the humidifier out of reach from children.
- Do not open the base or remove the water level sensor for self-servicing.
- Always unplug the humidifier from the power outlet before cleaning the humidifier or detaching the water tank from the humidifier base.
- Always make sure the humidifier is placed on a flat, level surface before operation.
- Only fill the water tank with purified or distilled water. Never fill the water tank with any other liquids unless directed by the manual.
- Do not place the humidifier near sources of heat, such as stovetops, ovens, or radiators.
- Do not place the humidifier directly on floors, carpets, or rugs. Only place the humidifier on water-resistant surfaces.
- Do not use attachments that are not recommended by Levoit for the humidifier.
Power and Cord
- Do not handle the power cord or plug with wet hands. Keep the plug and power cord away from liquids.
- This humidifier has a polarized plug (one prong is wider than the other), which fits into a polarized outlet only one way.
- This is a safety feature to reduce the risk of electric shock. If the plug does not fit, reverse the plug. If it still does not fit, do not use the plug in that outlet. Do not bypass this safety feature.
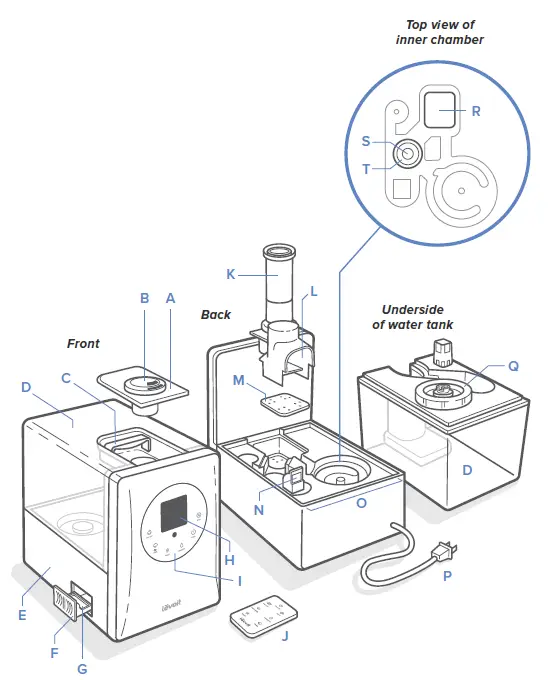
Function Diagram
- A.Nozzle Cap
- B.Nozzles
- C.Handle
- D.Water Tank
- E.Base
- F.Aroma Box
- G.Aroma Pad
- H.LED Display
- I.Control Panel
- J.Remote Control
- K.Mist Tube
- L.Mist Channel
- M.Absorption Pad
- N.Air Vent
- O.Inner Chamber
- P.Power Cord
- Q.Water Tank Cap
- R.Heating Element
- S.Transducer
- T.Insulation Ring

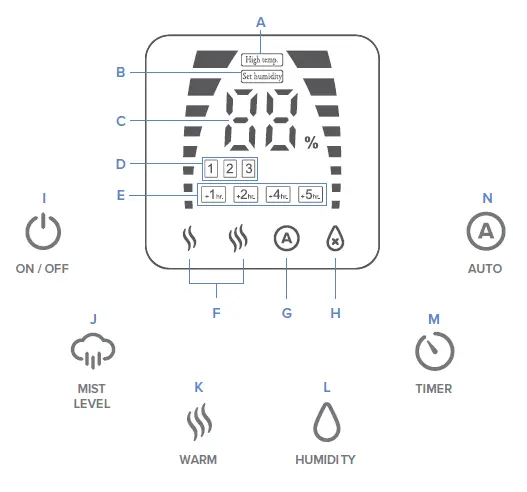
Display
- A. High Temperature Warning
- B. Humidity Setting Indicator
- C. Relative Humidity (RH) Percentage
- D. Mist Level
- E. Timer
- F. Warm Mist Setting
- G. Auto Mode Indicator
- H. Low Water Indicator
Control Panel
- I. On/Off Button
- J. Mist Level Button
- K. Warm Mist Button
- L. Humidity Level Button
- M. Timer Button
- N. Auto Mode Button
CONTROLS
 On/Off Button: Turns the humidifier on/off.
 Mist Level Button: Cycles through mist level settings: low, medium, and high.
 Warm Mist Button: Turns on warm mist and cycles through warm mist settings: low, medium and high heat (see page 11).
 The humidity Level Button: Sets the Relative Humidity (RH) percentage.
 Timer Button: Sets or cancels a timer (see page 12).
 Auto Mode Button: Turns Auto Mode on or off (see page 12).
Remote Control
The remote control can be used to control any functions of the humidifier from a distance. It must be within 16 ft / 4.8 m of the humidifier to work.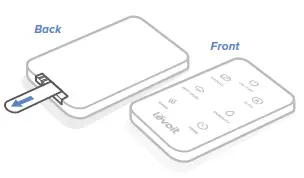
GETTING STARTED
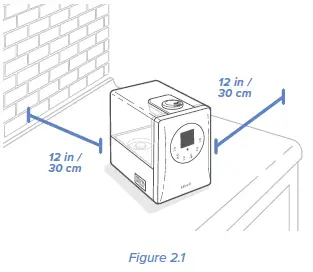
- Place the humidifier on a flat, level, elevated, and water-resistant surface, such as a table or nightstand. Make sure the room is well-ventilated.
- Position the humidifier at least 12 in / 30 cm away from walls and appliances to prevent them from getting wet.

- Do not place the humidifier directly on floors, carpets, or rugs.
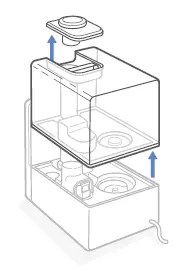
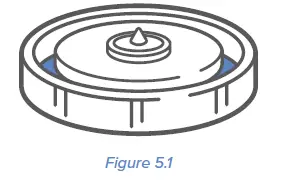
- Remove the nozzle cap from the water tank. Use the handle to remove the water tank from the base.

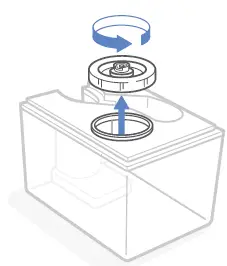
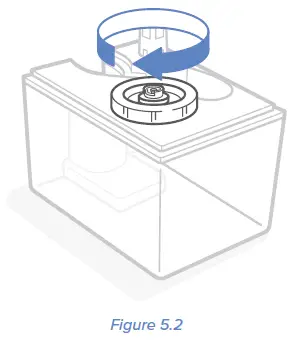
- Flip the tank over and twist the water tank cap counterclockwise to remove it

- Pour water into the opening. Fill the tank at least halfway with cold or room temperature water. The maximum capacity is 1.5 gal / 5.6 L.

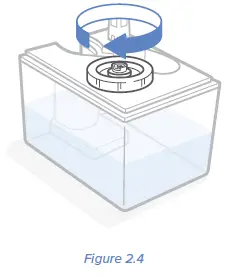
- Replace the water tank cap. Twist the cap clockwise to secure it tightly to the water tank. [Figure 2.4] Wipe off any excess water on the top and bottom of the base.
- Carefully place the water tank back onto the base, aligning the water tank cap with the inner chamber. Place the nozzle cap back on top of the water tank.

- Plug in the humidifier. The humidifier will light up, then turn off.

USING YOUR HUMIDIFIER
- Press to turn on the humidifier.
- Optionally, rotate the 2 nozzles to diffuse mist in any desired direction.
- Optionally, press to change the mist level
Warm Mist
Press to turn on warm mist. Keep pressing to increase the heat setting for the mist, and to turn warm mist off.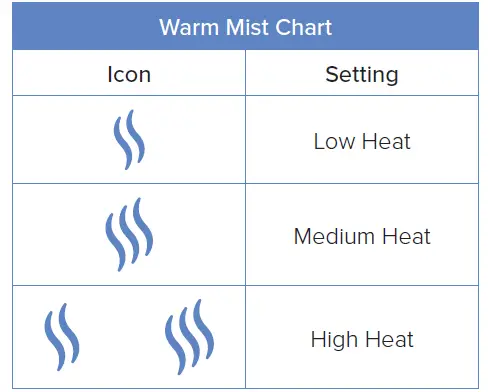
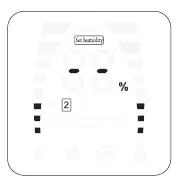
Humidity Level
You can customize the humidity level that the humidifier will maintain.
- Press once. The display will show “–.”

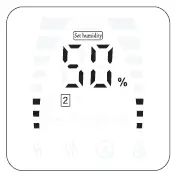
- Keep pressing to set a humidity level between 40%and 80% Relative Humidity (RH).

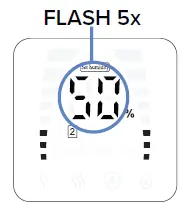
- The display will flash 5 times to confirm your selection.

- Once the humidity of the environment reaches the set RH percentage, the humidifier will automatically stop misting. It will start misting again when the humidity drops to 5% below the set level.
Timer
- You can set a timer between 1 and 12 hours.
- Press repeatedly to choose a time in increments of 1 hour. When you stop pressing , the display will flash 3 times and the timer will start.
- The humidifier will automatically power off once the timer is finished.
- To cancel a timer, press repeatedly or press and hold until the display reads
Auto Mode
Auto Mode uses the humidifier’s sensor to automatically adjust the mist level (or turn it off) to maintain a comfortable level of humidity
- Press to turn Auto Mode on/off.
- The timer and warm mist setting can be used with Auto Mode.
- Changing the mist level using cancel the Auto Mode function.
Turning Off the Display
The display will automatically dim after 10 seconds of inactivity. To turn off the display, press and hold for 3 seconds. To turn the display back on, press any button, except .
Memory Function
While the humidifier is plugged in, it will remember your settings (except Timer) when turned off, and will resume these settings when turned back on.
Automatic Shutoff
The humidifier will automatically turn off when all of the water in the tank has been diffused![]() . will show on the display until more water is added to the water tank.
. will show on the display until more water is added to the water tank. 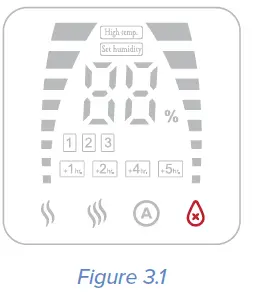
Absorption Pads The mineral absorption pads help prevent mineral buildup (scale) inside the humidifier, especially around the heating plate.
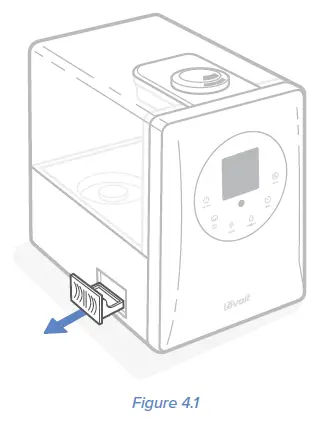
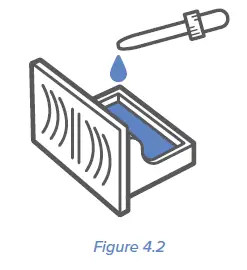
Using the Aroma Box
The humidifier can be used as an aroma diffuse
- Turn off the humidifier.
- Pull out the aroma box on the left side of the humidifier.

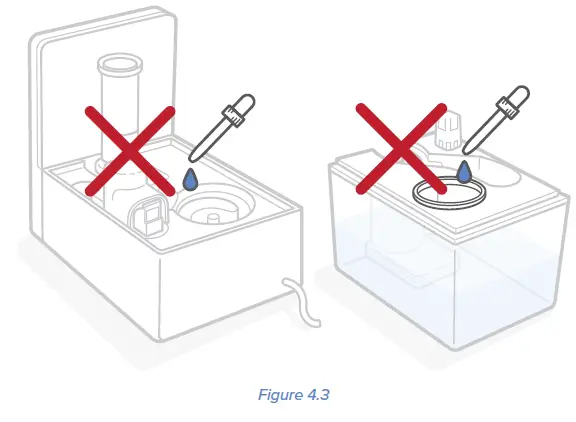
- Put 2-3 drops of essential oil on the aroma pad.

- Place the aroma box back into the humidifier. Fill the water tank with water and place it back on the base (see Getting Started, page 9).
- Plug in and turn on the humidifier.

PREVENTING WATER LEAKS
- The water tank may leak if not placed properly on the base.
- Make sure the silicone ring around the water tank cap is secured at all times.

- Twist and secure the cap tightly onto the water tank

- Note: A small gap between the cap and the tank is normal.
- Before moving the humidifier, remove the tank from the base and empty any excess water from the inner chamber.
- Wipe off any excess water on the top and bottom of the base.
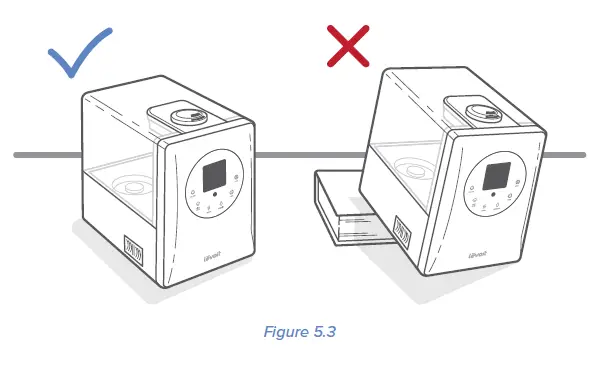
- Do not shake the humidifier or place it on an inclined surface. Make sure to place the humidifier on a flat, level surface.

KEEPING THINGS CLEAN
- Always make sure the humidifier is unplugged before cleaning.
- Use a tissue or cloth to clean the nozzle regularly.
- Do not use liquid detergents to clean the humidifier.
- We recommend using purified or distilled water instead of tap water for misting to prevent scale buildup in the humidifier.
General Cleaning
- You should clean the humidifier every 3 days. Change the water every day or every other day to avoid bacteria growth.
- Unplug the humidifier. If you’ve used the warm mist setting, allow the humidifier to cool before cleaning.
- Make sure the nozzle cap is cool. Remove the nozzle cap from the water tank and rinse under clean, running water. Set it aside to air dry.
- Remove the water tank from the base and pour out any water from the inner chamber. If you’ve used the warm mist setting, use caution in case the water is still hot.
- Fill the tank with 3 US cups / 710 mL of distilled white vinegar. Replace the cap and gently shake to coat all sides of the water tank. Allow it to sit for at least 1 hour.
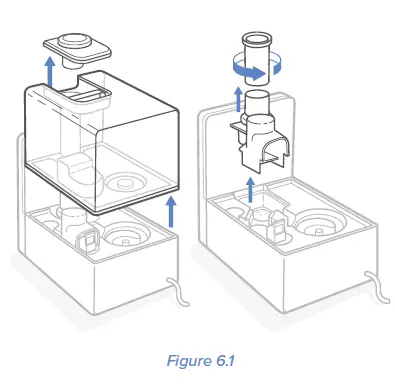
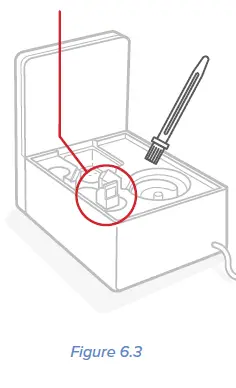
- Remove the mist channel and mist tube.[Figure 6.1] Detach the mist tube from the mist channel by twisting the tube counterclockwise. Rinse both parts and dry thoroughly.

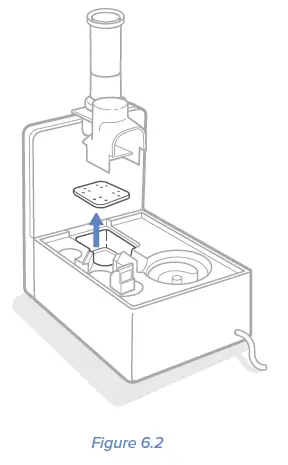
- Remove the absorption pad inside the heating element and rinse. Dry the pad with a clean, dry cloth.

- Add 1 US cup / 238 mL of distilled white vinegar to the inner chamber and soak for 1 hour.
- Use the included cleaning brush to remove any scale buildup inside the water tank or in the inner chamber.

- Pour out the vinegar from the water tank and the inner chamber and thoroughly rinse with warm water.
- Dry all parts with a clean, dry cloth. Make sure all parts of the humidifier are completely dry before reassembling or storing.
- Do not use the humidifier immediately after disinfecting. This may be a health hazard.
Cleaning the Aroma Pad
- Pull out the aroma box.
- Remove the aroma pad and rinse under warm, running water.
- Dry with a clean cloth and place it back into the aroma box.
Deep Cleaning the Humidifier
Deep clean the water tank every 2 weeks and before and after storing the humidifier for long periods of time. You should also deep clean if there is any mold buildup inside the water tank or inner chamber.
- Fill the water tank with 1 US cup / 238 mL of vinegar along with 1 gal / 3.8 L of cold or room temperature water.
- Place the humidifier outdoors and allow it to run for 1 hour.
- Pour out the mixture and refill with cold or room temperature water. Then, run the humidifier for another hour outdoors.
- Rinse the water tank and inner chamber thoroughly under running water. Note: Do not submerge the base in water.
- If storing, allow the water tank and base to completely air dry before reassembling.
Replacing the Aroma Pads and Absorption Pads
- If the aroma pads or absorption pads are stiff even after cleaning, then they need to be replaced. Extra pads are included with the humidifier.
- To maintain the performance of your humidifier, only use official Levoit aroma pads and absorption pads. To buy replacement pads, visit Levoit’s online store. Go to levoit.com for more information.
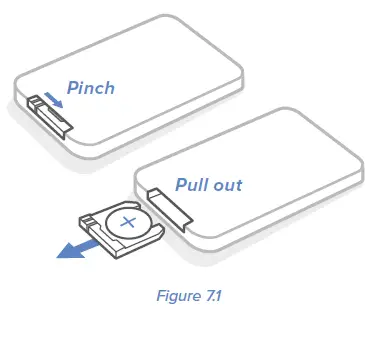
Replacing the Remote Control Battery
- Remove the battery compartment by pinching the tab in and pulling the compartment out. ]

- Remove the old battery.
- Replace with a new 3V CR2025 battery. Note: Make sure the polarities match.
- Replace the battery compartment.
TROUBLESHOOTING
| Problem | Possible Solution |
| No mist comes out of the nozzles. | Plug in the humidifier and turn it on. |
| Add at least 2 US cups / 475 mL of purified or distilled water to the water tank. | |
| Clean the humidifier (see Keeping Things Clean, page 15). | |
| Water may be in the air vent. Take the water tank off and allow the vent to fully air dry before using again. | |
| Only a small amount of mist comes out of the nozzles. | Clean the humidifier, especially the nozzles, air vent, and transducer (see Keeping Things Clean, page 15). |
| Humidifier uses water too quickly. | The humidifier uses up water based on the environmental temperature and humidity. If your environment is cold and/or dry, the humidifier will run out of water faster. |
| Humidifier produces an unusual smell. | If the humidifier is new, remove the water cap, and place the water tank in a cool, dry place for 12 hours. |
| If essential oils were diffused on the aroma pad, rinse the pad and allow it to dry. | |
| Clean the humidifier (see Keeping Things Clean, page 15). | |
| Humidifier makes a loud or unusual noise. | Make sure the water tank is properly in place (see Getting Started, page 9). |
| Place humidifier on a flat, level surface. | |
| Make sure there is at least 2 US cups / 475 mL of purified or distilled water in the water tank. | |
| When using the warm mist function, the heating element will make a gurgling noise when the water level is low. Add more water to the water tank. | |
| The humidifier may be malfunctioning. Stop using the humidifier and contact Customer Support (see page 22). | |
| Mist comes out from the base. | Make sure the water tank is properly in place (see Getting Started, page 9). |
| Water visibly leaks from the humidifier. | Stop using the humidifier and see Preventing Water Leaks (page 14) before using again. If the humidifier continues leaking, contact Customer Support (see page 22). |
| Problem | Possible Solution |
| White dust appears around or in the humidifier. | This is caused by minerals in the water. Use purified or distilled water to fill the humidifier. Avoid using water with high mineral content. |
| Clean the humidifier every 3 days (see Keeping Things Clean, page 15). | |
| The area around the humidifier is damp or wet. | Run the humidifier on a lower mist setting. |
| Open a window to ensure proper airflow for the humidifier, or move the humidifier to a more well-ventilated room. | |
| Make sure the water tank is properly in place (see Getting Started, page 9). | |
| When replacing the water tank, wipe off excess water from the water tank and base. | |
| If the humidifier is leaking, contact Customer Support (see page 22). | |
| Mist is not warm after pressing . | Allow the humidifier to heat up for about 15 minutes to produce warm mist. |
| Clean the heating element of the humidifier (see Keeping Things Clean, page 15). | |
| Essential oils don’t smell strongly enough. | The aroma is intended to be light. This humidifier is not an aroma diffuser. |
| The humidity level isn’t changing in my room. | Use a higher mist level setting. |
| Depending on your environment, the humidifier may take longer to humidify your air. | |
| The humidifier has a maximum effective range of 430–753 ft² / 40–70 m². If the room is larger, the humidifier will not be as effective. | |
| The humidifier does not respond to the remote. | Move remote control to within 16 ft / 4.8 m of the humidifier. |
| Remove the plastic tab from the battery compartment. | |
| Change the battery (see Replacing the Remote Control Battery, page 17). |
| Problem | Possible Solution |
| Incorrect humidity percentage is displayed. | The room may be larger than the humidifier’s effective range. Move to a room smaller than 430–753 ft² / 40–70 m². |
| Moisture may have built up inside of the humidity sensor. Turn off the humidifier and allow the sensor to air dry. Make sure the nozzles are facing away from the sensor. | |
| If the humidifier is placed within 12 in / 30 cm of a wall or in a corner, the built-in humidity sensor cannot provide a proper reading for the relative humidity in the room. | |
| The humidity sensor will give an improper reading if it is exposed to dust. Avoid using the humidifier in dusty rooms. | |
| If the display always shows either 30% or 90% RH when you start the humidifier, the humidity sensor is malfunctioning. Contact Customer Support (see page 22). |
WARRANTY INFORMATION
| Product Name | Hybrid Ultrasonic Humidifier |
| Model | LV600HH |
| Default Warranty Period | 1 year |
| For your own reference, we strongly recommend that you record your order ID and date of purchase. | |
| Date of Purchase | |
| Order ID | |
Terms & Policy
Arovast Corporation warrants all products to be of the highest quality in material, craftsmanship, and service, effective from the date of purchase to the end of the warranty period.
Arovast Corporation will replace any product found to be defective due to manufacturer flaws based on eligibility. Refunds are available within the first 30 days of purchase. Refunds are only available to the original purchaser of the product. This warranty extends only to personal use and does not extend to any product that has been used for commercial, rental, or any other use for which the product is not intended. There are no warranties other than the warranties expressly set forth with each product.
This warranty is non-transferrable. Arovast Corporation is not responsible in any way for any damages, losses, or inconveniences caused by equipment failure or by user negligence, abuse, or use noncompliant with the user manual or any additional safety or use warnings included in the product packaging and manual.
This warranty does not apply to the following:
- Damage due to abuse, accident, alteration, misuse, tampering, or vandalism.
- Improper or inadequate maintenance.
- Damage in return transit.
- Unsupervised use by children under 18 years of age.
Arovast Corporation and its subsidiaries assume no liability for damage caused by the use of the product other than for its intended use or as instructed in the user manual. Some states do not allow this exclusion or limitation of incidental or consequential losses so the foregoing disclaimer may not apply to you. This warranty gives you specific legal rights and you may also have other rights which may vary from state to state.
ALL EXPRESSED AND IMPLIED WARRANTIES, INCLUDING THE WARRANTY OF MERCHANTABILITY, ARE LIMITED TO THE PERIOD OF THE LIMITED WARRANTY.
Additional 1-Year Warranty
You can extend your 1-year warranty by an additional year. Log onto www.levoit.com/warranty to register your new product for the extended warranty. Please fill out all required fields and include your order ID, place of purchase, and purchase date, if applicable.
Defective Products & Returns
If you discover your product is defective within the specified warranty period, please contact Customer Support via [email protected] with a copy of your invoice and order ID. DO NOT dispose of your product before contacting us. Once our Customer Support Team has approved your request, please return the product with a copy of the invoice and order ID.
CUSTOMER SUPPORT
If you have any questions or concerns about your new product, please contact our helpful Customer Support Team.
Customer Support
- Arovast Corporation
- 1202 N. Miller St., Suite A
- Anaheim, CA 92806
- Email: [email protected]
- Toll-Free: (888) 726-8520
- Support Hours
- Mon–Fri, 9:00 am–5:00 pm PST/PDT


