![]() EX BM350 Battery Monitor Kit
EX BM350 Battery Monitor Kit
User Manual

EX-BM350 Battery Monitor Kit
Thank you for your purchase of the EXPION360 Battery Monitor
Application
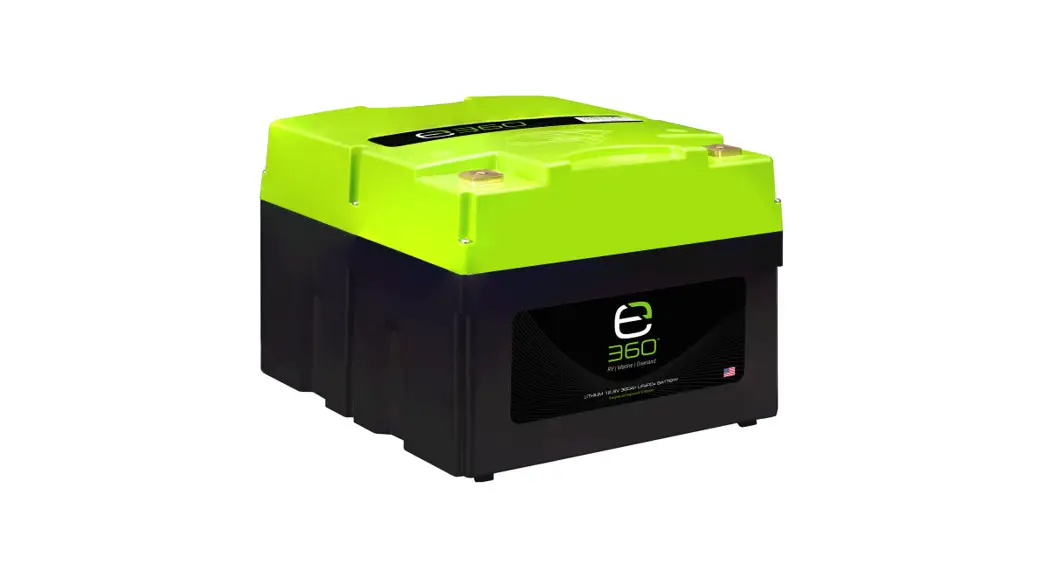
The Expion360 Battery Monitor is designed to measure a batteries state of charge (SOC). It measures voltage, watts, and capacity in real time. The monitor will show both power consumption as well as power replenishment. The monitor can be used with Lithium, Lithium Iron Phosphate, Lead Acid, AGM, Gel and Nickel Metal Hydride batteries with a voltage range of 8V to 80V. Please read all instructions prior to installing your new battery monitor to make the installation trouble free.
Wiring Instructions
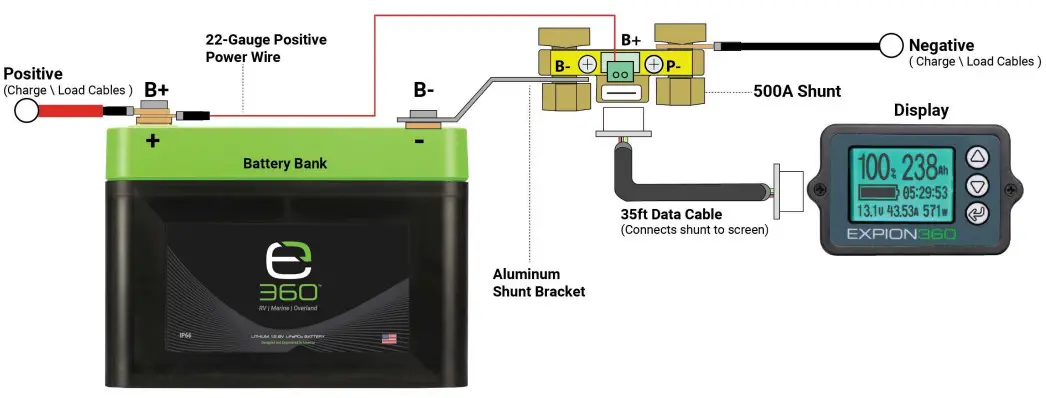
(2.1)Shunt: Attach the shunt B-terminal to the negative (black -) terminal on the battery(s). Attach all negative cables to the P- terminal on the shunt. The shunt can be mounted right side up or up side down for a better fit. It is very important to make sure all negative cables are attached to the P-terminal on the shunt so power can be calculated across the bridge of the shunt to accurately monitor the battery(s) SOC.
(2.2)Monitor Power: Attach the short red monitor power wire to either B+ terminal (Green terminal) on the shunt. Attach the other end with the ring terminal to the positive (red+) terminal on the battery. This connection provides power to the battery monitor screen.
(2.3)Monitor Data Line: Plug in one end of the battery monitor data line to the data inlet on the shunt and the other end to the display unit (screen). Your battery connections are now complete.
Display Screen Functions
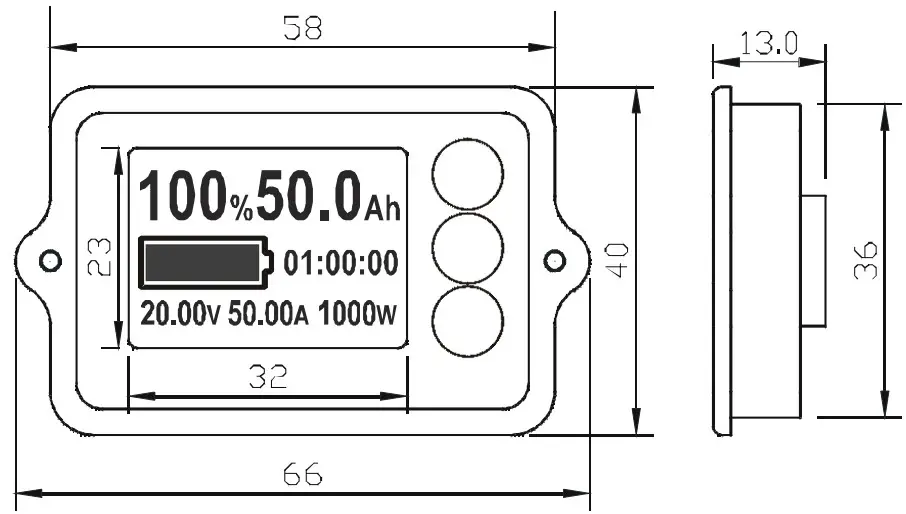
(3.1)% – Percentage: Upper Left Corner. This shows state of charge (SOC) as a percentage from 0% empty to 100% full.
(3.2)Ah – Amp Hour: Upper Right Corner. Abbreviated as Ah. This shows SOC in amp hours. The amp hour capacity of the battery(s) being monitored must be entered in when programing the monitor for the first time for this value to measure correctly.![]() (3.3)Battery Symbol: Middle Left. This shows SOC as a battery symbol. When the battery is being charged it will cycle to show it is filling. When the battery is full this symbol will be shaded and when it is empty it will not be shaded.
(3.3)Battery Symbol: Middle Left. This shows SOC as a battery symbol. When the battery is being charged it will cycle to show it is filling. When the battery is full this symbol will be shaded and when it is empty it will not be shaded.
(3.4)Hour Counter: Middle Right. This will show run time remaining at the current rate of discharge until the battery is empty while under a load or time remaining until the battery is full when charging.
(3.5)V – Voltage: Bottom Left. This shows the voltage level the battery is at.
(3.6)A – Amperage: This shows the current (amperage) being used while discharging or supplied while charging.
(3.7)W – Watts: This shows the watts (power) being used while discharging or supplied while charging.
(3.8)Screen: The screen back-lighting will pulsate while charging or during a higher state of charging than discharging. The screen will remain solid during discharging or during a higher state of discharge than charge. The screen will be dark with no back-lighting when there is a balanced state of charge and discharge with no power being consumed or supplied.
(3.9)Display Screen Back-Lighting Modes: Pulsating: Charge Mode
Solid: Discharge Mode
Dark: Balanced Inactive Mode

Set Up Screen
To access the set up screen to enter the battery(s) capacity, maximum charge voltage, and minimum discharge voltage for your monitor to operate correctly.![]() (4.1)Press and hold the left arrow key on the faceplate until the set up screen appears. This will show the three values you need to enter.
(4.1)Press and hold the left arrow key on the faceplate until the set up screen appears. This will show the three values you need to enter.![]() (4.2)Press the up or down arrow keys to move the cursor to the setting you would like to change.
(4.2)Press the up or down arrow keys to move the cursor to the setting you would like to change.![]() (4.3)Press and hold the left arrow key again to select that setting.
(4.3)Press and hold the left arrow key again to select that setting.![]() (4.4)Press the up or down arrow keys again to select the number you need.
(4.4)Press the up or down arrow keys again to select the number you need.![]() (4.5)When you are done entering the information press and hold the left arrow key one last time to save your settings. Within 60 seconds the screen will automatically return to the home screen with your settings saved. Or simultaneously press the up and down arrow keys and hold to return to the main menu.
(4.5)When you are done entering the information press and hold the left arrow key one last time to save your settings. Within 60 seconds the screen will automatically return to the home screen with your settings saved. Or simultaneously press the up and down arrow keys and hold to return to the main menu.
(5)Set Battery Capacity to Empty or Full![]() The last step in the setup is to set the battery to its starting point at either empty or full capacity to start the monitoring process. We recommend starting at full unless you are unsure of the capacity of the battery being monitored. If unsure of the battery capacity start with the battery fully depleted (Empty) and set the monitor to its highest capacity, then charge the battery fully and record the capacity when charging is complete. Enter that Ah reading for capacity. From the home screen press the up arrow to set to full as your starting point after the battery has been fully charged (recommended). From the home screen press the Down arrow to set to empty as your starting point after the battery has been fully discharged.
The last step in the setup is to set the battery to its starting point at either empty or full capacity to start the monitoring process. We recommend starting at full unless you are unsure of the capacity of the battery being monitored. If unsure of the battery capacity start with the battery fully depleted (Empty) and set the monitor to its highest capacity, then charge the battery fully and record the capacity when charging is complete. Enter that Ah reading for capacity. From the home screen press the up arrow to set to full as your starting point after the battery has been fully charged (recommended). From the home screen press the Down arrow to set to empty as your starting point after the battery has been fully discharged.
Screen Measurements
(6.1)Wiring Diagram
The Importance of Peukerts Law
Peukerts Law
To explain this law in simple terms: lead acid (flooded, SLA, AGM and Gel) batteries have a variable rather than fixed capacity based on the batteries discharge rate. The higher the discharge rate, the lower the usable amp hours the battery has or, the lower the discharge rate, the higher the usable amp hours the battery will have. This is much like the fuel in your vehicle when you travel at a higher rate of speed gas mileage is lower than if you are moving at a lower rate of speed. A lead acid battery will show its capacity as an amp hour rating followed by an hour rating (discharge time), usually listed as a 20HR rate and sometimes also listed as a 5HR rate to show amp hour capacity with low power usage and higher power usage. The amp hour and hour rate will be listed on the battery. If you have a battery that shows its rating at 100Ah @ 20Hr, that means that in 20 hours the battery will be discharged at a 5A load. The following formula is how you determine the load 100/20 = 5.
Due to this law, it is hard to get a highly accurate Ah capacity, percentage, and time remaining readings on the Expion360 Battery Monitor, however, we can increase accuracy by setting the starting capacity (CAP) in the setup menu to a more accurate figure based on estimated power usage. This will help to provide a more accurate reading due to variable capacity (Peukerts Law). We have provided an amperage chart for RV appliances to help determine power usage. Most appliances run for short periods of time and amperages are based on 1 hour, so if appliances are only running for a few minutes, the amperage would be a fraction of the listed amount. For example, an appliance that is rated at 1.0A running for ½ an hour will only draw .50A. Figuring power usage can be difficult and is not an exact science if unsure of your usage, start with setting “CAP” at the 20HR rate to establish a starting point and then customize that setting based on tracking the average power consumption over time.
(8)Setup for a New Flooded, SLA, and AGM Battery:
First, determine the batteries capacity at its 20-hour rate, this amount should be listed on the battery and shown like 100Ah@20Hr. To determine how many amps are available from the figure you divide 100/20=5 or 5A per hour.
We recommend setting “CAP” at the batteries 20Hr. rate to start then estimate actual power use over time and adjust “CAP” most likely to a lower amount if power use is higher according to Peukert’s Law. Some battery manufacturers will also list a 5Hr. rate that can be helpful in determining true capacity based on actual power use. If Parallel connecting two or more batteries the Ah capacity will need to be increased by the amount of each battery, and that will be the new figure to enter into the formula to establish a starting point for capacity.
(9)Voltage, Amperage, and Wattage Readings:
The voltage, amperage, and wattage readings on the battery monitor will be accurate within the amount listed on the specification sheet and are not affected by discharge rate (Peukerts Law). To see if your amp hour settings are correct according to your power use you can watch amperage being used at different times of the day and determine an average usage and apply it to the above settings chart to help determine your amp hour capacity. You can also assess your battery state of charge by the voltage reading on the monitor. The “Battery State of Charge at Different Voltage Readings” chart provided shows average voltage readings and state of charge for a new AGM battery. Readings will be somewhat different for different battery manufacturers, different battery chemistries and battery age.
(10)Settings for 12V Lithium Iron Phosphate (LiFePo4) and other Lithium Battery Chemistries:
Setting the battery monitor for lithium battery use is simple because lithium is nearly 100% efficient when discharging so Peukerts law, for the most part, does not apply here. You will get almost the batteries full rated capacity at any discharge rate.
(10.1)SETUP FOR LITHIUM:
CAP: 100% of the batteries rated amp hour (Ah) capacity Should be listed on the battery.
FULL: 14.4V to 14.6V Charge voltage.
See battery manufacturer specifications for full voltage.
ZERO: 10.5V to 11.5V. Lowest voltage the battery is considered empty at.
See battery manufacturer specifications for empty voltage.
(10.2)SETUP FOR EXPION360 LITHIUM VIPER POWER CELL:
CAP: 100% of the amp hour (Ah) capacity. 120Ah per battery.
FULL: 14.6V. Charge voltage.
ZERO: 10.5V. You may also set zero voltage higher if you want your battery to read empty sooner. 11.2V is recommended.
(11)Battery Aging and Battery Monitoring:
Many factors can determine a batteries lifespan. For Lead Acid, AGM, and Gel chemistries: life cycles are affected by undercharging, overcharging, depth of discharge (especially below 50% capacity), higher than the recommended charge current or discharge current, and operating at extremely high and low ambient temperatures. For lithium chemistries, life cycles are affected by the depth of discharge (especially to a full 100%), Higher than recommended charge or discharge current and operating at extremely high and low ambient temperatures. When a battery ages its capacity lowers, and because all batteries will age differently depending on how well they were operated and cared for in the past it will be challenging to determine its true capacity especially for Lead Acid, AGM and Gel. For old Lead Acid, AGM and Gel set the monitor to the lower amp hour capacity rate and test to determine how accurate the setting is by reading voltages and state of charge estimates at those voltages. You can also check voltage at the battery using a voltage meter. Then adjust accordingly, most likely lowering the amp hour capacity setting. For lithium set the amp hour capacity to 95% of its listed capacity and perform the same test and then adjust accordingly. Lithium capacity will not change due to aging as quickly as other battery chemistries.
12VDC APPLIANCES
| DIRECT BATTERY POWER | AMPERAGE |
| APPLIANCE | 12VDC |
| LED LIGHT | .10A – .20A |
| STANDARD LIGHT | .50A – 1.5A |
| FLUORESCENT LIGHT | 1.0A – 2.0A |
| CO DETECTOR | .50A – 1.0A |
| LP LEAK DETECTOR | .50A – 1.0A |
| POWER ROOF VENT | 1.0A – 2.0A |
| RANGE HOOD FAN | 1.5A – 2.5A |
| WATER PUMP | 2.0A – 6.0A |
| RADIO | 3.0A – 5.0A |
| VENT FAN | 1.0A – 5.0A |
| TV | 3.0A – 4.0A |
| DVD | 2.0A – 3.0A |
| TV ANTENNA BOOSTER | 1.0A – 2.0A |
| POWER JACK | 8.0A – 10A |
| ELECTRIC POWER SLIDE | 8.0A – 10A |
| LP FURNACE BLOWER | 10A – 12A |
| LP REFRIGERATOR | 1.0A – 2.0A |
| LP HOT WATER HEATER | 1.0A – 2.0A |
13.120VAC APPLIANCES
| INVERTER BATTERY POWER | AMPERAGE |
| APPLIANCE | 12VDC |
| AIR CONDITIONING | 120A – 160A |
| MICROWAVE | 80A – 130A |
| COFFEE MAKER | 50A – 80A |
| BLENDER | 50A – 60A |
| HAIR DRYER | 50A – 120A |
| CURLING IRON | 10A – 12A |
| COMPACT DISC PLAYER | 10A – 12A |
| LAPTOP COMPUTER | 20A – 30A |
| CROCK POT | 10A – 20A |
| ELECTRIC BLANKET | 5A – 15A |
| ELECTRIC FAN | 10A – 20A |
| ELECTRIC SKILLET | 60A – 120A |
| TOASTER | 70A – 100A |
| VACUUM | 10A – 20A |
| IRON | 50A – 100A |
| ELECTRIC TOOLS | 20A – 60A |
| SPACE HEATER | 80A – 130A |
| ELECTRIC LIGHT | 5A – 10A |
TECHNICAL SPECIFICATIONS
| CATEGORY | FIGURE |
| VOLTAGE RANGE | 8VDC – 80VDC |
| WORKING POWER CONSUMPTION | 10mA ± 1mA |
| STANDBY POWER CONSUMPTION | 0.6mA ± 0.2mA |
| DISPLAY BACKLIGHT ON CURRENT DRAW | 45mA ± 5mA |
| DISPLAY BACKLIGHT OFF CURRENT DRAW | 35mA ± 5mA |
| OPERATING TEMPERATURE RANGE | 32°F – 120°F |
| SHUNT CURRENT RANGE | 0A – 500A |
| AMP HOUR SETTING RANGE | 1Ah – 999Ah |
| AMP HOUR MONITORING RANGE | 1Ah – 999Ah |
| CURRENT MONITORING RANGE | 1mA – 999.999A |
| WATTAGE MONITORING RANGE | 0W – 999W |
| PERCENTAGE MONITORING RANGE | 0% – 100% |
| DISPLAY BACKLIGHT ON SECONDS | 3sec ± 1sec |
| DISPLAY BACKLIGHT OFF SECONDS | 15secs ± 5sec |
| VOLTAGE ACCURACY | ±1% |
| CURRENT ACCURACY | ±1% |
| MONITOR SCREEN WATER RESISTANCE | NONE |
| MONITOR SCREEN UV PROTECTION | NONE |
| DISPLAY BACKLIGHT PULSE | CHARGE MODE |
| DISPLAY BACKLIGHT SOLID | DISCHARGE MODE |
| DISPLAY BATTERY SYMBOL CYCLING | CHARGE MODE |
| DISPLAY BATTERY SYMBOL SOLID | DISCHARGE MODE |

FOR OPTIMUM LIFE CYCLES DO NOT DISCHARGE FLOODED, SLA, AGM. OR GEL BATTERIES BELOW 50% SOC AND TO PREVENT SULFATION DO NOT DISCHARGE BELOW 80% SOC.
![]() QUESTIONS:
QUESTIONS:
[email protected]![]() (541) 797-6714
(541) 797-6714


