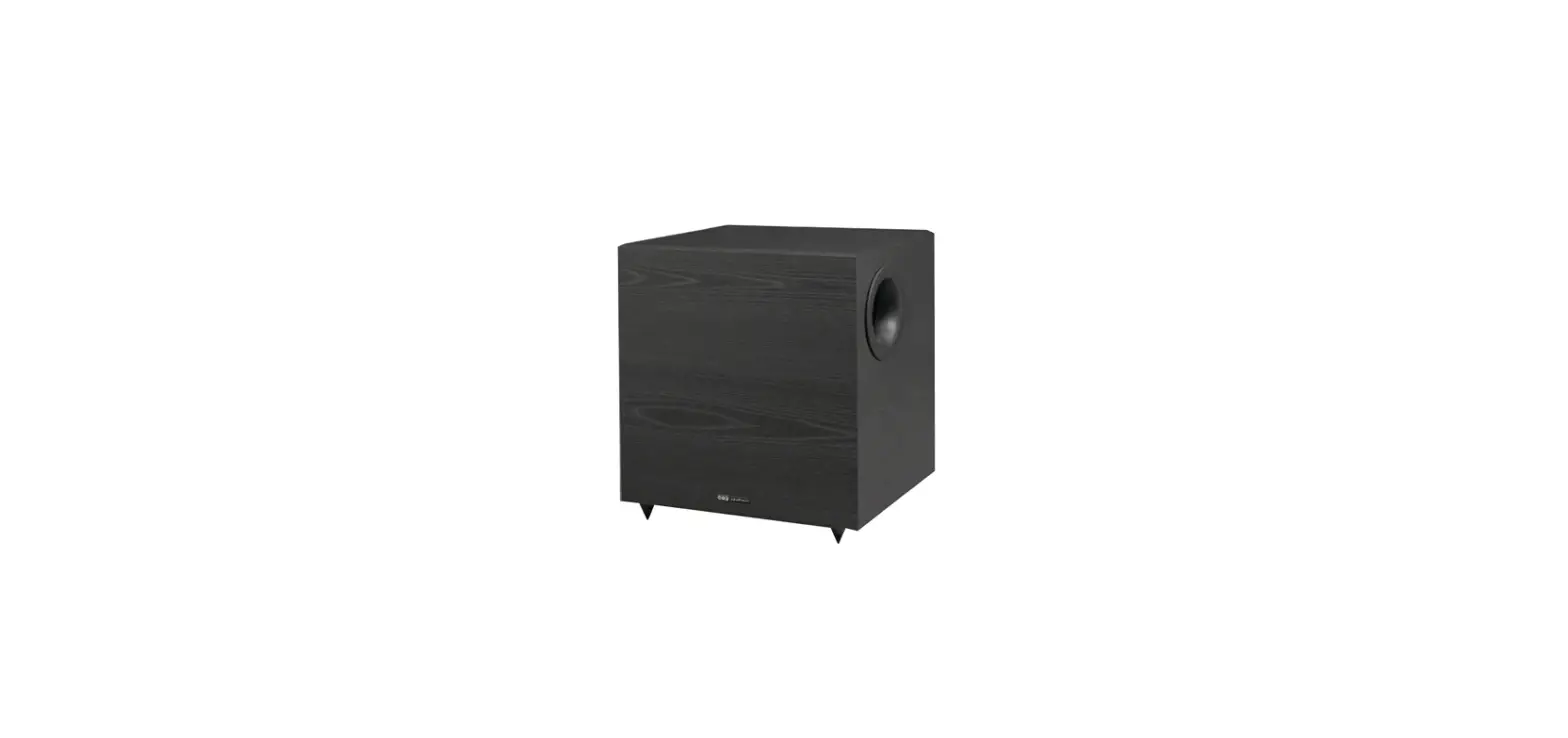
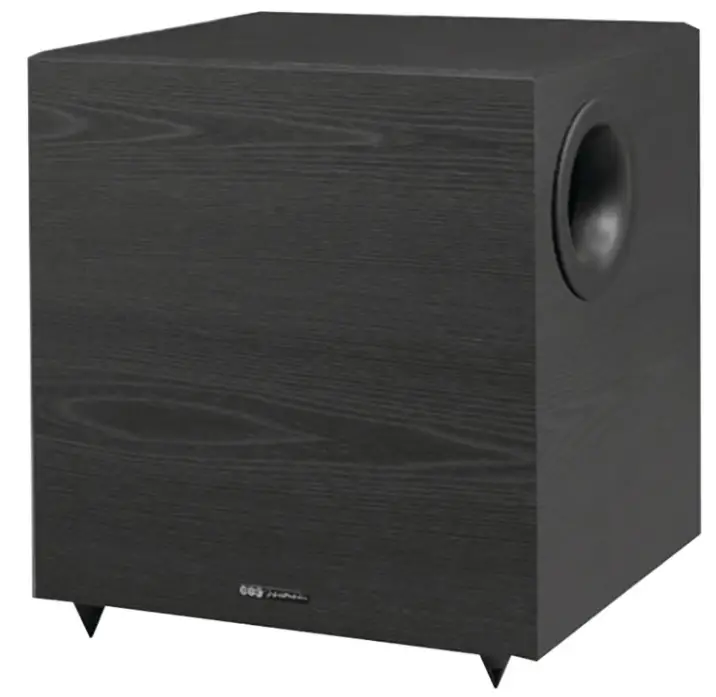
 BIC V-1220 12-inches Down-Firing Powered Subwoofer
SPECIFICATION
- WOOFER 12” Down-Firing Long-Throw Woofer, Tuned “Venturi” Vent
- POWER 430 Watts Dynamic Peak Output (200 Watts RMS Continuous)
- FREQUENCY RESPONSE 23Hz – 180Hz (+/- 3dB)
- CROSSOVER FREQUENCY RANGE 40Hz – 180Hz (user variable)
- ENCLOSURE TYPE Vented
- DIMENSIONS 18 ½” H x 17” W x 14” D
- SHIPPING WEIGHT 44 lbs (20kg)
- LIMITED WARRANTY 7 years parts on Driver, 2 Years on Amp & Associated Electronics
SAFETY INSTRUCTIONS
- Read Instructions- Read all the safety and operation instructions before operating the V-1220.
- Retain Instructions Keep the safety and operating instructions for future reference.
- Heed Warnings- Follow all warnings on the subwoofer and in these operating instructions.
- Follow Instructions Follow all operating and other instructions.
- Water and Moisture Do not use the subwoofer near water for example, near a bathtub, washbowl, kitchen sink, laundry tub, in a wet basement or near a swimming pool.
- Heat-Locate the subwoofer away from heat sources such as radiators, or other devices that produce heat.
- Power Sources – Connect the unit only to a power supply of the type described in these operation instructions or as marked on the subwoofer and amp.
- Power Cord Protection – Route power supply cords so that they are not likely to be walked upon or pinched by items placed upon or against them, paying particular attention to cords at plugs, convenience receptacles, and the point where they exit the subwoofer.
- Object and Liquid Entry- Do not drop objects or spill liquids into the inside of the subwoofer.
WARNING: To reduce the risk of fire or electric shock, do not expose this component to rain or moisture.
INTRODUCTION
Congratulations on your purchase of a V-1220 powered subwoofer. It will give your stereo system unparalleled low frequency output!
Bass frequencies are critical to realistic sound reproduction. After you’ve hooked up your V-1220, you will discover just how much punch and depth you’ve been missing. No matter what kind of music or videos you listen to… whether you listen to them loud or soft, you will experience sound that is richer and fuller. Bass guitar and string bass will have more impact. You will be able to FEEL as well as hear percussion – just the way you would at a live performance. If you have an audio/video system, movies will come alive with thunderous sound effects that were never possible without the V-1220.
This manual will take you step-by-step through the setup and operating process of your V-1220. Reading this manual carefully will ensure you get maximum performance from your V-1220.
UNPACKING
Remove the V-1220 carefully from its carton to prevent any scuffing or scratching. Take a moment to inspect for any shipping damage. If you discover shipping damage, please contact your dealer and the shipping company immediately.
Please make sure to keep your sales receipt, it will establish the duration of your warranty.
PLACEMENT
Placement is extremely important because it dramatically affects the bass quality. An optimally placed subwoofer is much more powerful and nice sounding than a poorly placed one. Three factors need to be considered:
- Distance from your main speakers – The best placement for your subwoofer is on the same wall as the main speakers. How-ever, if you are not able to place your subwoofer on the same wall as your main speakers, avoid placing the subwoofer halfway be-tween the front and back walls. This is where you get a strong null from your room’s standing waves. No matter how powerful the subwoofer is, there will not be as much bass around the center of the room.
- Distance from a wall outlet – Since the subwoofer requires AC power, it must be placed within 10 feet of a wall outlet. We don’t recommend extending that range with an extension cord.
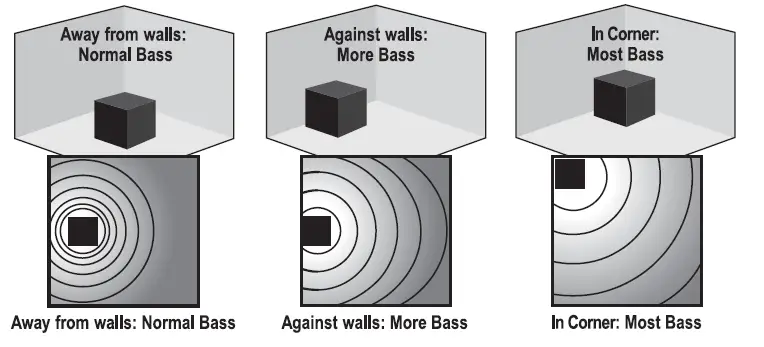
- Positioning and Proximity to walls and corners – Physical placement of the subwoofer will have a definite impact on the frequency response and the perceived amount of subwoofer bass output. Because low frequencies have long wavelengths, they are influenced by proximity to a boundary such as a wall or floor.
When you place the subwoofer well away from a wall, it will produce bass at a certain level. Move the subwoofer close to the wall, it will produce more output (about 3dB more). Putting the subwoofer in a corner will increase output another 3dB (6dB more than when placed away from walls and corners). The main thing to remember is you can place your subwoofer in many areas of your room dependent on how much bass you want. If you like a lot of heavy bass, put the subwoofer into a corner. If you like smoother, less obvious bass, move the subwoofer out into the room. Since low bass waves are very large (up to forty feet or more across!), they tend to cancel and reinforce each other, causing places in the room where there are lots of bass and other places where there isn’t very much bass at all. To locate the best place in your room to put your subwoofer, you can use a technique called the “subwoofer crawl”. First place the subwoofer where you will be sitting (ex. couch or chair) in your listening area. Turn on music with steady/constant bass and walk around the room at/near knee level until you find the place where the bass sounds most accurate and balanced. This is where the subwoofer should be placed.
AMPLIFIER PANEL
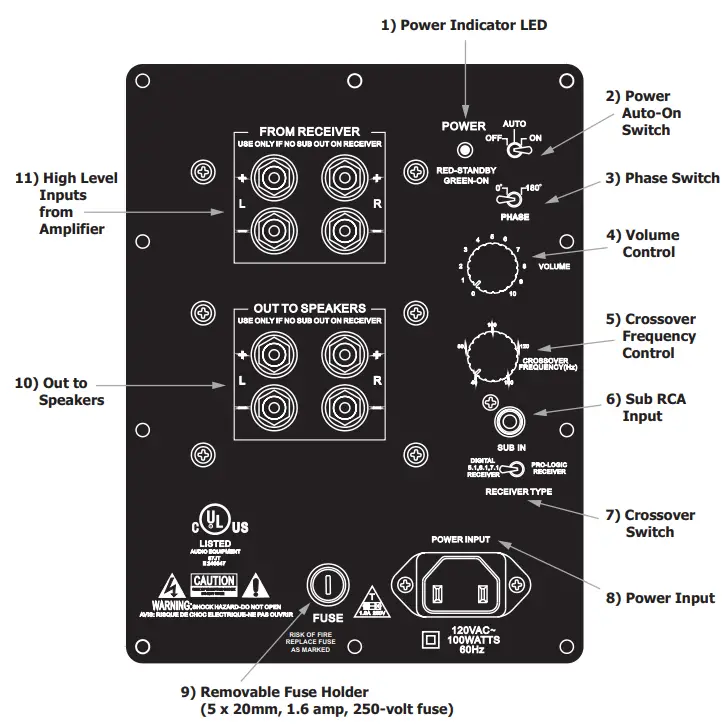
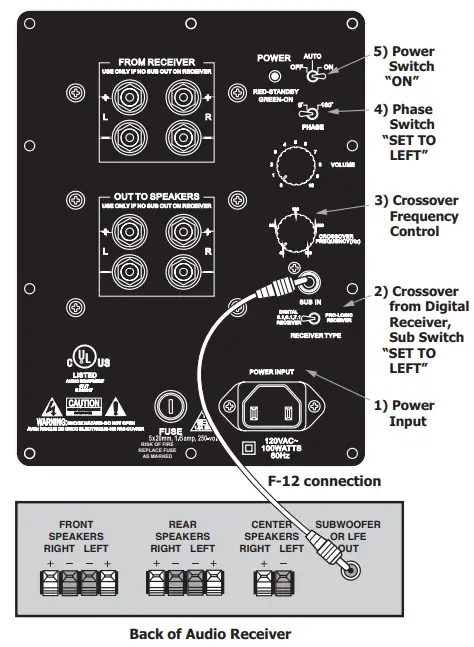
- POWER INDICATOR LED When the subwoofer is ON, this LED light will be green. When the subwoofer is in the STANDBY mode, it will be red.
- POWER/AUTO ON SWITCH This toggle switch turns the subwoofer on and off. When the switch is in the OFF position, the subwoofer will not play. When the switch is in the ON position, the subwoofer will stay on at all times. When the switch is in the AUTO position, the subwoofer will automatically come on when bass frequencies are fed to it. Then after around 15-20 minutes after you stop playing music, the subwoofer will automatically go into STANDBY mode until more bass frequencies are fed to it. STANDBY mode uses very little electricity.
- PHASE SWITCH This switch is used to set the subwoofers phase to either normal 0º or reverse 180º (out of) phase. The physical location of your subwoofer and main speakers determines the phase setting that will sound best at your main listening position. Once you determine the placement of the subwoofer, you will need to try both positions of this switch to determine which setting sounds better in your room. If this requires using the 180º mode, don’t worry, there is nothing abnormal about it.
- VOLUME CONTROL Rotating this knob clockwise increases the output level of the subwoofer. To start out, make sure that the VOLUME is turned all the way down (fully counterclockwise). Then, slowly adjust the volume to blend with the other speakers in your system. Care should be taken not to overdrive the subwoofer to the point of audible distortion.
- CROSSOVER FREQUENCY CONTROL If you are connecting your subwoofer to a Dolby Digital type receiver which has a low level SUBWOOFER or LFE output that requires a subwoofer cable for connection, you will adjust and set your subwoofer crossover through your receiver, not by using this control. Please check your receiver owner’s manual for instructions.
If your receiver is not digital (example: stereo only integrated amp or older Dolby Pro Logic receiver) and/or you are using the HIGH LEVEL INPUT speaker connections, you will use this control to set your crossover in your subwoofer. This control determines what lower part of the frequency spectrum will be reproduced by the sub- woofer and what higher parts will be handled by your main speakers. It is a crossover control. Rotating the knob sets the point where all lower frequencies will be handled by the subwoofer and all higher frequencies will be routed to your main stereo speakers. As a starting point, if you are using left and right tower speakers, set the CROSSOVER FREQUENCY CONTROL to 80 Hz, with bookshelf speakers to 100 Hz, and with small mini speakers to 120 Hz. - SUB RCA INPUT This jack is used with a cable to connect your subwoofer to your receiver. This is the preferred connection. If you use this connection, you will not use #10 and #11.
- CROSSOVER SWITCH If you are using a Dolby Digital receiver which has a low level SUBWOOFER or LFE output that requires a subwoofer cable for connection, set this switch to Digital Receiver so you can adjust your subwoofer crossover through your receiver. If your receiver is not digital (example: stereo only integrated amp or older Dolby Pro Logic receiver) and/or you are using the HIGH LEVEL INPUT speaker connections, set this switch to Pro Logic Receiver so you can adjust your crossover through your subwoofer.
- POWER INPUT This connector is the AC power in for the power cord which is supplied with your V-1220.
- REMOVABLE FUSE HOLDER By pushing in and turning counter-clockwise, you can remove and replace the fuse. Use only the correctly rated 5 x 20 mm, 1.6 amp 250-volt replacement fuses.
- OUTPUT TO SPEAKERS If your receiver does not have a SUBWOOFER or LFE output, use these color coded binding posts to run speaker wire from your main left and right speaker terminals to these OUTPUT TO SPEAKER terminals. Note: These cannot be used in conjunction with SUB-IN low level inputs (See #6).
- HIGH LEVEL INPUTS FROM AMPLIFIER If your receiver does not have a SUBWOOFER or LFE output, use these color coded binding posts to run speaker wire from your receivers main left and right speaker terminals to these HIGH LEVEL INPUTS.
SUBWOOFER CONNECTION – METHOD A
Connecting to Receivers with a SUBWOOFER or LFE Output Jack
All Dolby Digital, DTS, THX, and Bass Management equipped receivers have a low level SUBWOOFER or LFE output jack. If you have this, you will use the METHOD A connection as shown below in Drawing C. This is the recommended and easiest connection. If your receiver does not have a low level SUBWOOFER or LFE output jack, you will use METHOD B (Drawing D) on Page 7 to connect your subwoofer to the receiver.
For this connection, you will need a mono interconnect cable with a male RCA jack on both ends. This can be purchased at the majority of electronics and audio stores. Make sure the length of your cable is long enough to reach from your receiver to your sub-woofer location. The cable should lie flat with a little bit of slack to give some placement flexibility.
WIRELESS HOOKUP – If you prefer a wireless connection rather than using a subwoofer cable, you can connect your V1220 wirelessly to your digital receiver with a BIC WTR-SYS kit. You can also add an unlimited amount of wireless subs to your system by adding BIC W-Receivers. Please contact BIC sales at 877-558-4242, ext. #1 for more information.
HOOKUP STEPS
- IMPORTANT: Make sure that ALL stereo system components including the subwoofer are turned OFF before proceeding.
- Locate the SUBWOOFER or LFE output connector on the rear of your receiver and connect one end of the RCA cable to it.
- Route the RCA cable to the subwoofer location (trying to minimize areas where it may be stepped on). Connect the other end of the cable directly to the SUB IN.
- Connect your main (and surround speakers if applicable) to the receiver according to the receivers owner manual.
- Connect the included power cord to the POWER INPUT (#1) on the back of your V1220. Then connect its plug to an AC outlet ONLY. Since your V1220 draws a moderately high amount of current, we do not recommend plugging it into a “convenience” outlet (switched or un-switched) found on the back of receivers and other stereo components.
- Set the CROSSOVER SWITCH (#2) to the “Digital Receiver” position (on left). This will enable you to set the crossover from your digital receiver and disable the CROSSOVER FREQUENCY CONTROL (#3) on the back of your V1220 (also see Page 5, #5). Refer to your receiver’s owner manual for in-structions on how to set your crossover. You also need to make sure the SUBWOOFER ON setting is set in your receiver. Otherwise, the receiver will send no signals to the sub-woofer and there will be no sound.
- Set the PHASE SWITCH (#4) to 0°. You will later need to follow instructions on Page 5, #3 for room settings.
- You are now ready to turn your POWER SWITCH (#5) on and enjoy the deep bass you have been waiting for. You can learn more about the “auto” feature on this switch on Page 5, #2.
- See Page 9 for “Initial Listening Test”.
SUBWOOFER CONNECTION-METHOD B
Connecting to Receivers with NO SUBWOOFER or LFE Output Jack
If your receiver does not have a low level SUBWOOFER or LFE output jack (for example, older Dolby Pro Logic receivers or stereo-only integrated amps), you will use the method shown below in Drawing D to connect your subwoofer to the receiver.
For this connection, you will need speaker wire to run from your receiver to sub (for subwoofer HIGH LEVEL INPUTS), and then from the sub to speakers (for OUTPUT TO SPEAKERS). Speaker wire can be purchased at the majority of electronics and audio stores. We recommend 16-18 gauge wire. The lower the number gauge, the thicker the wire is. For longer runs, use thicker wire. Make sure the length of your wire is long enough to give a little bit of slack to for some placement flexibility.
HOOKUP STEPS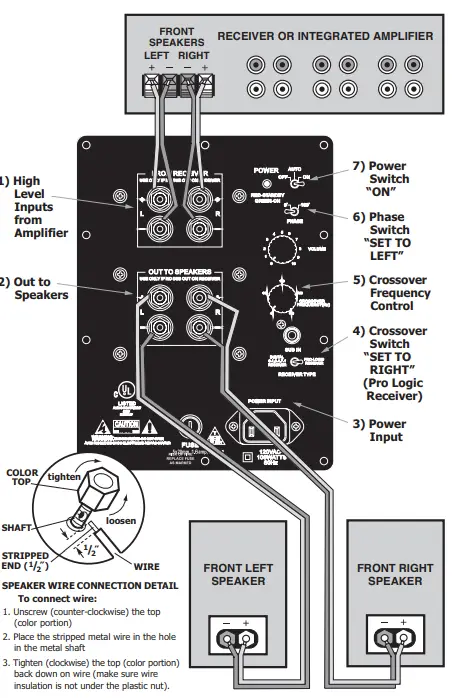
- IMPORTANT: Make sure that ALL stereo system components including the subwoofer are turned OFF before proceeding.
- Measure the length of wire you will need, and then cut and strip Â½Ë of the insulation from each end of the four wires you will run for hookup.
- Locate the front left and right main speak-er terminals on the rear of your receiver and connect two wires to these terminals.
- Route the speaker wire to the subwoofer location (trying to minimize areas where it may be stepped on). Connect the other ends of the speaker wire directly to the HIGH LEVEL INPUTS FROM AMPLIFIER #1. Make sure the left and right wires are hooked to the proper left and right channel and that all (+) terminals go to (+) terminals and all (-) terminals go to (-) terminals. Most speaker wire has some marker to help you keep track of the polarity such as color coding or writing.
- Connect the two remaining speaker wires from OUT TO SPEAKERS #2 to your main left and right speakers. As in step 4 above, make sure the left and right channels and (+) and (-) polarity are correct.
- Connect the included power cord to the POWER INPUT (#3) on the back of your V1220. Then connect its plug to an AC outlet ONLY. Since your V1220 draws a moderately high amount of current, we do not recommend plugging it into a “convenience” outlet (switched or un-switched) found on the back of receivers and other stereo components.
- Set the CROSSOVER SWITCH (#4) to the “Pro Logic Receiver” position (on right). This will enable you to set the crossover from your subwoofer with the CROSSOVER FRE-QUENCY CONTROL (#5) on the back of your V1220 (also see Page 5, #5). In most cases, setting the crossover to the 90Hz setting on the control will yield the best results.
- Set the PHASE SWITCH (#6) to 0°. You will later need to follow instructions on Page 5, #3 for room settings.
- You are now ready to turn your POWER switch (#7) on and enjoy the deep bass you have been waiting for. You can learn more about the “auto” feature on this switch on Page 5, #2.
- See Page 9 for “Initial Listening Test”.
SPEAKER WIRE CONNECTION DETAIL
To connect wire
- Unscrew (counter-clockwise) the top (color portion)
- Place the stripped metal wire in the hole in the metal shaft
- Tighten (clockwise) the top (color portion) back down on wire (make sure wire insulation is not under the plastic nut).
INITIAL LISTENING TEST
- It’s now time to test the V-1220 subwoofer in your listening environment.
Before turning your stereo system and subwoofer on, double-check all connections. - Turn the volume controls on both the subwoofer and your audio receiver all the way down (fully counterclockwise) and check that the PHASE SWITCH is set to 0° and CROSSOVER SWITCH is set to the proper setting (see Page 5, #7).
- Turn your stereo system and then subwoofer to the ON position by using the POWER AUTO-ON SWITCH. (See details on Page 5, #2 regarding AUTO position after performing the “Initial Listening Test”).
- Confirm that the subwoofer’s green POWER INDICATOR LED is glowing. If it isn’t, check the power connections between the subwoofer and the wall outlet.
- Play a musical selection that you are familiar with. Pick a song that has regular low bass beats. Advance the audio receiver’s volume control up to a normal listening level. If you don’t hear sound through your main speakers, turn off the system and check connections. Also consult the troubleshooting tips.
- If sound is coming out of your main speakers, slowly turn the sub amp’s VOLUME CONTROL clockwise until you hear noticeable additional bass. If you don’t hear bass by the time you have advanced the subwoofer’s VOLUME CON-TROL halfway, turn off the system and check connections. Also consult the troubleshooting tips.
- Adjust the sub amp’s VOLUME CONTROL until you are satisfied with the amount of bass (care should be taken not to overdrive the subwoofer to the point of audible distortion). You may want to try several different movies, tapes, com-pact discs or DVDs while determining how high to adjust the volume. The amount of bass will vary from disc to disc and between different types of music.
- Now that you have adjusted the quantity of bass through the volume, it’s time to work on the quality of the bass by experimenting with subwoofer placement in your room and adjusting the crossover and PHASE SWITCH.
- Subwoofer Placement (Also See Page 3 “Placement”) – Subwoofer placement is extremely important because it dramatically affects the bass quality. An optimally placed subwoofer is much more powerful and nice sounding than a poorly placed one. While playing music, move the subwoofer around, in and out of corners, closer and farther from the wall, etc. – as much as the power cord or other connections will allow to determine the best placement. You may also want to try the “subwoofer crawl” technique found in the last paragraph of “Placement”, Page 3.
- Crossover – If you have hooked your subwoofer to a Dolby Digital, DTS, THX, or Bass Management receiver, you will need to refer to your receiver’s user manual for instructions on how to adjust and set your subwoofer crossover from the receiver.
- After you are satisfied with the output of your subwoofer, you can make all your volume settings through your receiver’s volume control. The only time you might want to re-adjust the subwoofer amp’s VOLUME CONTROL is when you encounter a musical selection that has abnormally low – or high – bass.
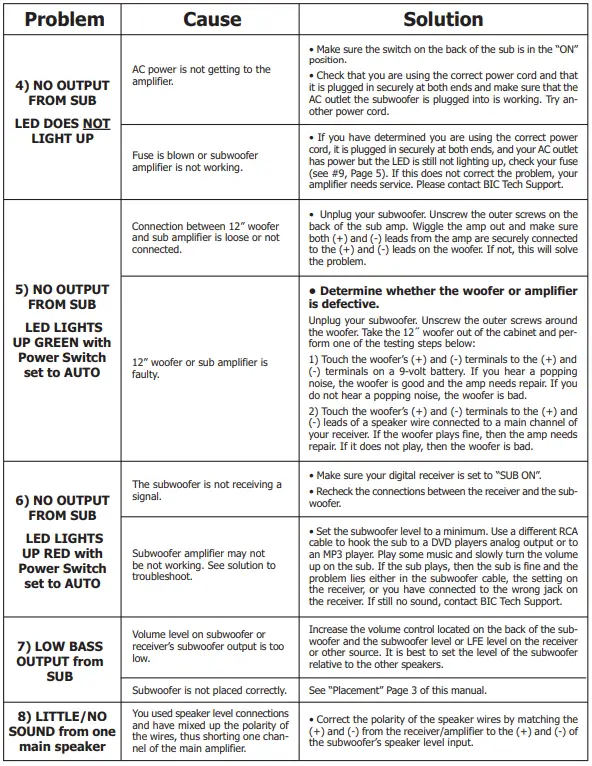
TROUBLESHOOTING GUIDE
If you are having a problem with your subwoofer, please read through this “Trouble Shooting Guide”. Many times problems are actually caused by other items in the system or the subwoofer’s interaction with those items. These problems can easily be resolved with this guide.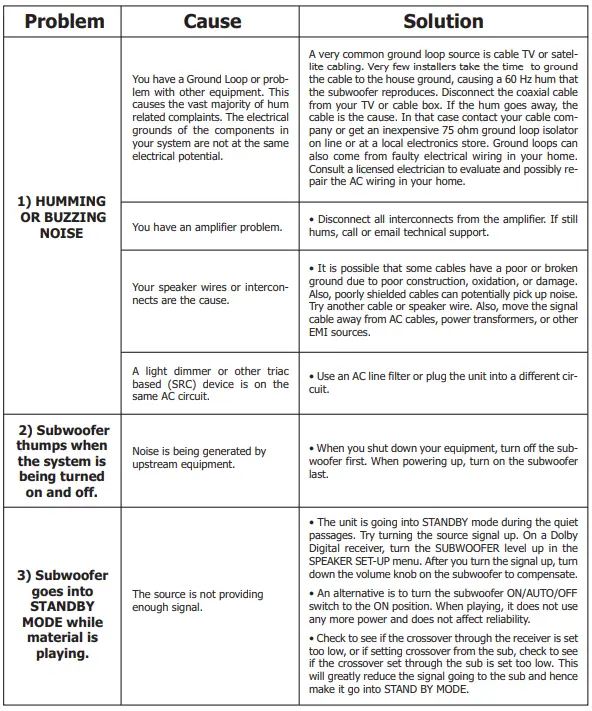
CARING FOR YOUR V-1220 SUBWOOFER
The V-1220 enclosure is finished in a very high quality polymer laminate covering that is both attrac-tive and excellent protection for the wood cabinet. To remove dirt or fingerprints use a damp, soft cloth. You may also use high-quality furniture polish on the wood laminate to maintain the original luster.
Converting V-1220 to 220-240 Volt Operation
The subwoofer can be converted to 220-240 volt operation. For instructions, email [email protected] or contact tech support at 877-558-4242, ext. 2.
WARRANTY INFORMATION
We suggest that you read the LIMITED WARRANTY completely to fully understand your warranty/service coverage. Be sure to save the sales receipt in a safe place. It will be necessary for warranty service.
If you believe your V-1220 requires service, please first check the “Troubleshooting Guide” on page 10 and 11 of this manual. Many times problems are ac-tually caused by other items in the system or the sub-woofers interaction with those items. If you require service, please contact us at 877-558-4242, ext. 2. Our techs will then assist in determining what part requires service and we will, at our option, repair or replace the defective part.
V-1220 Powered Subwoofer Limited Warranty
If the V1220 system proves to be defective in materials or workmanship within seven years (two years on amp and associated electronics) from the date of the original customer’s purchase, we will, at our option, repair or replace the defective part.
DISCLAIMER
THE WARRANTY STATED HERE-IN IS IN LIEU OF ALL OTHER WARRANTIES, EXPRESS OR IMPLIED, INCLUDING MERCHANTABILITY AND FIT-NESS FOR PARTICULAR PURPOSE AND ALL OTHER LI-ABILITIES AND OBLIGATIONS OF B.I.C AMERICA, ALL OF WHICH ARE EXPRESSLY DISCLAIMED. B.I.C AMER-ICA HAS NOT MADE AND DOES NOT HEREBY MAKE ANY OTHER REPRESENTATION, WARRANTY OR COVENANT WITH RESPECT TO THE CONDITION, QUALITY, DURABILITY, DESIGN, OPERATION, CAPAC-ITY, FITNESS FOR USE OR SUITABILITY OF THE B.I.C ELECTRONIC PRODUCT.
Exclusion of Certain Damages
B.I.C America’s liability for any defective product is limited to repair or replacement of the product at our option. B.I.C America shall not be liable for incidental or consequential damages of any kind or character be-cause of product defects. Some states do not allow limitations on how long an implied warranty lasts and/or do not allow the exclusion or limitation of incidental or consequential damages, so the above limitations and exclusions may not apply.
This Warranty Does Not Cover
- Damage caused by abuse, accident, misuse, negligence, or improper operation.
- Products that have been altered or modified.
- Any product whose serial number has been altered, defaced, or removed.
- Normal wear and maintenance.
- Damages caused by shipping. (All claims for shipping damage must be made with the carrier.)
WARRANTY SERVICE
Warranty service must be performed by a B.I.C authorized service center. All warranty repairs must be accompanied by the original bill of sale and a B.I.C warranty claim form. No other documents are acceptable or required. This warranty gives you specific legal rights, and you may also have other rights which vary from state to state.
Due to our continual efforts to improve product quality as new technology and techniques become available, B.I.C America re-serves the right to revise its Speaker Systems specifications without notice.
FAQs
Are BIC V-1220 subwoofers with downward firing good?
The floor can be used as a resonating surface to create a bass sound with more depth. Do you ever experience that rumble in your chest when something explodes in a thriller? A down-firing subwoofer is incredibly effective at producing that effect, which is one of the reasons home theatre systems utilise them so regularly.
Which BIC V-1220 downfiring subwoofer has a better front firing design?
Front-firing drivers in subwoofers produce all of the aforementioned attributes much more effectively than down-firing drivers. This produces bass that is highly impactful and quick-sounding, a feature that is diminished in down-firing systems.
What position is best for a BIC V-1220 downfiring subwoofer?
A down-firing subwoofer can be put on the floor, in a corner, or halfway up a wall, depending on the acoustics of the space. With its corner location, the speaker can more evenly disperse the audio signal around the room by embracing the walls.
How much room is required for a BIC V-1220 down firing sub?
Some advise cutting the sub in half, but I’ve seen cuts as little as an inch have no noticeable impact. In reality, most of JL’s Stealthboxes fall between 1 and 1.5. I’ve completed a couple, and unless space is extremely limited, I aim for 2-3. Make sure there is enough room to accommodate the full suspension travel and then some.
Can you turn a BIC V-1220 subwoofer so that it fires downward?
A front-firing subwoofer should never be placed face down, and neither should a down-firing subwoofer. It’s not meant for that, and using it in that way will ruin the sound profile.
Can carpet be used with a BIC V-1220 downfiring subwoofer?
Most down firing subwoofer installations are made on softer surfaces like carpet. It is better to lay down the fire on carpet rather than on hard, flat surfaces because the latter will reflect sound directly and produce an unpleasant boomy listening experience, even though part of the sound may be absorbed by the carpet.
How far away from speakers should a BIC V-1220 subwoofer be?
The subwoofer should be placed 4 to 5 feet from the left and right front speakers. So my second piece of advice is to stay away from mounting the subwoofer in a corner. Corner placement has many advantages, but the main one is that the sub will produce more bass with less distortion there.
Is it possible to utilise a woofer as a BIC V-1220 subwoofer?
Yes, a subwoofer may frequently be utilised as a subwoofer when a low pass crossover is employed to limit the output to a lower frequency band. The important thing to remember is that, as is typically the case, it depends on the specific speaker.
What ought to be placed beneath my BIC V-1220 subwoofer?
A carpet may help to better balance the sounds in the room, but bare hard flooring may allow deeper subwoofer sound waves to go further without being muffled, depending on where other speakers are placed.
Why does the BIC V-1220 subwoofer have a hole in it?
The holes in subwoofers and other bass speakers are designed to amplify the lower frequencies, which frequently get lost in the background. When your speaker is in use, the front and back are squeezed, which could result in an unbalanced sound.
What occurs if the BIC V-1220 sub bottoms out?
A clacking or pounding sound is typically audible as the voice coil and box come together. When this happens, there are consequences besides poor sound quality. Other components, such as the speaker cone, may gradually distort. Even the voice coil’s separation from the speaker cone could result from it.
How does a BIC V-1220 subwoofer enhance audio quality?
Therefore, smaller speakers are able to produce sound in a more pleasant frequency range. In essence, subwoofers help full-range speakers perform better overall and offer high-quality music without distortion by reducing the effort placed on them.
Does the sound of every BIC V-1220 subwoofer match up?
A few cheaper subwoofers are preferable to one more expensive subwoofer. Finding the Truth: Potentially, or perhaps not. Although it is uncommon to claim, all subwoofers will sound comparable within their linear range.
How can I stop the floor beneath my BIC V-1220 subwoofer from vibrating?
One way to isolate the sub from the floor is to place it on an isolation pad or platform. A flat, stiff piece of material typically sits on top of a thick layer of foam to dampen cabinet vibrations.


