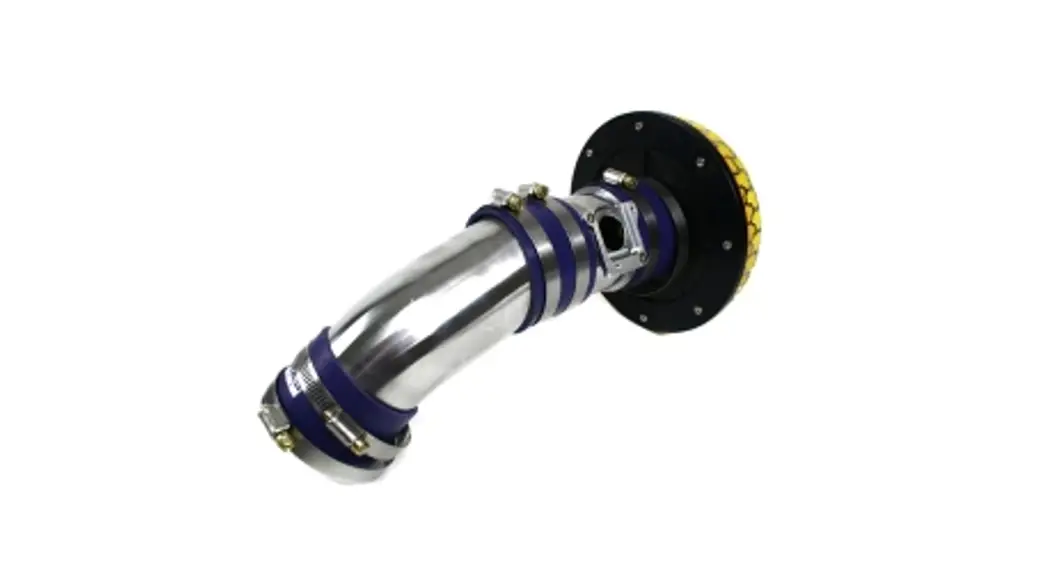
![]() ABA-FD2 Racing Suction Reloaded Intake Kit
ABA-FD2 Racing Suction Reloaded Intake Kit
Instruction Manual
ABA-FD2 Racing Suction Reloaded Intake Kit
70020-AH012
HONDA CIVIC TYPE-R
Model: ABA-FD2
Engine Type: K20A
Model Year: 2007/03-
Ver. 20090601
NOTICE
This manual assumes that you have and know how to use the tools and equipment necessary to safely perform service operations on your vehicle. This manual assumes that you are familiar with typical automotive systems and basic service and repair procedures. Do not attempt to carry out the operations shown in this manual unless these assumptions are correct. Always have access to a factory repair manual. To avoid injury, follow the safety precautions contained in the factory repair manual.
SAFETY PRECAUTIONS
WARNING
- To prevent electrical damage/burns/fire, always:
– Disconnect the negative terminal of the battery before beginning installation.
– When disconnecting wires/connectors, take extra care to avoid breaking/snapping the connectors.
CAUTION
- Do not misuse this product.
– Misuse of this product may lead to engine damage.
– Misuse of this product may lead to the loss of its original function. - Prior to installation, make sure the engine bay temperature has cooled to approximately 40℃/104°F
– Failure to let the engine cool down properly can lead to severe burns. - Insert clean rags into open piping to prevent contaminants from entering the pipes.
– If neglected, contaminants in the piping can lead to engine damage.
– Make sure that all of the parts listed in the Parts List are included in the kit.
– Reference the factory service manual for the vehicle when removing factory parts.
– Be careful when handling this product; avoid dropping or subjecting it to excessive impacts. Failure to do so may result in product damage or improper installation.
– Use the proper tools when tightening nuts and bolts. If over-tightened, the bolts may become damaged.
– Keep the removed factory parts in a safe place for ease of re-installation at a later date (if necessary). When reinstallation of the removed factory parts, make sure to reinstall them correctly.
CAUTION
- Replace the air filter element at regular intervals:
(Recommended) Replace every 3,000~5,000Km/2,000-3,000miles or every 3~6 months. Replacement filter elements are sold separately.
※ Do not wash the filter elements as the filtration properties will be degraded.
※ However, there are certain conditions where, depending on dirt buildup, the filter may need to be replaced earlier than the above-recommended intervals.
If the vehicle and the product are not maintained properly as mentioned above, the product cannot perform properly, and the airflow meter sensor may not be able to detect the intake air volume accurately; it may lead to engine damage or bad conditions.
INSTALLATION PROCEDURE
1. REMOVAL OF FACTORY PARTS
- Remove the negative terminal from the battery.
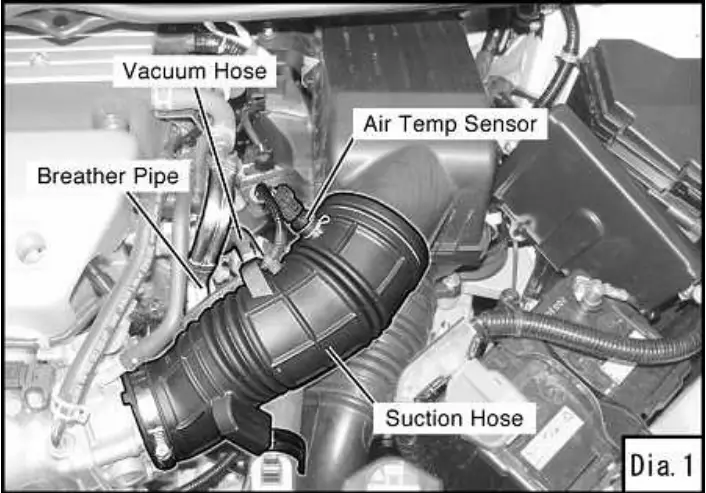
- Remove the hose clamp, and disconnect the vacuum hose and the breather pipe from the suction hose. (Dia.1)
- Disconnect the air temp sensor from the suction hose. (Dia.1)
- Loosen the hose clamp, and remove the suction hose. (Dia.1)

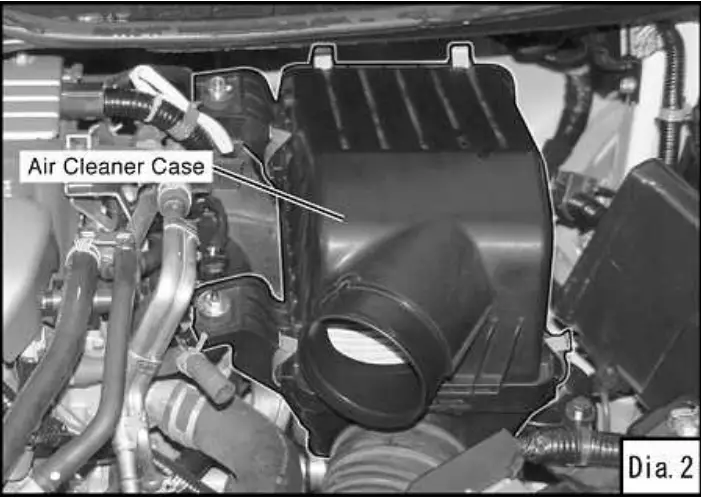
- Loosen the nut and bolts, and remove the air cleaner case. (Dia.2)

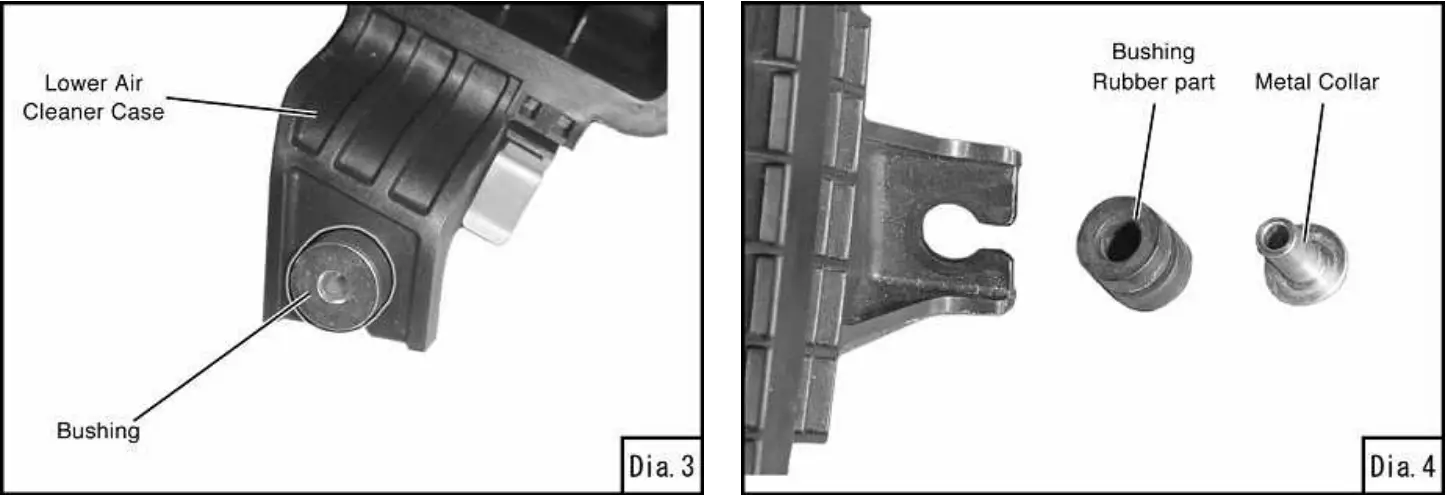
- Remove 3 bushings from the lower air cleaner case.
To remove the bushing, first remove the metal collar from the center; then remove the remained rubber part. (Dia.3, 4)
2. INSTALLING KIT PARTS
Advice:
When removing the breather pipe/water bypass assembly, a small amount of coolant may leak.
Please either drain the coolant before removal or ensure appropriate measures are taken to prevent coolant leakage onto other parts of the engine. After installing the kit, refill the coolant, and bleed the air from the radiator before starting the engine for the first time.
- Loosen the hose clamps, and remove the breather pipe/water bypass assembly (Dia.5)

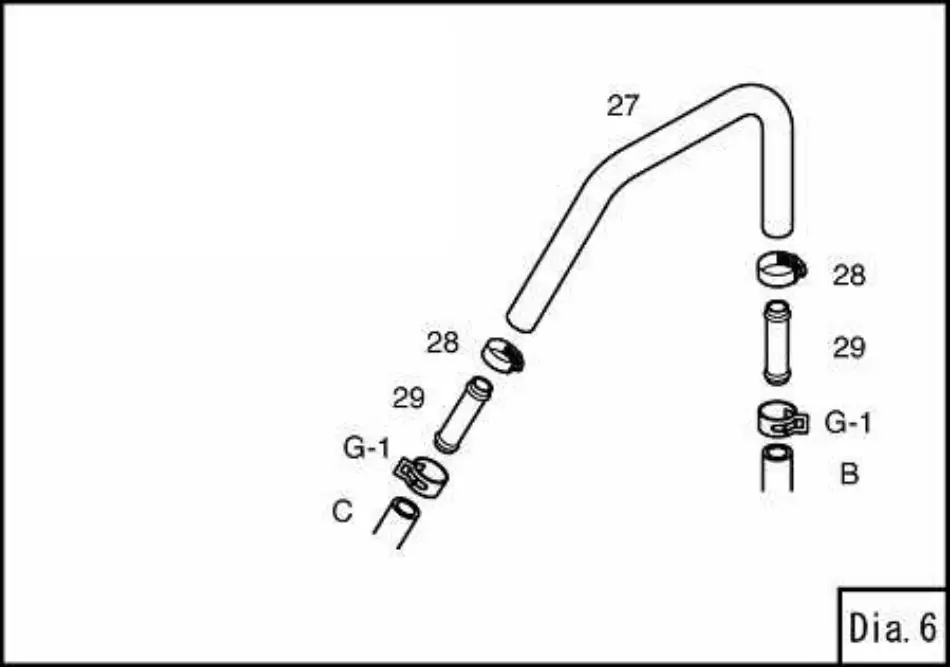
- Install the Hose φ8. (Dia.5,6)
 27. Hose ∅ 8
28. Hose Clamp #4
29. Joint Pipe 08
G-1. Hose Clamp (Factory) - Install the bushings removed from the lower air cleaner case to the heat insulator and the heat insulator bracket. The removed metal collars must be reinstalled as well. (Dia.7)

- Install the heat insulator bracket No.1, and No.2 to the heat insulator. (Dia.8)
 8. Heat Insulator Bracket No.1
9. Heat Insulator Bracket No.2
11. Heat Insulator
17. Bolt M6-25
19. Spring Washer M6
20. Flat Washer M6
22. Nut M6
23. Rubber Bush - Install the Fitting 10mm to the suction pipe. To prevent air leakage, wrap the thread section with tape. (Dia.9)
Advice:
After tightening the hose fitting by hand, tighten them further one to two times with an appropriate tool. (It is not necessary to tighten the fitting to the point where the nut touches the pipe.) To prevent air leakage, wrap the threaded section with tape.
After tightening the hose fitting by hand, tighten them further 1 to 2 times with an appropriate tool. (It is not necessary to tighten the fitting to the point where the nut touches the pipe.)
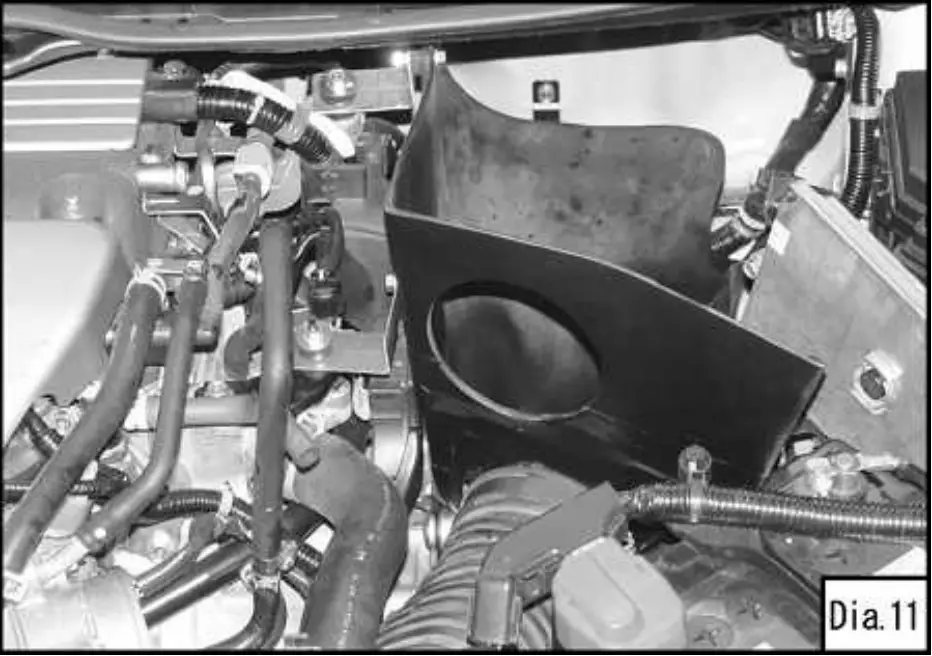
- Temporarily place the heat insulator on the vehicle. Do not tighten bolts and nuts at this time. (Dia.11)

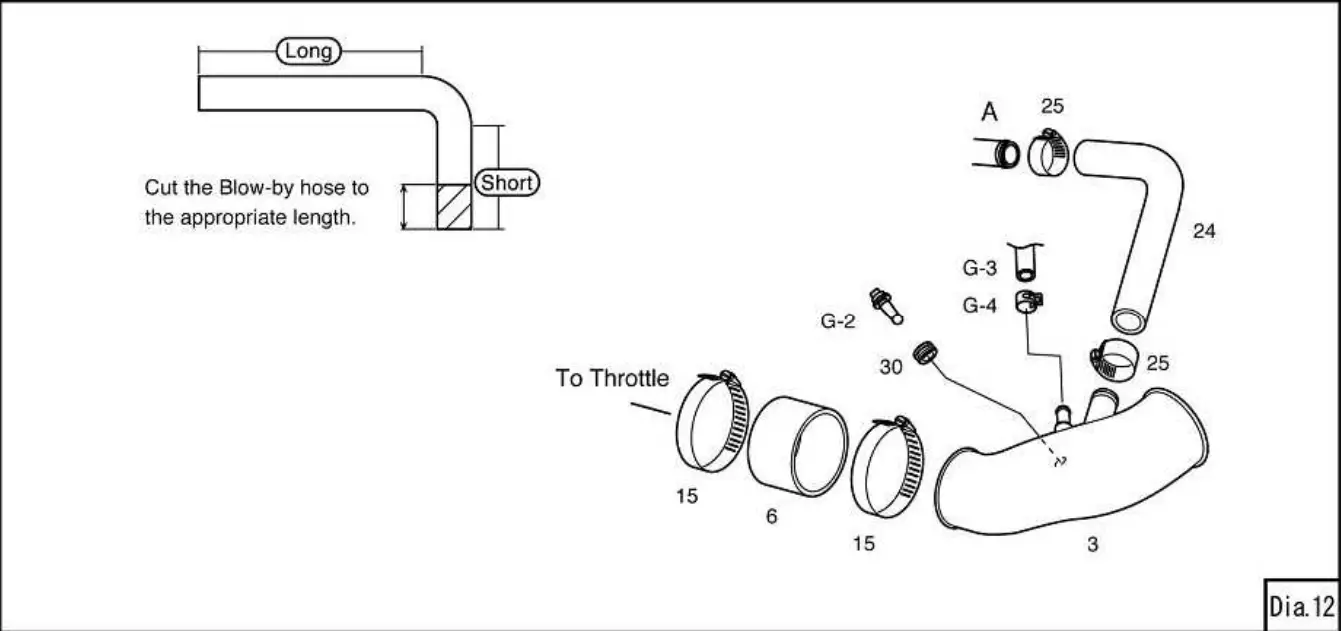
- Temporarily install suction pipe No.2 to the throttle. (Dia.10,12).
 3. Suction Pipe No.2
6. Joint Hose 4)70
15. Hose Clamp #48
24. Blow-by Hose
25. Hose Clamp #8
30. Grommet
G-2. Air Temp Sensor (Factory)
G-3. Vacuum Hose (Factory)
G-4. Hose Clamp (Factory) - Route the Suction Pipe No.1 from the opening of the heat insulator, and temporarily secure the pipe with the Air Cleaner Bracket and the Universal Bracket. (Dia.13)
When securing the pipe, attach the Sponge Tape to the gap between the Suction Pipe No.1 and the opening of the intake funnel’s heat insulator. ADVICE
If the joint hose cannot be inserted easily, apply a lubricant such as soap water inside the joint hose.
Wipe off any excess moisture after inserting the joint hose.1. Filter Assy
2. Suction Pipe No.1
3. Suction Pipe No.2
4. Joint Hose 4)100
5. Joint Hose (1)80
7. Air Cleaner Bracket
8. Heat Insulator Bracket No.1
9. Heat Insulator Bracket No.2
10. Universal Bracket
11. Heat Insulator
12. Intake Funnel13. Hose Clamp #64
14. Hose Clamp #56
16. Bolt M6-45
18. Bolt M6-15
19. Spring Washer M6
20. Flat Washer M6
21. Flange Nut M6
23. Rubber Bush
G-5. Nut (Factory•D)
G-6. Bolt (Factory • E)
G-7. Air Duct (Factory) - Position the kit parts where they do not come in contact with the vehicle body and/or other parts. Tighten the hose clamps and bolts. (Dia.15)
ADVICE: Use of proper tools can help avoid overtightening of hose clamps. (Screwdrivers are recommended.
Do not use boxed wrenches since they tend to use more force.) If over-tightened, the air cleaner may bend or become damaged.
(Tightening torque: 2.0~3.0 N-m {0.2~0.3 kgm}) 1. Position Universal Bracket onto Joint Hose as shown.
2. Slip the Hose Clamp over the bracket and onto the hose. Tighten the clamp. - Attach the Sponge Tape where the kit parts and/or the heat insulator may come in contact with any other vehicle’s parts.

- Reconnect the air temp sensor connector.
- Reconnect the battery negative terminal.

 27. Hose ∅ 8
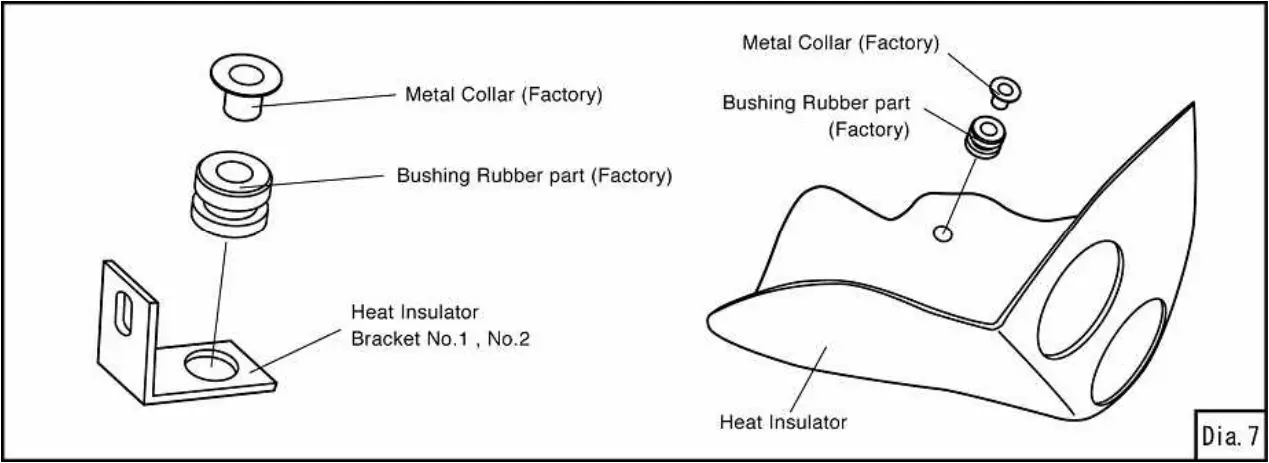
 8. Heat Insulator Bracket No.1
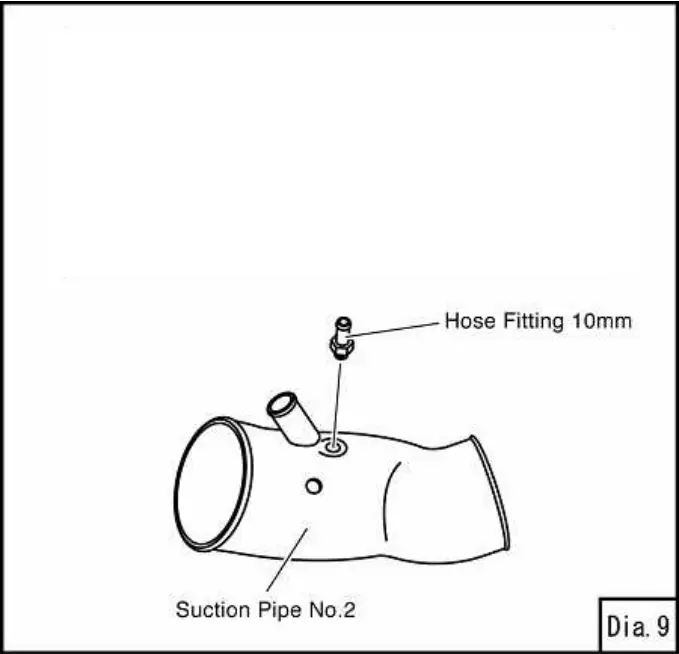 To prevent air leakage, wrap the threaded section with tape.
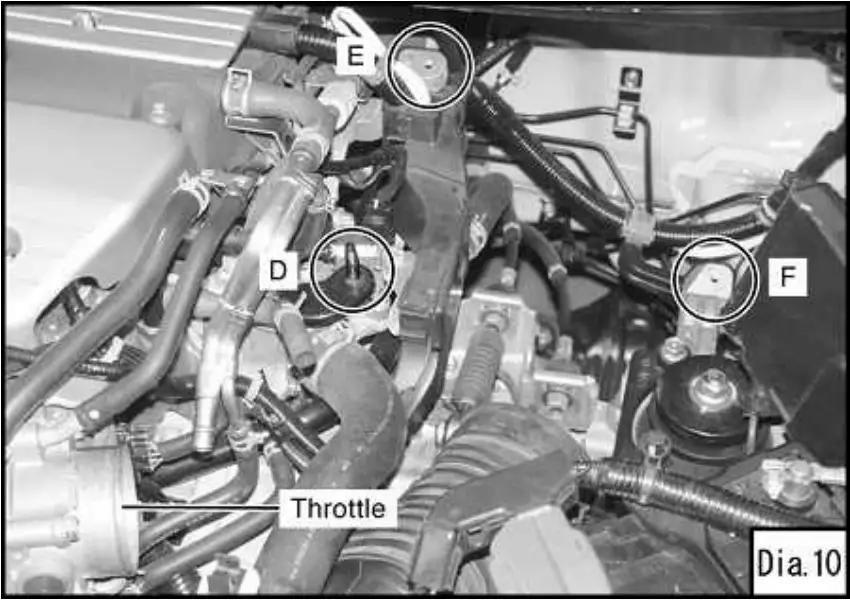
 3. Suction Pipe No.2
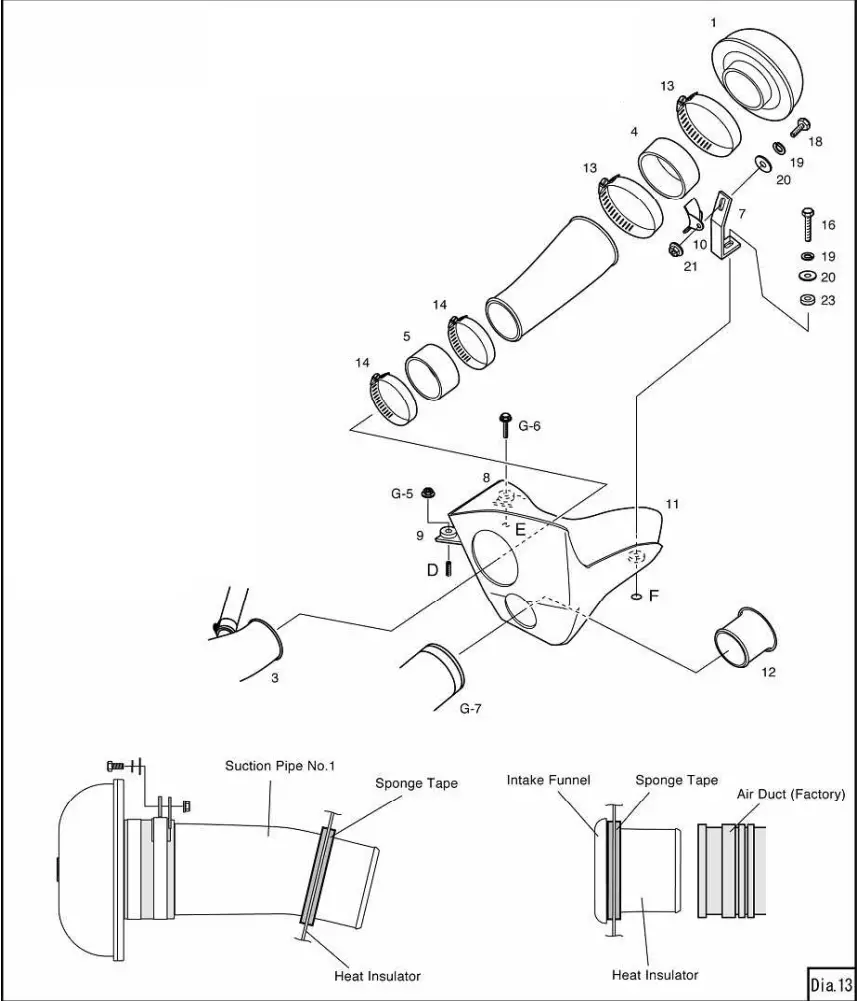 ADVICE
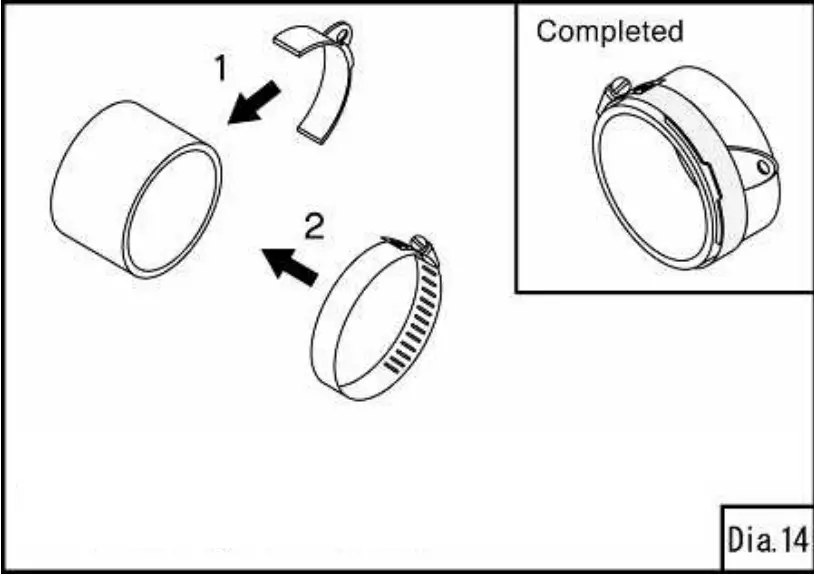 1. Position Universal Bracket onto Joint Hose as shown.
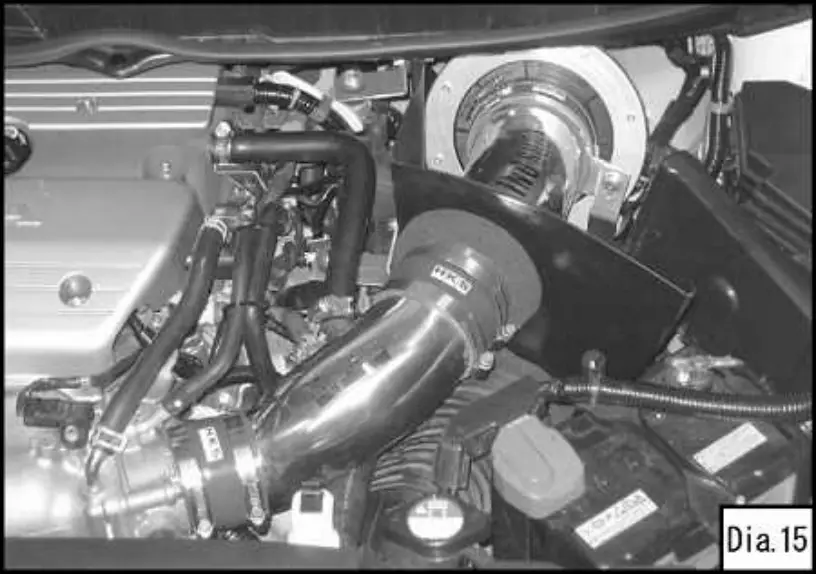
![]() CAUTION
CAUTION
Once the installation is complete, refill the coolant, bleed the air from the radiator (after starting the engine), and make sure the coolant is not leaking.
Confirmation after installation
Check the following after the installation process is complete.
1. Check the following before starting the engine:
- Make sure all pipes and hoses are routed and connected correctly.
- Make sure all hose clamps are tightened.
- Make sure the negative cable terminal is securely connected to the battery.
- Make sure all bolts and nuts are tightened.
- Make sure all installed components do not come in contact with other parts.
2. Start the engine and check the following:
- Make sure the air is not leaking.
- Make sure the RPM rises smoothly when revving the engine 2-3 times while in neutral.
- Make sure the installed parts are not hitting each other.
- Make sure there are no unusual conditions found while idling.
- Make sure there are no loose bolts after turning off the engine. Re-tighten if necessary.
MAINTENANCE
Proper maintenance of this product is necessary in order to maintain its safety, reliability, and function of this product.
Maintenance is the responsibility of the driver/owner.
- If work needs to be performed outside the scope of this manual, consult a professional.
- If the vehicle gets damaged, have the repairs performed by a professional.
- If you experience any abnormal noises, smells, or vibrations from the vehicle while driving, reference the vehicle’s Owner’s Manual.
- If this product is ever re-sold, please give this Instruction Manual to the new owner.
- When removing this product from the vehicle, please consult a professional.
PARTS LIST
| No. | Description | Qty | Image | Remarks |
| 1 | Filter Assy | 1 |  | φ200- 100 |
| 2 | Suction Pipe No.1 | |||
| 3 | Suction Pipe No.2 | 1 | ||
| 4 | Joint Hose | 1 | φ100 | |
| 5 | Joint Hose | 1 | φ80 | |
| 6 | Joint Hose | 1 | φ70 | |
| 7 | Air Cleaner Bracket | 1 | ||
| 8 | Heat Insulator BracketNo.1 | 1 | ||
| 9 | Heat Insulator Bracket No.2 | 1 | ||
| 10 | Universal Bracket | 1 | ||
| 11 | Heat Insulator | 1 | ||
| 12 | Intake Funnel | 1 |
| No. | Description | Qty | Image | Remarks |
| 13 | Hose Clamp | 2 |  | #64 |
| 14 | Hose Clamp | 2 | #56 | |
| 15 | Hose Clamp | 2 | #48 | |
| 16 | Bolt | 1 | M6-45 | |
| 17 | Bolt | 2 | M6-25 | |
| 18 | Bolt | 1 | M6-15 | |
| 19 | Spring Washer | 4 | M6 | |
| 20 | Flat Washer | 6 | M6 | |
| 21 | Flange Nut | 1 | M6 | |
| 22 | Nut | 2 | M6 | |
| 23 | Rubber Bush | 5 | ||
| 24 | Blow-by Hose | 1 | φ16 |
| No. | Description | Qty | Image | Remarks |
| 25 | Hose Clamp | 2 |  | #8 |
| 26 | Hose Fitting | 1 | φ10 | |
| 27 | Hose | 1 | φ8 | |
| 28 | Hose Clamp | 2 | #4 | |
| 29 | Joint Pipe | 1 | φ8 | |
| 30 | Grommet | 1 | ||
| 31 | SpongeTape | 4 | ||
| 32 | Tie Wrap | 5 | ||
| 33 | Sticker | 1 | ||
| 34 | Instruction Manual | 1 | ||
| 35 | Instruction Manual | 1 | English |
![]() E04521-H50080-00
E04521-H50080-00


