![]()
SPECIAL EDITION (SE)
OPERATION MANUAL
Version 3
![]()
©2011 Bob’s Space Racers Incorporated
427 15th Street, Daytona Beach, Florida 32117
Tel: (386) 677-0761 Fax: (386) 677-0794
BOB’S SPACE RACERS ®
WHAC-A-MOLE® SE ARCADE MANUAL BSR V3.0
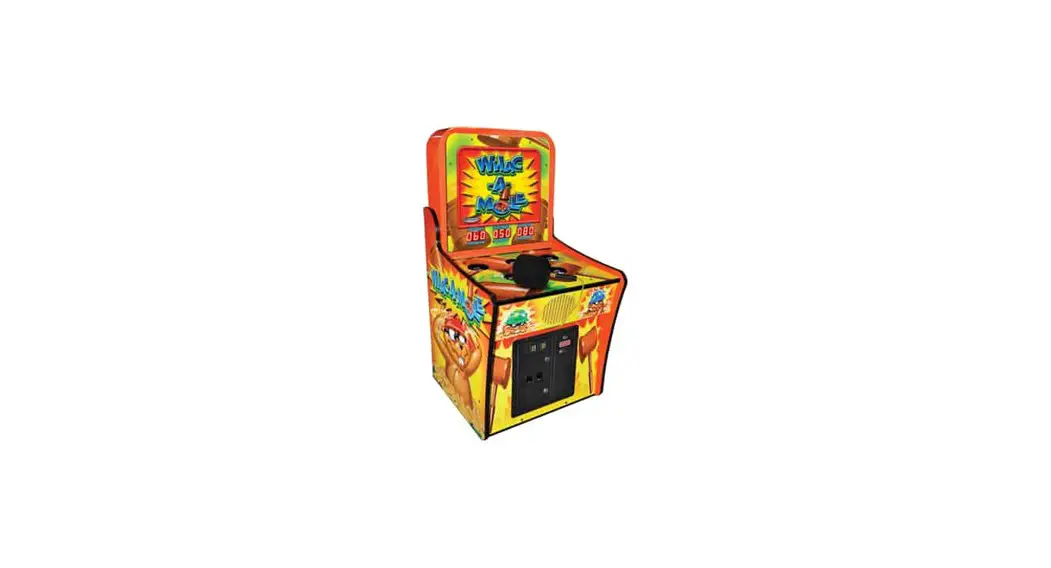
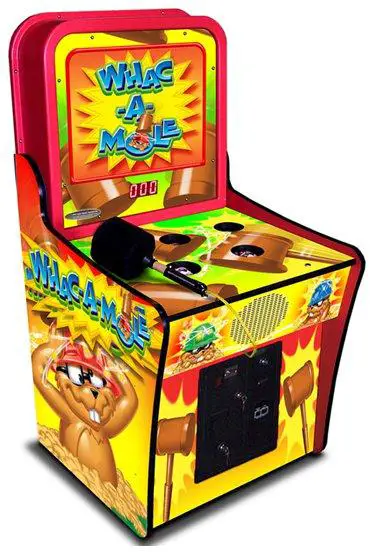
MODEL VIEW
Whac-A-Mole® SE Version 3
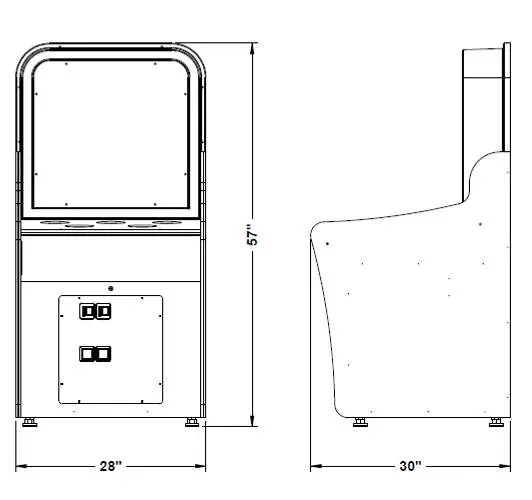
SPECIFICATIONS
Rated power supply:
110VAC ±5%, 60 Hz.
(Note: As for the actual voltage, please refer to the label on the game).
Power consumption:
Minimum 125W (1.14 Amps)
Dimensions:
28” W x 30” D x 57” H
Weight:
317 lbs
NOTE: Game parameters are subject to change without notice.
INTRODUCTION
Overview
Thank you for purchasing the new Whac-A-Mole® SE from Bob’s space Racers. Built on a long tradition of value, the new “SE” version Whac-A-Mole® retains all of the great game play of the original game yet is specifically designed for today’s Arcade environment. The new game uses technology specifically developed for this application.
Features:
New Solenoid Operation
The new solenoid design uses a heavy duty steel encapsulated high temperature bobbin developed specifically for this game. The “free floating” mounting system assures long life for the integral brass sleeve as well as the Annealed Chrome mole (solenoid) shafts. This design eliminates the air compressor, pistons and associated parts of the original design. This results in a lower cost, simpler and quieter design that is specifically tailored to the Arcade environment.
Cabinet Design
The new cabinet is designed to be lighter to make it easier to handle. It also incorporates a new marquee design that is fully back lit to attract players from across the room. New exciting graphics including a cute looking updated mole design to complete the package.
Electronics
The game utilizes all solid state circuitry for the ultimate in reliability.
Programming
The game has extensive programming options available to customize the game to your location.
Self Diagnostics
The game checks itself at power up to be sure that all of the solenoids and associated sensors and switches are functioning properly. If a failure is discovered, the game will display the problem on the score LED’s.
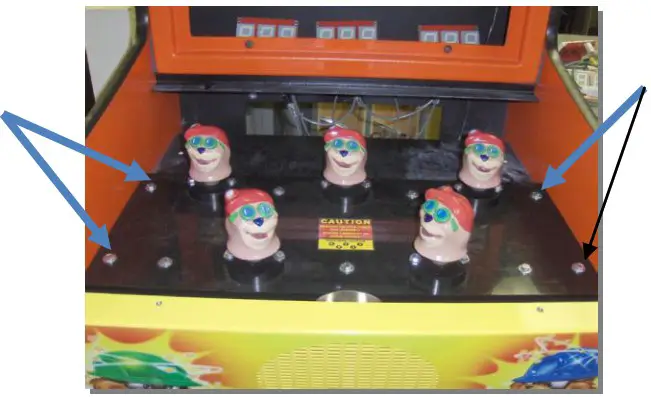
GAME PLAY
The game play is the same great play that generations have been entertained by. Hit those moles when they pop out of the holes. The faster you get, the faster they get. There is a special reward for getting the high score.
The score, high score of the day and bonus ticket amounts are indicated on the scoreboard.
The game plays until time runs out.
IMPORTANT SAFETY INFORMATION
WARNING: Unplug the game from the AC wall receptacle when servicing this product. Failure to do so could result in serious injury to yourself or others.
Use only a GROUNDED AC receptacle. Failure to do so could result in improper operation or damage to the game and could void your warranty. If you are unsure that your AC receptacle is properly grounded, have a qualified electrician perform this check for you.
Always be sure power to the game is turned off when doing even routine maintenance. Otherwise moving parts could activate unexpectedly and cause injury.
This product is heavy as necessitated by the design. When moving this game, be sure you have adequate help. Use a suitable dolly or hand truck where practical. Use back support when needed.
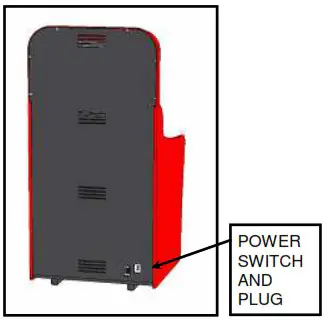
REAR VIEW
IF YOU WISH TO SET YOUR GAME UP DIFFERENTLY FROM THE FACTORY SETTINGS, PLEASE REFER TO THE PROGRAMMING SECTION OF THE MANUAL.
SET UP
- Be sure that the game is on a level surface. If the game is rocking on the floor use suitable shims to remove the rocking of the game.
- Be sure to plug the game into the proper A.C. GROUNDED receptacle. Do not use long extension cords unless absolutely necessary and if so, be sure it is a heavy duty cord of at least 16 Ga. and no longer than 20 ft. Check the label on the back of the game to make sure the power requirements of the game match that of your location.
- Turn the game on and check to be sure there are no unusual sounds and that everything appears to be working correctly. When you first turn the game on, you will notice all of the moles taking turns popping up out of their holes. This is part of the diagnostic self test.
PACKAGE CONTENTS
Be sure to check that you have received all packages indicated below.
(1) Game Unit
(2) Accessories
| NO | NAME | SPECIFICATION | QTY | ILLUSTRATION | NOTE |
| 1 | Power cord | 10A/250V, 10 feet (Part # E0027145) | 1 |  | Wrapped up inside coin box. |
| 2 | Manual on CD | (M0013000) English | 1 | 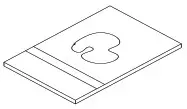 | In a bag in the games ticket holder. |
| 3 | Keys | 2111 | 8 | 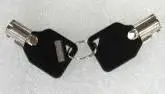 | Coin Box |
| 5 | Keys | 2112 | 6 |  | Deltronic Coin Mechanism |
INSTALLATION
Check the parts list before installation. Verify that all parts that have been received and are in good condition.
ATTENTION
• For indoor use only!
Play zone (Operation Zone):
This machine requires space for playing the game. Be sure to leave enough space when installing the machine.
![]() WARNING
WARNING
- Be sure to check the Electrical Specifications. Ensure that this product is compatible with your location’s power supply, voltage and frequency requirement.
A plate describing Electrical Specifications is attached to the product. Non- compliance with the Electrical Specifications can cause a fire and electric shock. - Putting many loads on one electrical outlet can cause generation of heat and a fire resulting from overload.
Locations to avoid:
WARNING
The machine is designed for indoor use only. Never install this machine outdoors or in any of the following:
- Locations exposed to direct sunlight
- Locations subject to rain or water leakage.
- Unstable locations or locations subject to vibration.
- Dusty, hot, or damp locations.
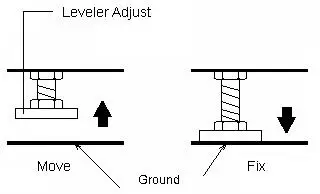
GAME LEVELING
Install this machine on a flat surface. Adjust levelers to lift the legs and level game.
Make sure that the machine is level with the floor. If the machine is not level, the game may not play well.
![]() WARNING
WARNING
- Disconnect game power before moving
- When moving the game, DO NOT slide the game across the floor
- Ensure the game is level before connecting the power
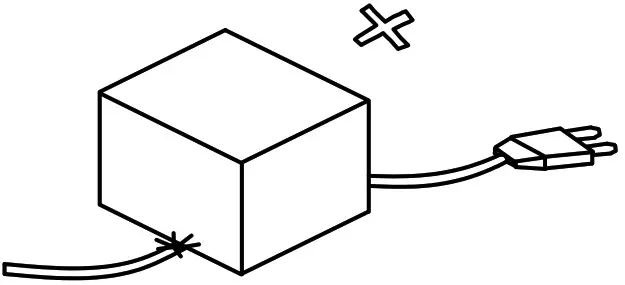
CONNECTING THE POWER CORD
- Insert the socket end of power cord into the power input of the game.
- Insert the power cord plug into a service outlet.
WARNING
- Do not put heavy items on power cord.

- Hold the power plug instead of the wire to draw the power cord out of the socket.

- Do not touch the power plug with wet hands.

- Do not draw or twist the cord or near a heat source.
- Do not place the cord where the player can easily trip over or come in contact with it.

- Operate this game with the correct power and fuse configuration. (The machine’s operating supply Voltage is 110VAC, please refer to the label on the machine. Improper voltage hookup may damage the machine, and may cause an electrical shock to an operator.
INSTRUCTION FOR PLAY
- Insert coin(s), the game starts.
- The object of the game is to hit the moles heads with the hammer as soon as the mole sticks its head out of the hole.
- Beat the high score to receive bonus tickets.
- Progressive speed modes have been added to increase the level of skill that it takes to achieve a higher score.
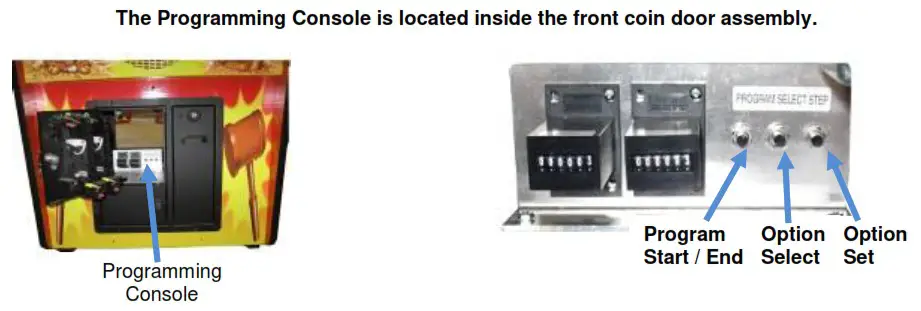
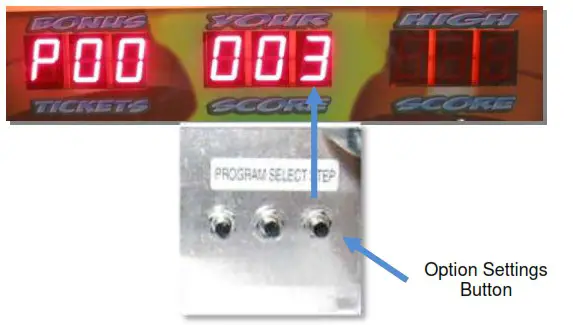
PROGRAMMING OPTIONS
The game option settings are readable only by the game operator for the purpose of customizing the game to suit their location.
Steps for Programming
 Press the “PROGRAMMING” button once to enter the programming mode. The game display will show the first program option and setting as shown below.
- Press the “SELECT” button to scroll through the various options (see “Programming Chart” below).

- Press the “STEP” button to scroll through the various settings for each option.
 Press the “PROGRAMMING” button once to enter the programming mode. The game display will show the first program option and setting as shown below.

Programming Chart
Options with Default Settings ( )
| P0 – P12 Game Volume: [P00] 1-6 (3) Coins Per Play: [P01] 1-4 (2) Plays Per Credit: [P02] 0-9 (1) Game Time (secs): [P03] 15-60 (20) Bonus Time: [P04] 0-10 (0) Minimum Tickets: [P05] 0-4 (1) Points Per Ticket: [P06] 0-150 (20) Attract Interval: [P07] 0-5 (1) Attract Sound: [P08] 0-1 (1) Bonus Minimum: [P09] 0-100 (25) Bell Time: [P10] 0-5 (3) | Beacon Light Time: [P11] 0-10 (8) Beacon / Bell Settings: [P12] (2)PA – PF, PR Bonus Adder: [P0A] 0-5 (1) High Score Default: [P0B] 250-800 (250) Maximum Bonus Tickets: [P0C] 0-250 (100) Mole Up Time Limit: [P0D] 1-5 (3) Attract Head Movement: [P0E] 0-1 (1) Progressive Speed Up: [P0F] 0-3 (1) Reset Defaults: [Pr] 0-1 (0) |
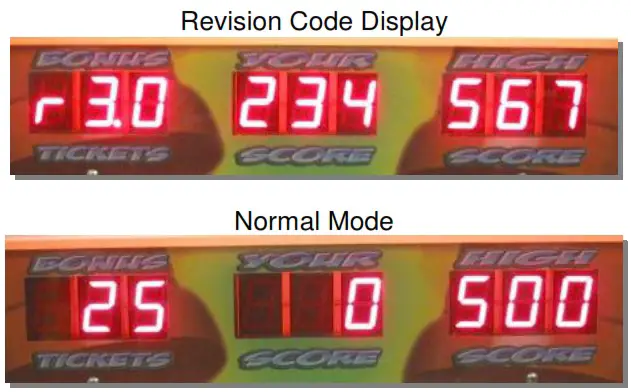
4. Press the “PROGRAMMING” button once again to EXIT the programming mode. The display will show the revision screen first, followed by the Mole heads moving up and down, before returning to normal mode as shown below. You are now ready to play the game.
MAINTENANCE AND INSPECTION
Maintenance
Due to the design of the machine, very little periodic maintenance is required.
Start the game and verify the correct operation before putting the game into everyday operations.
Clean the surface of the game as needed.
After about a month of game operation, check to be sure all parts are secure and in proper working order.
- Remove power before servicing game.
To avoid a short circuit, the power must be removed before touching the inside of the game. - Choose the appropriate replacement parts.
Using the wrong parts could lead to malfunction or damage to the game and components. - Do not substitute or change equipment, without authorization.
Doing so could lead to a short circuit and machine malfunction, or fire. - Do not put containers of water, cups or soda cans on the machine. In addition, chemicals or heavy items should not be allowed around the game.
The spill could cause a short circuit. Falling items could injure people or destroy the machine.
Cleaning
CLEANING – Clean the outer surfaces of the game with a commercial spray type cleaner. DO NOT however, use glass cleaner or commercial sprays on the marquee graphic panel. Use a good quality spray type furniture polish to keep the game looking good.
Vacuum the inside of the game occasionally to help keep the dust and ticket debris off of all the optical sensors.
Clean Mole Shafts Regularly
TEST MODE
Sensor and Coin Test Mode:
- With the game power on, press the “Program” button on the Programming Console. This will take you into programming mode.
- While in programming mode:
Manually pull up the mole heads and if you hear the mole sounds then the sensor is working correctly.
Manually press the coin switch and if you hear a coin sound then the switch is working correctly. - After the desired changes are made to the programming options, press and hold the “Program” button on the unit. This will restart the game in game play mode with the desired changes updated into the game play.
ERROR CODES
- If E1 is displayed on the center display, there are no tickets in the ticket dispenser.
- If the codes 810, 820, 830, 840, or 850 are displayed on the center display there is a sensor failure.
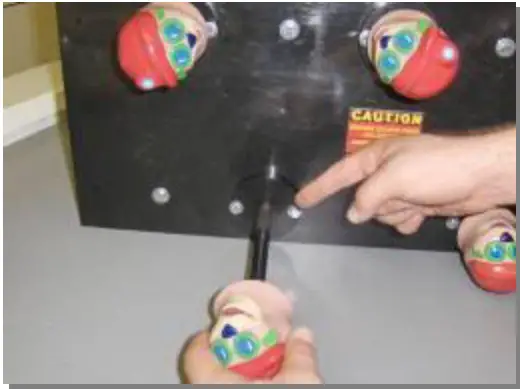
COIL BED SERVICING
The coil bed is the assembly that houses the solenoids, score sensors and Whac-A-Mole® heads. This unit is built as an assembly to make servicing and repair easy. The entire unit removes from the game as a sub-assembly in just a couple of minutes.
SHAFT CLEANING
Procedure 1
A quick fix for a Shaft that is sluggish
Procedure 2
Cleaning Shafts without removing them from the game unit
This procedure should be performed every 2 weeks
Procedure 3
Removing Whac-A-Mole® Heads for cleaning
This procedure should be performed every 3 months or less if required
Procedure 1 Instructions
A quick fix for a Shaft that is sluggish
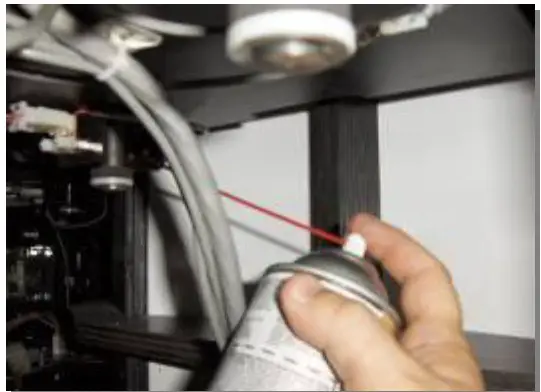
Spray the Shaft with an all purpose Silicone Lubricant.
Note: Do not use graphite spray. It is conductive and you could short out the electrical wiring and/or the Printed Circuit Board (PCB).
Procedure 2 Instructions
Cleaning Mole Head Shafts without removing them from the game unit
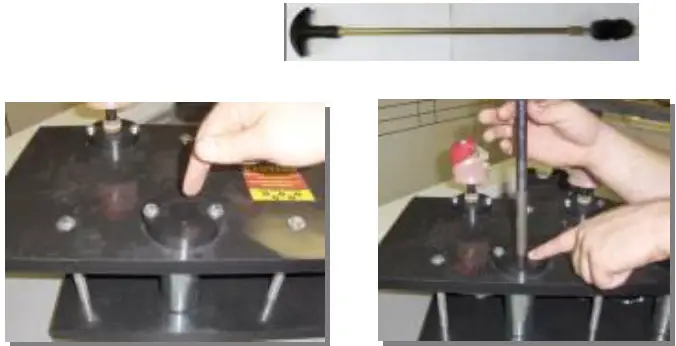
1. Open the front of the game unit for access
3. Remove the clip using a short flathead screwdriver.
3. Remove the washers from the shaft.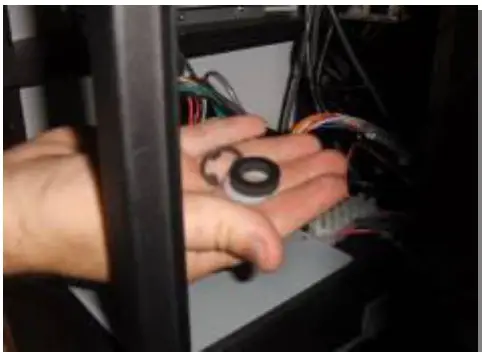
4. Lift the Mole Head out of the unit.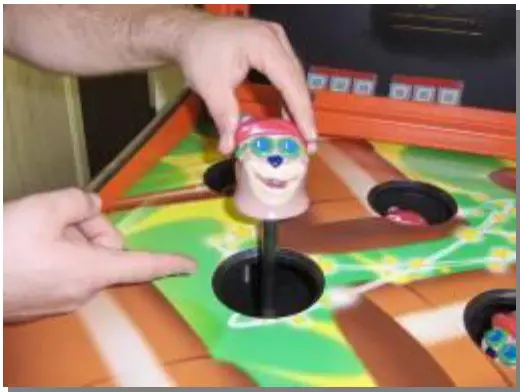
5. Remove the 3 washers from the top of the shaft.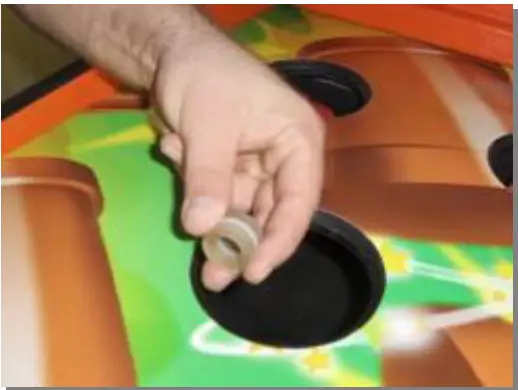
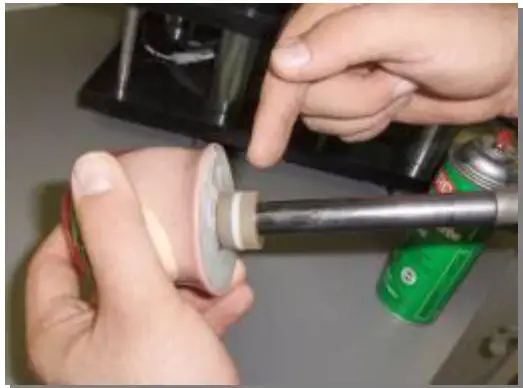
5. Clean the shaft using a soft cloth.
Use an electrical contact / anti corrosion cleaner such as ElectriCorr VPCL – 239 or equivalent.Polish the shaft with Scotch bright.Remove any rust spots with an emery cloth.
7. Reassemble the shaft in the reverse order.
Procedure 3 Instructions
Removing Mole Heads for cleaning
- Turn off the A.C. power to the game.
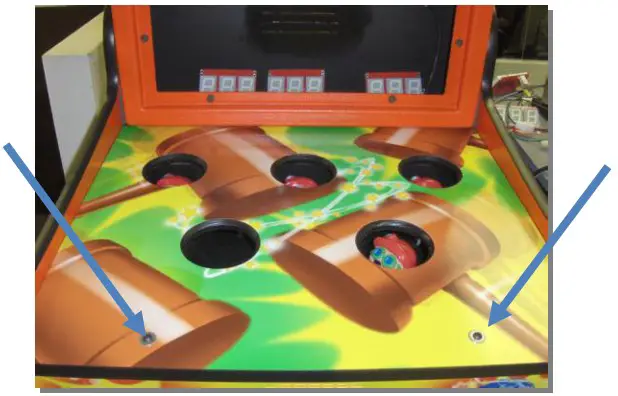
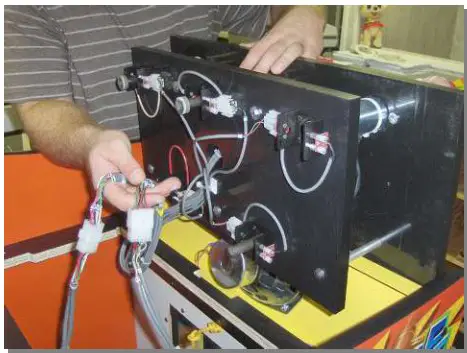
- Remove the 2 bolts that attach the playfield to the top of the main cabinet.

- Lift the playfield up and pull forward to remove it from the unit.

- Remove the 4 bolts and washers (7/16”) that secure the coil bed to the cabinet.

- Remove the coil bed assembly by carefully lifting it up.

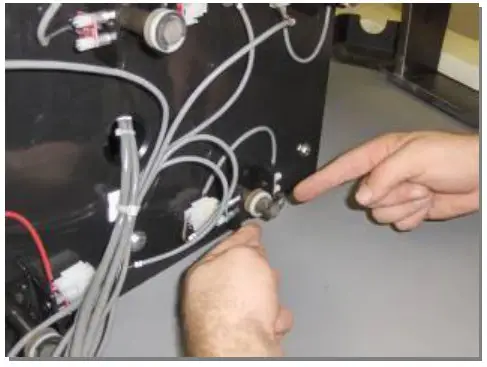
- Disconnect the two Molex connectors that are connected to the coil bed assembly.
 WARNING! REMOVE WITH CARE. SENSORS ARE EASILY BROKEN!!!!!
 - Remove the clip using needle nose pliers or a small screwdriver.
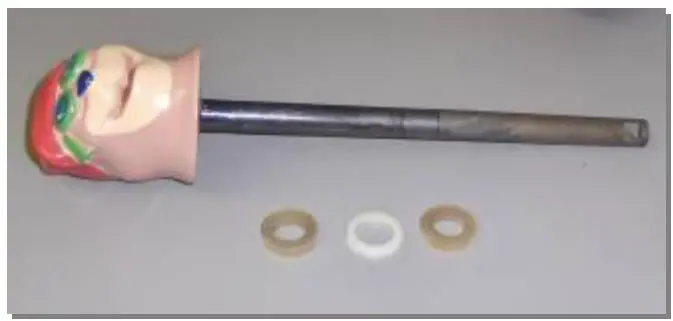
* Make note of the order of the washers on the top and bottom of the shaft.
- Remove Mole Head from the Assembly by pulling it out and then remove the 3 washers from the shaft.
 Clean the shaft using a soft cloth and an electrical contact / anti corrosion cleaner such as ElectriCorr VPCL – 239 or equivalent.
Polish the shaft with Scotch bright
Remove any rust spots with an emery cloth. - Spray the shaft with Dry Graphite Lubricant.

- Clean the bore in the assembly with a gun cleaning kit. *Gun cleaning kits can be purchased at a local Wal-Mart store.

- Reassemble the washers on the top part of the shaft. *Note the correct order

- Insert the shaft into the assembly.
- Reassembly the washers. Note the correct order Snap the clip back in place.
Repeat these steps for each of the Mole Head shafts
- Return the coil bed assembly to the game
Plug in the Molex plug connectors.
- Secure the coil bed assembly to the unit using the 4 bolts and washers.

- Return the playfield area to the unit and attach the 2 bolts.

 WARNING! REMOVE WITH CARE. SENSORS ARE EASILY BROKEN!!!!!
 Clean the shaft using a soft cloth and an electrical contact / anti corrosion cleaner such as ElectriCorr VPCL – 239 or equivalent.
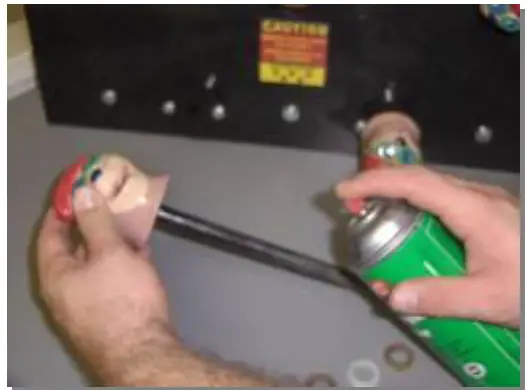
TROUBLESHOOTING
WARNING
For your safety, and to reduce risk of damage to your game read the Important Safety Information on page 5 before attempting any troubleshooting procedure.
TROUBLESHOOTING PHILOSOPHY
When troubleshooting any product, certain general guidelines should be followed.
- Always check to be sure that your game is turned on. Be sure that all of the fuses in the game are functional and check to see that the AC voltage is in the proper operating range for your game.
- Check to be sure that all of the game harnessing is plugged in properly and that all of the pins are firmly seated in the connectors. It is always possible that a harness can be damaged by rough shipping or moving.
- Check game harnessing to be sure that none of the wires have become or are damaged. Using a handheld multi-meter, check continuity of the wires to make sure they are not broken.
- Check for obvious damage to the P.C. Boards or electrical components.
- If you have multiple games or multiple parts on a game, change or exchange the parts and see if the problem goes away or moves to another location. This way you can quickly eliminate certain parts as being the problem with the game.
- When changing electronic or electrical components, ALWAYS turn off and unplug the game.
- Check to see that all power supplies are delivering the specified voltages to the P.C. Boards and components as shown in the manual.
Quick Reference Troubleshooting Chart
| Symptom | Possible Problem | Solution |
| 1) Power | (ii) Power | |
| Sound Problems -No sound -Low Sound -Intermittent Sound | Low Volume Faulty speaker harnessing Faulty speaker Faulty sound board or sound board harnessing Faulty Main P.C. Board | Check Volume Control and adjust as necessary Check connections and/or repair harnessing Check and/or replace speaker Check connections or Replace Sound Board (See “Description C” below) Check and/or repair or replace Main P.C. Board |
| Game does not take or add money correctly | Coin switch out of adjustment Coin mech dirty or improperly adjusted Faulty Coin switch Faulty coin switch harness or connector Improperly programmed electronic mech Game improperly programmed Faulty Front Panel Board Faulty Main P.C. Board or component | Re-bend coin switch wire Clean and adjust mech as necessary Check and/or replace switch Check and/or repair harnessing Reprogram or replace electronic mech Check programming options and adjust Repair and/or replace Front Panel Board Repair and/or replace Main P.C. board |
| Ticket Dispenser not working properly, or no tickets being dispensed | No tickets in the game Tickets jammed in dispenser Ticket dispenser sensor blocked with debris Poor connection on the ticket dispenser Game improperly programmed Faulty ticket dispenser Faulty ticket dispenser harnessing Faulty Front Panel Board Faulty main PC board | Refill ticket dispenser and press the reset button Clear ticket jam Clean off sensor Check and/or replace connectors Check ticket programming options Replace dispenser Check and/or repair harnessing Repair and/or replace Front Panel Board Replace or repair Main P.C. Board |
| (iii) Game will not start | Game power off Faulty or unplugged sensor pair Main fuse blown Ground wire broken or loose Moles not working properly Faulty 12 volt power supply Faulty Front Panel Board Faulty Main P.C. Board or component | Check on/off switch and power cord Repair and/or replace sensor pair (See “Description B” below) Check and/or replace fuse as necessary Replace or tighten faulty ground wire See “moles won’t pop up” below Check and/or replace the 12VDC power supply Repair and/or replace Front Panel Board Repair and/or replace Main P.C. Board |
| Game stops or is stopped with nothing displayed | The power connector is disconnected. The game could have a bad connection or short circuit. | Reconnect the connector securely. Check all circuitry for bad connection or short circuits. |
| Mole heads won’t pop up | Excessive dirt or debris on solenoid shaft Solenoid shaft alignment Faulty sensor pair The current is too low. Faulty 36 volt power supply Faulty solenoid coil Faulty main P.C. board or component | Remove shaft and clean shaft and solenoid (See “Description A” below) Check that the bearing is evenly tightened Check and/or replace sensors Check and/or replace the 36VDC power supply Check and/or replace the 36VDC power supply Check coil resistance and replace solenoid coil Repair or replace main P.C. board |
| Mole head will not score | Disconnected sensor Faulty Connector or Connections Dirty Sensor Faulty Sensor. | Check connections. Check and/or replace Sensor Clean Sensor, (See “Description B” below) Check and/or replace Sensor, (See “Description B” below) |
| Noisy mole heads when they move up and down | The shaft has loosened and needs tighten. The mole shaft could be bent. | Tighten parts. (See “Description A” below) Check and/or replace mole shaft. (See “Description A” below) |
| Light bulbs are out | Lamps are burnt out Possible faulty socket connection Faulty ticket dispenser harnessing Faulty main PC board | Replace the lamps. Check connections and connectors Check and/or repair harnessing Replace or repair main PC board |
ELECTRONIC / ELECTRICAL REPAIR
WARNING: Unplug the game from the AC wall receptacle when servicing this product. Failure to do so could result in serious injury to yourself or others.
Power Supply Servicing
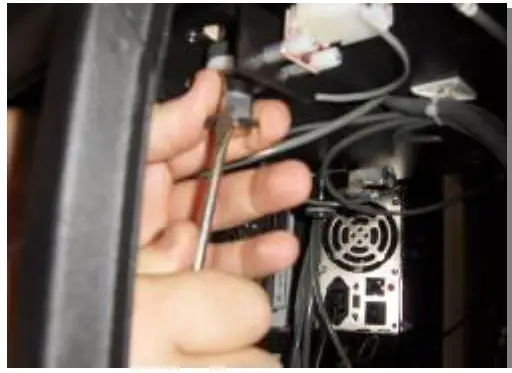
- Turn off A.C. power to the game and unplug the game from the A.C. receptacle.
- Remove coil bed as indicated above in the “coil bed removal and installation” section.
- Remove whichever power supply is faulty and replace.
- Assemble in reverse order.
Main PCB, Sound Board, Fuse and Relay Servicing
- Turn off A.C. power to the game and unplug the game from the A.C. receptacle.
- Remove the (2) bolts that attach the playfield to the top of the main cabinet.
- Lift out and remove the playfield support frame from on top of the coil bed.
- Replace the damaged board or bad fuse.
- Assemble in reverse order.
NOTE: IF THE SOLENOID IS INSTALLED UPSIDE A LARGE LOSS OF SOLENOID STRENGTH WILL BE NOTED. INSTALLING THE SOLENOID UPSIDE DOWN MAY ALSO RESULT IN SOLENOID WIRE DAMAGE. - Re-install the solenoid plunger bearing making sure that the anti-rotation roll pin engages the notch in the top of the solenoid.
- Re-install the bearing retaining bolts.
NOTE: INSTALL THE BOLTS EVENLY AND DO NOT OVERTIGHTEN. IF THE BOLTS ARE TIGHTENED UNEVENLY, SOLENOID PLUNGER SHAFT BINDING MAY OCCUR. - Re-assemble the rest of the game in reverse order. Refer to the specific sections of the manual if necessary.
- Plug the game in and test for smooth solenoid operation.
Score Sensor Replacement
- Remove coil bed as indicated above in the “coil bed removal and installation” section.
- Unplug and unscrew the defective sensor pair and replace.
- Assemble in the reverse order.
Solenoid Replacement
- Remove coil bed as indicated above in the “coil bed removal and installation” section.
- Remove the associated Mole head as indicated in the “mole head removal” section.
- Remove the (2) 1/4-20 hex head bolts that hold the solenoid plunger bearing into the top of the coil bed assembly.
- Unplug the bad solenoid and remove from the coil bed assembly.
- Install the new solenoid making sure that the wires come out of the TOP of the solenoid and feed back down into the coil bed. There is a clearance notch in the top of the coil bed assembly for the solenoid wires.
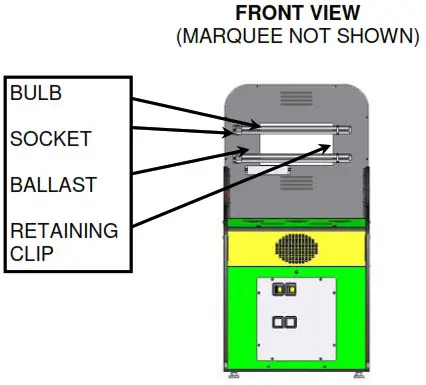
MARQUEE DISPLAY AND FLORESCENT BULB / BALLAST REPLACEMENT
- Turn off A.C. power to the game and unplug the game from the A.C. receptacle.
- Remove the (8) screws that hold the marquee cover graphics to the marquee.
- Remove the graphics panel.
Score Display Removal
1. Remove the (4) hex nuts from the back of the score display.
2. Remove the score display from the marquee.
3. Remove the ribbon cable from the bad display.
4. Remove the (12) screws and the plastic back from the back of the score display.
3. Remove the (4) hex standoffs that hold the board to the mounting bracket.
4. Assemble in reverse order.
NOTE: BE CAREFUL TO PLUG THE RIBBON CABLE IN PROPERLY TO ASSURE PROPER FUNCTION AND TO AVOID DAMAGE TO THE BOARD.

Florescent Bulb Replacement
- Remove the retaining clip that secures the bulb to the standoff.
- Press the RED lock button of the fixture to release the bulb.
- Replace the bulb in reverse order.
NOTE: BE SURE THAT THE NEW BULB IS PROPERLY SNAPPED INTO THE HOUSING TO AVOID IT COMING OUT FROM THE VIBRATION OF NORMAL GAME PLAY. ALSO, BE SURE THAT THE RETAINING CLIP IS SECURELY SNAPPED TO THE STANDOFF.
Florescent Ballast Replacement
- Remove the florescent bulb and the retaining clip.
- Unscrew the bulb socket from the rear of the cabinet by removing the (2) screws.
- Unplug the ballast and remove the (2) screws that hold it to the rear of the cabinet.
- Carefully remove the wires from the bulb socket.
- Assemble in reverse order.
PARTS LIST
| Part Number | Description | Photo |
| A0800005 | Decal Set | |
| TBD | Decal, Top | |
| TBD | Decal, Speaker Area | |
| TBD | Decal, Front Bottom | |
| TBD | Decal, Play Area | |
| TBD | Decal, Left Side | |
| TBD | Decal, Right Side | |
| CX800207 | Panel Playfield | |
| CX800235 | Playfield Support Box Assembly | |
| E0023750 | 5 amp, 250 volt fuse | |
| E0800913 | Electrical Wire Box | |
| E0025100 | 12VDC Mech Counter | |
| E0800005 | Solenoid, 175 Stator | |
| E0800040 | Ballast 120v Fluorescent | |
| E0800041 | Fluorescent Compact Bulb | |
| E0800042 | Fluorescent Socket Bulb | |
| E0800070 | Speaker 6″ x 9″ Oval | |
| E0800154 | Sensor Tube Receiver | |
| E0800165 | Sensor Tube Transmitter | |
| EX033609 | 3 Digit – 7 Segment Display | |
| W0800002 | Shaft Whac-A-Mole Head Plunger | |
| W0800004 | Shaft Elect Whac-A-Mole Plunger | |
| E0800154 | 5VDC/12VDC/110VAC/ 200 W PSU | |
| E0800165 | 27 VDC 11.7 Amp PSU | |
| EX033609 | Bracket Score Sensor Mtg | |
| W0800207 | Washer/Spacers For Mole Plungers | |
| TBD | Main Logic Board | |
| TBD | Station IO Board | |
| E0007276 | System Programming Module | |
| TBD | All Unit Wiring Harnesses with Plugs | |
| TBD | Mole Box Assembly (Does not include Mole Plungers, coils or cables) |
WARRANTY
BOB’S SPACE RACERS INC.
90 DAY COIN-OPERATED GAME WARRANTY
- INCLUDED IN THIS WARANTY Bob’s Space Racers ® , Inc. warrants to the original purchaser only that the equipment that is the subject
of this sale conforms to its specifications, and is free from defects under normal service for a 90 day period from the original date of deliver. This warranty does not include any damages resulting from occurrences listed in paragraph 2 below. This warranty is not transferable under any circumstance. Any claims under this warranty must be received in writing by Bob’s Space Racers ® 120 days from date of delivery. Within a reasonable time of such written notification Bob’s Space Racers , Inc. within ® , Inc. will replace or repair any defective component of the equipment or part thereof which fails for reasons other than normal service, use, or wear. Bob’s Space Racers ® , Inc. reserves the right to request dated proof of purchase by the end user (original purchaser) at any time. Light bulbs are specifically excluded from this warranty and shall be the sole responsibility of the purchaser. Bob’s Space Racers ® , Inc., within its sole discretion, makes the final determination as to whether to repair or replace any component and whether any such repair or replacement shall be performed where the equipment is located or at it’s home facility in Volusia County, Florida, or another facility of its sole choice. Any and all freight charges for the purposes of repair or replacement shall be paid by the original purchaser. All defective parts shall be returned to Bob’s Space Racers ® , Inc. if requested. Bob’s Space Racers ® , Inc. does not warrant that the equipment will meet any
original purchaser’s specific requirements or that the operation of the equipment will be uninterrupted. These remedies are the original
purchaser’s exclusive remedies for breach of warranty. - EXCLUDED BY THIS WARRANTY Bob’s Space Racers ® , Inc. does not warrant (a) any product, components or parts not manufactured
by Bob’s Space Racers ® , Inc.; (b) damages caused by use of the equipment for purposes other than those for which it was designed; (c) defects caused by failure to provide a suitable installation environment for the equipment; (d) damage caused by unauthorized attachments, modification, or service; (e) damage caused by normal wear and tear or improper power supply; (f) damage caused by accident or disaster such as fires, flood, lightning, and wind; or (g) any other abuse or misuse of the equipment. - EXCLUSIVE WARRANTY. THE FORGOING WARRANTY IS EXCLUSIVE AND IN LIEU OF ALL OTHER WARRANTIES OR REMEDIES, WHETHER WRITTEN, ORAL OR IMPLIED. THERE ARE NO WARRANTIES WHICH EXTEND BEYOND THE
DESCRIPTION ON THE FACE HEREOF. ANY AND ALL IMPLIED WARRANTIES OF MERCHANTABILITY, FITNESS FOR A PARTICULAR PURPOSE, COURSE OF DEALING OR USAGE OF TRADE ARE HEREBY EXPRESSLY DISCLAIMED AND EXCLUDED. - REMEDIES LIMITED. UNDER NO CIRCUMSTANCES, EXCEPT TO THE EXTENT PROHIBITED BY APPLICABLE LAW, SHALL
BOB’S SPACE RACERS ® , INC. BE LIABLE FOR ANY LOSS OR DAMAGE, DIRECT OR INDIRECT, SPECIAL INCIDENTAL OR
CONSEQUENTIAL ARISING OUT OF THE USE OR INABILITY TO USE THIS EQUIPMENT INCLUDING BUT NOT LIMITED TO ANY CLAIM FOR LOSS OR PROFITS, LOSS OF SAVINGS OR REVENUE, LOSS OF USE OF THE EQUIPMENT, OR ANY ASSOCIATED EQUIPMENT, FACILITIES OR SERVICE, DOWNTIME, THE CLAIMS OR COSTS OF THIRD PARTIES INCLUDING CUSTOMERS AND INJURY TO PROPERTY. Some states do not allow limitations on how long an implied warranty lasts or the exclusion or limitation of incidental or consequential damages, so the above limitations or exclusion may not apply to you. This warranty gives you specific legal rights, and you may also have other rights which vary from state to state. - NO OTHER WARRANTIES. Unless modified in writing and signed by both parties, this agreement is understood to be the complete and exclusive agreement between the parties, superseding all prior agreements, oral or written, and all other communications between the parties relating to the subject matter of this agreement. No employee or representative of Bob’s Space Racers ® , Inc. or any other party is authorized to make any other warranty or to assume any other liability in connection with the sale of its equipment.
- TIME LIMIT FOR CLAIMS. Any claim for breach of warranty or claims under this warranty must be received in writing by Bob’s Space
Racers ® , Inc. within 120 days following delivery of the equipment. 7. FUTURE CHANGES. Bob’s Space Racers ® , Inc. reserves the right to reserve, change or modify the construction and design of its equipment or any component part or parts thereof without incurring the obligations to make such changes or modifications in present equipment. 8. ALLOCATION OF RISKS. This agreement allocates the risks of equipment failure between Bob’s Space Racers ® , Inc. and the original purchaser. This allocation is recognized by both parties and is reflected in the price of the goods. THE PURCHASER ACKNOWLEDGES THAT HE HAS READ THIS AGREEMENT, UNDERSTANDS IT, AND IS BOUND BY ITS TERMS. - TO OBTAIN WARRANTY SERVICE. The original purchaser must, at his/her own expense, bring or ship the equipment to an authorized location for service. Additionally, the original purchaser must pay all freight, shipping or transportation charges for the return of the equipment from Bob’s Space Racers ® , Inc. to the original purchaser. Telephone or write:
Bob’s Space Racers ® , Inc.
427 th 15 Street Daytona Beach, FL 32117
Telephone number: 386/677-0761
FAX: 386/677-0794
WHEN CALLING FOR SERVICE
- When calling for service, please check the service manual first. Many times the answer to your problem has been addressed in this documentation.
- Please make sure you have the serial number of the game ready when you call.
- If this is a repeat call, please tell the service technician that you have made a previous call regarding this problem. This way we will be able to retrieve the history on your game allowing us to serve you better and save you time.
- Please retain proof of purchase for your product. This might be requested for warranty repairs.
- Please call from the game if possible since we might need you to check certain things on the game while we are on the telephone with you.
IF YOU HAVE ANY QUESTIONS OR COMMENTS, PLEASE CALL OUR SERVICE DEPARTMENT AT
(386) 677-0761
(MONDAY – FRIDAY, 8:30AM – 5:00PM EST, EXCLUDING HOLIDAYS)
(or)
EMAIL QUESTIONS [email protected]: [email protected]
(or)
VISIT THE “CUSTOMER SUPPORT” SECTION ON OUR WEBSITE: WWW.BOBSSPACERACERS.COM


