 DIY W-PANEL PATIO COVER User Manual
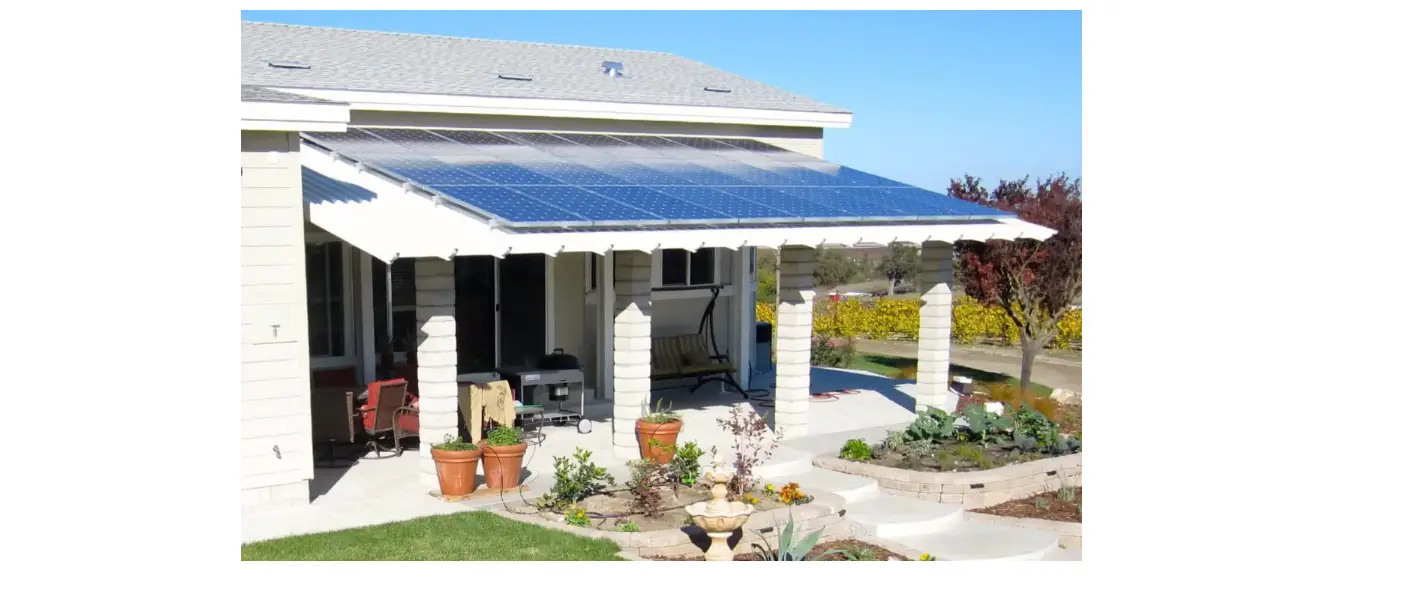
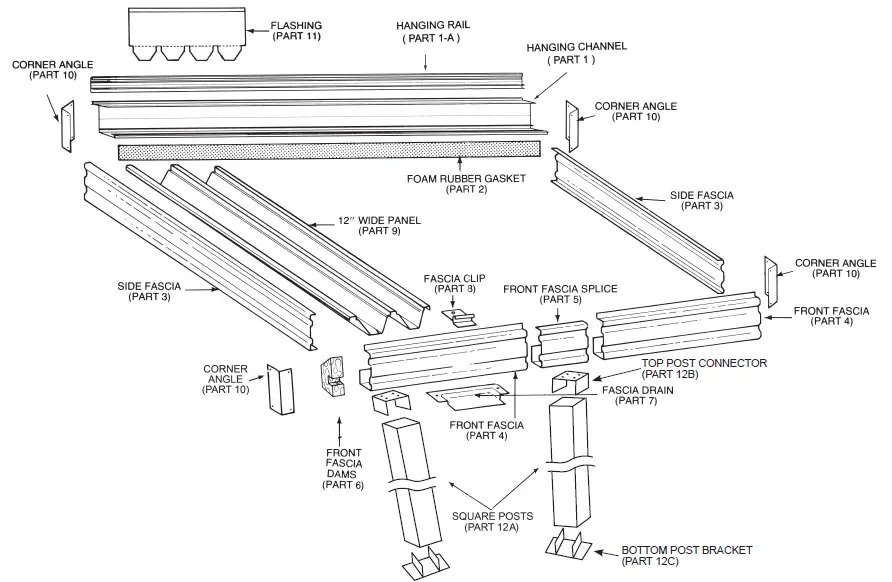
Introduction
Check the contents of the carton against the Parts List. This will help you to become familiar with most of the parts on sight. Unpack and lay out the parts and identify them with component descriptions.
- Inspect all component parts to familiarize yourself with each component.
- The tools recommended (Listed are the basic ones).
- Before drilling or cutting any component, know its use.
- Refer to the actual sizes of bolts and nuts as you install them.
- Before beginning installation, read each instruction step carefully and know the detail involved.
- Determine what type of installation yours is before proceeding, such as, attaching to siding or stucco wall, to roof eaves or attaching to concrete, or brick wall.
ASSEMBLY INSTRUCTIONS:
Read the instructions and study the illustrations carefully. Note the location of the various parts and how they are mounted. A diagram of the patio cover shows how the parts of the entire structure fit together. Follow the step-by-step instructions and your patio cover will go together quickly and accurately.
RETAIN THIS MANUAL AND PARTS LIST AFTER ASSEMBLY FOR FUTURE REFERENCE.
TOOLS RECOMMENDED (NOT INCLUDED):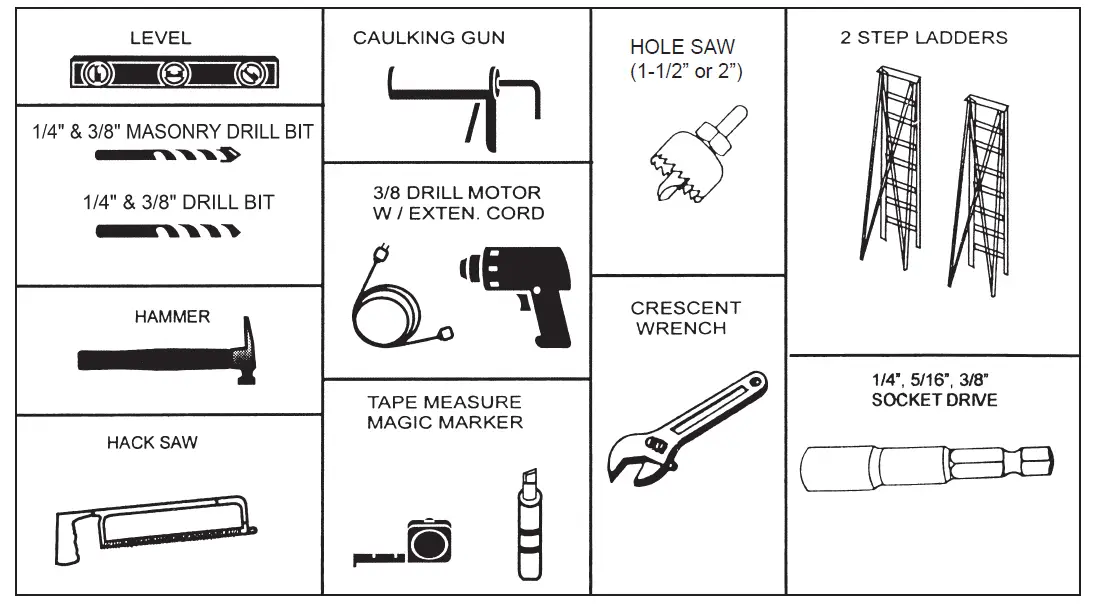
(Before Beginning Installation, Read Each Step Carefully)
Bolts, Nuts, and Screws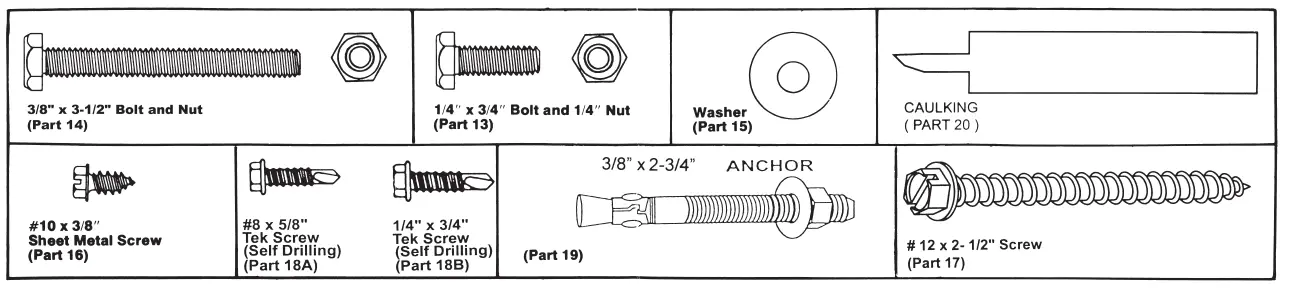
Components and Assembly Instructions

STEP 1
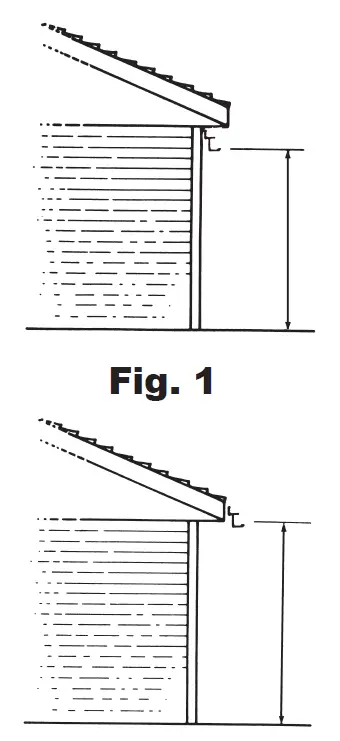
Patio cover height should clear out swinging doors and windows and finish at a minimum of 6’8” to the underside of the front fascia.
WARNING:
Before attaching the hanging channel to the fascia board or wall, you must determine rafter or stud spacing so that attachment screws will drive into each of the above members and provide the necessary support for the patio cover. Spacing is usually 16”. Masonry installation will require anchor screws purchased locally.
STEP 2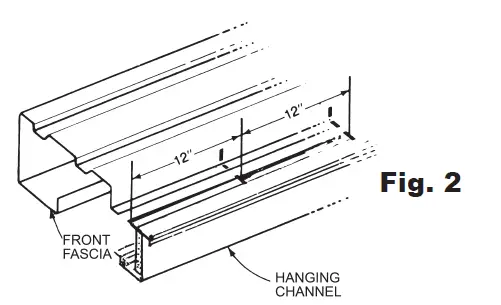
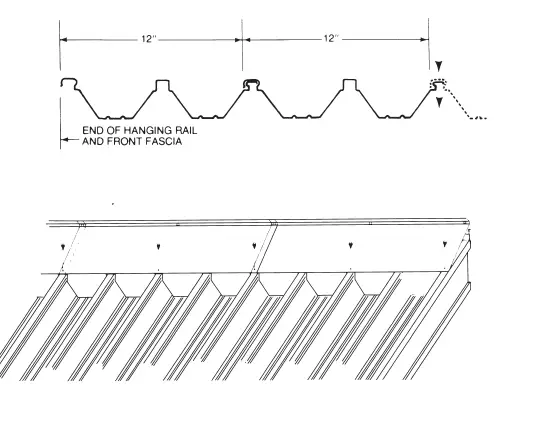
- Lay the hanging channel (Part 1) on the slab. On wider covers, you will have 2 hanging channels. Lay end to end. Place the front fascia (Part 4) next to the hanging channel (Part 1), on wider covers, you will have 2 front fascias. Lay end to end. Mark 12” spaces with a marker. Mark the top of the front fascia (Part 4).

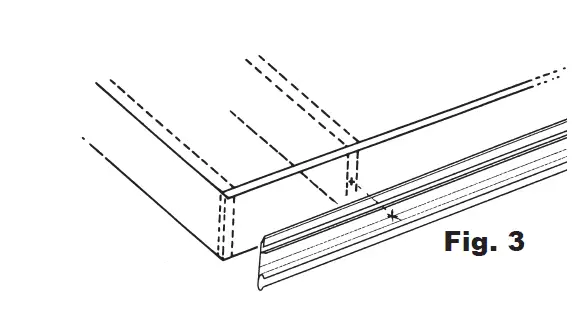
NOTE: Last space will be 12-3/4” to allow for flange width on the last panel. Do not cut the hanging channel. Those marks will be used later to install the roof panels (Part 9) at the proper spacing. (Fig. 2). - Place hanging rail (s) (Part 1-A) in the desired position on the wall or fascia board and mark first hole to be drilled in hanging rail (s) (Part 1-A) relative to rafters or wall studs. (Fig. 3).
- Drill a 1/4” hole on the mark, 1” down from the top of the hanging rail. Drill additional holes in the length of the hanging rail (Part 1-A) based on previously determined rafter or wall stud spacing. Repeat the above steps for the second piece of hanging channel on wider covers (Part 1-A).

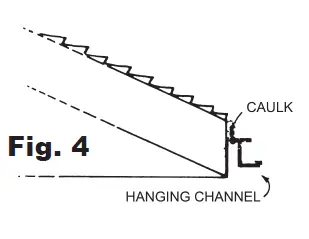
- Slide the hanging channel (Part 1) into the bottom of the hanging rail (Part 1-A) using a 5/16” socket drive and # 12 x 2-1/2” screws (Part 17) fasten the hanging rail(s) to the fascia board or wall. Caulk the top of the hanging rail (Part 1-A) (Fig 4).
STEP 3
Prepare Front Fascia
Skip step A if you have only one (1) Fascia.
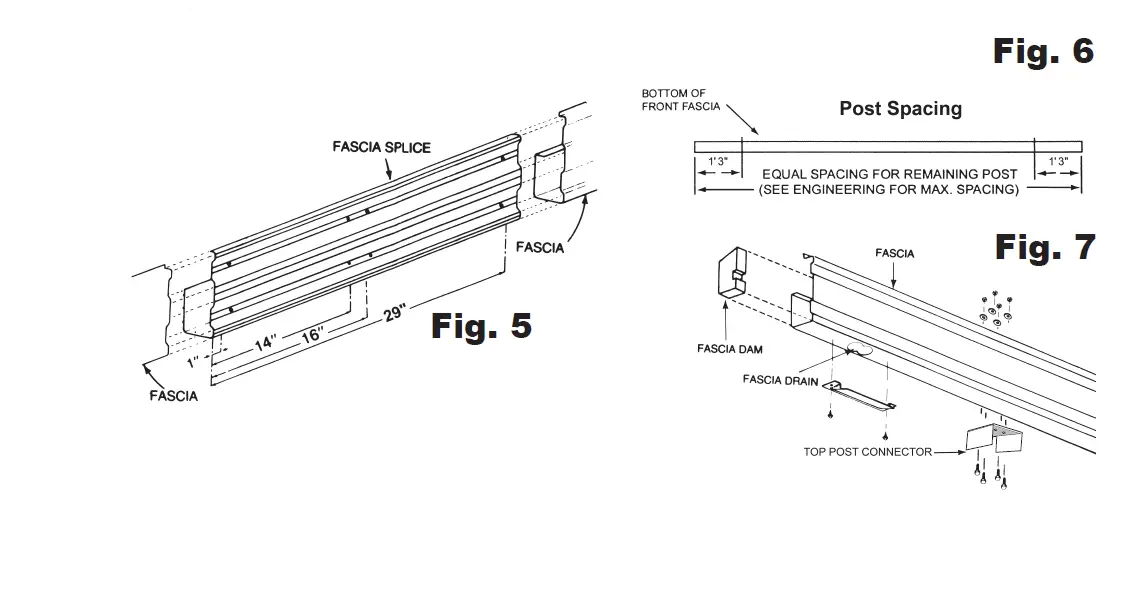
- Splice the two pieces of fascia together.
- Apply a generous amount of caulking to the inside of the fascia ends to be spliced.
- Place the splice in the fascia so that its center coincides with the end of the first fascia.
- Place the second fascia over the other end of the splice.
- Secure the splice using a 3/8” socket drive and twelve 1/4” x 3/4” Tek Screws (Part 18B)
- Install tek screws (Self Drilling) at 1”, 14”, 16” and 29” from the end of the splice (eight screws) use (four) additional screws (Part 18B) to attach the back leg of the fascia to the splice. (Fig. 5)
- Attaching Top Post Connector (Part 12B) (For max post spacing, see engineering)
- Using the top post connector as a guide, mark the holes in the connector on the bottom of the fascia (Part 4).
- Drill 1/4” diameter holes in the bottom side of the fascia (Part 4).
- Bolt the connector (Part 12B) to the bottom of the fascia (Part 4) using four 1/4” x 3/4” bolts and nuts (Part 13) and washers (Part 15).
- Generously caulk the inside of the fascia (Part 4) around the protruding bolt heads.
- Determine fascia drain locations.
- Using a hole saw, drill a 1-1/2” or 2” diameter hole in the bottom of the fascia, one on each end. 2. Fasten the fascia drain (Part 7) to the bottom of the fascia using the socket drive and two #8 x 5/8” tek screws (Part 18A) per drain. (Fig. 7).
- Compress and insert fascia dams (Part 6) into each end of the fascia and caulk around them generously.
- To allow for proper water drainage, a minimum of 1/2” per foot slope is recommended.
- Slide the bottom post bracket (Part 12C) up into the post, and drill two 3/8” diameter holes through both post and bottom bracket. Use two 3/8” x 3-1/2” bolts and nuts (Part 14) to fasten. To determine the length of the post (Part12A), measure the distance from the concrete slab to the bottom of the hanging channel (Part 1). next, deduct 4” for the back leg of the fascia (Part 4) and also deduct the min. 1/2” per foot slope of panel length. The fascia (Part 4) should be level from end to end. (NOTE: If your concrete slab has a slope in it and is not level, the post (Part 12A) will have to be various lengths to compensate for the uneven surface.) Now fasten the square post to the top post connector previously installed on the fascia. Drill two 3/8” diameter holes through both post and post connector. Use two 3/8” x

STEP 4
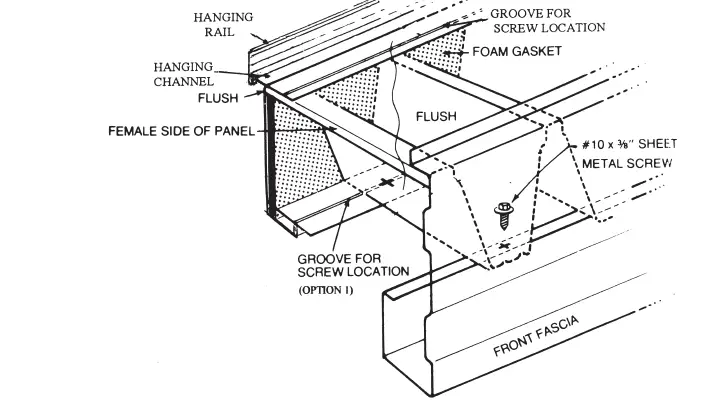
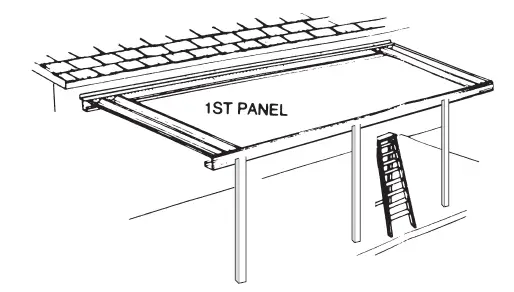
- Install the first panel as shown in Fig. 9. Be sure to press the panel into the foam gasket.
- End of the panel with pre-punched hole attached to the front fascia (Part 4).
- Install the last panel in the same manner. Be sure the male side of the panel ends are flush with a hanging channel and front fascia. (Fig. 10).
- Move the fascia assembly side to side so that first panel is square to the fascia board or wall.
- Attach a square post at the ground.
- For surface mounting to the top of the slab: Mark the post position on the slab. Ensure that posts are plumb in both directions. Using the pre-drilled holes in the bottom bracket as a guide, mark both holes on the slab. Drill 3/8” diameter holes in the slab and fasten the bottom post bracket to the slab with two 3/8” x 2-3/4” anchors.
- Remove the sheet metal screw (Part 16) from the first panel (Part 9) the side with the male lock at the front fascia (Part 4).

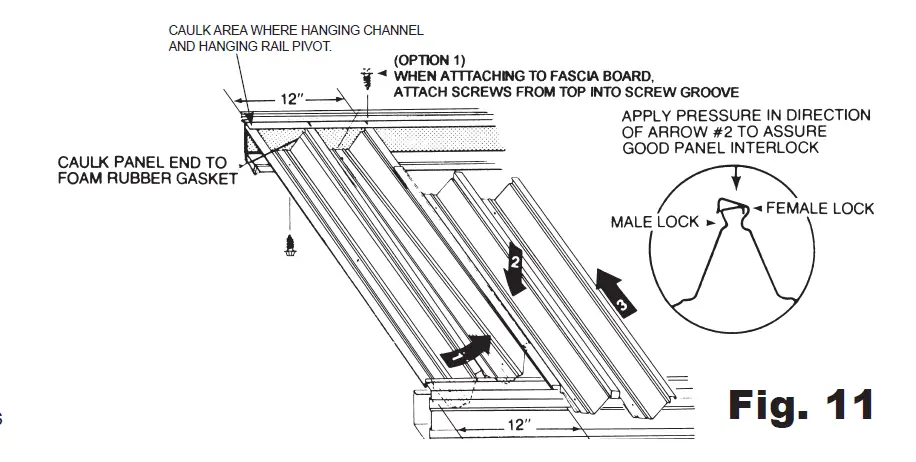
- Install the second panel as shown (Fig. 11) following the directions of the arrows in numerical order.
- You must adjust the interlocking joint between the two panels to align with the 12” marks on the hanging channel and the front fascia. (Fig. 12).

- See (Fig. 11) and fasten first panel (Part 9) at the hanging channel (Part 1) with # 10 x 3/8” sheet metal screws (Part 16). Fasten first panel at the front fascia thru pre-punched holes into the front fascia. (Fig. 9).
- Install the third panel (Part 9) in the same manner as the second panel (Part 9). Fasten the second panel (Part 9) in the same manner as the first panel. The caulk panel ends to the foam rubber gasket. (Fig. 11).
- Install preformed flashing (Part 11) into the grove on the hanging rail (Part 1-A). Position over first and second panels (Part 9). Bend tabs down so they fit snug to the surface of the roof panel. Screw flashing (Part 11) to peaks of Roof panels (Part 9) using # 10 x 3/8” sheet metal screws (Part 16). Caulk (Part 20) the top of screw heads. (Fig 13).
- K. Repeat the above steps until the last panel is reached. Remove the last panel and fasten as previously described.

STEP 5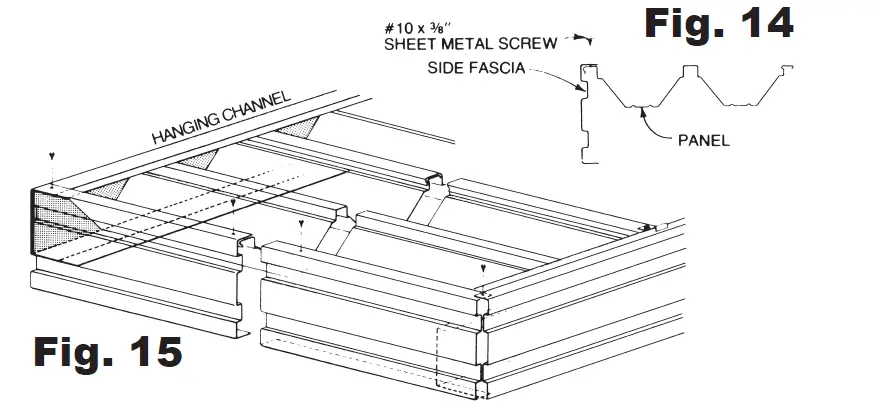
- Place the top flange of the side fascia (Part 3) over the top flange of the hanging channel (Part 1) at the wall. (Fig. 14)
- Place the top flange of the side fascia (Part 3) under the top flange of the front fascia (Part 4).
- Using an adaptor and # 10 x 3/8” sheet metal screw (Part 16), fasten the side fascia (Part 3) to the hanging channel (Part 1) and front fascia (Part 4). Also fasten at approx. 24” spacing to the panel. (Fig. 15).
STEP 6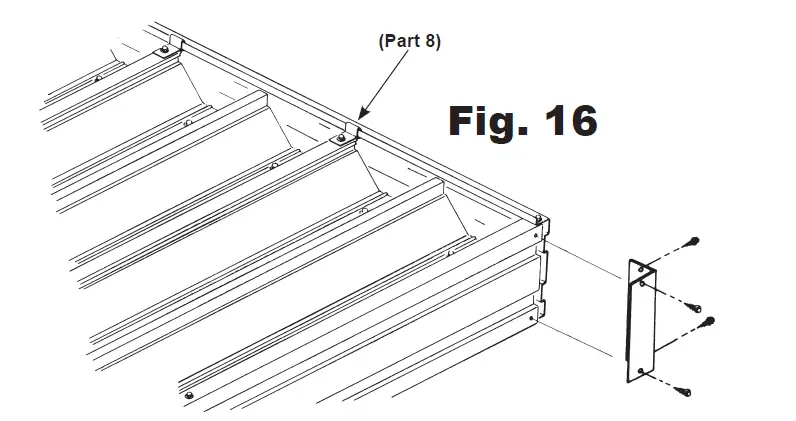
- Secure the top of the pans to the front fascia with fascia clips (Part 8). Place the top of the clip over the top leg in the fascia where pans connect together and secure using #10 x 3/8” sheet metal screw (Part 16).
- Attach the corner angle (Part 10) to the front (Part 4) and side fascia (Part 3) using the socket drive and four #8 x 5/8” tek screws. (Part 18A)
- Fasten the corner angle (Part 10) to the side fascia (Part 3) only at the wall location with two #8 x 5/8” tek screws. (Part 18A)
Patio Care and Maintenance
Your patio cover has a paint finish to resist the effects of damaging weather and aging. It is recommended you clean your patio cover at least twice a year by using a soft brush and mild detergent and wash off with water.


