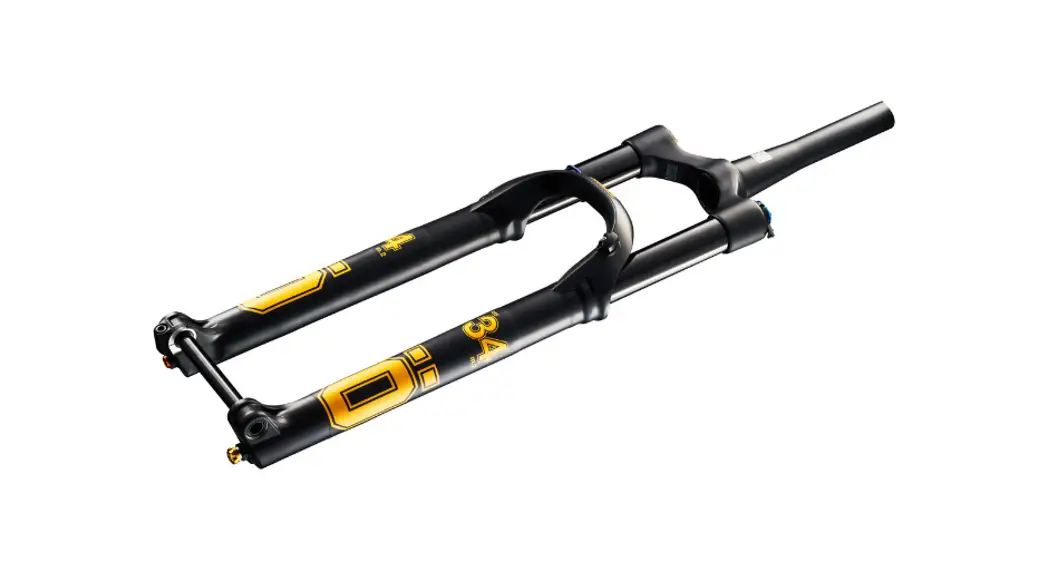
![]() RXF34 m.2 Front fork for Bikes
RXF34 m.2 Front fork for Bikes
Owner’s Manual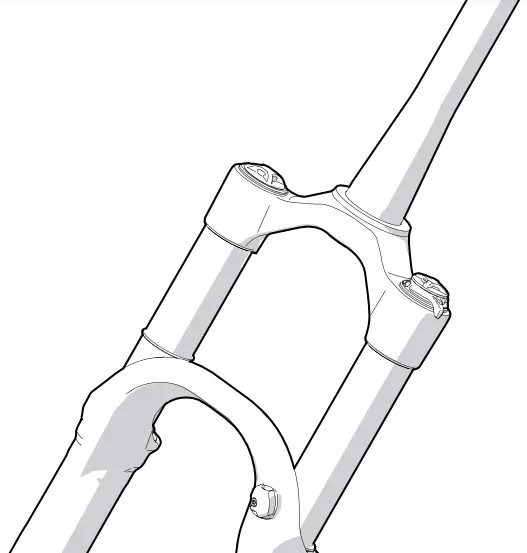
RXF34 m.2 Front fork
FGXXX 34XX 22XX
Owner’s Manual
RXF34 m.2 Front fork for Bikes
Öhlins Racing AB – The Story
It was the 1970’s, a young man named Kenth Öhlin spent most of his spare time pursuing his favourite sport: motocross.
Being a careful observer, Kenth’s attention was continously drawn to one specific detail – motocross bikes had more engine power than their suspension could handle. It was not long before Kenth realised that better performance could be achieved by improved wheel suspension.
Öhlins Racing was established in 1976, and just two years later the company won its first World Championship title. Despite being in the business for almost 40 years, the search for perfection and new functions is still the main focus of the company.
Congratulations! You are now the owner of an Öhlins product. More than two hundred World Championships and other major world titles are definitive proof that Öhlins products offer outstanding performance and reliability. Every product has gone through rigorous testing and engineers have spent thousands of hours, doing their very best to use every possible experience from our almost 40 years within the racing sport.
The product that you now have in your possession is pure racing breed that is built to withstand.
By installing this product on your bike you have made a clear statement… you are a serious rider with a focus on getting the maximal handling ability and outstanding feedback from your bike. Along comes the fact that your Öhlins product will be a long lasting friend, delivering the very best of comfort and performance every time you go for a ride. Go explore
SAFETY PRECAUTIONS
General Warnings
⚠ Warning!
After you have installed the Öhlins product, take a test ride at low speed to ensure that the bicycle has maintained stability.
⚠ Warning!
If the suspension makes an abnormal noise, or the function is irregular, or if you notice any leakage from the product, stop the bicycle immediately and return the product to an Authorized Öhlins MTB Service Center.
⚠ Warning!
The product warranty shall only apply if the product has been operated and maintained in accordance with recommendations in this manual. If you have any questions regarding usage, service, inspection and/or maintenance please contact an Authorized Öhlins MTB Service Center.
⚠ Warning!
This product was developed and designed exclusively for bicycles and shall only be installed on intended bicycle models in its original condition as delivered from the bicycles manufacturer.
⚠ Warning!
This product contains pressurized air. Do not open, service or modify this product without proper education and proper tools. All hydraulic servicing must be completed by an Authorized Öhlins MTB Service Center. All other servicing must be completed by an Authorized Öhlins MTB Service Center alternatively you can conduct the service yourself if you have the necessary skills, genuine parts and tools. In some cases the product may need to be sent to another region for service.
✋ Caution!
Do not use a pressure washer or a power washer when cleaning the fork.![]() Note!
Note!
The fork is an important part of the bicycle and will affect the stability.
![]() Note!
Note!
Read and ensure you understand the information in this manual and other technical documents provided by the bicycle manufacturer before using the product.
SAFETY SYMBOLS
In this manual, mounting instructions and other technical documents, important information concerning safety is distinguished by the following symbols:
⚠ Warning!
The Warning Symbol means: Failure to follow warning instructions can result in severe or fatal injury to anyone working with, inspecting or using the Product/Fork, or to bystanders.
✋ Caution!
The Caution Symbol means: Special precautions must be taken to avoid damage to the Product/Fork.
![]() Note!
Note!
The Note Symbol indicates information that is important regarding procedures.![]() Note!
Note!
Öhlins Racing AB can not be held responsible for any damage to the shock absorber, bicycle, other property or injury to persons, if the instructions for mounting, usage and maintenance are not followed exactly.![]() Note!
Note!
When working with the Öhlins product, always read the bicycle manufacturer’s manuals.![]() Note!
Note!
This manual shall be considered as a part of the product and shall therefore accompany the product throughout its life cycle.![]() Note!
Note!
Please retain the original packaging for warranty or service needs.![]() Note!
Note!
Please note that during storage and transportation, especially at high ambient temperature, some of the oil and grease used for assembling may leak and stain the packaging. This is in no way detrimental to the product, wipe off the excessive oil/grease with a cloth.![]() Note!
Note!
Please note that the images in this manual are a general representation of the product and may differ slightly from your product.![]() Note!
Note!
Maximum system weight (including rider, bike and gear) 135 kg.
© Öhlins Racing AB. All rights reserved.
Any reprinting or unauthorized use without the written permission of Öhlins Racing AB is prohibited.
THE ÖHLINS RXF34 M.2 FRONT FORK
Congratulations on your excellent choice of purchasing this high performance Öhlins front fork.
This product is designed for the upcoming, next generation of stars and has been developed by Öhlins’ mountainbike department in Sweden, with their experience from the world stars of today.
We recommend you to read this manual carefully for proper bike set up to get the best possible performance out of your suspension components.
HOW IT WORKS
To get your suspension set up correctly the front fork and shock absorber must be in balance.
To achieve this, both must be considered when setting up the new product.
To set up the fork there is two systems to consider.
Spring
The main purpose of the spring is to support the rider and bike and restore the set ride height after impact.
Setting up your sag is the most important aspect of tuning your fork, and this is done by correctly tuning your air spring. Sag is the percentage of suspension travel that is used when you assume normal, static riding position on the bike. See separate chapter for air spring setup procedure. 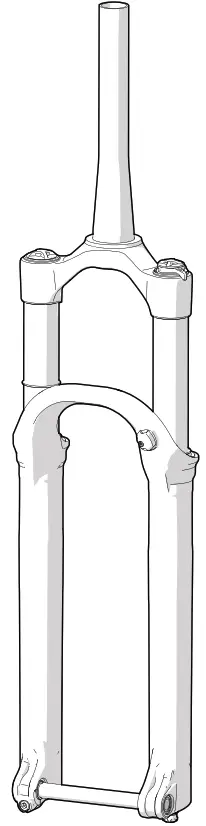
Hydraulic damping
The damping controls the forks movement in compression and in rebound by converting the kinetic energy in to heat. Valves and shim stacks are used to regulate the oil flow and thus controlling the amount of damping.
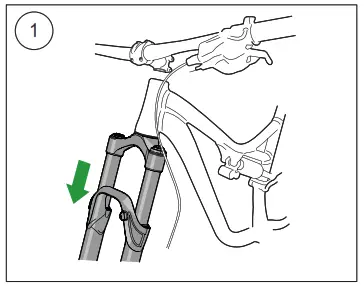
MOUNTING INSTRUCTIONS
⚠ Warning!
It is advisable to have an Authorized Öhlins MTB Service Center install the front fork.
⚠ Warning!
If the bicycle is mounted in a work stand please make sure to hold the frame when front fork is removed to prevent damage to paint and (or) fi nish.![]() Note!
Note!
Before installing this product clean the bicycle thoroughly.
RXF34 m.2 – FGXXX 34XX 22230
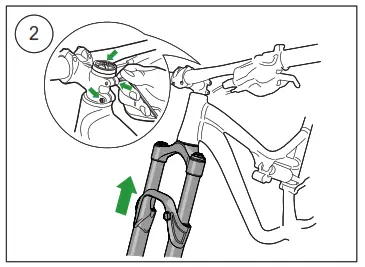
- Remove the original front fork.

- Place the front fork. Install stem and tighten headset according to manufacturers’ instructions.

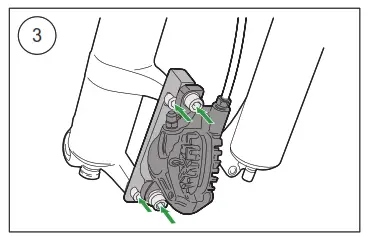
- Install the brake caliper according to the brake manufacturer’s instructions. Minimum rotor size 160 mm, maximum rotor size 203 mm.

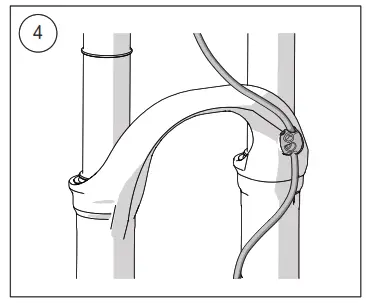
- Attach the brake cable to the hose clamp and tighten the screw. Use a 2.5 mm Hex wrench. Tighten the bolt to 0.5 Nm.

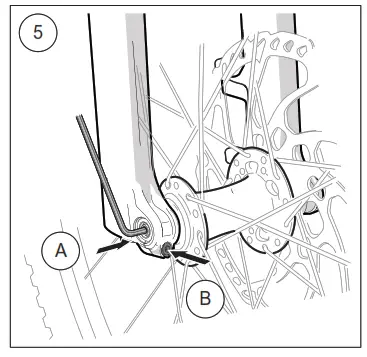
- Apply Grease on wheel shaft and shaft threads before installation. Use a 5 mm Hex wrench to tighten the Wheel Shaft A before screw B. Tighten A and B to 6 Nm.

✋ Caution!
Ensure that all screws are tightened to the correct torque and that nothing fouls or restricts movement of the front fork when the suspension is fully compressed or extended. Please check suitable clearance between the fork and frame when turning.
AIR SPRING SETUP
Spring pressure setup
A correct spring setup is the most important part of setting up your fork. Start with the recommended pressure and sag and go throught the tuning steps described below.
A poorly setup air spring can never be fully compensated by adjusting your damping system.
Setting sag is a crucial part of setting your bicycle since it aff ects the height of the bicycle and the fork angle. In the following chapter we will describe how to set the sag. Please check pressure recommendations in table to the right.
![]() Note!
Note!
This procedure must be performed on a fl at surface. Do not jump or bounce on your bicycle as it will result in an inaccurate sag measurement.
Setting sag:
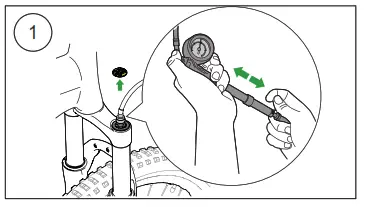
- Unscrew top air cap (Main chamber) and assemble the air pump. Pump to desired pressure. Disassemble the air pump and reinsert the compression air cap.

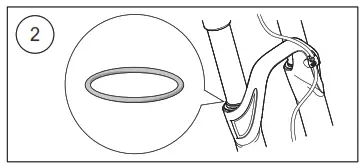
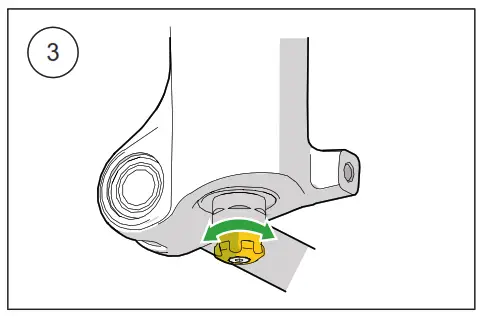
- Set the O-ring (sag indicator) at the position according to illustration.

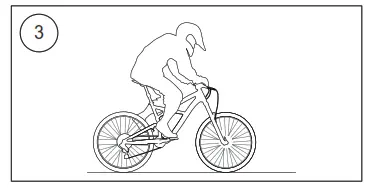
Rider weight Air pressure 50 – 55kg (110 – 121lbs) 48 – 63 psi 55 – 60kg (121 – 132lbs) 53 – 67 psi 60 – 65kg (132 – 143lbs) 57 – 72 psi 65 – 70 kg (143 – 154 lbs) 62 – 76 psi 70 – 75 kg (154 – 165 lbs) 66 – 81 psi 75 – 80 kg (165 – 176 lbs) 71 – 85 psi 80 – 85 kg (176 – 187 lbs) 75 – 90 psi 85 – 90 kg (187 – 198 lbs) 80 – 94 psi 90 – 95 kg (198 – 209 lbs) 84 – 99 psi 95 – 100 kg (209 – 220 lbs) 89 – 103 psi 100 – 105 kg (220 – 232 lbs) 93 – 108 psi 105 – 110 kg (232 – 243 lbs) 98 – 112 psi 110 – 115 kg (243 – 254 lbs) 102 – 117 psi 115 – 120 kg (254 – 265 lbs) 107 – 121 psi - Dressed in full riding gear assume normal riding position on the bicycle.

- Step off the bicycle and measure the distance the O-ring (sag indicator) has moved. Sag should be set to approximately 15-25 % of the fork travel.

General recommendations:
- too little sag: release air from main chamber
- too much sag: fi ll up with more air in main chamber
General recommendations:
Heavy hard charging rider may require less sag while a smoother rider may benefi t from more sag. If you have any questions, contact an Authorized Öhlins MTB Service Center for advice.
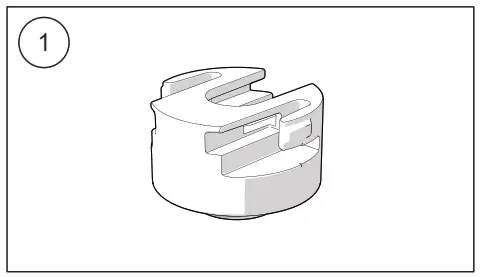
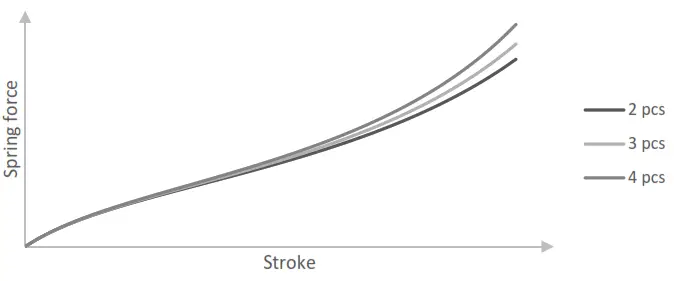
Adjusting volume
Adjusting the air spring volume by adding or removing volume spacers aff ects the ramp characteristics of the spring. Adding spacers will increase the end stroke spring rate and removing them will decrease the rate.
| Stroke length | Recommended number of volume spacers | Maximum number of volume spacers |
| 120 | 4 x 8 ml | 6 x 8 ml |
| 130 | 3 x 8 ml | 5 x 8 ml |
⚠ Warning!
Make sure that all pressure is released from the air spring before starting to work on it.
⚠ Warning!
Never install more spacers than the specifi ed maximum amount.
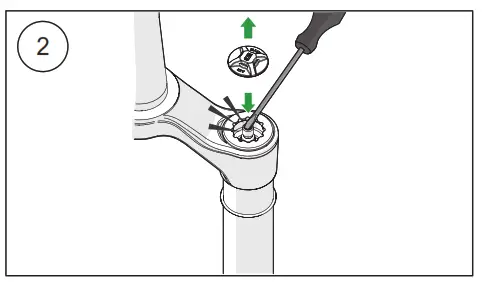
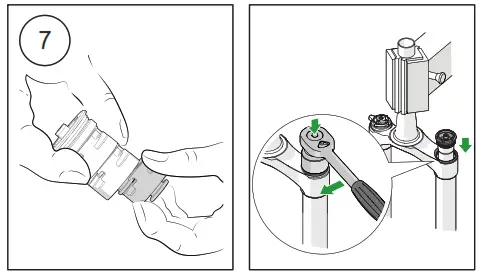
- Make sure the area around the top cap is completely clean.
- Release all the air from the air spring.

- Use a socket wrench with a casette lockring socket tool to loosen the top cap.

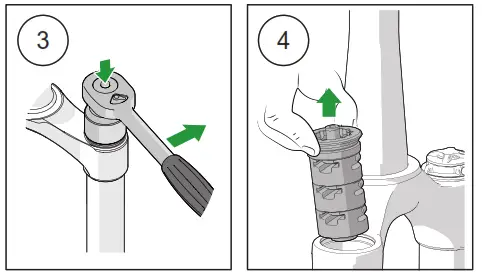
- Pull the top cap and volume spacers from the stanchion.
- Add/remove volume spacers from the top cap.

- Make sure the top cap o-ring is free from debris and damage. If the o-ring is damaged contact an authorized Öhlins MTB service center.
- Push the volume spacers and top cap back into the stanchion.
- Use a torque wrench with a casette lockring tool to tighten the top cap to 32 Nm.
Reset to original ride position
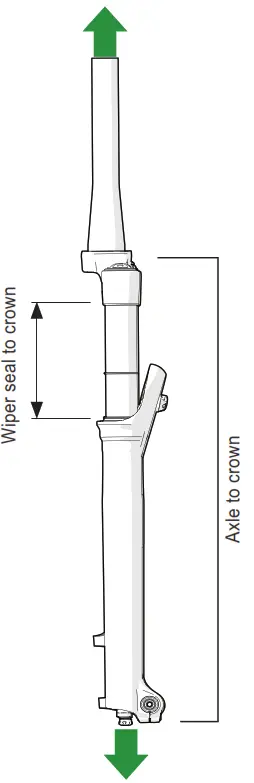
After reducing the air pressure in the main chamber, it is necessary to reset the fork to its original length.
Example: If you are lowering the pressure from 90 psi to 70 psi, the fork will get a lower ride position (shorter travel). Reset the fork to original Ride position by extending the fork by pulling the handlebar up, while your friend is holding the wheel tight to the ground. Repeat the extension about 10 cycles, until you have reached the original length.
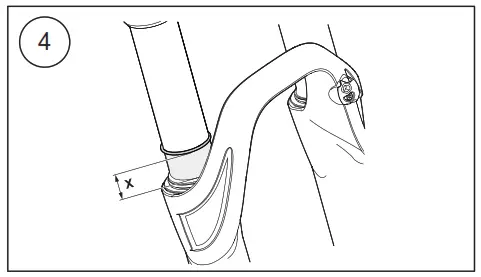
Original fork lengths:
| Fork travel [mm] | Wiper seal to crown [mm] | Axle to crown [mm] |
| 120 | 122 | 531 |
| 130 | 132 | 541 |
OTX18 SETUP
Compression damping controls the energy absorption when the front fork is being compressed, thus controls how easily the front fork compresses when you hit a bump. Rebound damping controls the energy absorption when the front fork is being extended and controls how fast the front fork returns to its normal position after being compressed.
To set the adjusters
Turn the adjuster clockwise to fully closed position. Then, turn counter clockwise to open, and count the clicks until you reach the recommended number of clicks.
✋ Caution!
Turn gently not to damage delicate sealing surfaces.
Tighten with your hand only.
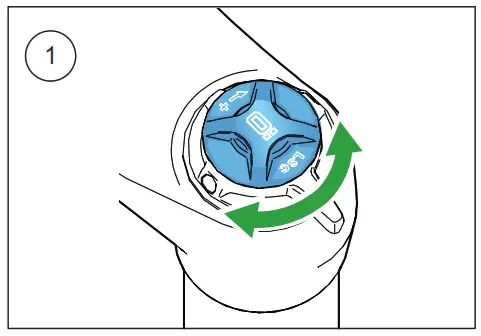
Compression damping adjuster
- Adjust low speed
To adjust, turn the blue coloured adjuster on the top of the OTX cartridge. Turn clockwise to increase damping, turn counter clockwise to decrease.
- Adjust high speed
To adjust, turn the black coloured adjuster on the top of the OTX cartridge. Turn clockwise to increase damping, turn counter clockwise to decrease. For additional platform control, turn to fully closed (position 0 [zero]). Note!
Note!
Position 0 [zero]: Additional platform control is designed to be used for long climbs and not for normal riding. If used for normal riding you may experience loss of traction and bump absorption.
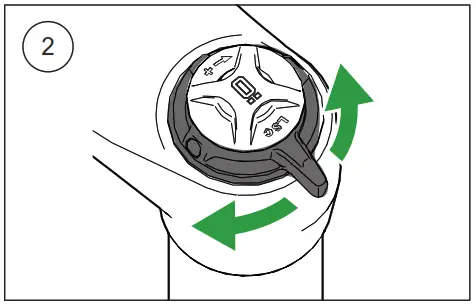
Rebound damping adjuster - Adjust rebound
Turn the gold coloured adjuster on the end eye/ bracket. Turn clockwise to increase damping, turn counter clockwise to decrease.
Stability and traction
All bicycles are designed with a suspension geometry that include height and fork angle. Changing any components may aff ect the suspension geometry and it is therefore essential that the front and rear ends match each other. Changing to Öhlins suspension gives optimum performance only when both the front fork and the rear suspension interactproperly. It is very important that the front andthe rear ride heights are within the specified values.
General setup
By adjusting the front fork and testing by trial and error you can learn how the diff erent settings aff ect your bicycle. Always begin your setup process by taking a test ride with all adjustments at their recommended basic settings. Choose a short run of varying character, for example with long as well as sharp bends, hard and soft bumps. Stay on the same run and adjust only one setting at a time. When you set up your bicycle you need to do it together with the front fork and on all types of tracks that you want to optimize, there are no setups that will be 100% perfect on all tracks, some compromises will need to be made.
Always keep priority at
– safe feeling
– stability
– comfort
This will allow you to ride safer, with more confi dence and use less energy.
Adjustment range
The RXF fork is designed for use within the full adjustment range, and using the front fork fully open or closed is normal for some riders.
Rebound damping
If the bike feels loose, nervous over bumpy sections and kicking in jumps, close the rebound adjuster one click.
If the bicycle feels hard, harsh (no comfort), packs down under bumps and is diffi cult to enter corners with or does not stay in line over bumpy sections, decrease the rebound adjuster 1 click.
If the bicycle feels
– unstable
– loose
– bouncy
→ Increase rebound damping
If the bicycle feels
– hard
– nervous
– low traction
→ Decrease rebound damping
Low speed compression damping
The low speed adjuster is used for controlling the chassis movement towards the ground. If you feel that the front fork feels soft, spongy, or the bicycle feels unstable (for example when going into a corner), close 1 click (clockwise). If you feel that the bicycle feels hard and has poor traction, open 1 click (counter-clockwise).
High speed compression damping
The high speed adjuster has three positions.
When the adjuster is fully closed it has position 0 [zero] and when the adjuster is fully open it has position 2.
Turn clockwise to increase the high speed damping and make the fork fi rmer. Turn counter clockwise to reduce the high speed damping. Position 1-2 is suitable for trail riding.
Position 0 [zero] is for those long climbs where the need for traction is limited and additional platform control helps to gain efficiency.
The front forks are delivered with the adjuster set to position 2 (fully open). This is the best allround setup and has the function that should suit most riders and tracks.
If the bicycle feels
– soft
– low
– is bottoming
→ Increase compression damping
If the bicycle feels
– harsh
– hard
→ Decrease compression damping
MAINTENANCE
Extreme riding in adverse weather conditions or lack of cleaning will shorten service intervals.
| Maintenance | Interval |
| Clean dirt and debris from front fork | Every ride |
| Check air pressure and set sag | Every ride |
| Check torque on front fork mounting bolts | Every ride |
| Remove lowers, clean and inspect bushings and seals, change oil bath if necessary | 50 hours |
| Full front fork air spring service | 100 hours/1 year |
| Remove and clean lowers, replace seals, change oil bath | 100 hours/1 year |
| Full front fork damping cartridge service | 100 hours/1 year |
NOTES
Your Öhlins retailer:![]()
Öhlins Racing AB
Box 722
SE-194 27, Upplands Väsby
Sweden
Phone: +46 (0)8 590 025 00
Fax: +46 (0)8 590 025 80
www.ohlins.com


