Changzhou Gaide Intelligent Technology Co.,Ltd
Manual
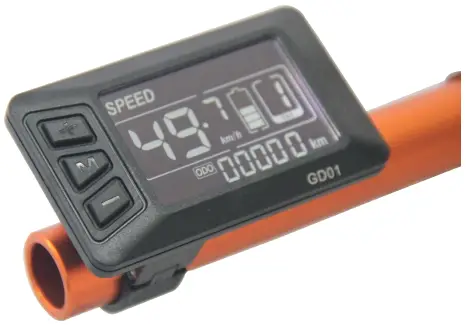
GD01 Ebike Intelligent Display
Address: NO.202 Tanggoutou Road , Yaoguan Town, Jingkai District, Changzhou city, Jingsu Province
Website: www.czgaide.com
1. Material & Dimension
1) Material
Caser and Cover and Press button: ABS,
LCD window: PMMA
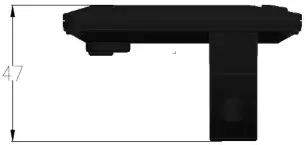
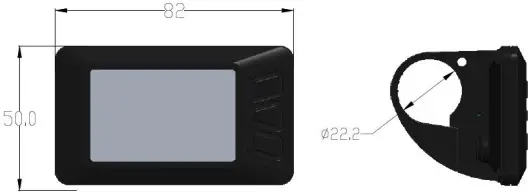
2) Outside and mounting dimension (mm)
3) Installation
- Install the display in the middle of handlebar, then adjust to suitable angle, install the press button to left side of handlebar.
- Power off the device, connect the device to controller.
- Power on
2. Overview of GD01
1) UART protocol:
Equipped with independent press buttons
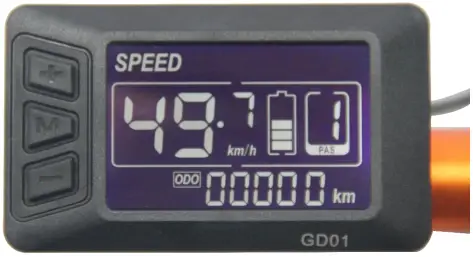
2) Speed:
Real-time SPEED
3) kmh/mile:
Kmh/MPH according to habit
4) Battery level:
Indicates the battery level in real time
5) Head light control:
Press + button for 3 seconds to power on/off
6) Back light adjustment:
3-level adjustment
7) Assist level:
From P to 7, press button to change assist level.
8) Distance:
ODO/Trip/Driving duration
9) Error code:
Please refer to appendix table 1 for definition
10) 6km mode:
In this mode, it will display ![]() on the screen
on the screen
11) Parameter setting:
Set parameters, such as: wheel size, speed limit etc
3. Presentation of screen
1) Battery level: 5 levels, voltage interval could be customized
2) Speed: Average SPEED/MAX SPEED/Real-time SPEED
3) Speed unit: Kmh/MPH
4) 6km mode: 6km mode Display ![]() .
.
5) Assist level: actual assist level P~7.
6) Head light icon: indicates when head light and back light are on.
7) Distance: Trip/ODO.
8) Error code: “ERR” and code when there is error
GD01 uses independent press button, in total three buttons:
+ “UP” M “Power” – “DOWN”
5. Operation instructions
1) Power ON/OFF
When the power is off, Long press M (Power) during 3seconds, screen will display all contents and start to normal working mode, and controller will be turned on When the power is on, Long press M (Power) during 3 seconds, screen will be powered off, and controller will be turned off . If no any operation both on bike and display during 10 minutes (time could be set), the display will turn off automatically , in this case, no power consumption for both display and controller.
2) Different Speed display:
Long press + and M o switch different speed information, Real time speed (SPEED)
3) ODO/TRIP/ Driving Time/Error Code
Short press M to switch ODO/TRIP/ Driving Time/Error Code ODO (Accumulated distance)→Trip(Single trip distance)→TM(Driving Time)→ERR(Error Code).
4) Assist level
Short press + or – to change assist level, default value is level 1
5) Head light control
Long press + for 3 seconds turn on/off the head light.
6) 6km mode
When the bike is stopped, long press –, will enter 6km/h mode, the speed will be 4.5~7.5km/h according to different road conditions, “![]() ” will show up on screen, long press – again or short press –,will quit 6km/h mode. Long press or short press could be customized by clients.
” will show up on screen, long press – again or short press –,will quit 6km/h mode. Long press or short press could be customized by clients.
6. Parameter setting
When the display is powered on, long press + and –, will enter parameter setting mode, in this mode, can change parameter values, long press again + and – will quit parameter setting mode or no operation during 10s will also quit this mode.
In parameter setting mode, short press +/ – will change parameter value, short press M will save current value and switch to next parameter.
1) P01-back light lightness:
short press +/ – will switch from 1 to 3, Level 3 is lightest. Level 2 is default value.
2) P02-kmh/MPH:
Short press +/ – to Switch kmh/MPH.
3) P03-Working voltage:
short press +/ – to switch 24V,36V,48V, Default value is 36V.
4) P04-Auto shutdown time:
short press +/ – to switch from 0 to 60, it is the time (in minutes) toshut down the screen automatically if no operation 0 means nevershut down, Default value is 10 minutes
5) P05-Number of Assist levels:
Display level 7.
6) P06-Wheel size selection:
short press +/ – to switch wheel size, step: 16 inch, 20 inch, 22inch, 24 inch, 26 inch, 700C, 28 inch.
7) P07-Number of magnets for speed sensor:
short press +/ – to switch fromt 1 to 15.
8) P08-speed limit:
short press +/ – to set the speed limit from 10 to 41km/h.
9) This feature is reserved: display P09, invalid.
10) This feature is reserved: display P10, invalid.
11) P11-assist sensitivity setting:
short press +/ – to switch from 1 to 24.
12) P12-assist starting power setting:
short press +/ – to switch from 0 to 3.
13) P13-Assist magnetic disc types
short press +/ – to switch from 5->6->8->10->12 ,different numbers of magnets.
14) P14-Current limit for the controller:
short press +/ – to switch from 1 to 20A
15) This feature is reserved: display P15, invalid.
16) P16-Reset ODO distance: long press + during 5 seconds.
17) P17-The signal direction of the booster sensor: short press +/ – to switch from 0 to 1; 0: Booster signal; 1 Power signal negative.
18) P18-Shift gears with gear: short press +/ – to switch from 0 to 1; 0: Don’t shift gears; 1: Shift gears.
19) P19- Throttle the 6KM function: short press +/ – to switch from 0 to 1; 0: Turn to the normal; 1: Throttle 6Km.
7. Specifications
1) Power supply: 24V, 36V, 48V
2) Rated current: 10mA
3) Max current: 30mA
4) Leakage current after power off: <1uA
5) Current supply to controller: 50mA
6) Working Temperature: -18~65
7) Storage temperature: -30~80
8. Error code definition
When an error appears, GD01 will notice users by different codes, please refer to table 1 for different codes:
Code (Decimal) | Signification |
| 0 | Normal |
6 | Low Battery level |
| 30 | Communication failure |
21 | current sensor fault |
| 22 | Throttle failure |
23 | Failure of motor phase line |
| 24 | Motor hall failure |
25 | Brake abnormity |
Table 1
9. Notices
Power on and power off must keep an interval of at least 3 seconds, please don’t press “M ” button frequently when it is powered off.
When the temperature is under -10°C , the screen will be a little darker than normal, when the temperature increases, the screen can go back to normal
10. FAQ
1) Q Why I can not power off?
A Please check connection between display and controller.
2) Q What can I do if an error code displays?
A Find a nearest shop to get repair
11. Warranty
1 year of warranty for quality issue except frame is broken.
12. Version
This is a universal manual for GD01.It could be customized by each client. Please confirm all details before purchasing.


