
![]()
![]()
Get Started with
SmartMesh® Device
Welcome to the World of SmartMesh
Embark onto a journey of connecting lighting with the SmartMesh ecosystem and elevate your lighting experience beyond illumination.
With SmartMesh Device you can have seamless control of all your lights at Home/Office wirelessly via SmartMesh Connect App or Alexa/Google Assistance.
See how easy it is to Personalise your connected light now!
Visit: www.smartmesh.tech
Installing SmartMesh Connect App
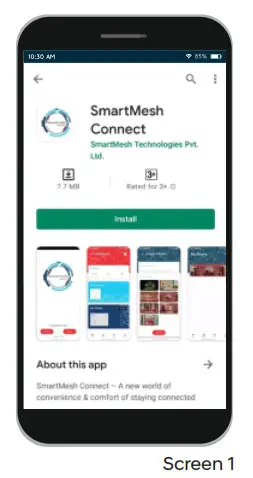
Install SmartMesh connect App from Google Play or App ore. Alternatively, you can also scan the QR code to get routed to the Installation page directly (as shown in Screen 1).
https://smartmesh.tech/application
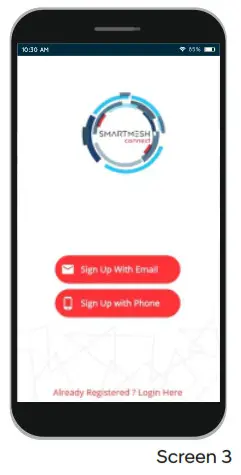
Click on the “SmartMesh Connect” by SmartMesh Technologies Pvt. Ltd. and proceed to install the App, asshown in Screen 2 and Screen3 .
Signup and Login
Once you open the installed App, you will be taken to screen 2 . On-Screen 2, click on the Sign-Up button (bottom of page).
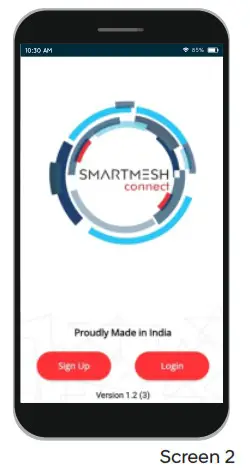
You can use your Email or Phone number as shown in Screen 3 and fill the required details by clicking on the “Sign Up with mail” or Sign Up with Phone” button. If you already have an account, please click on the login button on Screen 2 and use your email/phone to log in to the app.
Signup and Login
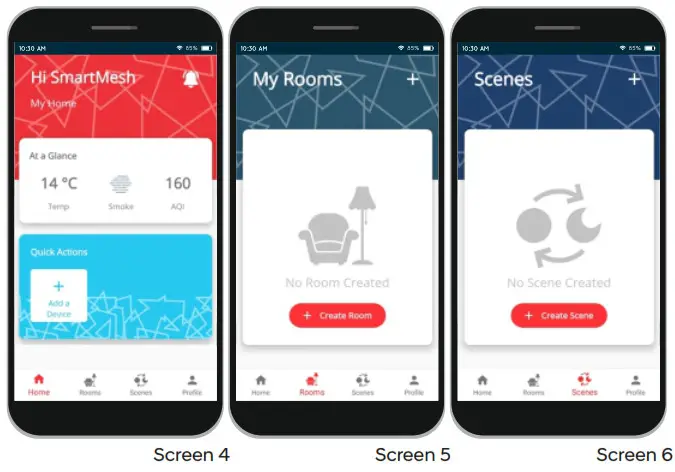
After Signing up or log in, you will be taken to the Main Dashboard as shown on Screen 4.
For a new account, the Devices, Rooms, or Scenes page will be blank (as shown in Screen 4 , Screen 5, and Screen 6 respectively)
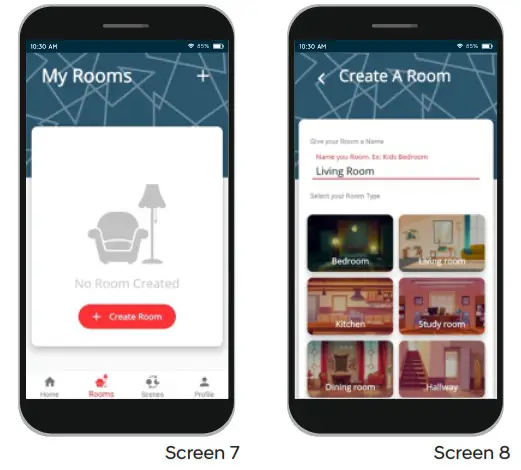
 Adding a New Room
 Adding a New Room
It is recommended that before adding a New Device, the user shall add a new room. In Order to add a new room, on the Rooms screen ( Screen 7 ), click on the Create Room button at the bottom or + icon on the top bar. Upon Click, you will be taken to Screen 8, where you can add a room.
Adding a New Device
There are two Modes to onboard a device – Quick Connect and WiFi Mode. The default is Quick Connect. WiFi Mode appears only when Quick Connect fails
(A) Quick Connect Mode
Power on the device, it will blink rapidly 3 times & stop (in case of light), which means that it is ready to connect. Click on Add a Device button on the Home screen ( Screen 9 ) and you will be taken to Screen 10.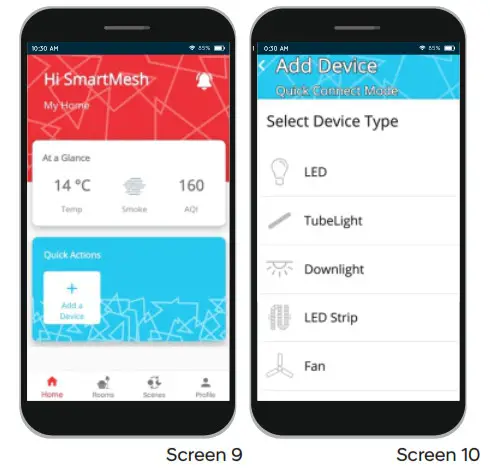
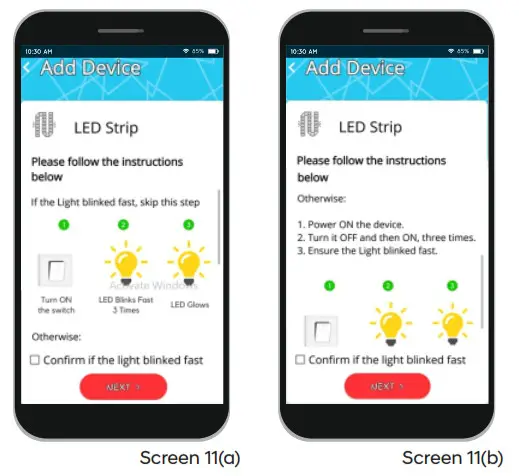
On-Screen 10click on the device you want to connect. You will be directed to screen 11. Click on
Checkbox -‘ Confirm if light blinked fast’ and proceed if LED blinked 3 times Screen 11(a).
In case of a slow blink, follow the ‘Otherwise‘ option. scroll the page and execute steps 1,2,3 as shown in Screen 11 (b).
After 3 times on/off, ensure light has blinked rapidly. If Yes, check the confirmation box.
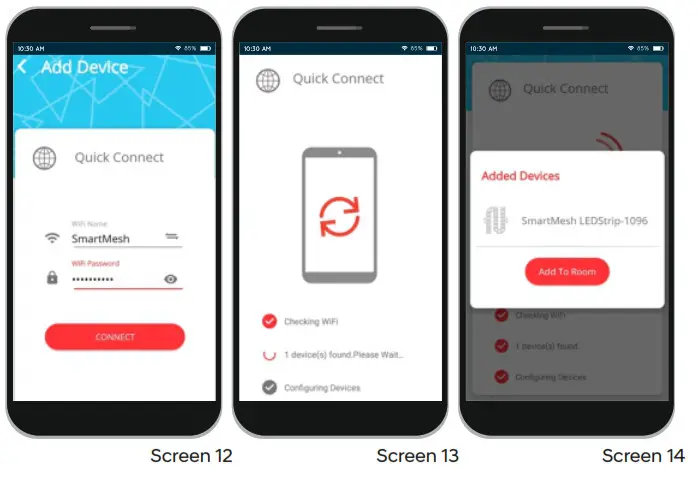
On clicking ‘Next’ you will be directed to Screen 12, where you will be required to input WiFi information.
IMPORTANT NOTES:a. Please make sure that your smart device is ON and nearby before clicking on the Connect button.b. Your WiFi Router should be 2.4GHz.c. Please enter the correct SSID and Password for your WiFi Routerd. You may be asked to accept permission to use WiFi on Android. Please ACCEPT the permission request.
Once you connect, it will scan for nearby devices ( Screen 13). This could take up to 45 seconds, please wait on that screen and do not allow the phone to go to sleep mode. You will be able to see a list of all smart device(s) that have been added refer to Screen 14.
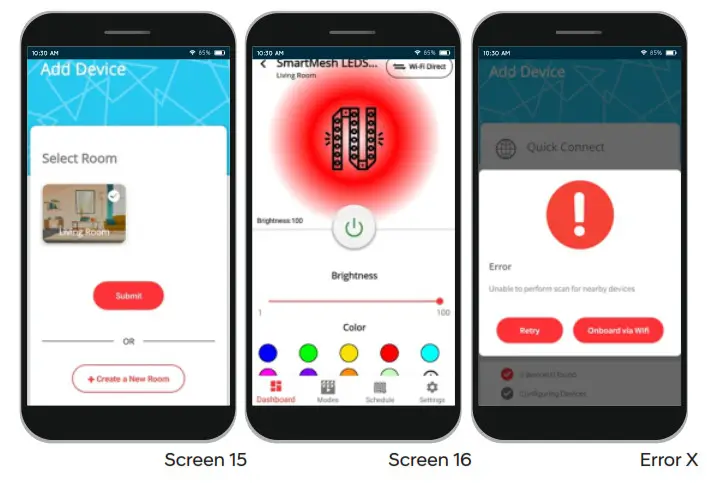
Click on ‘Add to Room’ and you will be redirected to Screen 15. Select the room in which you want to add this device/s to and click on the submit button.
Once you are on Screen 16, you have successfully onboarded your SmartMesh Device and can control your smart device now.
Exception
In case Onboarding failed because of reasons like Power Failure, Internet disconnection or no device found. You will get Pop-Up error as shown in Screen X.
- It is advisable to click on ‘Retry’ and try again with ‘Quick Connect’ mode.
- When encountered multiple failures through ‘Quick Connect’, go for ‘Onboard via WiFi’ mode

Connect via WiFi mode
Android
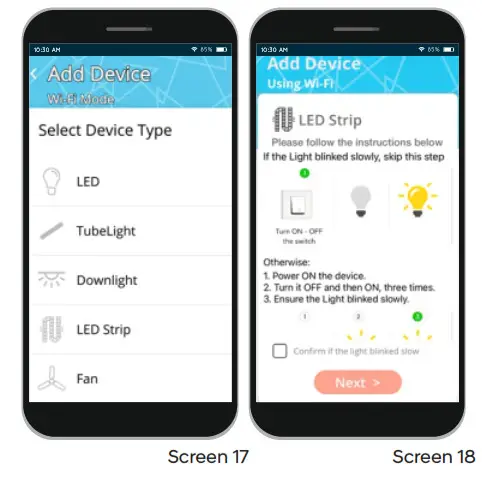
WiFi Mode is applicable for adding a single device at a time & appears only after Quick Connect Mode fails.
Please Click on the ‘Onboard via WiFi’ button to navigate to Screen 17. Please select the device in Screen 17. Toggle the main switch (Power-ON/OFF) of the device 3 times to bring the setting of the device to WiFI mode. It will blink SLOWLY for 3 times (in case of light) which means it is ready to connect in WiFi mode – Screen 18.
Follow the instruction, flag the checkbox and click Next, you will be directed to Screen 19.
The app will scan for nearby Smart Devices ( Screen 19). Once the scanning is complete, you will be presented with a list of nearby Smart Devices ( Screen 20).
Tap on the smart device that you want to connect with and you will be taken to Screen 21.
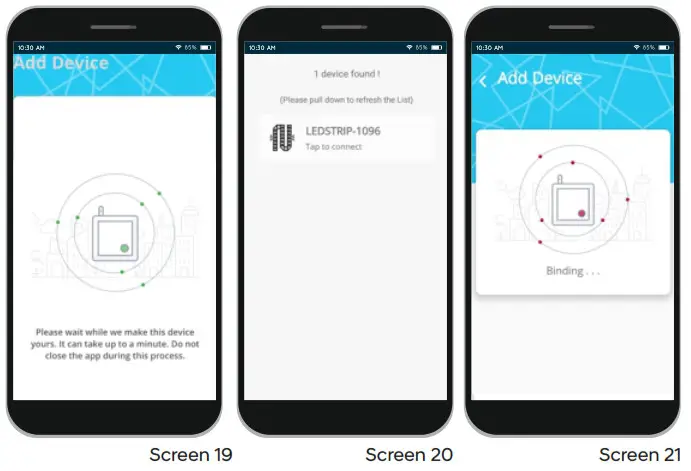
IMPORTANT NOTE: Once you are on Screen 21, please don’t close the App in between and complete the process in one go.
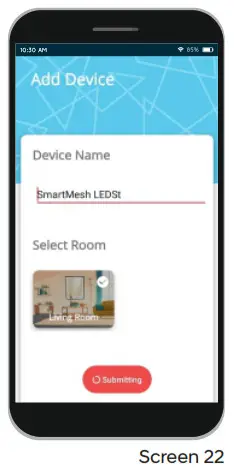
Once the process is completed, you will be taken to Screen 22, here you can select the room where you want to put the smart device, and also edit the default name of the device.
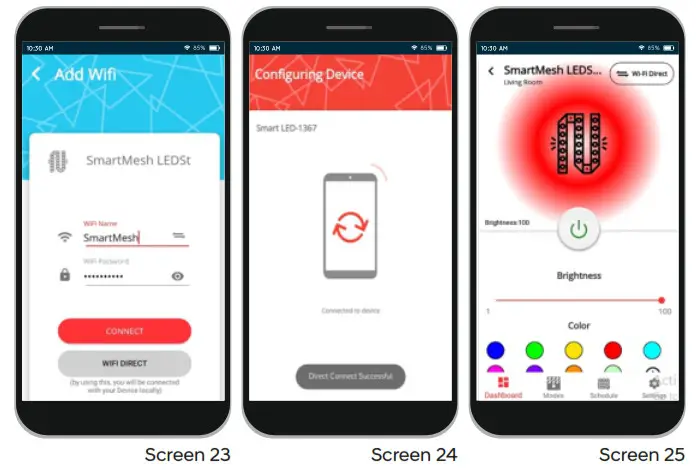
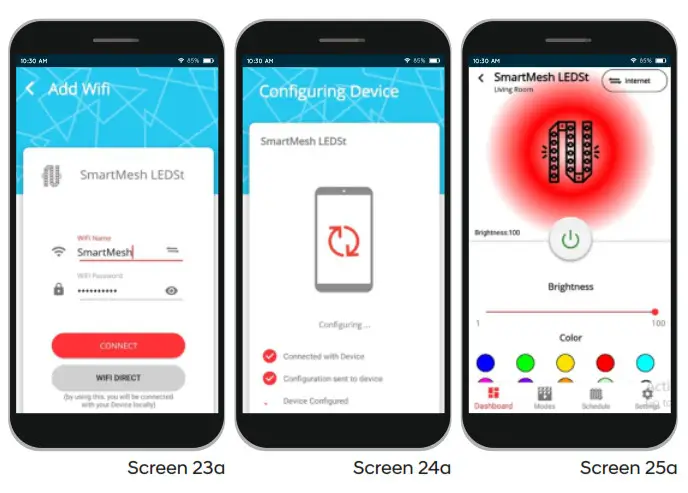
Click Submit and you will be taken to Screen 23. Input the SSID and password of your WiFi and click on Connect button. On clicking the Connect button, you will be moved to Screen 24 here the app will try to complete the configuration and connection of the smart device. On successful completion, you will be moved to Device Dashboard ( Screen 25). Once you are on Screen 25, you can control your SmartMesh device.
IMPORTANT NOTES:
a. Please make sure that your smart device is ON and nearby before clicking on the Connect button.
b. Your WiFi Router should be 2.4GHz.
c. Please enter the correct SSID and Password for your WIFI Router
IOS
While most the steps remain the same, there are few additional steps in Apple iPhone, because of its architectural difference.
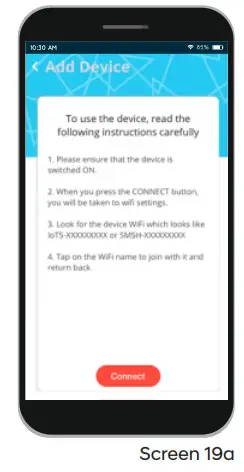
Continue from Screen 18. Follow the instruction, flag the checkbox and click Next, you will be directed to Screen 19a. ClickConnect and you will be taken to Screen 20a.
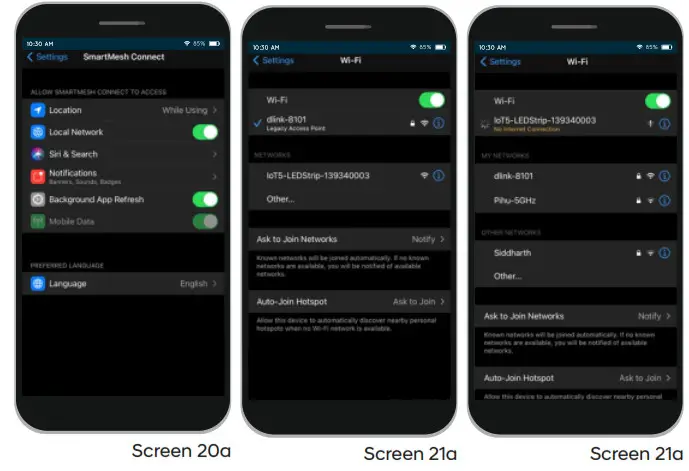
Click on Settings to go one step back and then Navigate to the WiFi section – Screen 21a. Select your Device Network (like IoT5-LEDSTRIP-1399340003 here) – Screen 22a.
The rest of the steps are the same (Continue with Screen 23)
Wi-Fi Direct
Wi-Fi Direct is an additional provision to operate / onboard your SmartMesh Device even when there is no Internet. It connects to your SmartMesh device directly and allows you to access the device In case you want to connect with WiFi Direct Mode on Screen 23, click on “W iFi Direct ” – Screen 23a.
On clicking the WiFi Direct button, you will be moved to Screen 24a where the app will try to connect to the smart device directly and on successful completion, you will be moved to Device
Dashboard ( Screen 25 ). Once you are on Screen 25a,you can control your smart device.
IMPORTANT NOTE: Please make sure that your smart device is ON and nearby before clicking on the wifi Direct button.
WiFi Direct Toggle button on Device Dashboard
Click on Wi-Fi Direct toggle button to operate your SmartMesh Device when there is no Internet. It connects your SmartMesh device directly with device access point and allows you to access the device.
WARM TIP on Light Blink:
– If it blinks fast then it is in quick connect and if it blinks slowly 3 times, then it is in wifi mode.
– 5 times ON/OFF is to reset the device to Factory Setting and subsequently bring the device to Quick Connect mode. It also removes an existing pairing, if any.
– When you initiate the device to factory setting by 5 times On/Off, It will blink slowly initially to indicate the device is moving to factory setting and then blink fast eventually to indicate Quick connect mode.
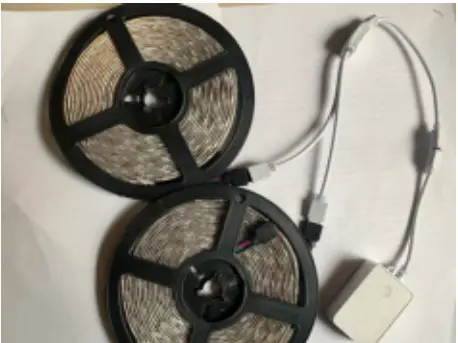
Connection instruction for Smart LED Strip:
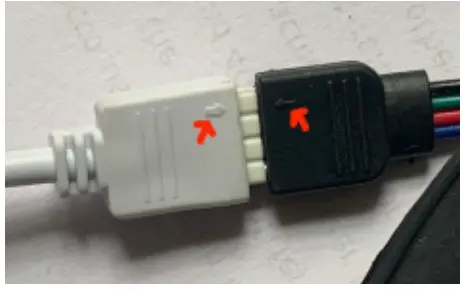
- For 5 meter Kit, Connect LED Strip to Wi-Fi Controller directly. Ensure arrows marked aligned to each other

- For a 10 meter Kit, Connect both Strips to the splitter from the plitting end and connect the end of the connector to the RGB Controller. Ensure arrows marked aligned to each other same s above.

- Connect Adaptor to DC Power Input in the controller
- Connect Adaptor to Power Supply. 5) LED Strips will start blinking rapidly and be ready to pair. Start following from Step -5 to add the device in app.
How to connect SmartMesh
Devices to Amazon Alexa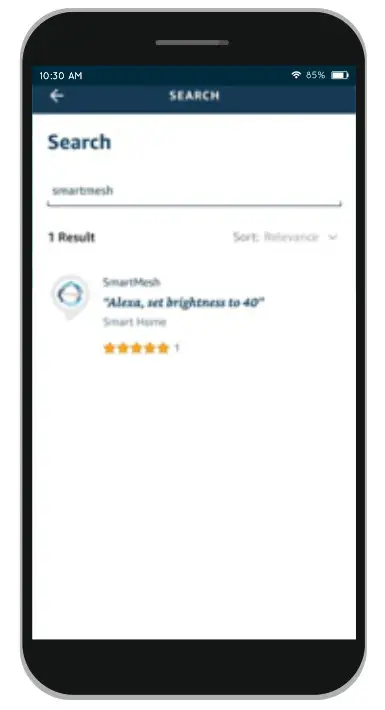
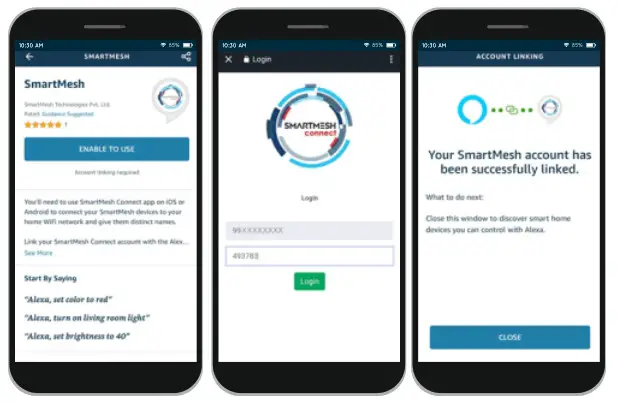
- Launch SmartMesh Connect App, sign in to your account, and make sure the SmartMesh device is on the device list.
- Modify device name so that Alexa can easily recognize, such as living Room Light, Bedroom Light, etc.
- Minimize SmartMesh Connect App, then Launch the
Alexa App and sign in your
Alexa account and make sure you have at least one
Alexa voice-controlled devices installed like Echo, Echo dot, etc. - In the lower right corner of the Home page, click the “More” button to show the App menu. Then clicks on “Skills & Games”.
- Click on Magnifier/Search icon on top and

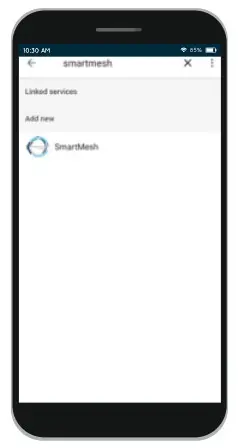
type in “SmartMesh” in the search and click the search button next to it. Select SmartMesh skills by SmartMesh Technologies Pvt. Ltd. - Enable SmartMesh skill by sign in to your SmartMesh Connect account to complete the account linking.
- After linked the account successfully, you can ask Alexa to discover devices. Alexa will show all the discovered devices after 20 seconds.
- Back to Menu by clicking the button, and then click the button.
How to connect Smart Device to Google Home
- Launch the Google Home app, click on the Settings icon present on the Home screen.
- Scroll down and select the “Works with Google” option present at the end of the Menu.
- Search for smart mesh on the top search option and select the “SmartMesh” action.
- Login with SmartMesh Connect app credentials. After successful account linking, in Google Home App you can see all the smart devices from your SmartMesh Connect pp account. You can assign rooms for each device.
- Now you can use Google Home to control your smart devices, you can say like:
OK Google, turn on/off wall light
OK Google, set bedroom light to red.

SmartMesh Support
As much as we’d love to help you
Should you need any assistance in any stage of onboarding or need quick help with respect to any functionalities, please text us by anning the WhatsApp QR ode.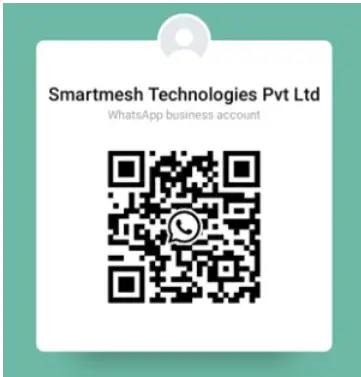
https://wa.me/message/RD7NKHPIO3UCP1
Alternatively you can also reach at
[email protected]
or call us at +91 9711373377
Thank you!


