
![]() Unlimited Power
Unlimited Power
EVOLUTION
MOTO
Automotive alarm
MOTO DUPLO i
MOTO TRIPLO i USER MANUAL
FUNCTION ON THE CONTROL AND RESPONSE OF THE ALARM
| Press | Function | Alarm Response |
| Enable the alarm | Blinkers flash once, siren beeps once. | |
| Disable the alarm | Blinkers flash twice, siren beeps twice. | |
* Then | Enable the alarm without sound | Blinkers flash once. (lx) |
* Then | Disable the alarm without sound | Blinkers flash twice. (2x) |
| Panic function | Sets off the alarm for 30 secs |
| Enable alarm wi- thout accelerometer | 2 Beeps and blinkers flash 1 |
Press Twice (2x) | Localization Function | Blinkers flash for 15 secs |
| ||
| Turn on the panel | Turns on motorcycle’s 15th line (Accessory position). |
| Then Start Function | Starts the motorcycle |
1.1. ENABLE OR DISABLE PERIODIC TRANSMISSION (ONLY CX-1P)
The CX-1P control comes from the factory with the presence transmission DISABLED. Before use, make sure the presence transmission is ENABLED If it is disabled, the lock cycle will begin.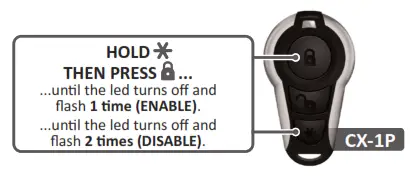
![]() After use, it is recommended that the periodic transmission be disabled to extend CR2032 battery life (It is recommended that the battery be replaced every 4 months).
After use, it is recommended that the periodic transmission be disabled to extend CR2032 battery life (It is recommended that the battery be replaced every 4 months).
When the ignition is turned on, the alarm will give 1 beep if the control battery is low.
PROGRAMMING CONTROLS
| TURN ON IGNITION | PRESS THE MASTER BUTTON | UNTIL THE SIREN BEEPS |
| TURN OFF IGNITION | EMITS 3 BEEPS FOR EACH PROGRAMMED CONTROL | PRESS |
![]() If the control is already programmed the siren will emit 1 beep. Each time a new control is programmed to the control panel the memory is cleared. Therefore all existing controls must be reprogrammed with the new one or they will not work.
If the control is already programmed the siren will emit 1 beep. Each time a new control is programmed to the control panel the memory is cleared. Therefore all existing controls must be reprogrammed with the new one or they will not work.
ALARM FUNCTIONS
3.1. TRIGGERED ALARM
When the alarm is triggered, it immediately locks down. The alarm sounds for one minute, then waits 10 seconds and reads the sensors again. After the alarm has been
triggered ten consecutive times by the accelerometer, this sensor is ignored until the next activation, unless the motorcycle is turned on.
3.2. USING THE CONTROL TO TURN ON THE MOTORCYCLE (ONLY MOTO TRIPLO i)
| PRESS FOR 3 SECS. | SIREN EMITS 1 BEEP | PANEL TURNS ON AUTOMATICALLY |
| MOTORCYCLE TURNS ON | PRESS* |
- Press
 button for 3 seconds. A beep will sound, the motorcycle’s panel will be activated, and if the button is pressed within 10 seconds the ignition will turn on (gray wire, positive current). As long as the button is held the output remains active.
 - To turn on the ignition, the motorcycle must be in Neutral .
- If you need to start the ignition again, press the button and then in 3 seconds *.
- To turn off the motorcycle press the
 button, 2 beeps will sound and the motorcycle will turn off.
 - If the motorcycle is in gear, it will not be switched off to prevent it from accidentally turning off when in motion.
![]() Before checking the control panel, give it 10 seconds after it has been activated to stabilize all the sensors.
Before checking the control panel, give it 10 seconds after it has been activated to stabilize all the sensors.
ENABLE OR DISABLE ALARM
The control panel can be switched on and off by programming (see table section 12, function 2).
INTEGRATED ANTI-THEFT SYSTEM
5.1. ANTI-THEFT FUNCTION IN NEUTRAL
If the motorcycle is put in neutral while the ignition is on, the anti-theft function is activated. The MASTER BUTTON needs to be pressed within 3 minutes or the alarm will
give a 10 second warning before entering lock down (see table section 12, function 6).
5.2. ANTI-THEFT FUNCTION USING THE IGNITION
Every time the ignition is turned on the MASTER BUTTON needs to be pressed within 3 minutes or the alarm will give a 10 seconds warning before entering lock down (see section 11).
ANTI-THEFT BY P$RESENCE
Activate and then deactivate periodic transmission:
Hold and then press the button ![]() . The control’s led light will turn off and then blink 1 time for active periodic transmission or 2 times for deactivated periodic transmission.
. The control’s led light will turn off and then blink 1 time for active periodic transmission or 2 times for deactivated periodic transmission.
To cancel the lock down, press the on the presence control.![]() In order to deactivate the
In order to deactivate the![]() control unit without the remote control, turn on the ignition and press the MASTER BUTTON. If the presence function is activated, the locks mentioned in sections 5.1 (ANTI-THEFT FUNCTION IN NEUTRAL) and 5.2 (ANTI-THEFT FUNCTION IN THE IGNITION) will not be functioning.
control unit without the remote control, turn on the ignition and press the MASTER BUTTON. If the presence function is activated, the locks mentioned in sections 5.1 (ANTI-THEFT FUNCTION IN NEUTRAL) and 5.2 (ANTI-THEFT FUNCTION IN THE IGNITION) will not be functioning.
TESTING LOCK DOWN BY PRESENCE
Turn the ignition on and turn off the periodic transmission of the control (see section 1). Wait the specified time until lock down.
VALET PARKING FUNCTION
If you need to leave your motorcycle at the mechanic, carwash, a place with valet service, etc…, you can activate this function without showing them where the master button is or giving them the remote control. Press the master button 3 times, it will emit 2 beeps and the locks mentioned in sections 5.1, 5.2 and 6 will be temporarily disabled. Each time the ignition is turned on or off, 2 beeps will sounds to warn the user that the motorcycle is unprotected. To reactivate the anti-theft function, press the MASTER BUTTON once. If using the presence function, you need to press ![]() on the presence control near the motorcycle.
on the presence control near the motorcycle.
| Press | Function | Alarm Response |
| 3 quick taps on the MASTER BUTTON | Disables the locks mentioned in sections 5.1, 5.2 and 6 | Siren emits 2 beeps |
| 1 quick tap on the MASTER BUTTON | Enables the locks mentioned in sections 5.1, 5.2 e 6 (If enabled) | No beeps |
DISABLE / DISARM THE ALARM WITHOUT THE CONTROL
This secret button needs to be installed in a concealed but easily accessible place. From this button, you can deactivate the control panel without the control by turning the
ignition on and touching the MASTER BUTTON.
PROGRESSIVE LOCK CYCLE
| LOCK FOR 2 SECS. | UNLOCK FOR 10 SECS. | LOCK FOR 2 SECS. | UNLOCK FOR 5 SECS. |
| COMPLETELY LOCKED | UNLOCK FOR 2 SECS. | LOCK FOR 2 SECS. |
AUTOMATIC LOCK
Confirm this function is working. If the motorcycle does not detect anything on any of the sensors in 1 minute, the alarm will activate automatically and the siren will give one beep (see table section 12, function 8).
PROGRAMMING
| ALARM DISABLED | TURN ON IGNITION | PRESS THE MASTER BUTTON | LISTEN CONSECUTIVE BEEPS OF THE FUNCTIONS |
| 1 BEEP ACTIVATED 2 BEEPS DEACTIVATED | RELEASE THE MASTER BUTTON AT THE DESIRED FUNCTION |
| Nº of Beeps | Function | Defaut Config. |
| 1 | Programming controls | —– |
| 2 | Enable/Disable alarm permanently | Enable |
| 3 | Enable/Disable with blinkers | Enable |
| 4 | Enable/Disable with siren | Enable |
| 5 | Time until lock down: 1:30 min or 3 min | 3 minutes |
| 6 | Anti-theft in NEUTRAL | Disable |
| 7 | Anti-Theft in IGNITION | Disable |
| 8 | Automatic Lock | Enable |
| 9 | Accelerometer | Enable |
| 10 | Factory Configuarations | —— |
| After the 10th beep, if it is not released the button will not change the current setting. | ||
ALARM SPECIFICATIONS
| Alarm Module | |
| Operating Voltage | 9 — 15 VDC |
| Max. Current for Blinkers | 5:00 AM |
| Max. Current for Locks | 10:00 AM |
| Remote Control’s Frequency | 433,92 Mhz |
| Consumption | 8 mA |
INSTALLATION
- Choose where the control module will be placed;
- To prevent shorts, use a multimeter to measure the current in the wiring and if possible insulate all connections before plugging the control module in;
- Be sure to secure the alarm module well before use;
- Follow the installation diagram to connect all the wires (signals and power) of the alarm;
- The separate resistor is only needed for Triple i installation on motorcycles Honda CG 160 Start/FAN/Titan 2017 forward;
- If you have any questions, please contact us: (BR) +55 18 2104-9412.
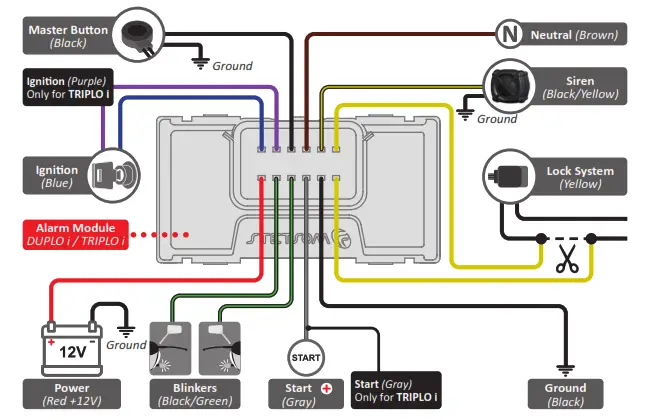
![]() For Yamaha motorcycles it is necessary to reverse the starting signal to negative – using an auxiliary relay. (Relay Sold Separately)
For Yamaha motorcycles it is necessary to reverse the starting signal to negative – using an auxiliary relay. (Relay Sold Separately)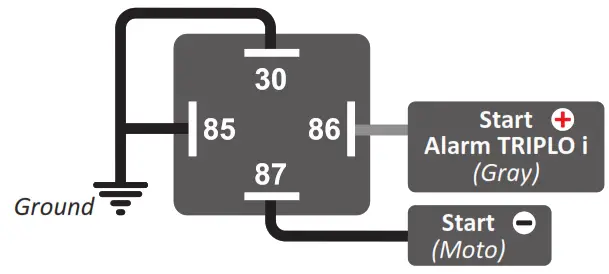
TRIPLO i (HONDA CG 160 START/FAN/TITAN 2017)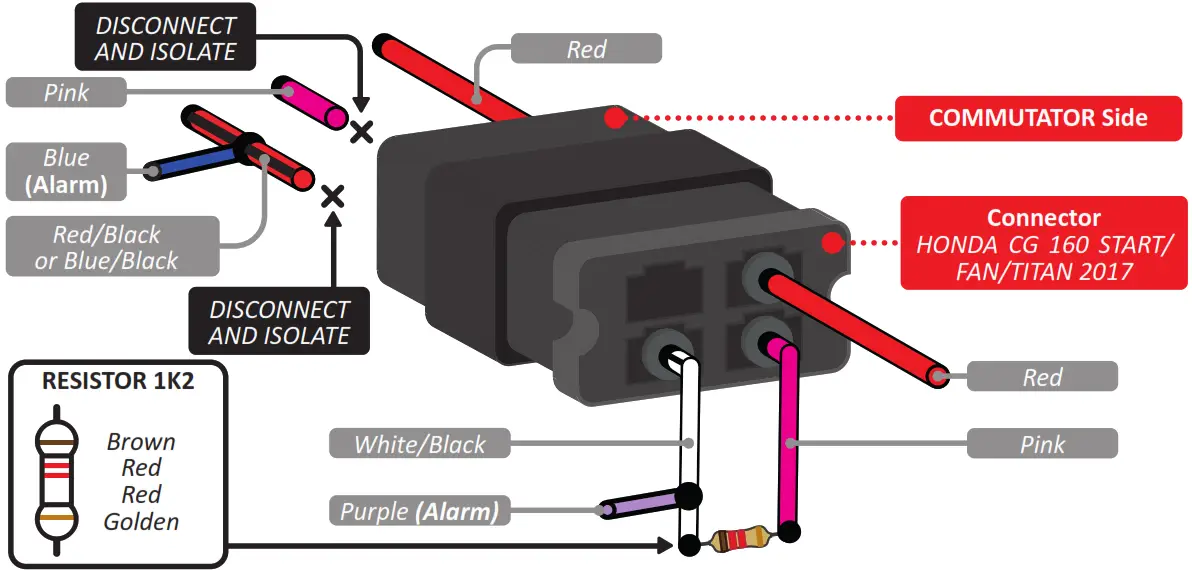
Access the site for more information
Visit www.stetsom.com.br/instaladores to find specific installationinformation for different models of motorcycles.
If you prefer, you can also access it from the QRCODE:
 https://www.stetsom.com.br/en/instaladores/
![]() All parts of this product, including electrical and electronic components, must be recycled or reused and should not be disposed of as household waste. Look for recycle points for these materials and do your part to protect the environment.
All parts of this product, including electrical and electronic components, must be recycled or reused and should not be disposed of as household waste. Look for recycle points for these materials and do your part to protect the environment.
Note: All parts of this product, including electrical and electronic components, must be recycled or reused and should not be disposed of as household waste. Look for recycle points for these materials and do your part to protect the environment.![]() Any updates made to this manual will be available for consumers to consult without any charge on the brand’s site. It is recommended that the updated manual be consulted whenever necessary. Images contained in this manual are merely illustrative and may differ from the actual product.
Any updates made to this manual will be available for consumers to consult without any charge on the brand’s site. It is recommended that the updated manual be consulted whenever necessary. Images contained in this manual are merely illustrative and may differ from the actual product.
Warranty Information
STETSOM, through its network of Authorized Technical Assistance Providers, guarantees technical assistance to the purchaser of their products. The repairs of any defects duly established as being of the manufacturer will be done without cost for replacement components or parts and repair labor. The repairs will be done by the Authorized Technical Assistance Provider specially designated by STETSOM.
CONSULT THE LIST OF AUTHORIZED TECHNICAL ASSISTANCE PROVIDERS ON OUR WEBSITE: www.stetsom.com.br/en/assistencias-tecnica
If you do not locate technical assistance in your city, please contact us at: BR +55 18 2104-9412
WARRANTY TERM CONDITIONS: Our warranty is 1 (one) year against manufacturing defects. Its validity starts on the date of the Sale to the FINAL Consumer.
To make use of the benefits of this warranty, you must present one of the following documents: the Final Consumer’s SALE NOTE or this completed CERTIFICATE.
CASES THAT VOID THE WARRANTY:
- 1 year after the issuance of the invoice of sale to the consumer or 1 year of completing the certificate of warranty (dated and stamped by the retailer or installer) or 1 year from the date of manufacture.
- Violation of seals, alteration or removal of the product’s serial or lot number.
- If the product suffers misuse, careless accidents involving: Water, Fire or Fall, or is installed in conditions contrary to the guidelines contained in the manual of installation that accompanies the product.
- Damages and changes in the circuit or adaptation of non-original parts.
- If you use installation techniques contrary to those given in the manual.
QUESTIONS AND ADVICE: STETSOM offers Customer Services to answer questions and give advice about their products and services. Please contact us through the channels: Phone: BR +55 18 2104-9412
E-mail: [email protected] – Site: www.stetsom.com
Additional Information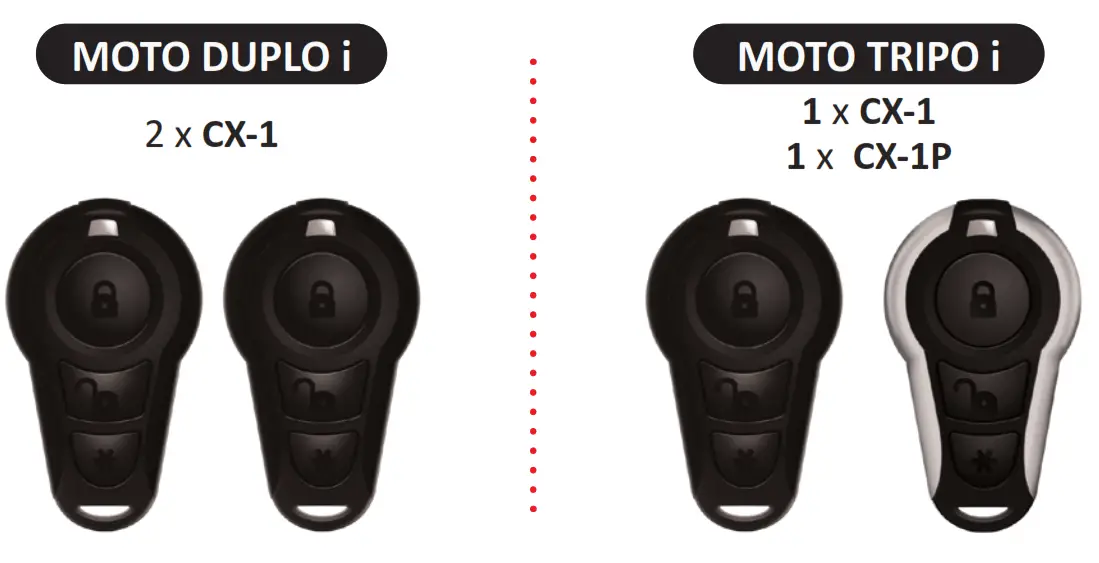
![]() CX-1 / CX-1P
CX-1 / CX-1P
Nº 02319-19-09020
Maximum Protection For Your Vehicle!
Get to know the entire line of Stetsom alarms, blockers and accessories. Access the Link or use the QR CODE:

SITE www.stetsom.com.br/pt/produtos/alarms
STETSOMBRASIL
GRUPOSTETSOM
STETSOMBRASILC
GUARANTEE CERTIFICATE
Serial number:……………….
Date of purchase:…………….
Month / Year of manufacture:…………..
Carimbo:………….
Stamp:…………………….![]()
STETSOM INDUSTRIA ELETRÔNICA LTDA. – CNPJ: 61.974.911/0001-04
RUA MARIANO ARENALES BENITO, 645 – DISTRITO INDUSTRIAL – CEP 19043-130
PRESIDENTE PRUDENTE/SP – BRASIL
www.STETSOM.com.br
R16
References
 Stetsom - Stetsom
 Stetsom - Stetsom
-
Assistências TécnicaTechnical AssistanceAsistencias Técnica - Stetsom
-
Assistências TécnicaTechnical AssistanceAsistencias Técnica - Stetsom
-
Suporte ao instalador de alarme - Stetsom
-
Assistências TécnicaTechnical AssistanceAsistencias Técnica - Stetsom
-
Alarmes Automotivo Carro e Moto - Segurança Automotiva - Bloqueador


